How to DIY a Family Command Center


Updated May 9, 2026
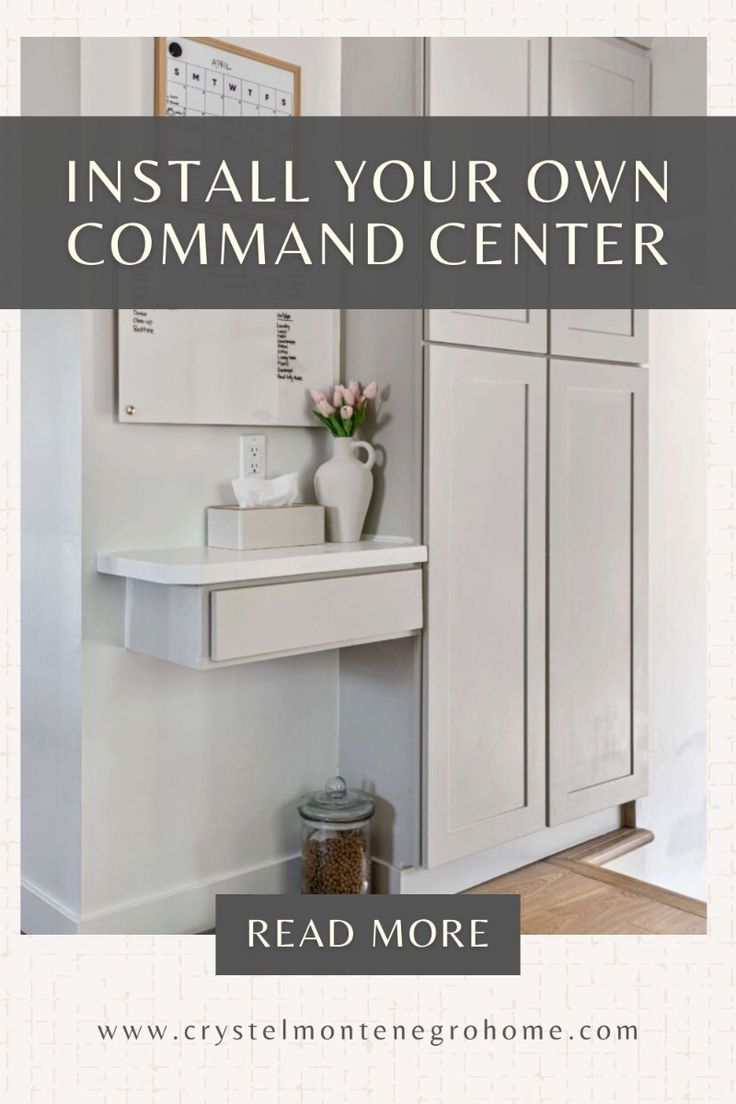
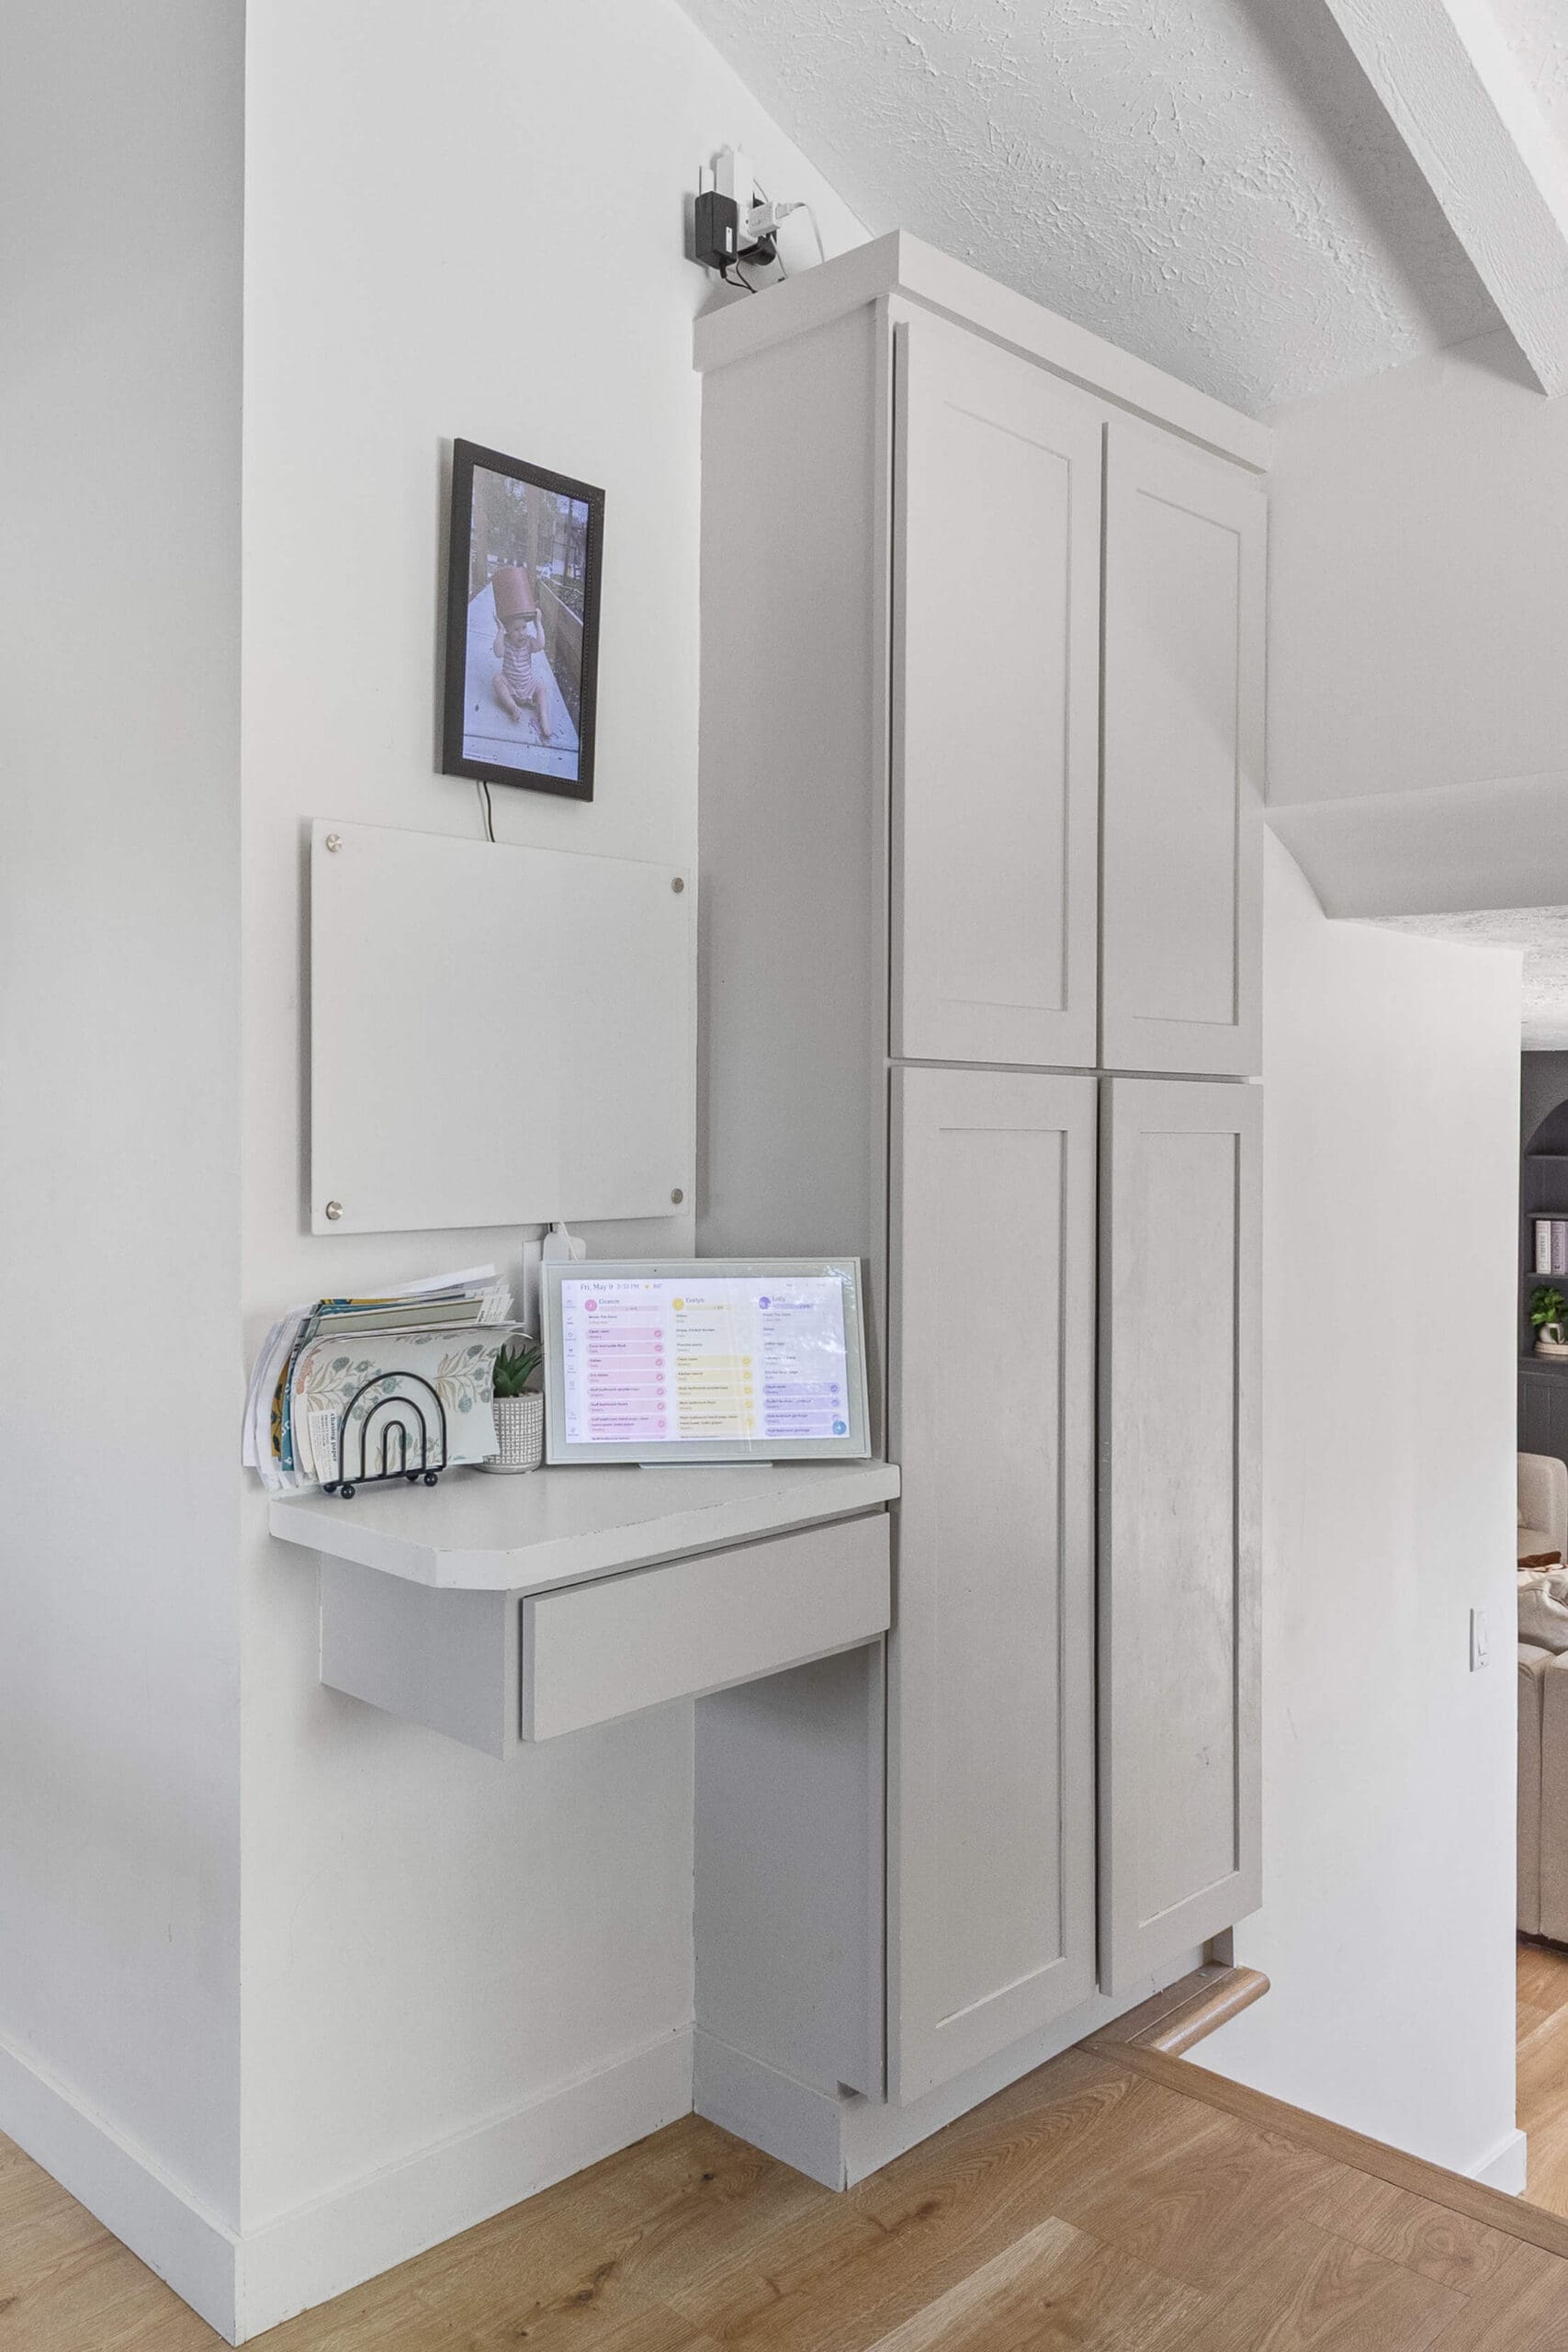
One way I keep my busy life organized is with my family command center. I took an empty, unused corner of my house and completely transformed it into a functional and beautiful family command center. I love having a place on the main floor to charge my phone and sort the mail, as well as a visual spot for our family calendar, my kids’ chore chart, etc.. The extra storage cabinets I added are also a big bonus.
What I Used to Build My Family Command Center
Tools
Materials
- Wood glue
- Shims
- 1/2 inch plywood
- 3/4 inch plywood
- 3/4 inch MDF
- Trim
- Baseboard
- Bondo
- Primer
- Paint
- Foam roller
- 10 inch drawer slides
- 2 – ready to assemble cabinets
Sources
- Acrylic dry erase board
- Gold, push pin magnets
- Drawer organizers
- Tissue box cover
- Dry erase calendar
- Magnetic dry erase markers
Where to Put a Family Command Center
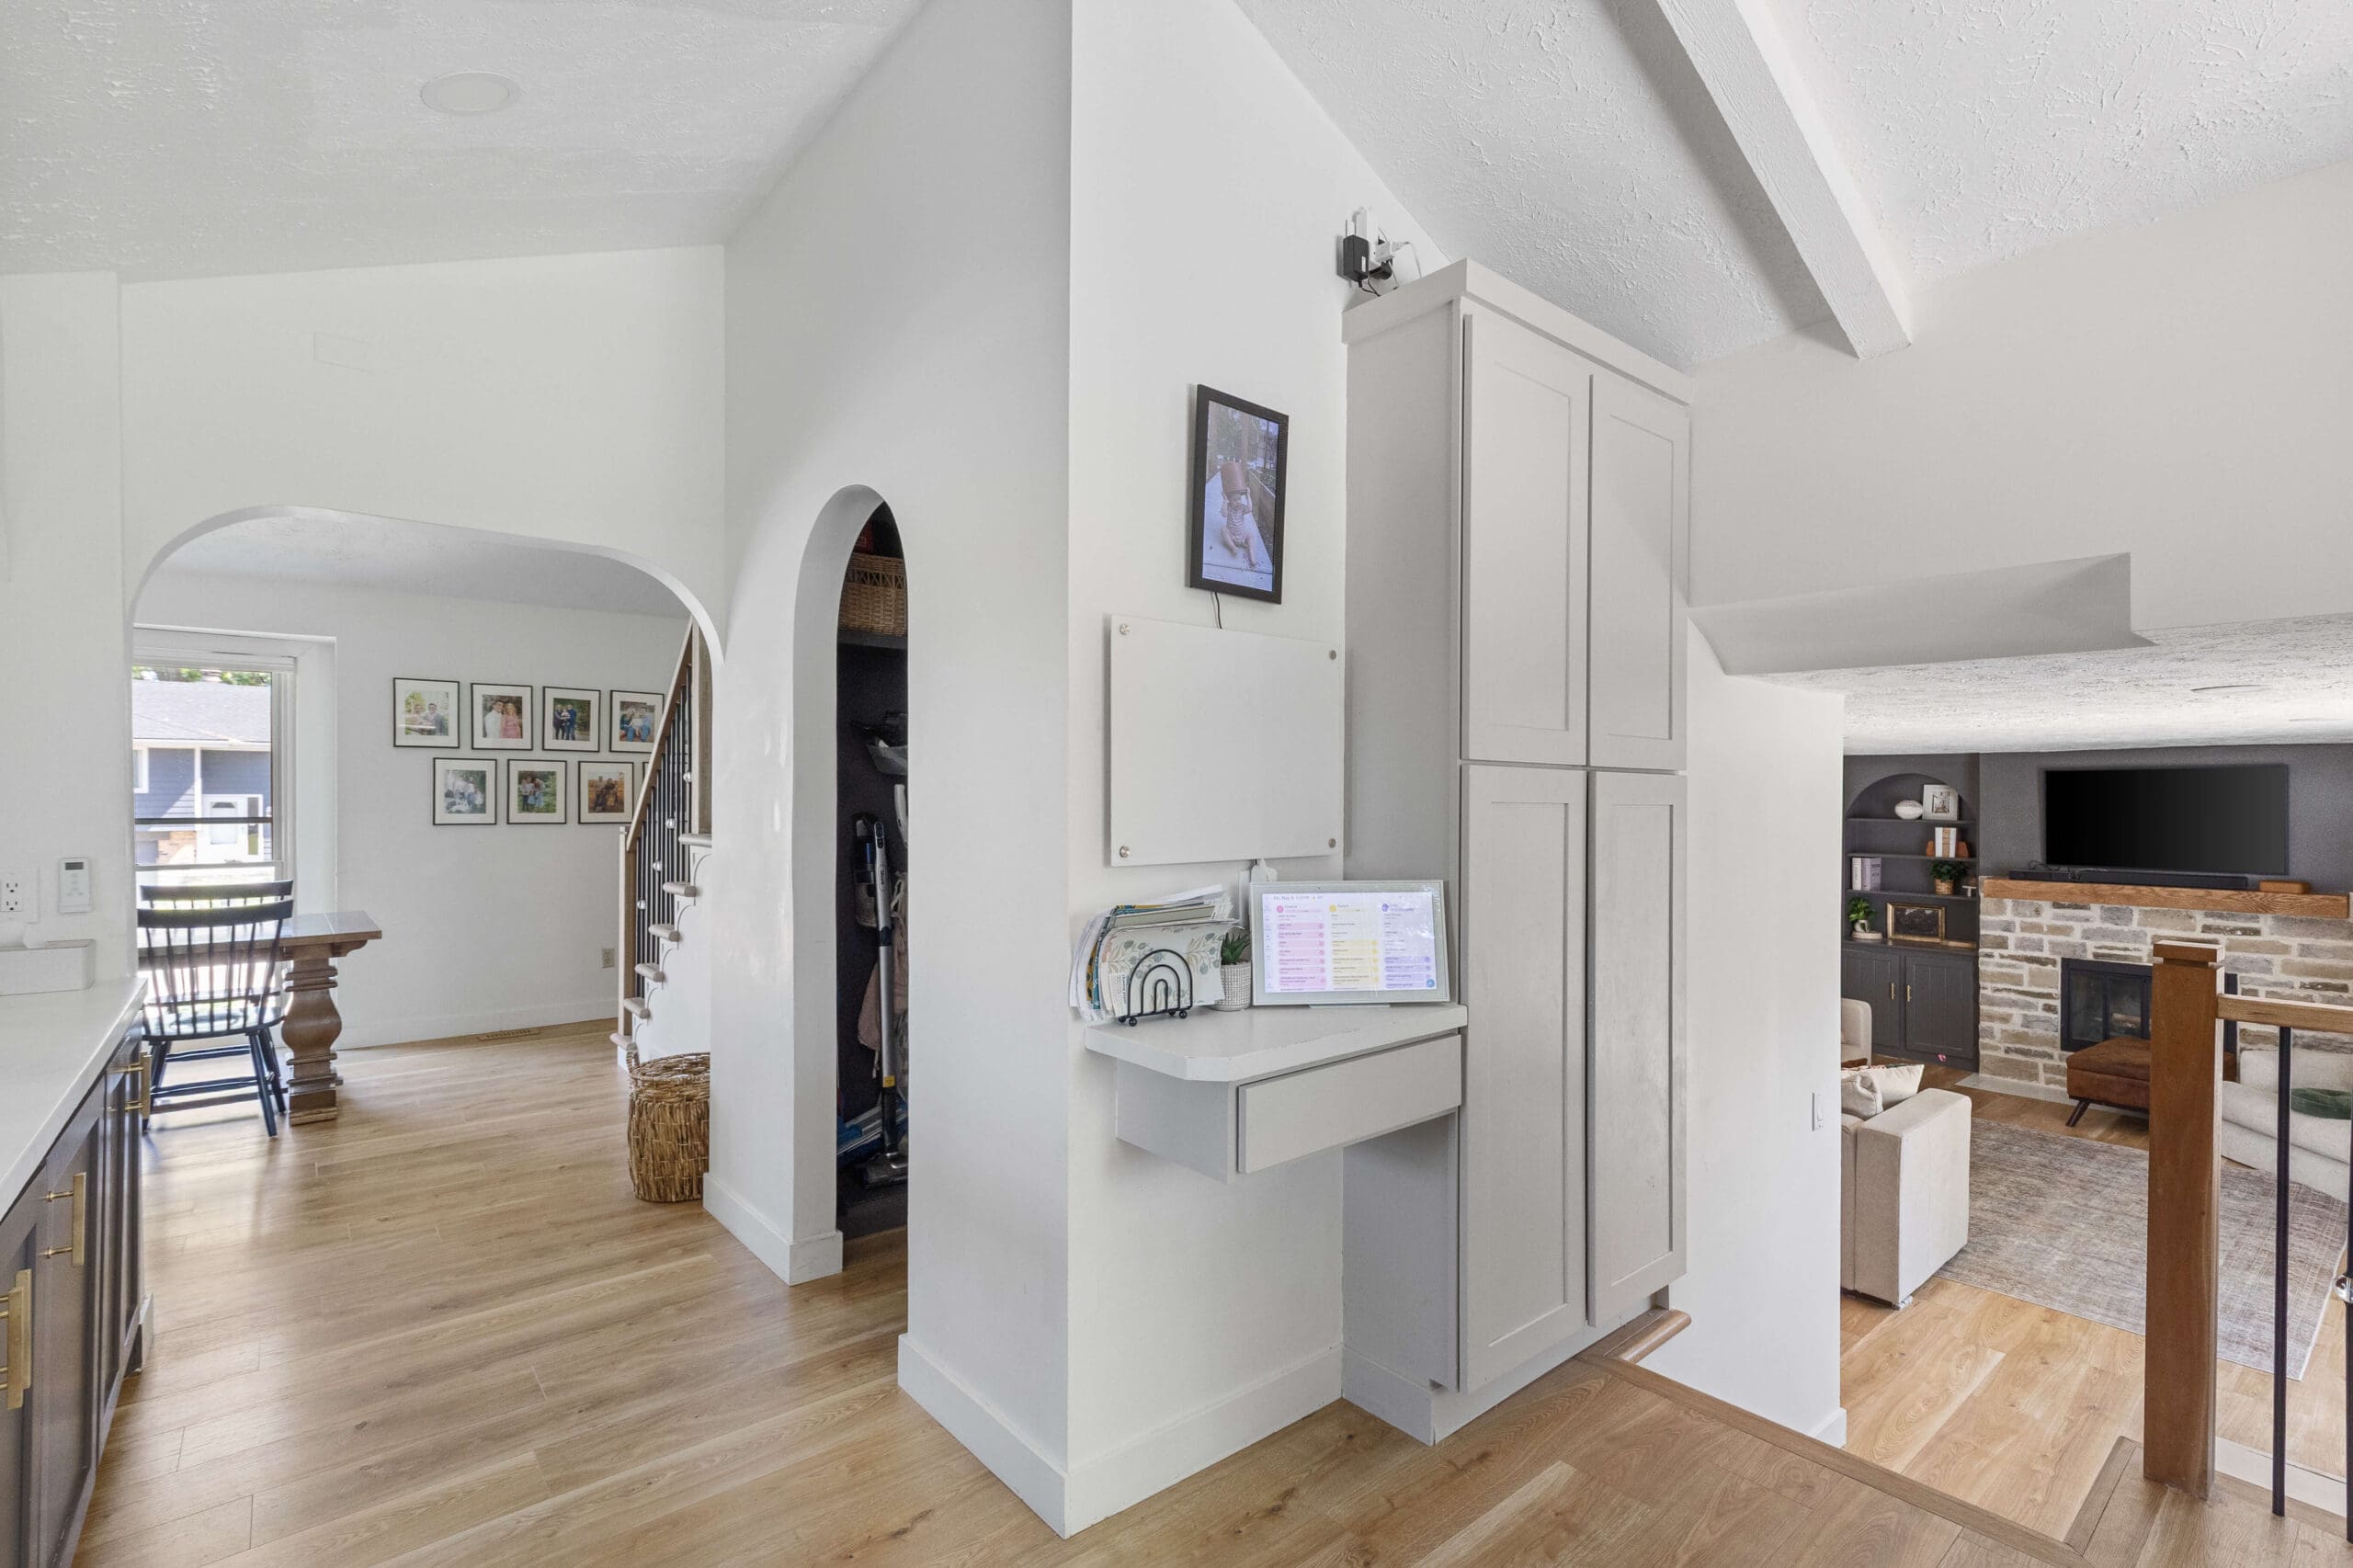
You might already have a little corner in your kitchen or mudroom to use as a family command center. When we moved into our home in Nebraska, there wasn’t a good place to set one up. After completely gutting and relocating the kitchen and framing in new walls for a walk-in pantry, I had a little nook along the wall on the way to our living room. There wasn’t a lot of space here, but there was just enough room to add an awesome family command center.


Saving Time With RTA Cabinets
I’ve built cabinets before, like for my homeschool/office built-ins, but while working on this family command center, we were elbow deep in so many projects that I decided to save myself some time and go with RTA cabinets, which is short for ready to assemble cabinets.
I ordered two tall cabinets from Lilly Ann Cabinets. The assembly instructions are easy to follow, and because I want them to be sturdy and last a really long time, I used wood glue everywhere that two pieces meet.


I also used brad nails, figuring it couldn’t hurt. Like I said, I want this thing to last forever!

Once I’d assembled both cabinets, it was time to install them. Floors in homes are rarely (like pretty much never) level, so I use basic shims to fix this. I added some under my cabinet and adjusted the shims until my level showed the cabinet was sitting just about perfect.

Then I attached them together tightly with a clamp.

I drilled a small pilot hole, then attached the cabinets together with a screw, repeating this at the top as well.


Next, I attached the cabinets to the wall by screwing through the back into the studs. Since my drywall was unfinished, it’s easy to see the studs. If you’re working in a finished room, you may need a stud finder.

Both cabinets were attached to each other and to the wall. It was looking great! I’m not worried about that gap at the bottom since the shims will be covered by baseboards.

Next, I added the doors by simply attaching the hinges using the provided screws and pre-drilled holes.

My goal with these family command center cabinets is to make them appear similar to my kitchen cabinets for a cohesive look. I chose shaker doors in the same style as the shaker doors I chose for my kitchen cabinets. I’ll paint them the same Accessible Beige color as I did my kitchen cabinets and add the same crown molding I did in my kitchen.
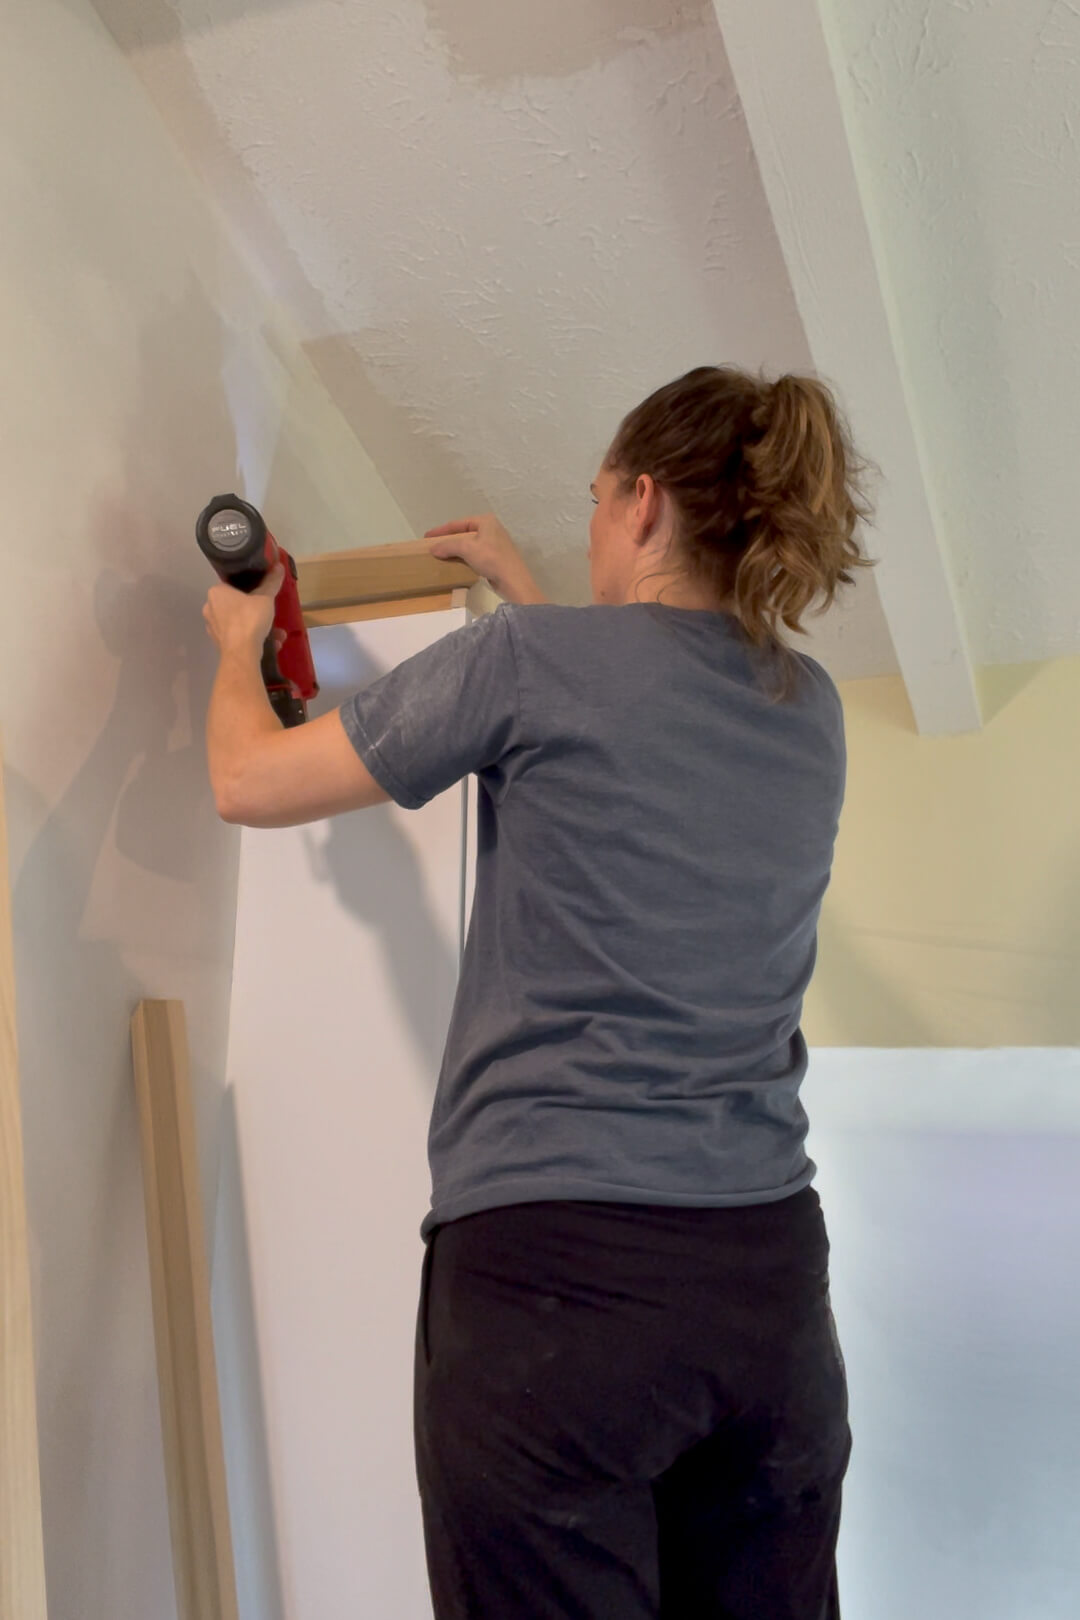
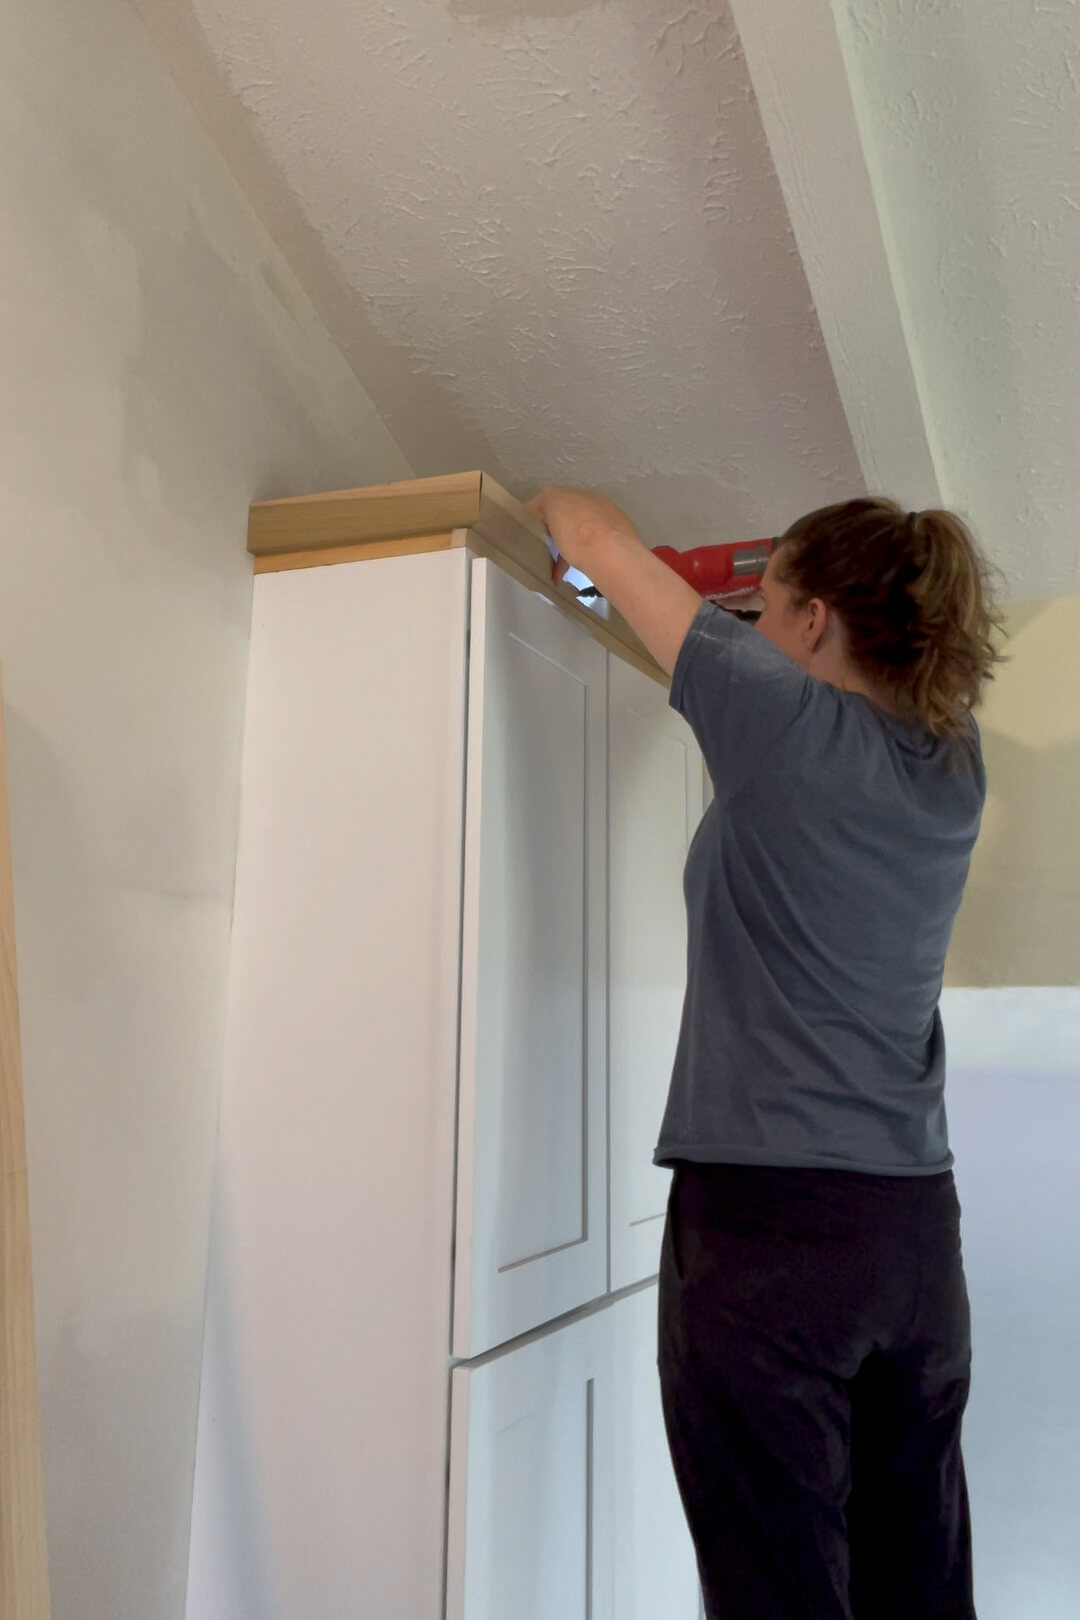
First, I needed something to attach the crown molding to, so I extended my cabinet face by nailing some scrap wood behind the face on each side. The crown will completely cover all of this.


Then I added the crown using a mitered corner where the two pieces of trim meet.
After caulking my seams, we were done with the family command center cabinet for now.

It doesn’t matter that the wood is different colors. Once I paint the cabinet, it will all look the same.

Building a Floating Cabinet Box
My vision for the space next to the tall cabinets was for a small countertop with a drawer. Using scrap plywood, I began constructing the box that my countertop will sit on and that the drawer will slide into.
Using my table saw I cut out 3/4″ plywood to make a top, bottom, two sides, and a back piece. The front would stay open for the drawer.

Then, I assembled the box using wood glue and screws.


The back piece doesn’t have to fill the whole back. In fact, it’s probably easier to put it in if it doesn’t. You just need a tall enough strip on the back to attach this box to the wall.
Like the rest of the box assembly, I used wood glue anywhere two wood pieces touched.

Then I added screws on each end.

And a few screws along the top of the box as well.

The nook I chose for my family command center is just steps away from my kitchen island. I wanted to make sure the command center countertop would be the same height as my kitchen countertop. I carefully measured, leaving room for the 3/4″ MDF that I’m adding on top of the box for the countertop.

To attach the box to the wall, I used a level to make sure I kept things nice and straight. I could have used my laser level here, but this job was simple. Either way, once the box was level and at the right height, I attached it to the wall, screwing through the back piece into the studs.

Now for the finishing touches! I don’t want this box to look like a bunch of scrap plywood. To cover up the seams and edges of the plywood, I’m using a piece of 1/4″ plywood that I cut to the size of the side of my box and attached it with nails.


For the front, I cut some scrap trim to the size I needed to make a cabinet face.

Then I attached it all with my brad nailer.

See how clean and nice it’s already looking! Just like with the crown on the cabinet, the mix of woods won’t matter here once it’s all been painted the same color.

Making a Countertop for My Family Command Center
I’ve done epoxy countertops quite a few times. I’ve made them from scratch in the kitchen of my last home, in the kitchen we remodeled in our current home, in my pantry, and many many more places. I’ve even used my method of epoxy countertops to cover old, 90’s style granite countertops in a dated bathroom. I’ve perfected my technique over the years and put everything into an affordable e-book. If you want a full tutorial on making epoxy countertops, definitely check out the e-book.
For this small countertop that I was adding to my family command center, I started with a scrap piece of 3/4″ MDF. I wanted to give the illusion that the countertop is twice as thick without using twice the MDF. So, I cut a few strips of MDF and attached them flush to the edge of the counter using wood glue and my brad nailer.


You’ll want to attach these strips all the way around the edges of the countertop.

The last thing I wanted to do was cut off the outside corner. My family command center is right by a main walkway, and I imagined all of my children bumping their heads into the corner at one time or another.
Using my square I marked out how much I wanted to cut off, then used my table saw to make the cut.


I used my sander to clean up the cut and to round off all the edges and corners so they’d be less sharp and pointy.

To really sell the illusion that the countertop is one, thick piece, we need to make that seam in the middle disappear. My product of choice for this step is Bondo.

I applied the Bondo all along the seam on the two sides of the countertop that would show. It’s a waste of time and materials to apply it to the back of the counter or on the side that’ll be against the tall cabinet.

After the Bondo had sufficient time to dry, it was time to sand it down.

Now that my countertop was done, it was ready to install, which was easy. I simply attached it to the floating box I had built with a couple of screws at each end of the countertop.

Since the face frame of the tall cabinet sticks out just a bit past the sides, it creates a small gap between the countertop and the cabinet.

I could have notched out the countertop to fit flush with the cabinet. Instead, I opted to add a small piece of trim. This is the same trim I used at the base of the shiplap backsplash in my kitchen, which is another small detail that really makes the family command center feel cohesive with the kitchen.


Attaching the trim was quick and easy with a couple of finish nails from my brad nailer.

Building a Drawer
The area where I was building my family command center was not very deep, so obviously, this drawer wouldn’t be very deep either. I needed some small, hard to find 10 inch drawer slides. Fortunately, I was able to find some here.

To install the slides, I used 1/4″ plywood as a spacer. You don’t want the slide to sit all the way on the bottom of the cabinet, or it might rub and have trouble opening and closing. The spacer lifts it off the bottom of the box giving it just a bit of space.

Once you extend the slide out, you can see the holes you screw through to attach the slide to your box. Getting the drill in there is a little awkward, but you can do it.

Now that my slides are in, I measured how big of a drawer to make. First, I measured between the drawer slides. It was 21.5″, so my drawer will be 21.5″ wide.

Next, I measured for depth. From the back of the drawer to the end of the slide it was 11″, but I want to give myself a little bit of space, so I’m only going to make the drawer 10″ deep.
For the height, my opening here is 5.5″ tall, but again, you want to give yourself a little bit of space, so I’m going to make my drawer 4″ tall.


Using those dimensions, I grabbed 1/2″ plywood and cut out a bottom piece and 4 side pieces. I assembled them all using wood glue along the edges and added a few brad nails to temporarily hold all my pieces in place.


Then put in screws to hold it all together permanently.

Now to install the drawer, we’re going to grab that same spacer so that my drawer isn’t rubbing the bottom of the box.

I set the drawer on top of the spacer and pulled it so it was hanging out of the box. Then I extended the slide out so it was sitting flush with the front of my drawer. When you extend the slide, you’ll see holes there for you to screw through for attaching to drawers. I attached my drawer slide on both sides using those holes.


Now that the drawer was attached, I was able to pull the drawer out almost all the way, until I could see the next set of holes. I added screws through those holes on both sides of my drawer. I had a perfectly working drawer in my family command center!

The last step for my new drawer was a drawer front. Fortunately, I had scrap 1×6 lying around, and it was the perfect size to cover all the gaps and overlap with the face frame.

I added bit of wood glue to the back of the drawer face.

Then, I attached it to the drawer with a couple of brad nails.

Once it was attached to the face of the drawer, I opened it and added a couple of screws from the inside of the drawer.

Now that the countertop and drawer for my family command center were completely built and installed, I needed to prep for paint.
I caulked along the edges where the countertop met the wall and along the trim piece.

I used wood filler on all my brad nail holes and the seams of my face frame. Now my family command center was ready to be painted!

As I mentioned at the beginning of the post, this family command center was a side project in the midst of so many other projects happening on our main floor. We installed flooring and added baseboard, painted the walls, and painted the family command center cabinets and drawer at the same time as we painted the rest of our kitchen cabinets. I painted and epoxied the countertop while doing my kitchen countertops. The last few finishing touches mostly happened off camera, but you can get details on how to do those steps in the other posts for my kitchen.
Just a quick look again at the before of this little, unused nook.
And the after!
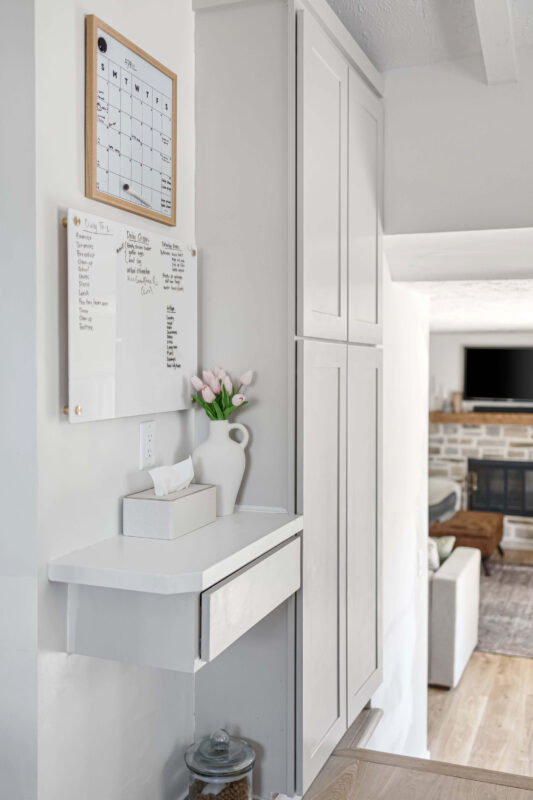
I love how my family command center turned out. It’s beautiful and such a good use of space. I am a big advocate for adding as much practical storage to your home as possible. It really helps my house stay clean and organized, when I have places to put things.
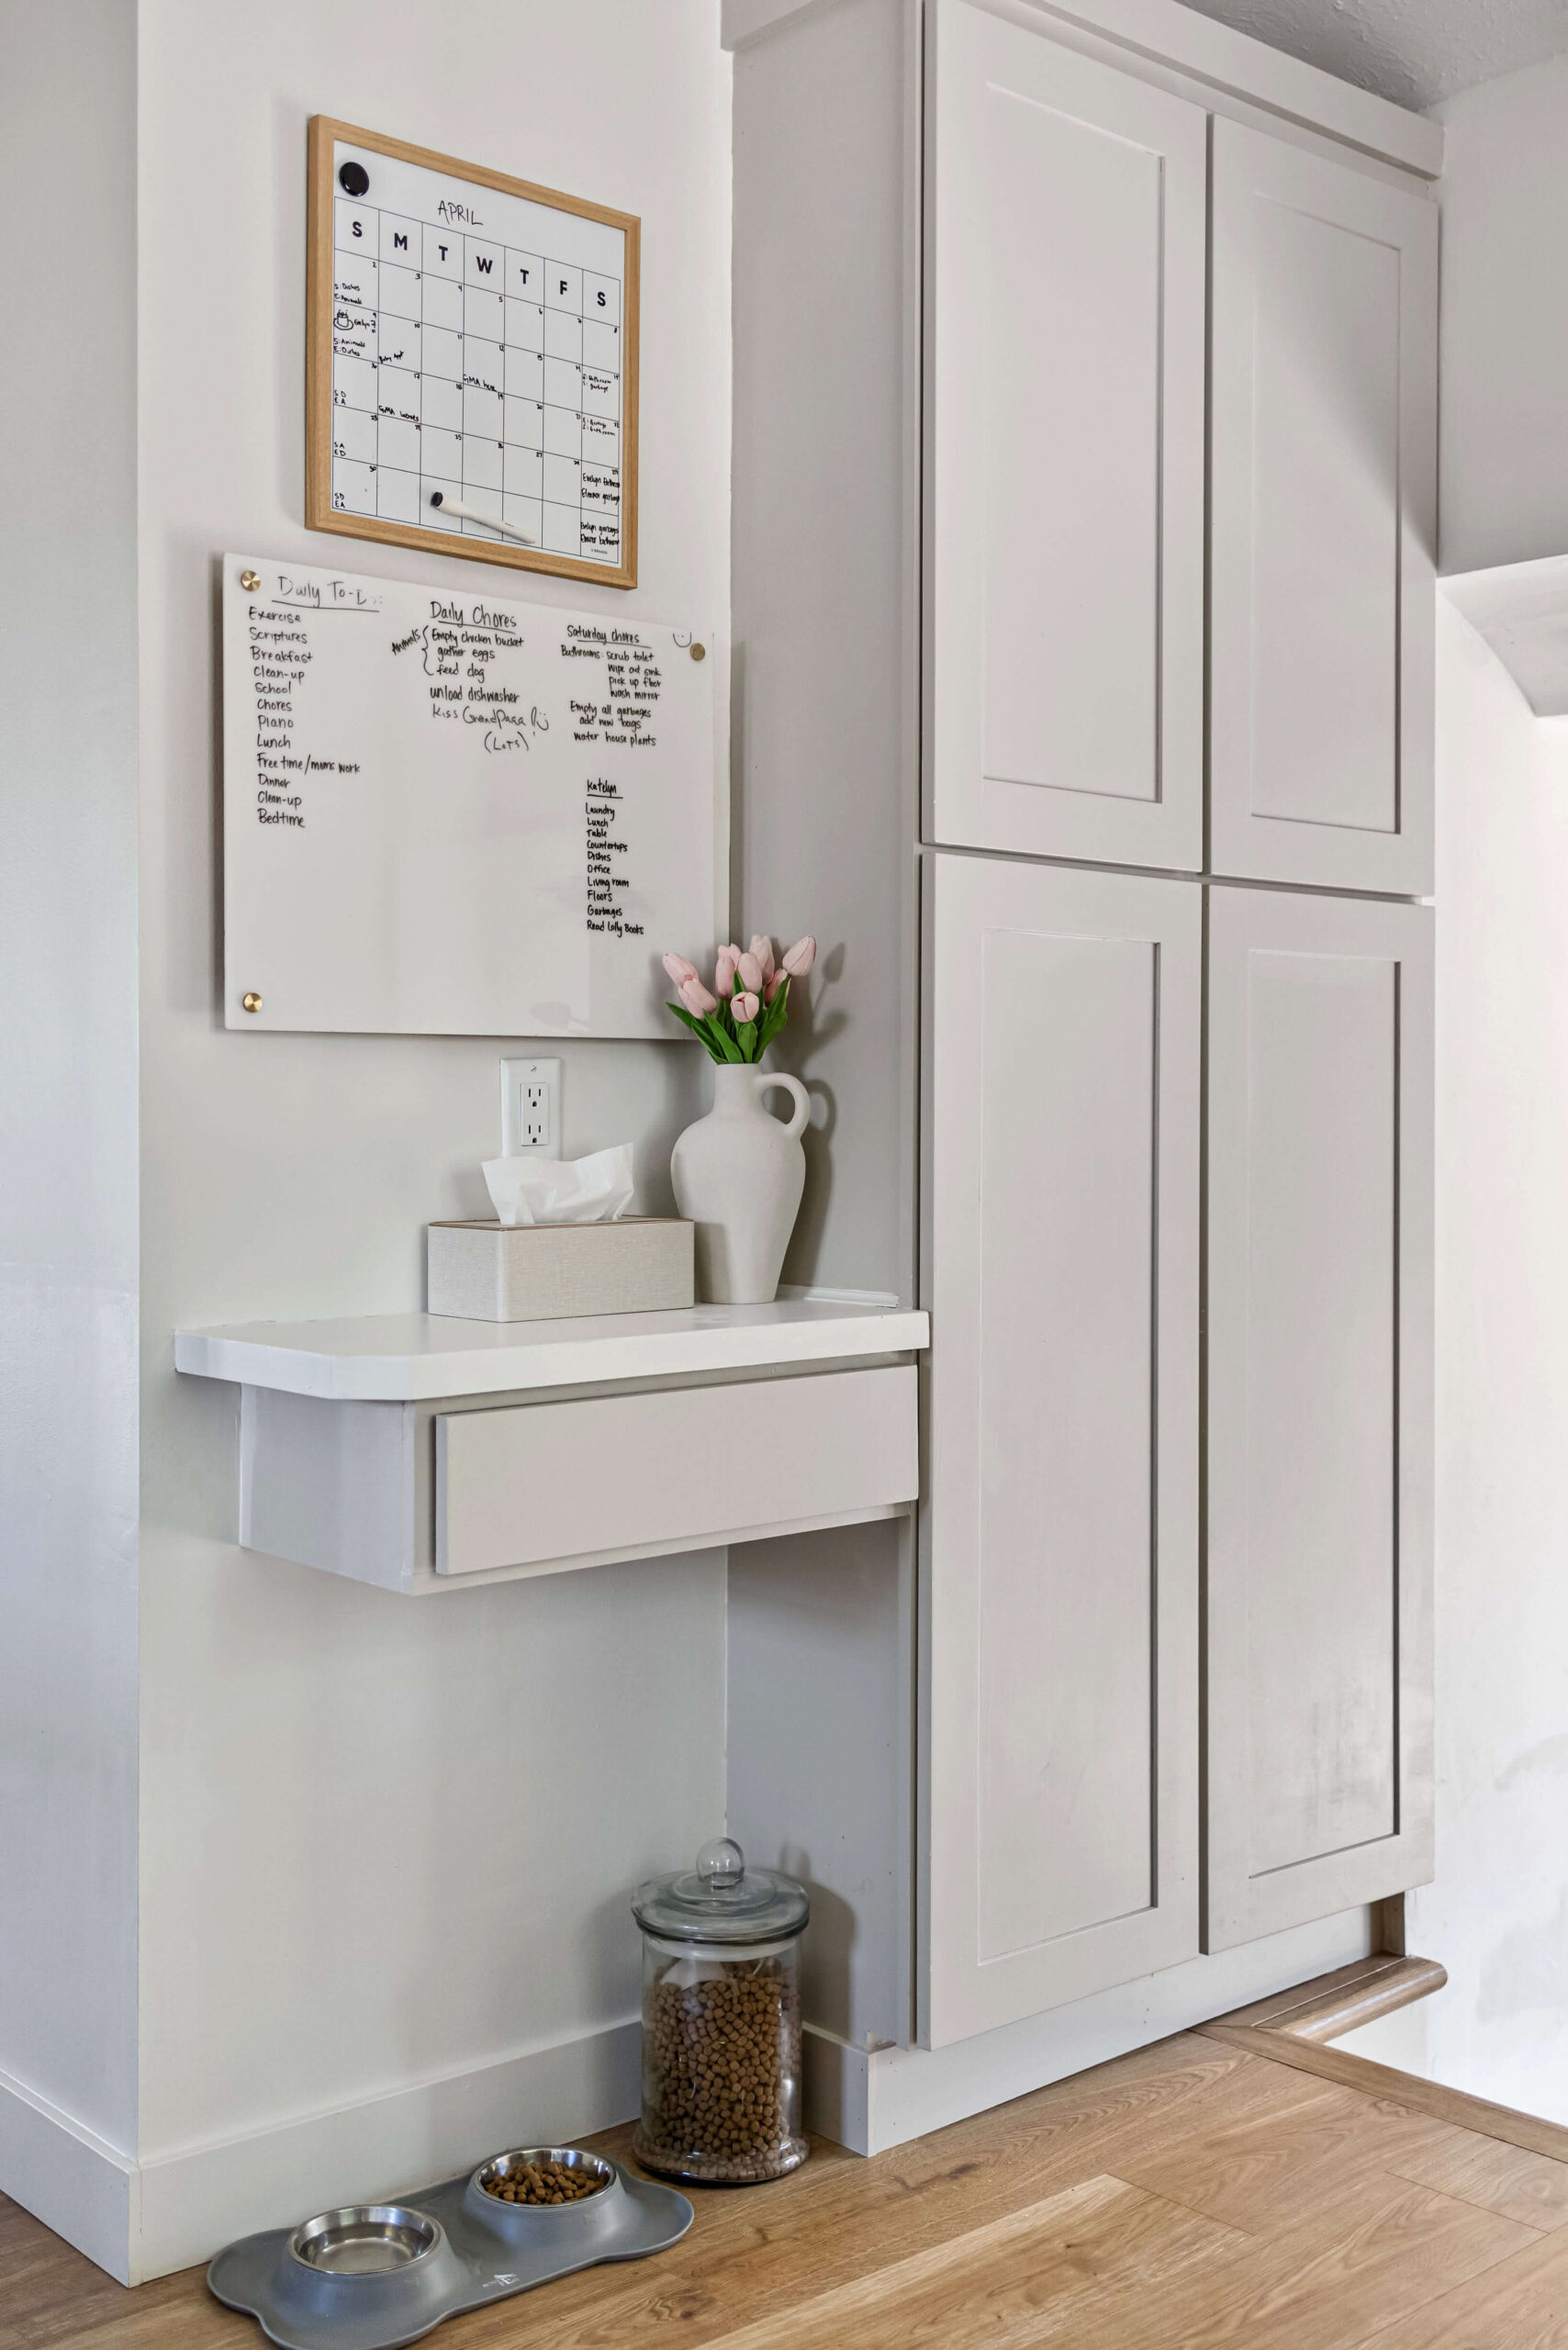
The whiteboard and the calendar have been great for helping our family stay organized.

Our family command center is truly right in the middle of all the action. It’s perfectly central, right off the kitchen, so it’s easily visible and accessible. Now that everything is painted, you would never know that it is any different from my kitchen cabinets.
Looking for more projects to keep you organized? Check out this post where I organize my spice cabinet, or this one where I build simple drawer organizers out of scrap plywood. And if you love beautiful and functional storage as much as I do, then you will love all of the details on my pantry build!