


How to Paint a Bathroom Vanity (DIY Tutorial)


Updated July 13, 2026
If you’ve ever walked into your bathroom and thought “this vanity has got to go,” you’re not alone, and you almost certainly don’t need to replace it. Learning how to paint a bathroom vanity is one of the highest-ROI DIY projects in any small bathroom remodel: the work runs about $50 to $100 in materials, takes one weekend, and takes a builder-grade vanity from “dated” to “looks custom” in a way no other single project does.
I’ve painted a lot of cabinets over the years, including bathroom vanities, kitchen cabinets, and random furniture pieces, so when I say this process works I mean it. This tutorial is the exact step-by-step I use, including the bonding primer trick that prevents peeling, the paint that actually holds up to humidity, and how to handle laminate or thermofoil vanities (yes, you can paint those too).
Part of my Small Bathroom Remodel series. Painting the vanity is one of 7 weekend projects that transformed our basement bathroom. See the full small bathroom remodel breakdown →
Painted Bathroom Vanity: At a Glance
- Remove all the doors and drawer fronts
- Clean and degrease every surface that will be painted
- Lightly sand to break the existing sheen
- Apply a bonding primer (this is non-negotiable)
- Sand again with fine grit for a glass-smooth finish
- Apply 2 to 3 thin coats of cabinet enamel
- Install soft-close hinges and rehang doors
- Add new hardware (gold or matte black both work)
Quick Answer: What’s the Best Paint for a Bathroom Vanity?
The best paint for a bathroom vanity is a high-quality cabinet enamel or urethane-reinforced trim enamel in satin or semi-gloss. My go-to is Sherwin-Williams Emerald Urethane Trim Enamel because it self-levels beautifully, dries to a hard scrubbable finish, and stands up to bathroom humidity better than standard wall paint. Whichever brand you pick, the absolute non-negotiable is using a bonding primer first, especially over factory laminate or thermofoil surfaces. Skip that and your paint will peel within months no matter what topcoat you used.
Watch the Full Bathroom Makeover Tutorial
Table of Contents
- Painted Bathroom Vanity: At a Glance
- Watch the Full Bathroom Makeover Tutorial
- Before: Our Builder-Grade Bathroom Vanity
- Tools and Materials for Painting a Bathroom Vanity
- Best Paint for a Bathroom Vanity
- Can You Paint a Bathroom Vanity Without Replacing It?
- Step 1: Remove the Doors and Drawer Fronts
- Step 2: Clean and Degrease
- Step 3: Sand the Vanity Surfaces
- Step 4: Prime the Bathroom Vanity
- Step 5: Sand Again for a Smooth Finish
- Step 6: Paint the Bathroom Vanity
- Step 7: Build or Replace the Vanity Doors (Optional)
- Step 8: Install Hinges and Rehang Doors
- Step 9: Add New Hardware
- How to Paint Bathroom Cabinets (Same Method, Slightly Different Scale)
- Cost and Time: How Much a Bathroom Vanity Makeover Takes
- Optional Upgrades for Your Painted Bathroom Vanity
- How to Make Painted Bathroom Vanity Cabinets Last Longer
- Painted Bathroom Vanity: Before and After
- More Small Bathroom Remodel Projects to Try
- 📌 Save This Bathroom Vanity Tutorial for Later
- Share Your Project With Me!
- FAQ About How to Paint a Bathroom Vanity
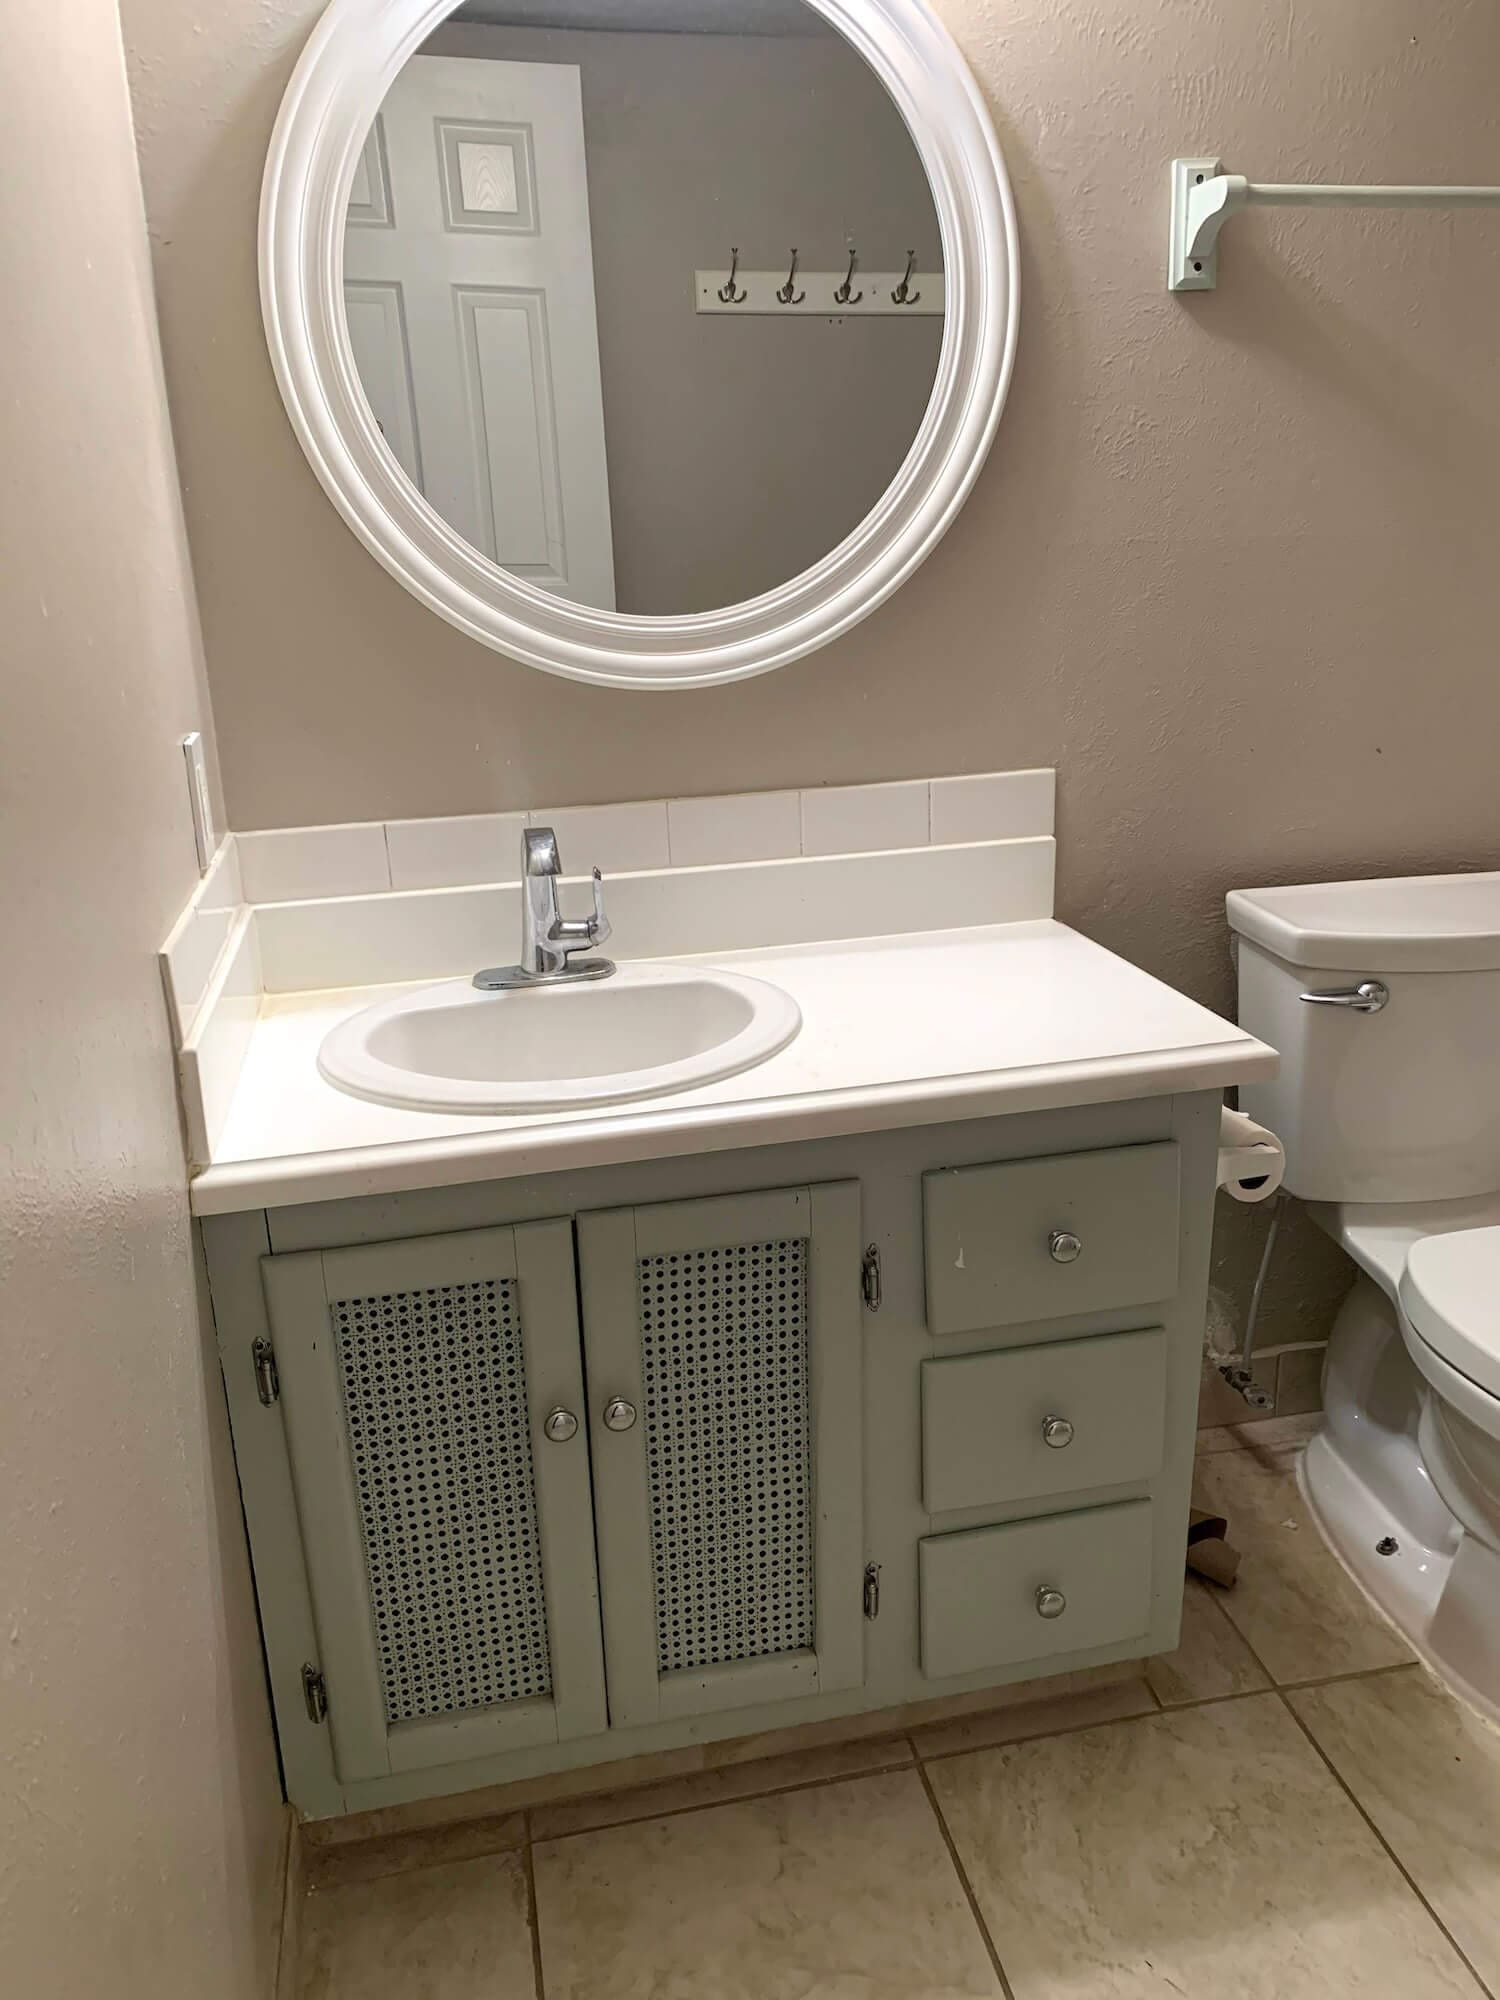
Before: Our Builder-Grade Bathroom Vanity
Our bathroom vanity was a classic builder-grade piece: sturdy frame, but dated finish, basic hardware, and a sad oak-tone color. The cabinet box was still solid, but the doors, hardware, and yellowing finish made the whole space feel older than it really was. Instead of spending $800 to $1,500 on a new vanity, I decided to do a budget-friendly DIY bathroom vanity makeover and work with what we already had.
Tools and Materials for Painting a Bathroom Vanity
Before you start, gather everything you’ll need. Having the right tools and products makes the difference between a vanity that looks freshly painted and a vanity that looks factory-finished.
Tools
Materials
- Degreasing cleaner
- Sandpaper
- Painter’s tape
- Bonding primer
- especially important for previously finished/laminate surfaces
- Cabinet paint in your preferred color
- My favorite (and the best paint for a bathroom vanity I’ve used) is Sherwin-Williams Emerald Urethane Trim Enamel because it cures to a super-hard, scrubbable finish.
- Cabinet hardware
Best Paint for a Bathroom Vanity
The best paint for a bathroom vanity is a cabinet enamel or urethane-reinforced trim enamel that handles humidity, splashes, and frequent cleaning. My favorite is Sherwin-Williams Emerald Urethane Trim Enamel because it self-levels beautifully and dries to a hard, durable finish, so your freshly painted bathroom vanity looks almost factory-made. Other strong options: Benjamin Moore Advance, Behr Cabinet Enamel, and Rust-Oleum Cabinet Transformations. Avoid wall paint, even premium wall paint, because it doesn’t cure hard enough to handle daily wiping and splashes.
Finish-wise, satin or semi-gloss are the right calls for a bathroom. Satin is more forgiving on imperfections, semi-gloss wipes clean easier. Either works. Avoid flat (won’t hold up to cleaning) and avoid high-gloss (too unforgiving on any tiny prep mistakes).
Can You Paint a Bathroom Vanity Without Replacing It?
In most cases, yes. Painting a bathroom vanity instead of replacing it is the right call as long as the cabinet box is structurally sound. Painting saves $500 to $1,500 versus replacing, and the prep + paint work takes a single weekend.
Painting is worth it if the vanity feels dated but the frame is sturdy, the doors still open and close properly, and there’s no major water damage to the box.
Many builder-grade vanities are laminate or thermofoil over MDF or particleboard. You can absolutely paint these, but you have to scuff-sand the surface and use a real bonding primer (not standard primer) so the paint has something to grip. If the laminate is peeling, bubbling, or missing in chunks, that’s a sign the material underneath has been damaged by moisture and paint isn’t going to save it.
Replace the vanity instead of painting if the cabinet box is swollen or crumbling, the bottom panel is soft from water damage, or the sides are delaminating. Paint can do a lot for a tired finish, but it can’t fix a vanity that’s structurally failing.
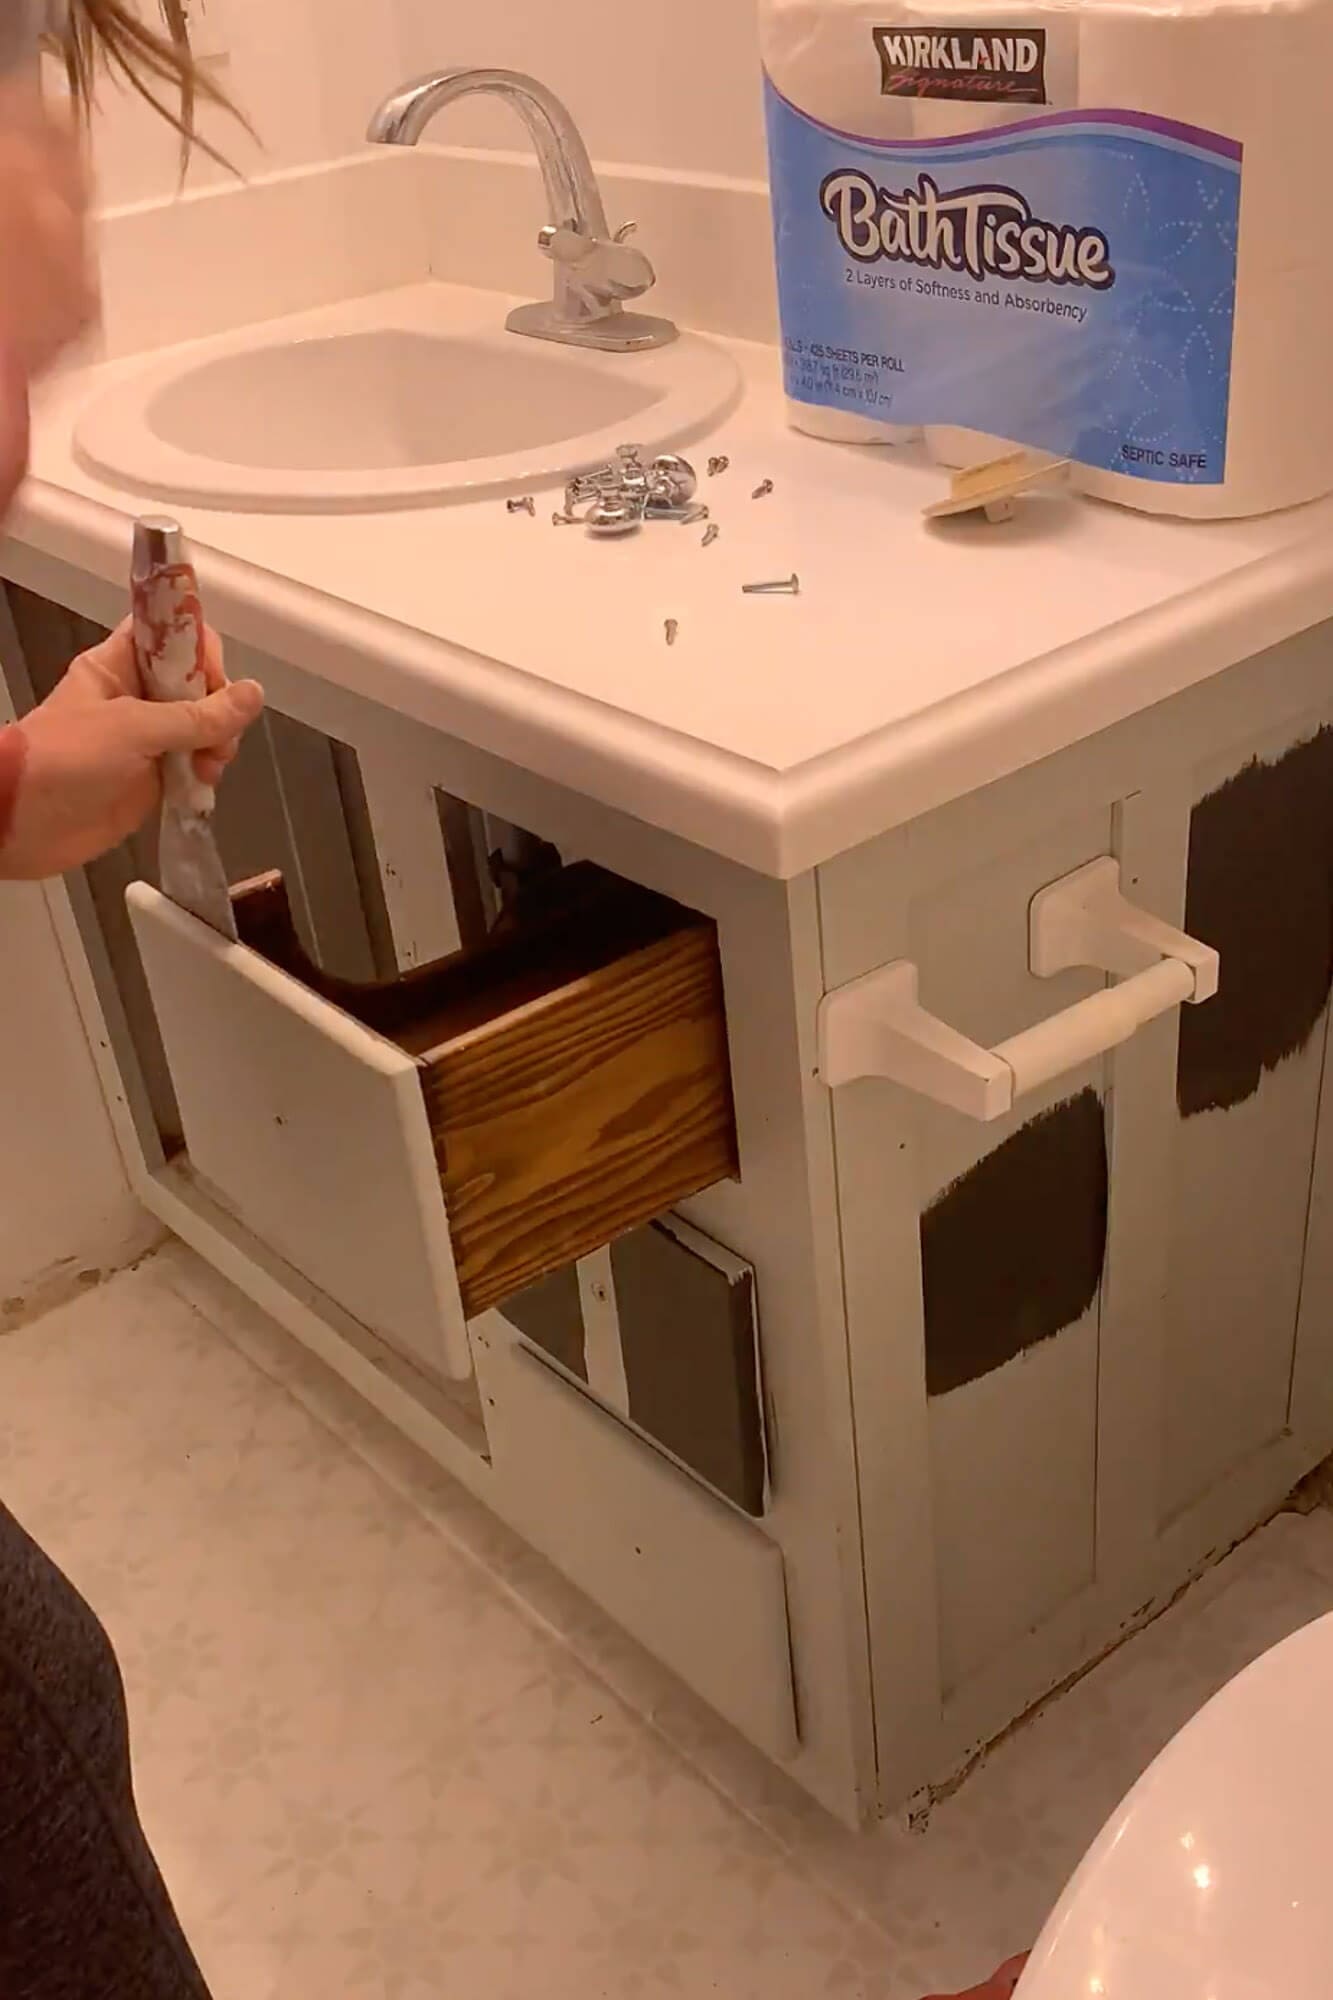
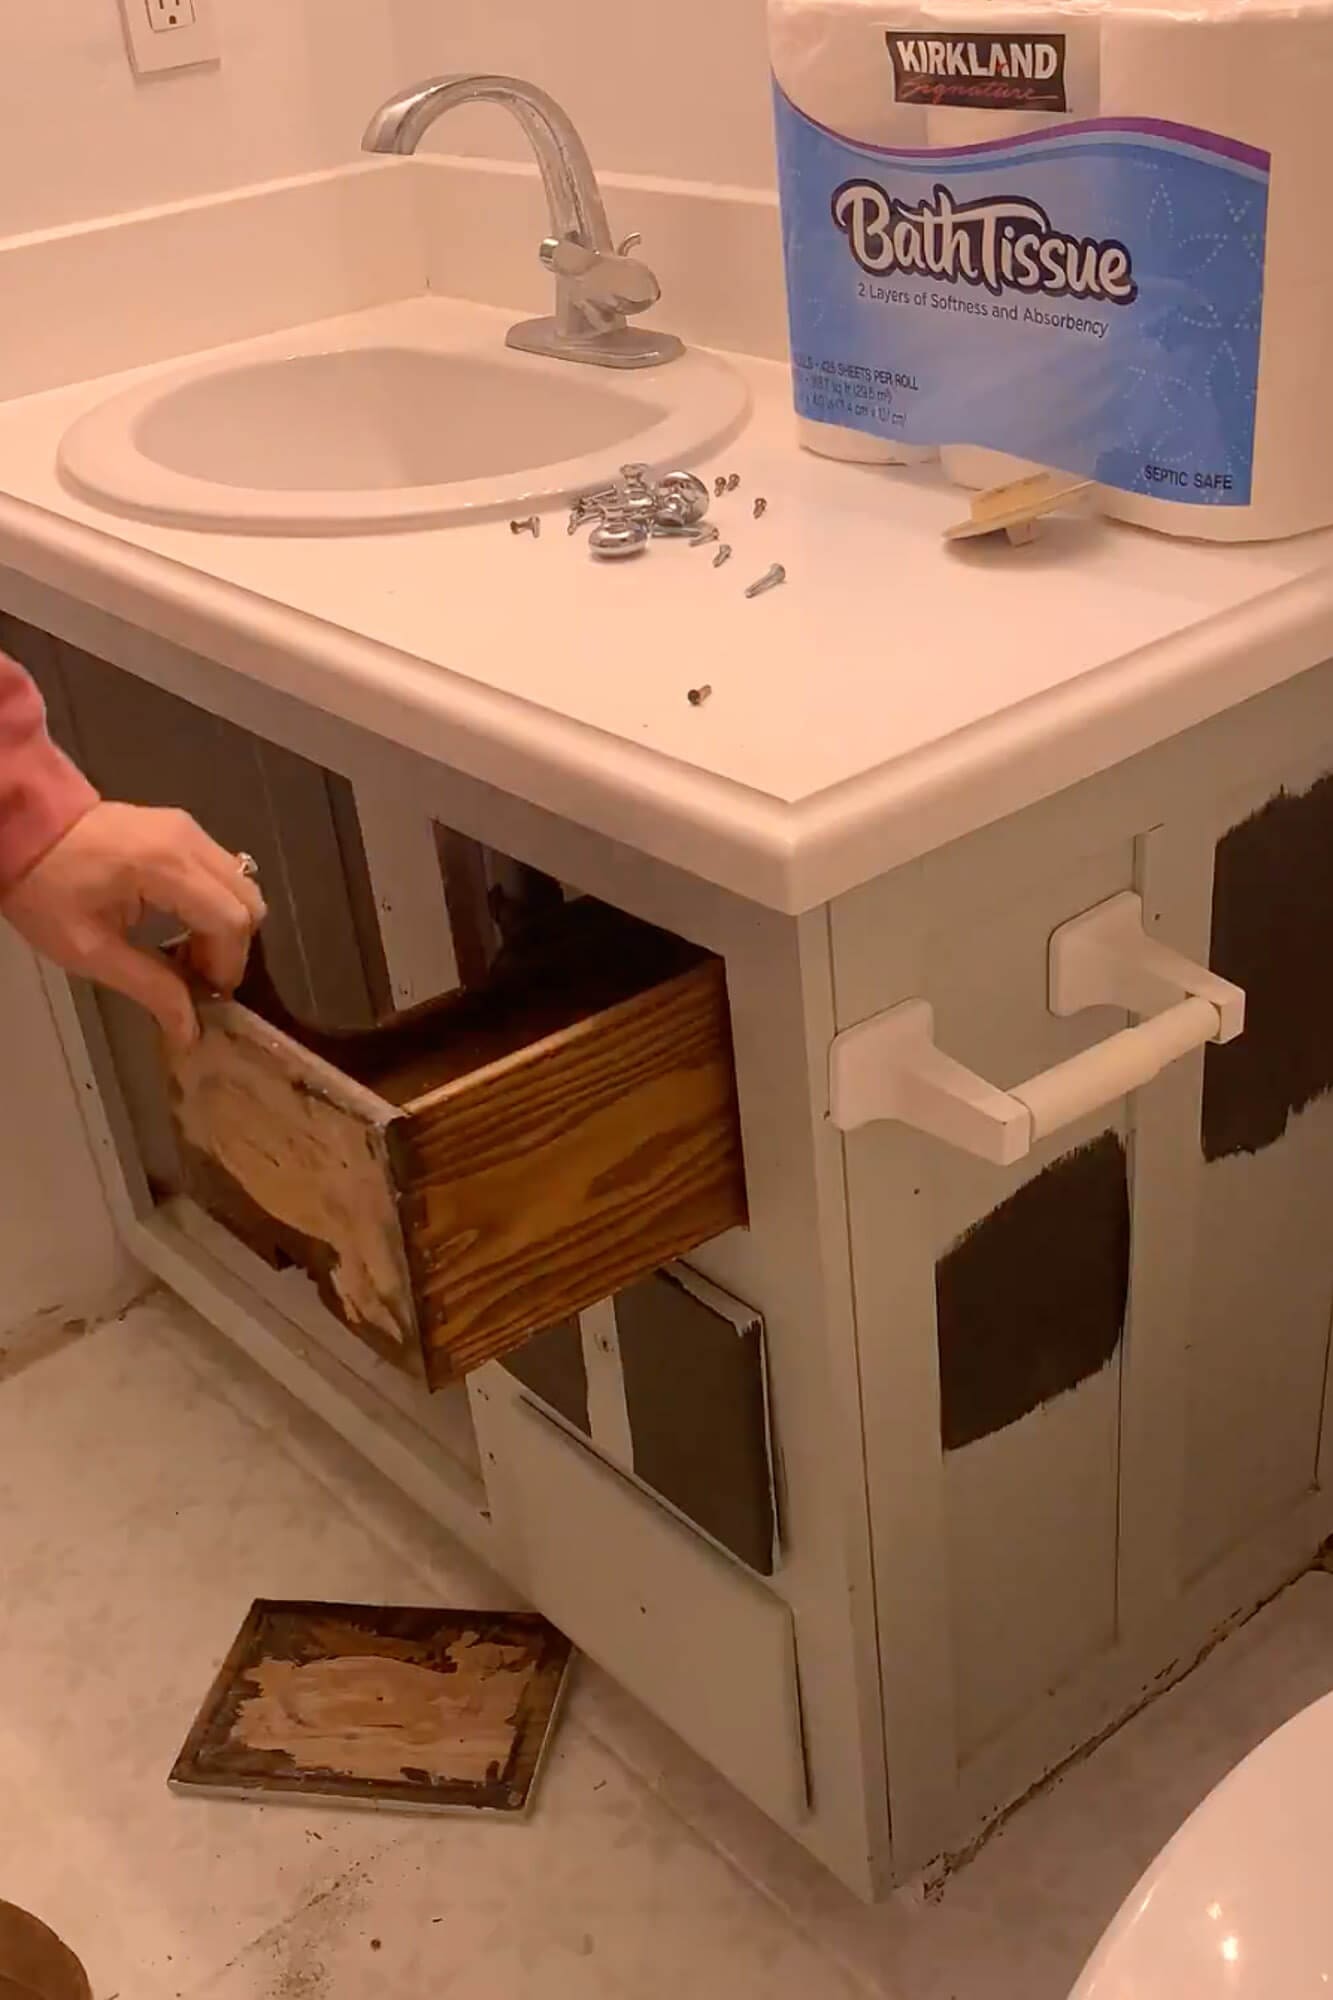
Step 1: Remove the Doors and Drawer Fronts
I always start by removing every door and drawer front. It makes painting dramatically easier and gives you access to every corner of the vanity box. Whether I’m working on a bathroom vanity or a full kitchen, this step never changes. It just leads to a cleaner, smoother finish.
Technically you can paint a bathroom vanity with the doors still attached, but taking them off makes it much easier to reach every surface and gives a cleaner finish. Label each door and drawer with painter’s tape (D1, D2, Drawer 1, etc.) so you can put them back exactly where they came from.
Step 2: Clean and Degrease
Use a real degreasing cleaner (Krud Kutter or diluted TSP) to wipe down every surface you plan to paint. Pay extra attention to areas around the sink, handles, and edges where hands and products tend to leave residue. Bathroom cabinets pick up hairspray, lotion, and toothpaste residue in ways most people don’t realize until they start cleaning.
Let everything dry completely before moving on. A clean surface is the foundation of any successful attempt to repaint a bathroom vanity. Skip this step and your primer won’t stick.

Step 3: Sand the Vanity Surfaces
Lightly sand the cabinet box, doors, and drawer fronts with 120-grit sandpaper to remove the glossy sheen. You’re not trying to strip the finish, just giving the primer something to grip onto. Two or three minutes per door is plenty.
Vacuum or wipe away every bit of sanding dust so it doesn’t get trapped under your primer or paint. A tack cloth works great for the final wipe.
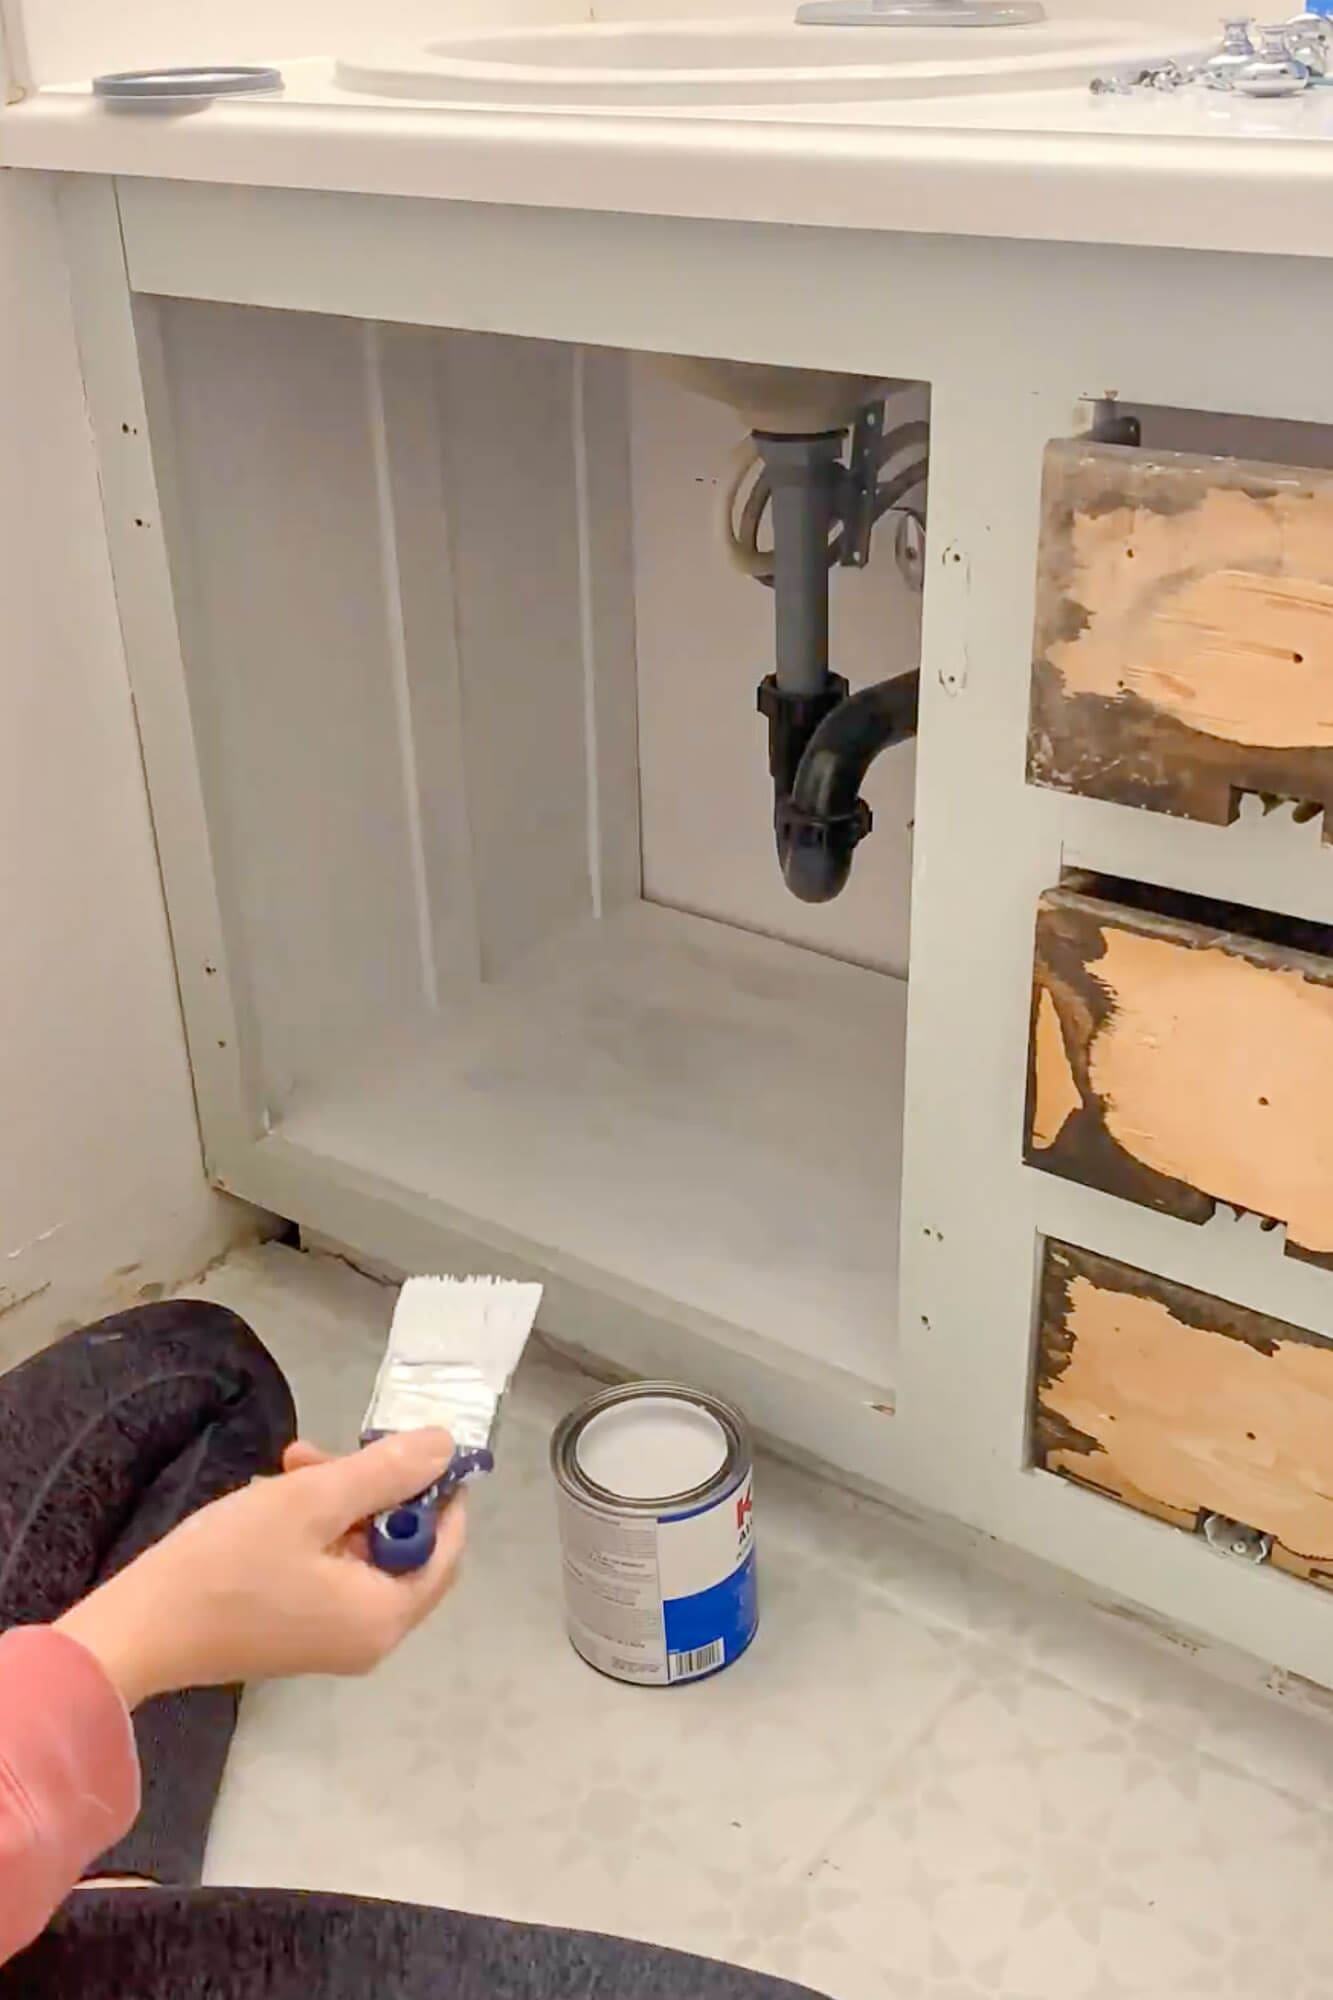
Step 4: Prime the Bathroom Vanity
Apply a bonding primer to all the surfaces you’re going to paint. Follow the directions on the can for dry time and recommended number of coats. This is the single most important step in the entire process when you’re learning how to paint a bathroom vanity.
Priming is what helps your paint stick and keeps stains or wood tannins from bleeding through, which is especially important in a space with moisture like a bathroom. Skipping or short-cutting this step is the #1 reason DIY vanity paint jobs fail within the first year.
Step 5: Sand Again for a Smooth Finish
Once the primer is dry, lightly sand again with fine-grit sandpaper (220 grit). This step smooths out any rough spots, primer drips, or texture, and helps you get that factory-style finish.
Wipe away the dust so you’re ready for paint. It’s a small step, but it’s part of the best way to paint a bathroom vanity so it feels as good as it looks.
Step 6: Paint the Bathroom Vanity
Now it’s time to paint. You can use a sprayer for the smoothest finish, or a foam roller and an angled brush if you don’t own one. Either approach works, but the sprayer gets you closer to factory-perfect.
Apply thin, even coats to the cabinet box, doors, and drawer fronts. Let each coat dry fully before adding another. Rushing the dry time is one of the main reasons paint jobs chip, so build in extra time. Two to three thin coats almost always looks better than one heavy coat.
This is the heart of how to paint a bathroom vanity: careful prep, bonding primer, and several thin coats of high-quality cabinet paint. Patience here is what separates a vanity that looks freshly painted from one that looks custom.
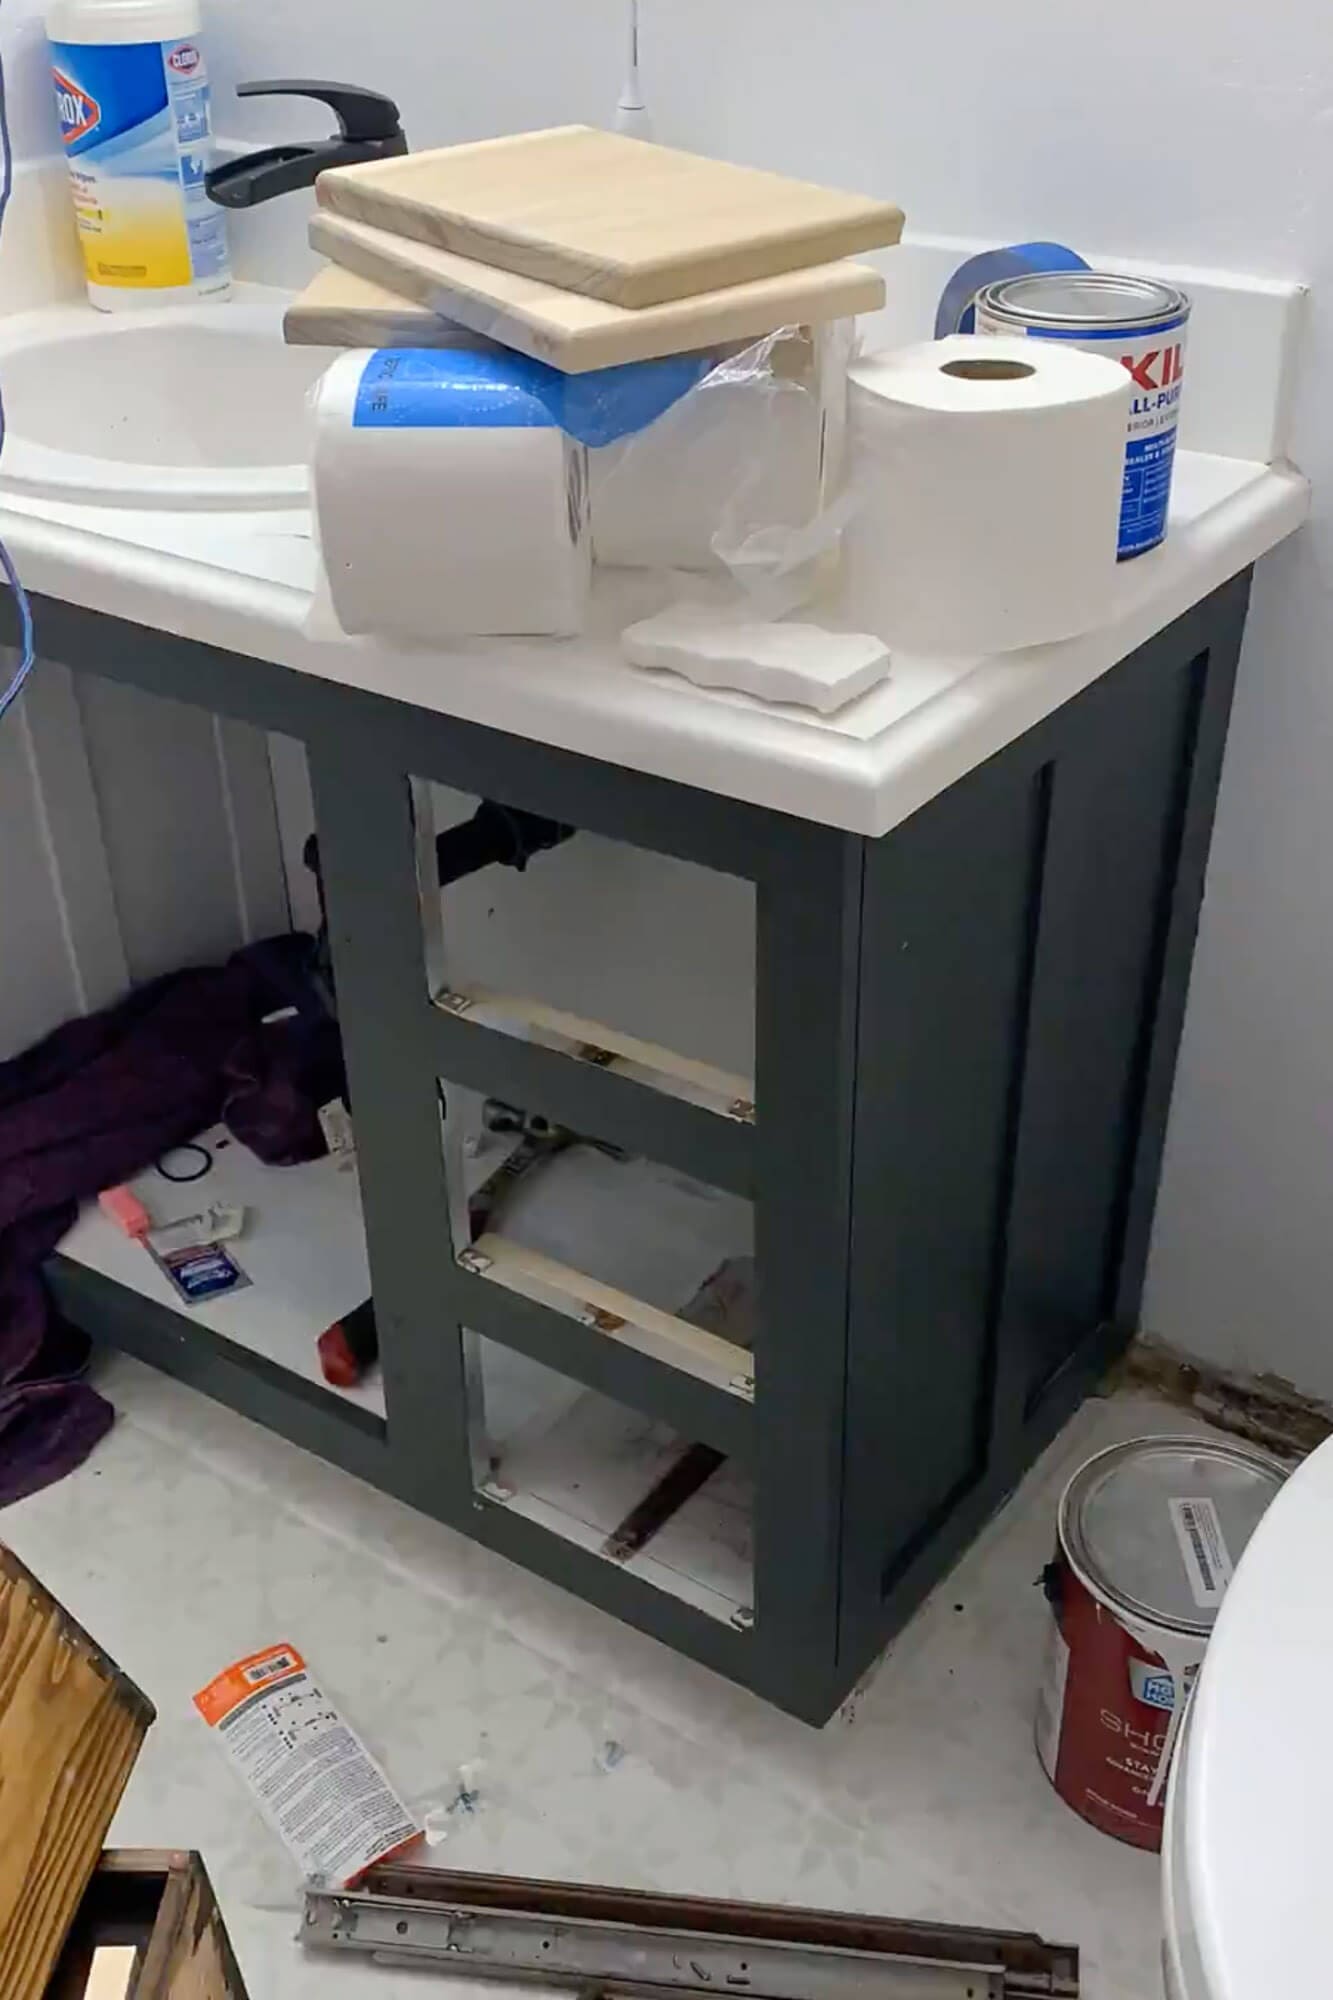
Step 7: Build or Replace the Vanity Doors (Optional)
In our bathroom, the cabinet box was worth saving but the old doors and drawer fronts were too worn and dated. You might be able to keep and paint your existing doors, but if they’re not in great shape, building or ordering new ones is a great upgrade.
I built simple shaker-style doors using basic tools and shared the full process in building shaker cabinet doors DIY. That tutorial walks through measuring, cutting, assembling, and prepping new doors.

If building doors isn’t your style, you can order custom doors online. When we remodeled our Omaha kitchen, I ordered doors instead of building them and shared all the details in my affordable kitchen remodel, including how to measure and place your order.

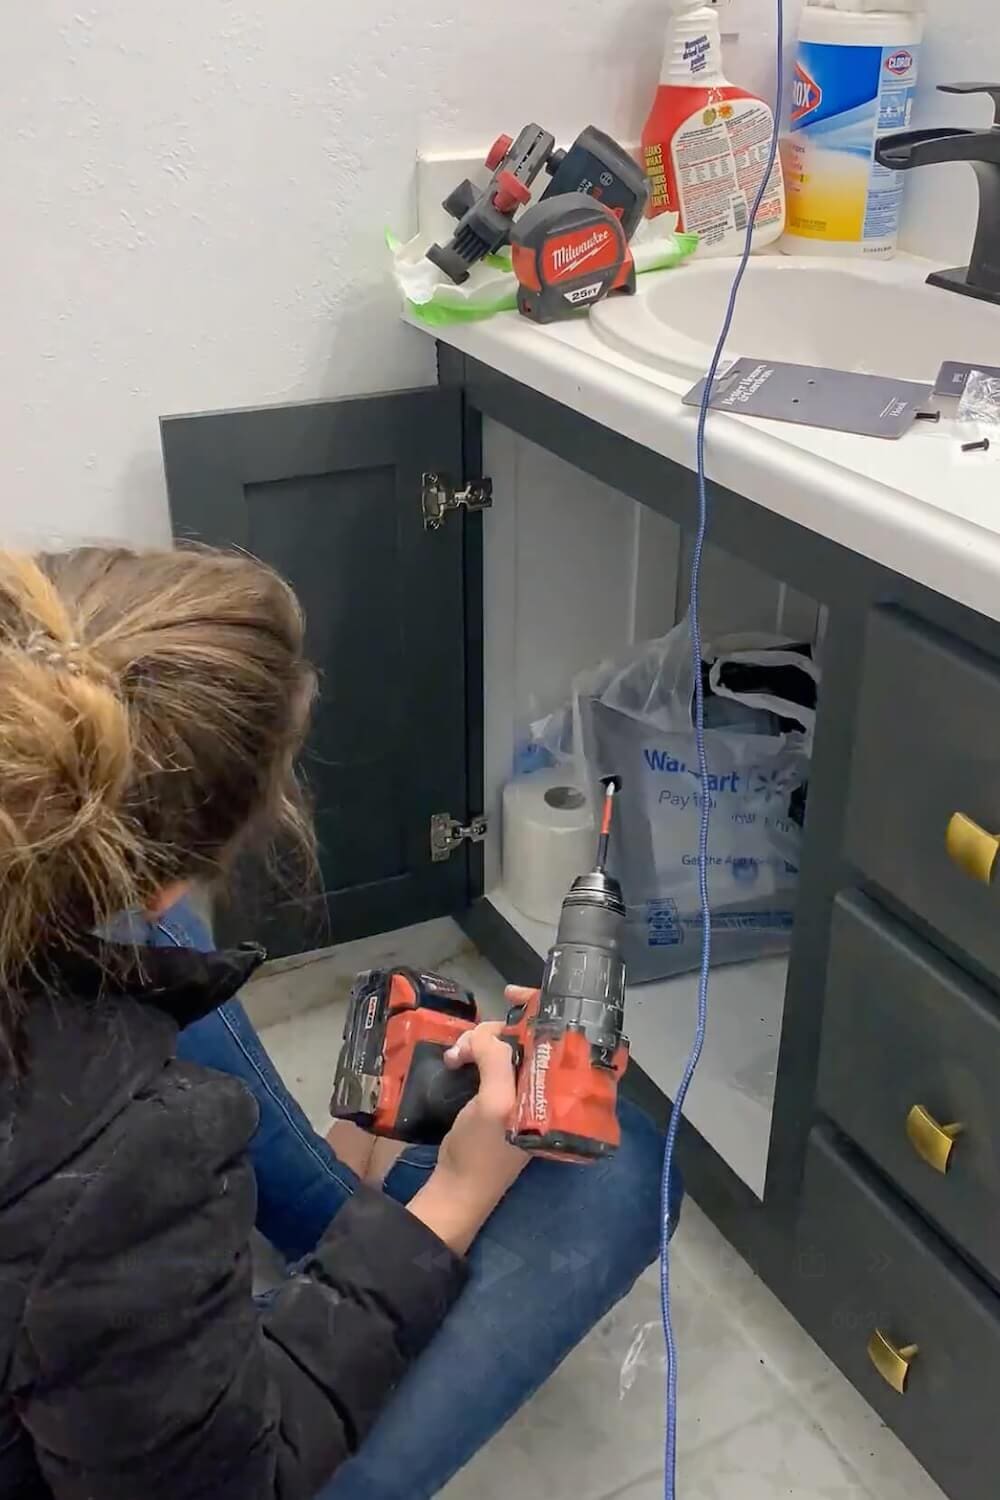
Step 8: Install Hinges and Rehang Doors
Once your doors and drawer fronts are painted and fully cured, add soft-close hinges if you’re upgrading, or reuse your existing ones. Soft-close hinges are a $20-per-cabinet upgrade that makes a vanity feel ten times more expensive.
Carefully rehang the doors and reinstall the drawer fronts on the freshly painted cabinet box. Check that everything opens and closes smoothly before moving on. Adjust the hinge screws if any door is sitting crooked.
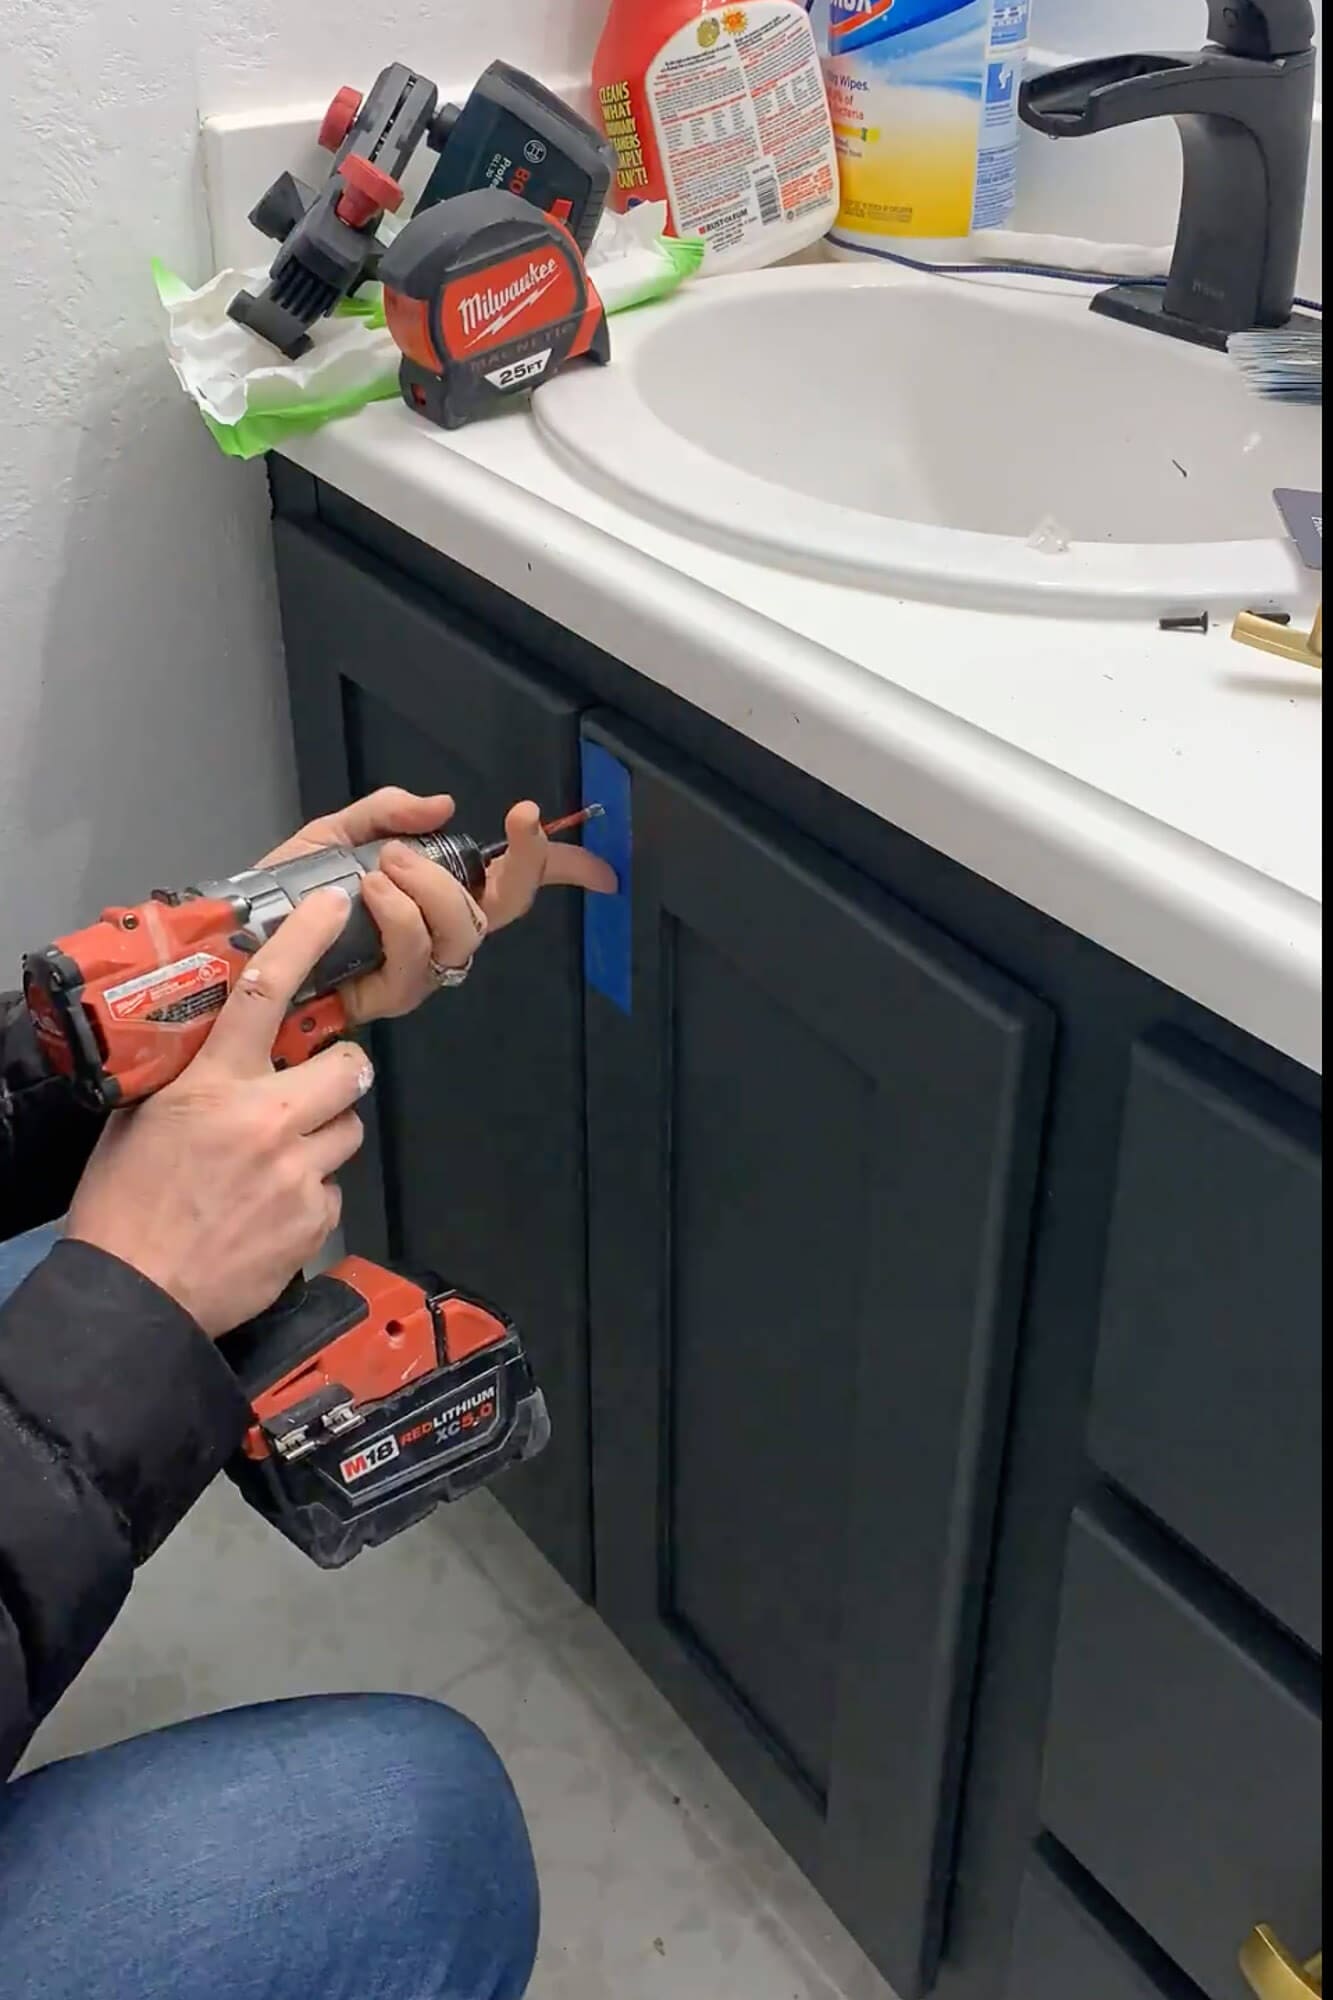
Step 9: Add New Hardware
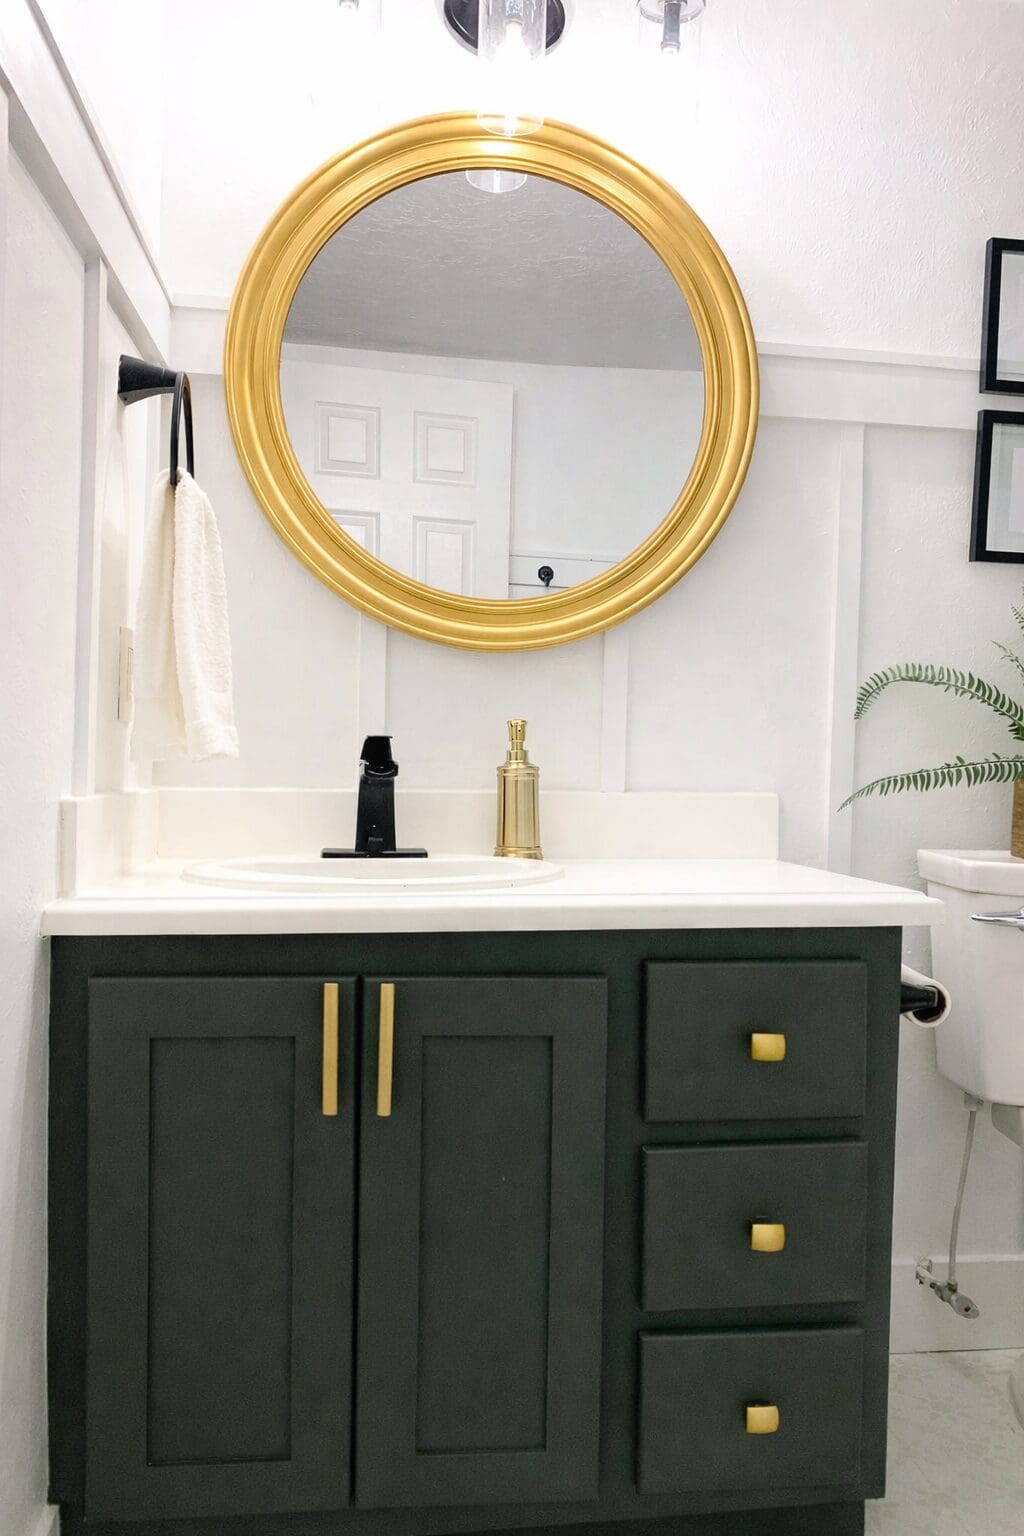
Gold or matte black cabinet pulls and drawer knobs are like jewelry for your painted bathroom vanity. They’re the detail that makes the whole project look intentional and finished.
To keep everything lined up, I use painter’s tape as a drilling template. Stick a strip of tape across the back of your pull, poke holes where the screws go, then move that tape to the door or drawer front. Drill through the marked spots and attach your hardware. It’s a quick way to get consistent placement without measuring every single door.
How to Paint Bathroom Cabinets (Same Method, Slightly Different Scale)
If you searched for how to paint bathroom cabinets instead of “vanity” specifically, the same exact method applies. A “bathroom vanity” technically just means the cabinet under your bathroom sink, so the prep, primer, paint, and hardware steps above are identical for any bathroom cabinet you’d want to paint: linen cabinets, medicine cabinets, even built-in shelving.
The key difference scales with size: bigger cabinets need more time, more paint, and a sprayer becomes more worth it as the surface area grows. For a single small vanity, a foam roller works fine. For a wall of bathroom cabinets, rent or borrow a sprayer.
For the longer-form deep dive that walks through every variation (kitchen cabinets, furniture, built-ins), see the ultimate step-by-step guide to painting cabinets and furniture.
Cost and Time: How Much a Bathroom Vanity Makeover Takes
One of the most common questions I get is how much it actually costs to repaint a bathroom vanity. The honest breakdown:
Materials: Around $50 to $100 for a typical small vanity. That covers a quart of bonding primer (around $25), a quart of cabinet enamel (around $35 to $50 depending on brand), sandpaper, a degreaser, and painter’s tape. New hardware (pulls and knobs) runs another $20 to $80 depending on what you pick. Soft-close hinges add $15 to $30 per cabinet if you’re upgrading.
Tools: If you already own a drill and a foam roller, your tool cost is essentially zero. A handheld sander is $40 if you need one, a paint sprayer rental is $30 to $50 per day. A sprayer is worth it for the smoothest finish but isn’t required.
Time: A focused weekend with cure time built in. Friday evening for prep (remove doors, clean, sand). Saturday for primer + first paint coat. Sunday for second paint coat + reinstall. The total ACTIVE work time is maybe 6 to 8 hours, but the project spans a weekend because of dry time between coats.
| Phase | Active hours | Notes |
|---|---|---|
| Remove doors and clean | 1 | Label every door for easy reinstall |
| Sand surfaces | 1 | 120 grit, just break the sheen |
| Prime (1 to 2 coats) | 1 to 2 | Plus full dry time per can |
| Sand again, fine grit | .5 | 220 grit for smooth finish |
| Paint (2 to 3 coats) | 2 to 3 | Thin coats with full dry between |
| Reinstall + hardware | 1 | Soft-close hinges if upgrading |
Optional Upgrades for Your Painted Bathroom Vanity
If you want to take your DIY bathroom vanity makeover a little further, here are a few upgrades that pair beautifully with a freshly painted cabinet:
- Swap the faucet for a modern matte black or brushed gold one
- Swap the shower fixture for a modern black one to match
- Replace the basic builder mirror with a gold-framed mirror. See my DIY gold bathroom mirror tutorial using Rub ‘n Buff
- Update the lighting and towel ring so the metal finishes feel intentional
- Add a marble or quartz remnant countertop if your existing one is dated
- Replace builder-grade plastic drawer slides with full-extension soft-close slides
How to Make Painted Bathroom Vanity Cabinets Last Longer
Once you’ve done the work of painting a bathroom vanity, these simple habits help the finish stay beautiful for years instead of months:
- Give your paint extra cure time before heavy use or aggressive cleaning. Cabinet enamel needs 2 to 4 weeks to fully cure even though it feels dry in 24 hours.
- Avoid harsh cleaners on the painted surfaces. Use mild soap and a soft cloth.
- Keep humidity under control with a fan or open window during showers, especially while the paint is still curing.
- Touch up small chips early so they don’t spread. Save a small jar of your paint for this.
- Re-caulk around the sink and countertop every couple of years to keep water from getting behind the cabinet box.
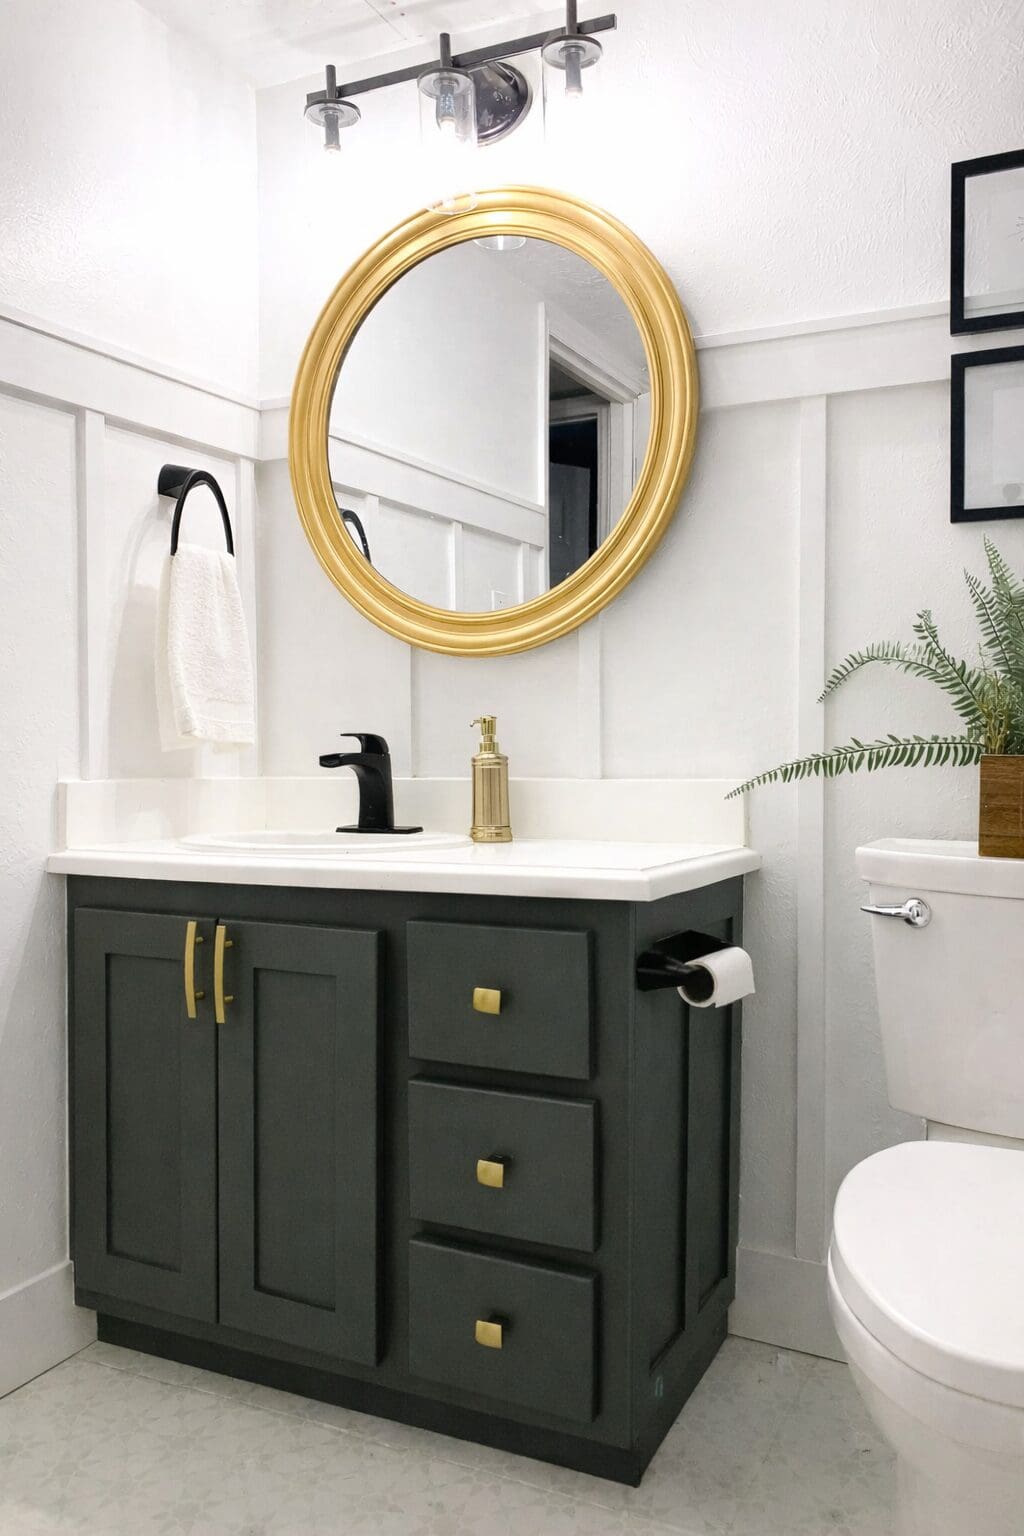
Painted Bathroom Vanity: Before and After
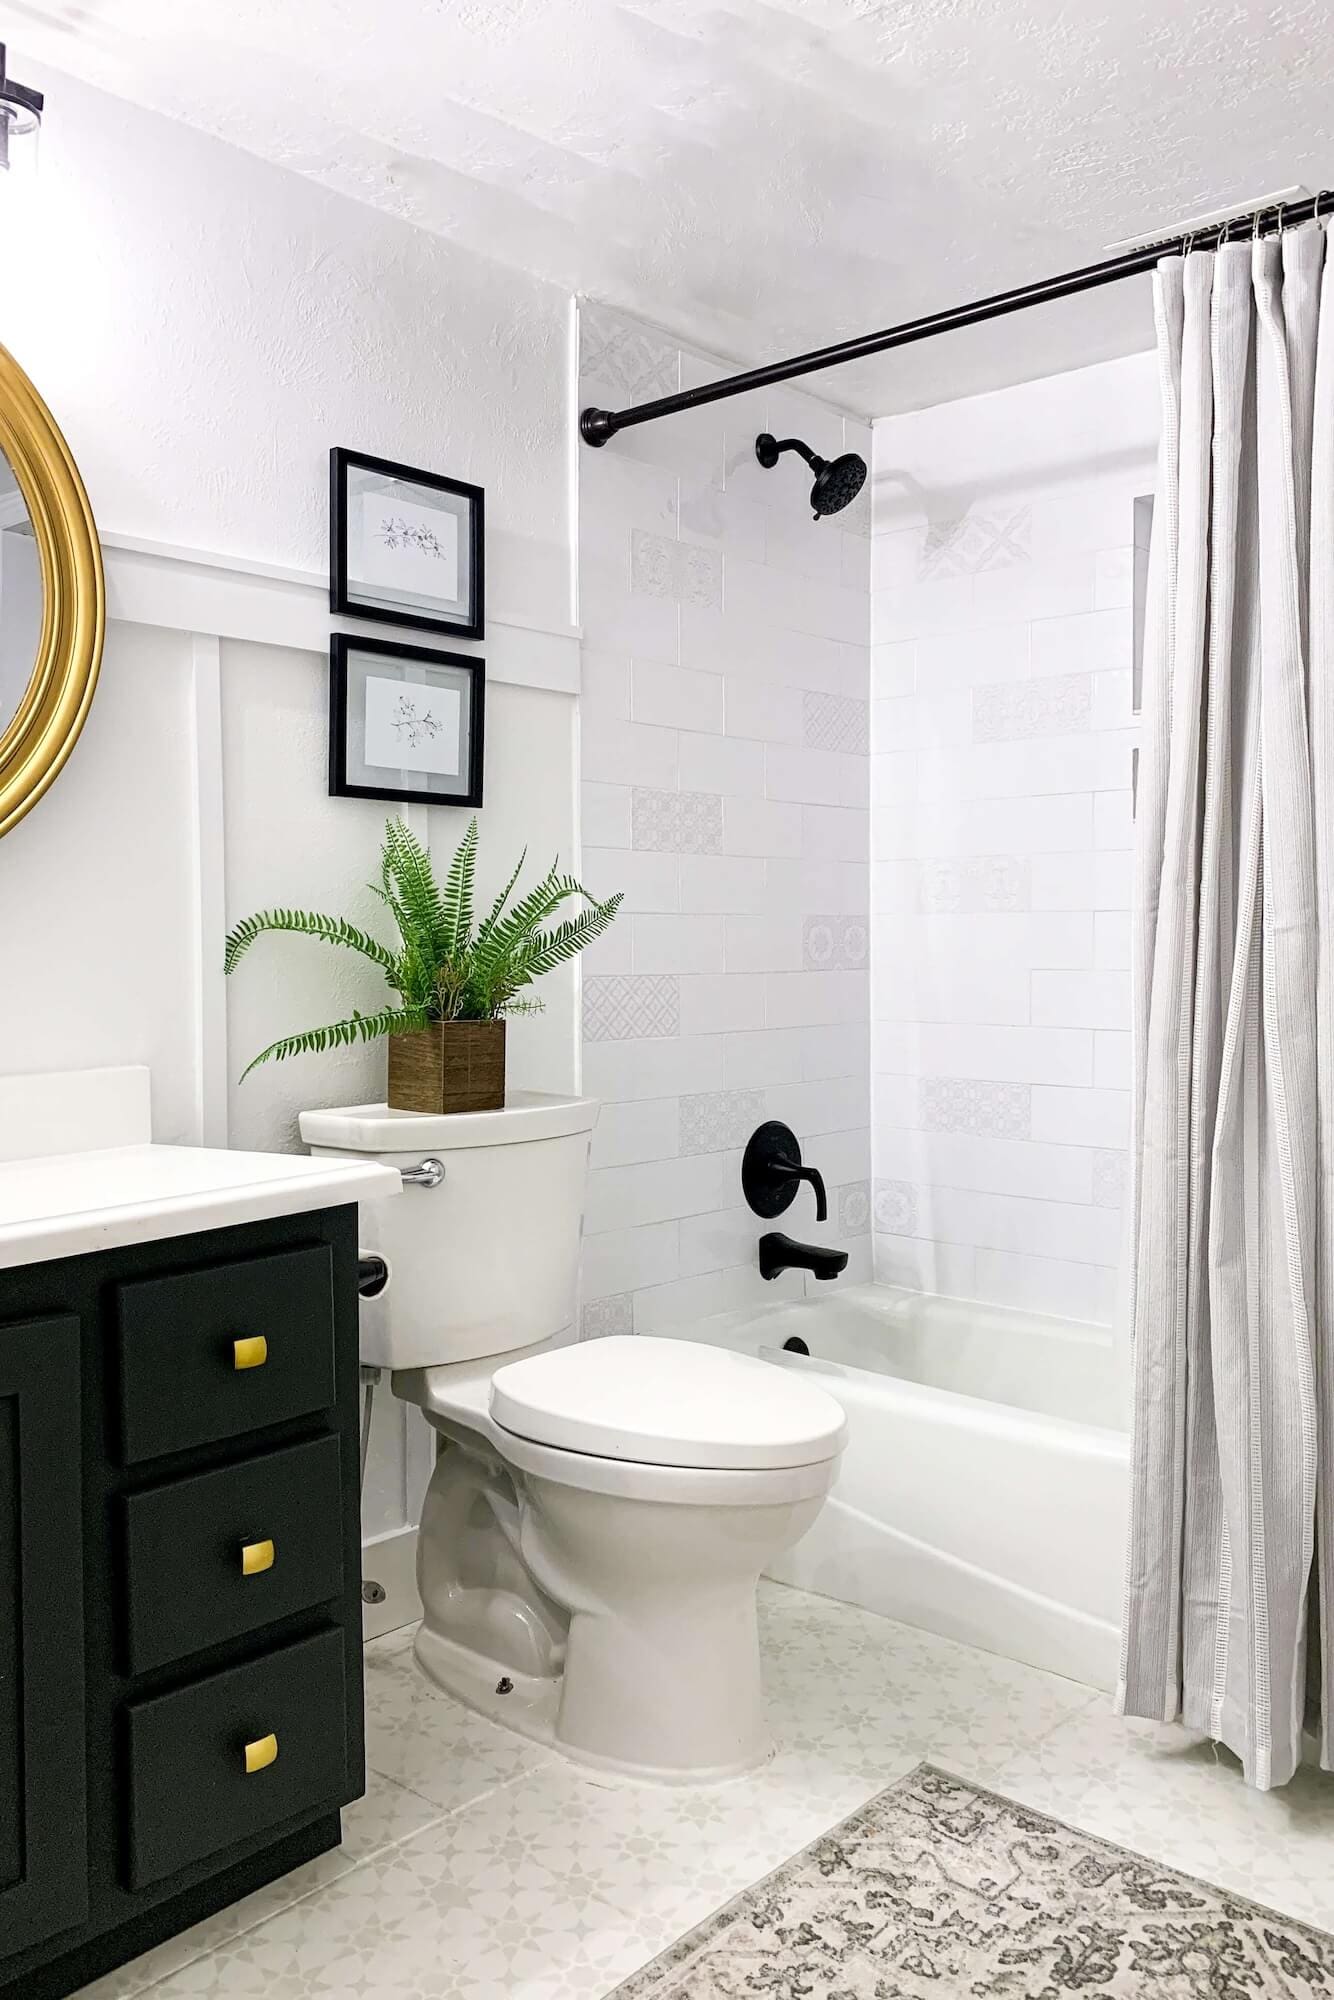
Once everything was painted, reassembled, and styled, the vanity felt completely new. Seeing how to paint a bathroom vanity transforms an entire room makes me want to redo every builder-grade vanity in the house. The deep paint color, simple shaker doors, soft-close hinges, and modern hardware all work together to make the bathroom feel intentional instead of builder-basic.
More Small Bathroom Remodel Projects to Try
If you’re working on a bigger bathroom makeover, these projects pair really well with a painted vanity:
- Small bathroom remodel hub (all 7 projects in one place)
- DIY gold bathroom mirror with Rub ‘n Buff
- How to build a DIY shower niche
- How to tile a shower wall
- Painting bathroom floor tiles on a budget
- DIY board and batten bathroom wall
- How to get rid of mold in a shower
And for the deeper-dive cabinet painting tutorial that covers kitchen cabinets, furniture, and built-ins:
📌 Save This Bathroom Vanity Tutorial for Later
Pin now and come back anytime you’re ready to tackle your own bathroom vanity makeover.
Share Your Project With Me!
If you try this project, tag me on Instagram. I’d love to see what you create and how you make this vanity makeover your own.
FAQ About How to Paint a Bathroom Vanity
A high-quality cabinet enamel or urethane-reinforced trim enamel in satin or semi-gloss handles bathroom moisture and daily cleaning. Sherwin-Williams Emerald Urethane Trim Enamel is my favorite because it self-levels and cures to a hard, durable finish. Avoid wall paint entirely.
Yes, especially on factory finishes, laminate, or previously glossy surfaces. Bonding primer is the difference between paint that lasts ten years and paint that peels in six months. Stix and Zinsser BIN are both excellent choices.
Light scuff sanding is still best, even if you’re using a bonding primer. If you absolutely have to skip sanding, use a deglosser plus a high-quality bonding primer, but be aware that durability may suffer compared to a properly sanded surface.
Yes. Clean thoroughly, scuff-sand, apply bonding primer (this is non-negotiable for laminate), then top with a cabinet enamel. Avoid heavy heat exposure on thermofoil doors during the cure period since the heat can cause the foil layer to lift.
Both work. Satin looks softer and hides imperfections better. Semi-gloss wipes clean more easily and reflects more light. Match your trim and door sheens in the bathroom for visual consistency.
Dry to the touch in a few hours, ready for a re-coat in 6 to 8 hours, but full cure takes 7 to 30 days depending on the brand. Be gentle with the surfaces during the cure period. No scrubbing, no banging, no heavy cleaning.
Around $50 to $100 in materials for a typical small vanity, plus another $20 to $80 for new hardware if you want to upgrade. Hiring it out runs $300 to $800 depending on your area, so DIY saves the bulk of the cost.
A focused weekend with cure time built in. Active work is 6 to 8 hours total: prep on Friday evening, primer and first coat Saturday, second coat and reinstall Sunday. Don’t try to rush it into a single day or the paint won’t have time to cure between coats.
You can, but the finish won’t be as clean. Removing the doors and drawer fronts gives you better access to every surface and prevents drips and runs at the hinges. The 15 minutes it takes to remove and re-hang is worth it.
If you used a high-quality cabinet enamel like Sherwin-Williams Emerald, no. The paint itself is durable enough. If you used a less specialized paint, a clear polyurethane or polycrylic top coat adds a layer of protection against scratches and water rings. Use water-based polycrylic over white or light colors to avoid yellowing.
Doing the whole bathroom? This vanity tutorial is one of 7 projects in my DIY small bathroom remodel. The hub post has the full breakdown of every project, the cost-saving framework, and links to all the other tutorials.