


How to Build a Porch Roof (Craftsman Gable Style)


Updated July 13, 2026
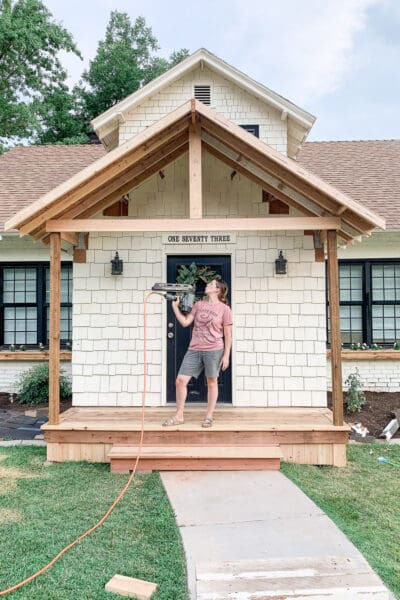
Ready to learn how to build a porch roof? We built this craftsman gable porch roof ourselves for a few hundred dollars in materials, spread over a couple of weekends – and I’d never built a roof before. This was the big one, the part of the whole front porch project that finally made it look like it had always been there. If you can cut a board and drive a screw, you can follow along. The whole thing is really just a wood triangle sitting on top of two posts, attached to the house, with shingles on top. I’ll explain every piece as we go – the same way I had to figure it out myself, one board at a time, with my kids watching from the step.
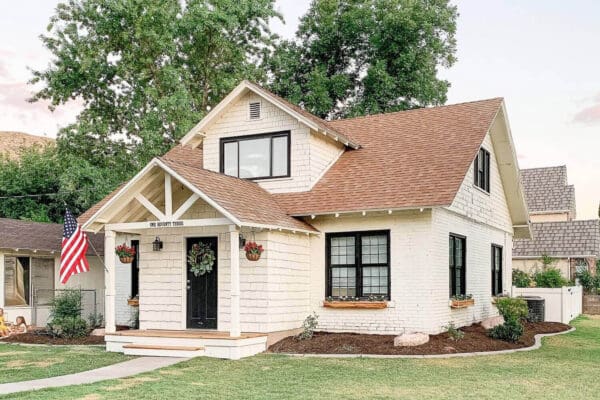
If you’re following along, this is the grand finale. In Part 1 I built the foundation and frame, in Part 2 I trimmed it out and laid the deck boards, and in Part 3 I built the step. Now we’re putting a roof over the whole thing.
How do you build a porch roof?
To build a porch roof, you first attach metal brackets into the house’s solid framing, then connect them to two front posts with a flat frame of beams – one beam across the front and one running back to the house on each side. Then you build the triangle: a ridge board across the top with sloped rafters running down to the frame. Cover it with wood panels, a water barrier, and shingles that match your house. A simple triangle-shaped gable roof like mine is the most beginner-friendly.
Table of Contents
- How do you build a porch roof?
- Watch the Full Front Porch Build
- How to Build a Porch Roof: At a Glance
- Materials and Tools to Build a Porch Roof
- Step-by-Step: How to Build a Porch Roof
- Step 1: Open Up the House and Attach the Brackets
- Step 2: Trim the Posts and Build the Flat Frame
- Step 3: Set the Ridge Board
- Step 4: Frame the Roofline With Fascia
- Step 5: Cut and Hang the Rafters
- Step 6: Cover the Frame With OSB Panels
- Step 7: Add the Craftsman Gable Bracket
- Step 8: Wrap the Columns
- Step 9: Roof It (Underlayment, Drip Edge, Shingles)
- Step 10: Paint and Finish
- How Much Does It Cost to Build a Porch Roof?
- Do You Need a Permit to Build a Porch Roof?
- How Do You Attach a Porch Roof to the House?
- More Outdoor and Curb Appeal Projects to Try
- 📌 Save This Porch Roof Build for Later
- How to Build a Porch Roof FAQs
Watch the Full Front Porch Build
Want to see the whole thing come together? Watch the full video of the front porch build, from framing to deck boards to this roof. Honestly, if any step below has you scratching your head, watching it happen for ten seconds explains it better than a paragraph ever could.
How to Build a Porch Roof: At a Glance
- Cost: roughly $300 to $700 in materials (less if you reuse shingles like I did)
- Time: about a week of build days, spread over a couple of weekends
- Difficulty: intermediate — the cuts are beginner-friendly, but you’re working up high and attaching to your house
- Permit: usually required, since it attaches to your home’s structure — check your city first
- Helpers: at least one, and a harness for whoever gets on the roof
Here’s the whole series, so you can see where the roof fits:
- Part 1: Foundation and frame covers the ledger board, posts, footings, and joists.
- Part 2: Trim and deck boards covers the mitered border trim and decking.
- Part 3: Building the step covers the box step and skirting.
- Part 4 (you’re here): The roof plus the gable detail and finishing.
Porch Roof Words, Translated
Roofing has its own language, so here’s your cheat sheet. Come back to this box anytime:
- Posts – the two vertical supports at the front corners. They become the pretty columns later.
- Beams – the horizontal boards that sit flat on top of the posts and run back to the house. Together they make a flat frame the roof sits on.
- Ridge board – the board at the very top of the triangle. The peak.
- Rafters – the sloped boards that run from the ridge down to the beams. The skeleton of the roof.
- Gable – the triangle shape you see from the street.
- Soffit – the flat underside of a roof’s overhang.
- OSB (sheathing) – big flat wood panels, like plywood’s budget cousin, that turn the skeleton into a solid roof surface.
- Fascia – the trim boards that cover the raw edges of the roof and make it look finished.
- Underlayment – a water-resistant layer that goes between the wood and the shingles. Your backup rain protection.
- Drip edge – a thin metal strip along the roof edges that makes water drip off instead of sneaking underneath.
- Hurricane ties – small metal connectors that lock each rafter to the beam so the roof stays put in wind.
Materials and Tools to Build a Porch Roof
Here’s what I used.
- The two 4×4 pressure-treated posts (already standing – we set these in concrete back in Part 1)
- 2×6 lumber for the beams, ridge board, and rafters (2×6 just means the board size – about 1.5″ x 5.5″)
- Metal brackets to attach the frame to the house
- Hurricane ties (small metal connectors) to lock the rafters to the beam
- OSB panels for the roof surface
- Roofing underlayment (I used the synthetic roll kind – tougher than old-school felt paper)
- Metal drip edge
- Shingles to match the house (I reused and matched the existing shingles)
- Plastic-cap roofing nails (they have a little plastic washer that keeps the underlayment from tearing)
- Cedar boards for the fascia trim and for wrapping the columns
- 3-inch wood screws
- Kreg pocket-hole jig (a little tool that lets you drill angled, hidden screw holes)
- Miter saw and circular saw (the miter saw cuts angles; the circular saw is the handheld one)
- Drill/impact driver, framing nail gun, and a brad nailer for the trim
- Chalk line, level, speed square, tape measure, pencil
- A sturdy extension ladder, a step ladder, safety glasses – and a safety harness for anyone getting on top of the roof
Want more of my go-to gear? Browse my favorite DIY tools and supplies on my Amazon storefront.
Step-by-Step: How to Build a Porch Roof
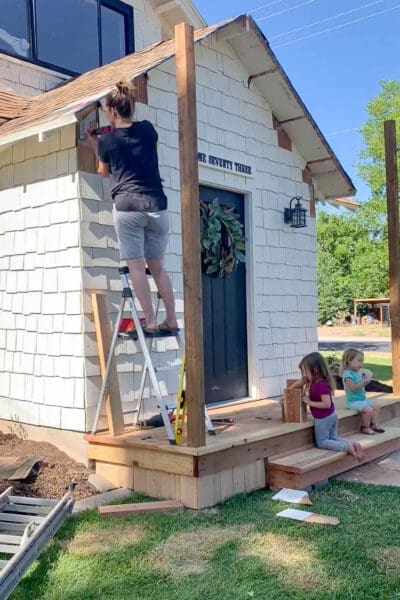
Fair warning, this is the longest and most involved part of the whole build. Because a porch roof attaches to your house and you’re working up on a ladder, it’s a bigger, riskier project than the rest of this series. Check whether your city requires a permit before you start, and if you’re not comfortable up high, it’s completely worth calling in a pro or an experienced friend. This was a full-on family project for us – you’ll see my sister, my husband, and my brother all show up in these photos, and my kids supervised from the step. Take it one step at a time.
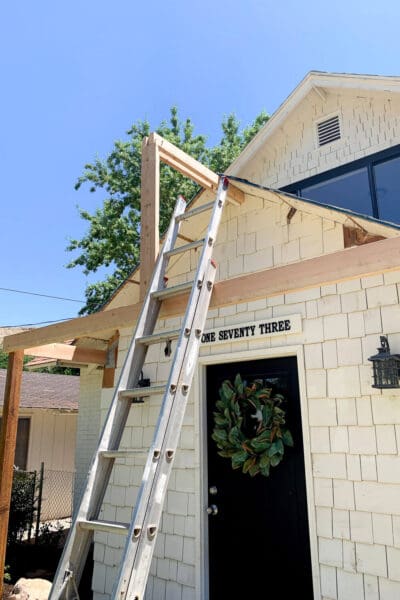
Step 1: Open Up the House and Attach the Brackets
Before any framing goes up, the house has to be ready to hold it. This connection carries the whole roof, and every board that follows builds off of it – so it comes first.
Where the new roof would meet the house, I opened up the house’s eave – I pulled off part of the soffit (the flat underside of the roof overhang) and a few rows of the house’s shingles, so I could reach the solid wood structure underneath.
You never want to attach a roof to just the pretty outer layer (the siding); it’s not strong enough. With the framing exposed, I screwed in metal brackets – those are what the roof’s beams will rest on in the next step. I used brackets on purpose so the whole roof isn’t hanging on a single row of screws.
Pro tip: Make sure your screws bite into the actual wood framing of your house, not just the siding or trim. Poke around until you find solid wood – you’ll feel the difference when the screw grabs.
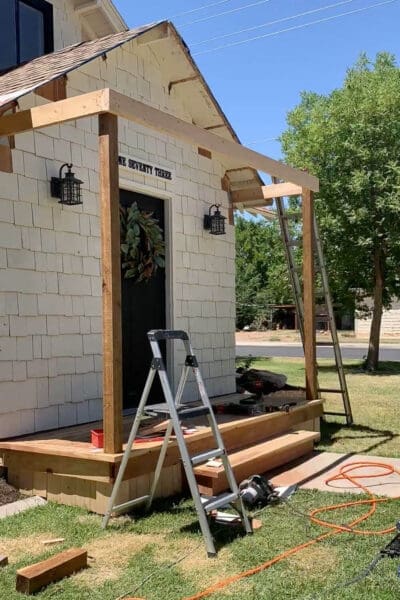
Step 2: Trim the Posts and Build the Flat Frame
Now the roof gets its flat, level frame of beams sitting up in the air – picture a tabletop with only two legs, where the back edge is held up by the brackets you just put on the house.
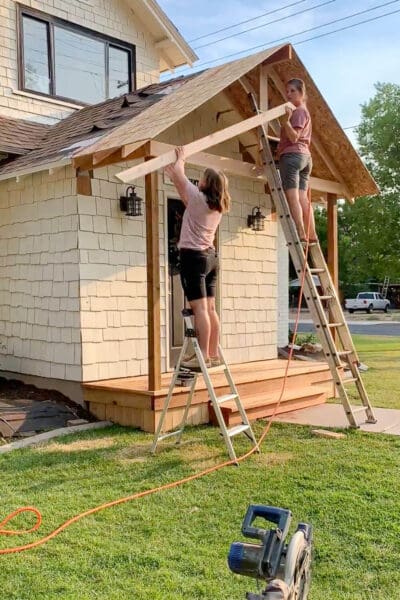
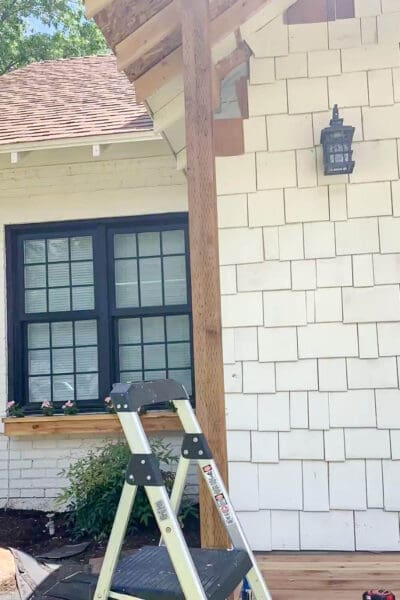
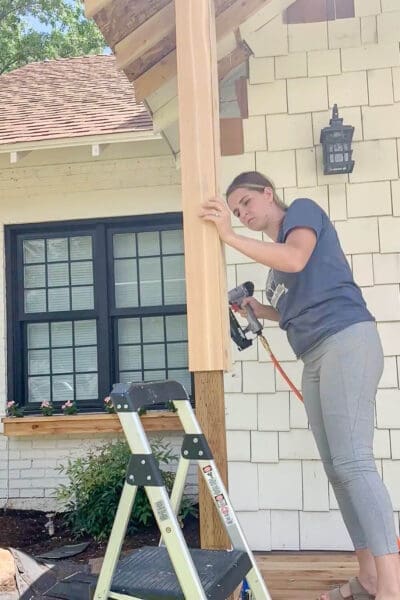
The two 4×4 posts at the front corners have been standing since Part 1, when we set them in concrete – I left them extra tall on purpose so I could cut them to the exact height now. I checked each post with a level on two sides to make sure it was still perfectly vertical, marked my height, and trimmed the tops with my circular saw right up on the ladder.
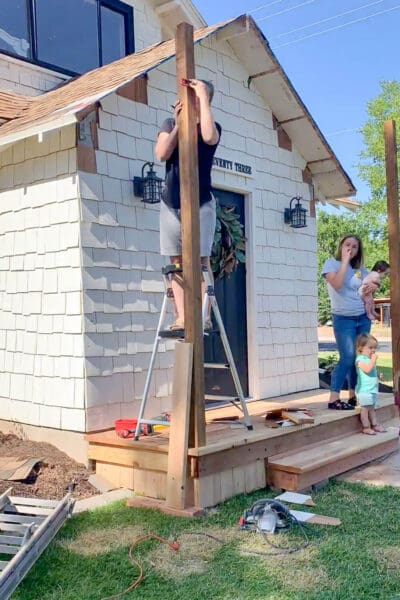
Then came three beams, all connected flat on top: one running from the house out to each post along the sides (resting on those Step 1 brackets), and one across the front connecting the two posts. I held my level against every board before fastening – if this frame isn’t level, everything built on top of it will be crooked too, so this is the step to be picky.
A few real-life notes from my build: I marked and trimmed the boards in place with my circular saw instead of hauling them down to remeasure (way fewer ladder trips), and I attached the frame with a framing nail gun plus structural screws. My sister steadied boards and ladders all day. This part goes so much faster with two people.
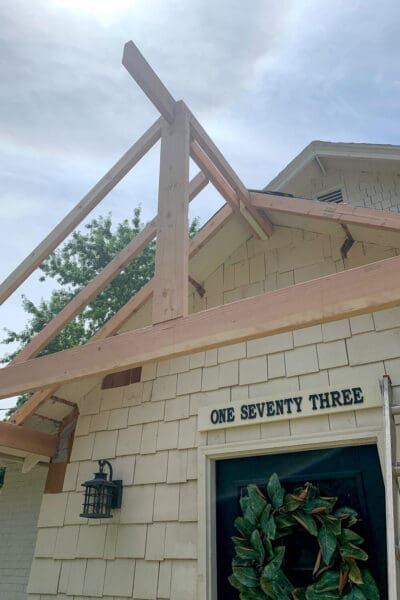
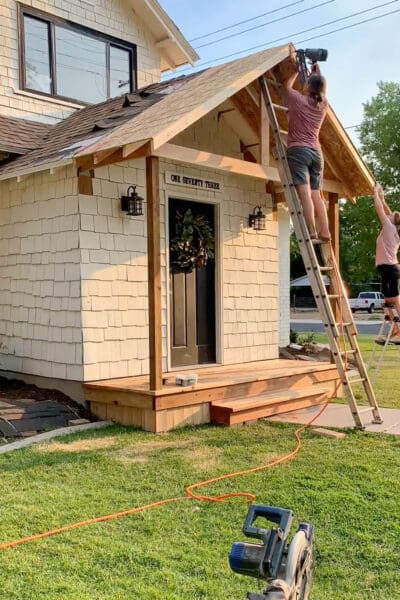
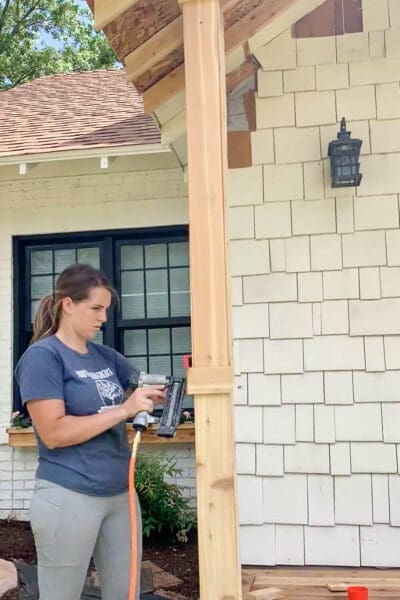
Step 3: Set the Ridge Board
The ridge board is the very top of the triangle – the peak of the roof. Every sloped board you add next will lean against it, so it needs to be dead center and level.
Here’s how I held it up there: I found the exact center of my front beam and stood a short vertical support post on it, checked plumb with my level (plumb just means perfectly vertical), and fastened it.
Then the ridge board runs from the house out to the top of that support – attached to the house at the back, resting on the support at the front. I screwed it on with pocket-hole screws, which go in at an angle from behind so you never see them on the finished porch.
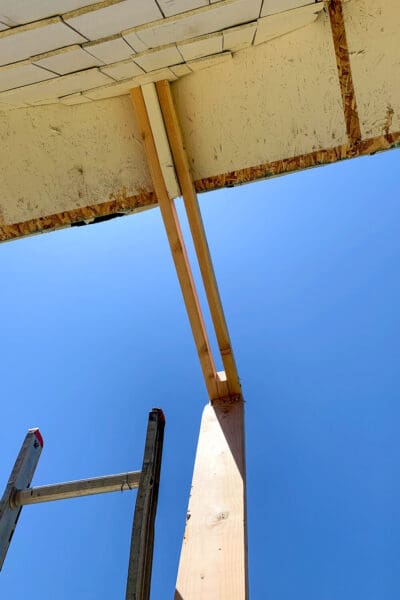
Take your time here: if the peak is off-center, one side of your roof will be steeper than the other, and you’ll see it from the street forever.
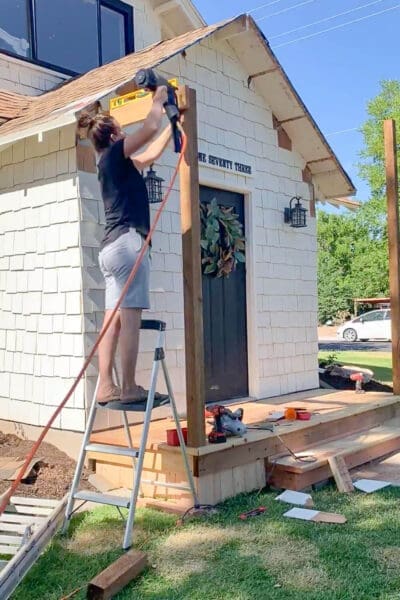
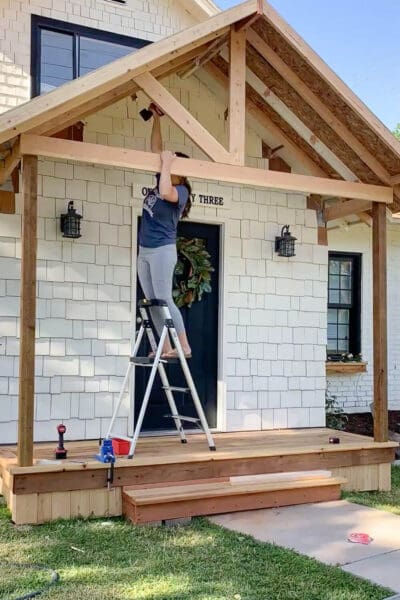
Step 4: Frame the Roofline With Fascia
Fascia is the trim board that outlines the edges of a roof – and on my build, the first round of it went up right after the ridge. One set runs against the house, following the slope of the new roofline, and one set outlines the gable triangle at the front. That drew the shape of the roof before a single rafter was in, and it gave the rafters and roof deck a clean edge to build to.
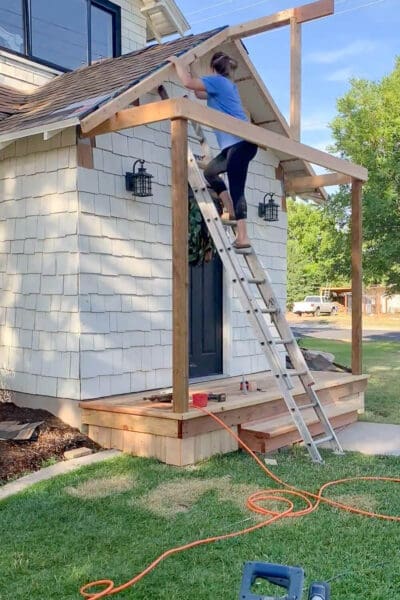
We ran cedar boards up both sloped edges, from the beam to the ridge on each side. (There’s one more round of fascia later, after the plywood goes on – that one caps the roof edge itself.)
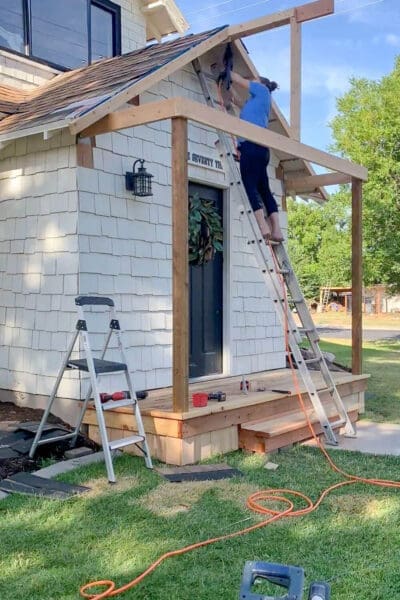
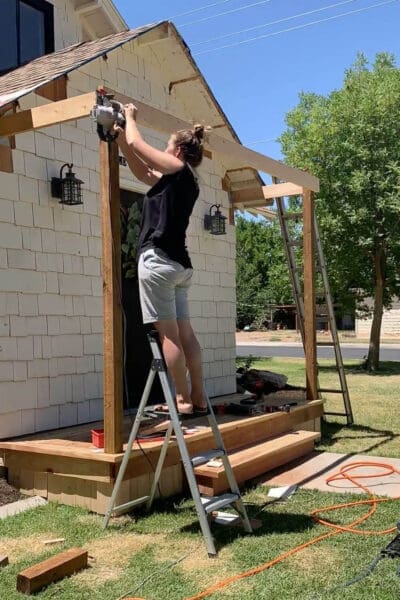
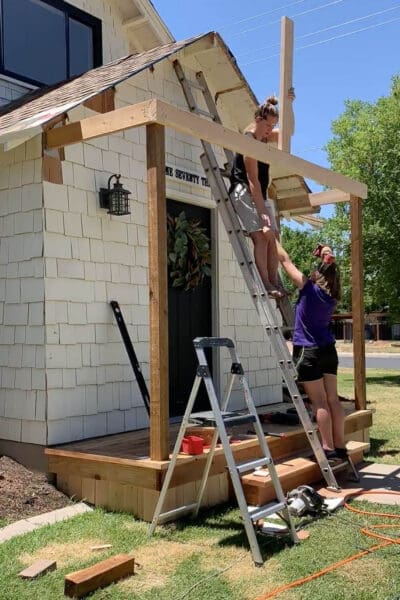
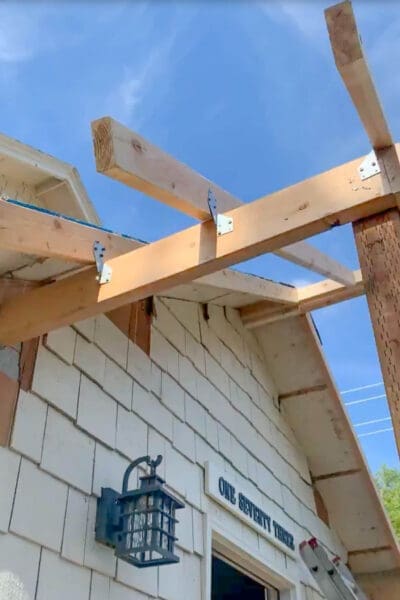
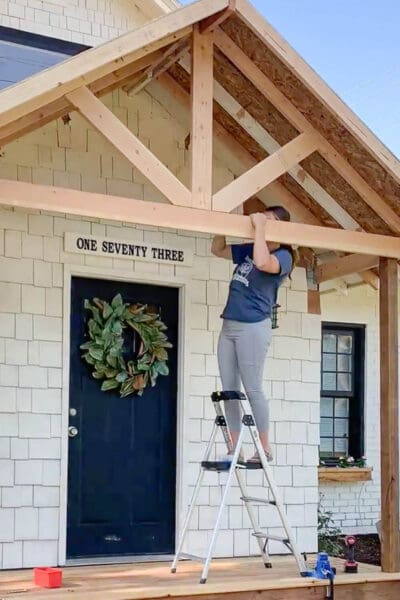
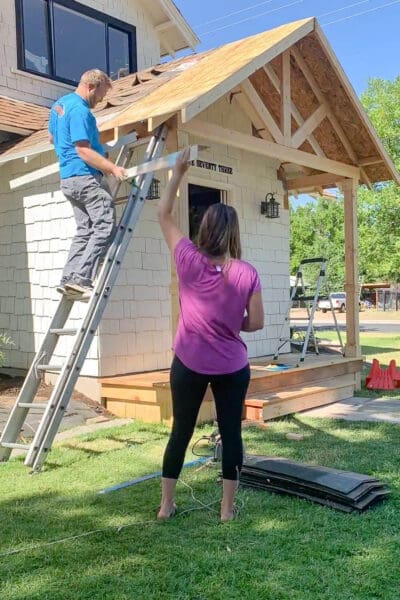
Step 5: Cut and Hang the Rafters
The rafters are the sloped boards that run from the ridge board down to the front beam – the skeleton of the roof. With the fascia outlining the triangle, the rafters fill in behind it, and this is where it starts actually looking like a roof.
Each rafter needs an angled cut at the top so it sits flat against the ridge. Don’t stress about calculating the angle: I held a board up in place, marked where it met the ridge, cut it, and test-fit it.
Once that first test rafter fit right, I used it as the template for all the rest. At the top, each rafter gets nailed into the ridge at an angle; at the bottom, it sits on the beam and gets locked down with a hurricane tie, a small metal connector that keeps the roof from lifting in wind.

I spaced my rafters about 24 inches apart, and here’s the one thing to plan for: the OSB panels that go on next have to be screwed into rafters along their edges. So I nudged my spacing a bit so panel edges would land on a rafter, and added an extra rafter where a gap got too wide. I also added a notched board at the front so the roof overhangs a little instead of stopping flush.
Pro tip: Cut ONE rafter, test-fit it, and only then cut the rest. Wood is never perfectly straight, so dry-fit before you commit.
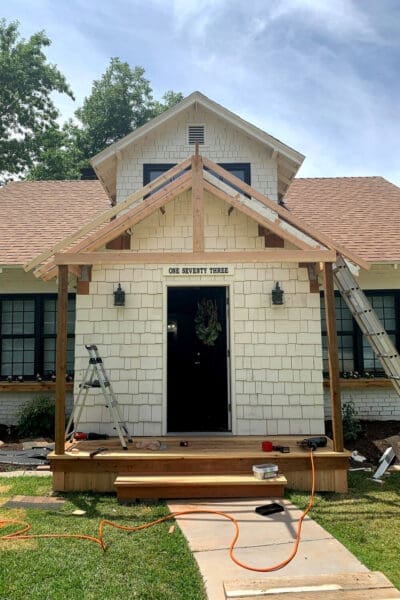
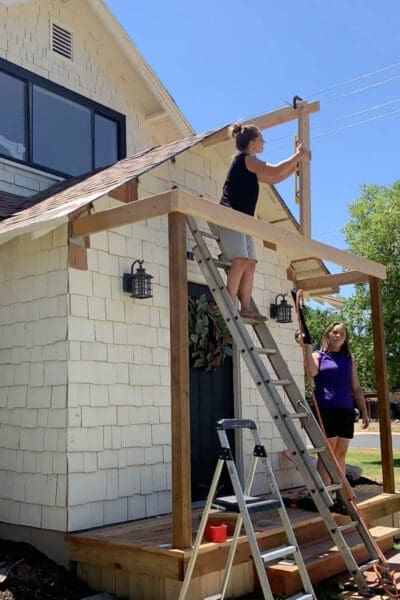
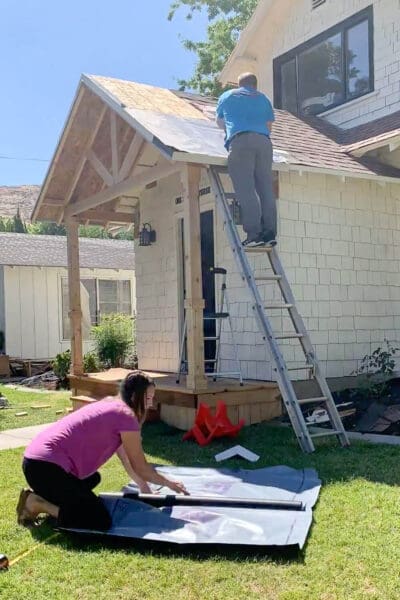
Step 6: Cover the Frame With OSB Panels
Time to turn the skeleton into an actual solid roof. OSB is that speckled board you see on every construction site – big, flat panels that get screwed down on top of the rafters.
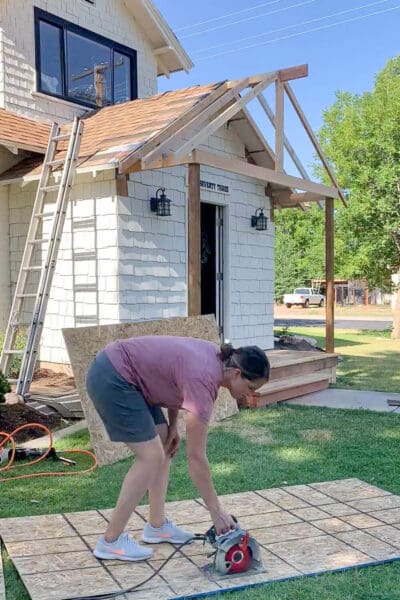
Here’s the trick that saved us: I laid the panels out flat on the lawn first, marked my cut lines in a grid, and cut everything to size down on the ground with my circular saw – so much easier and safer than measuring and cutting up on a ladder.

Then I handed the panels up to my husband, who screwed them down from on top of the roof. One more trick: once a panel is lying on the rafters, you can’t see the rafters under it anymore, so snap chalk lines across each panel marking where the rafters run underneath. Then every screw hits wood on the first try.
Once the panels were down, we capped the exposed plywood edge with that second round of cedar fascia – nailed right over the edge of the OSB, up both slopes. That’s the finished edge you see from the street, and it’s what the drip edge attaches to later.
This is the “oh my gosh, it looks like a real roof” moment. It’s also the sweatiest one.
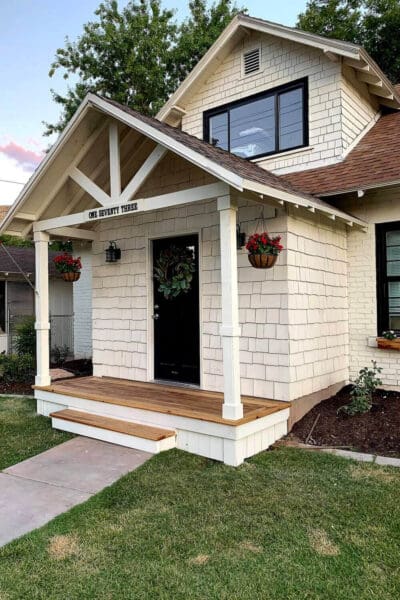
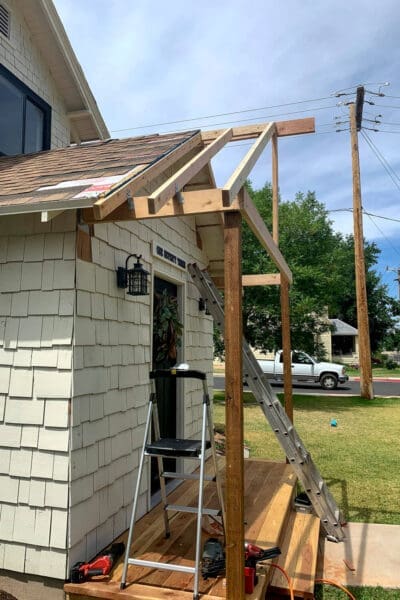
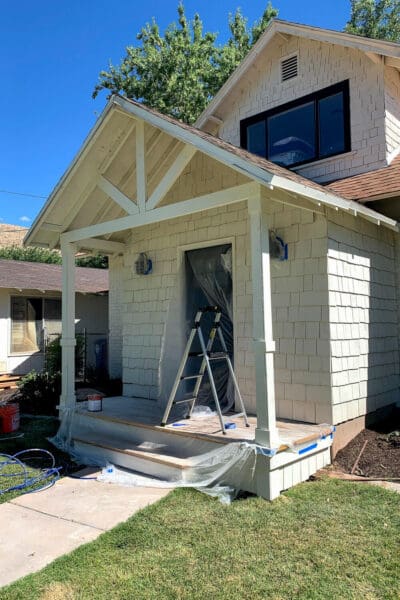
Step 7: Add the Craftsman Gable Bracket
The gable is the triangle you see from the street, and this decorative wood bracket inside it is what gives the porch all its character. With the roof decked, I added the bracket pieces up inside the gable.
I’m not going to pretend I did fancy math here. I cut angled pieces, held them up until they looked right, and measured halfway between the peak and the beam so the crossbar looked centered. Everything attaches with hidden pocket-hole screws plus small metal brackets at the joints. I cut two of every piece so both sides matched perfectly.
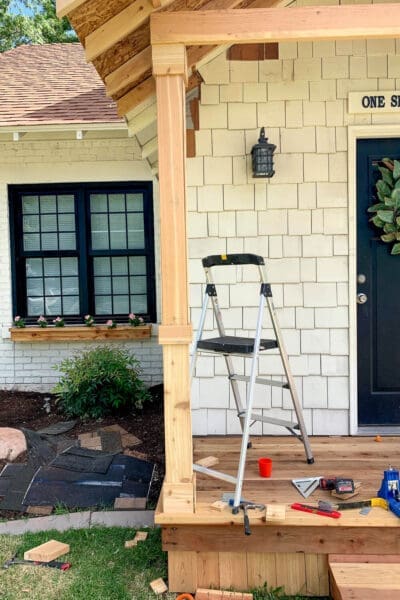
Step 8: Wrap the Columns
The two posts holding everything up were still bare pressure-treated 4x4s – strong, but not exactly pretty.
So before roofing day, I dressed them up by wrapping all four sides in smooth cedar boards, with the corners cut at 45-degree angles so they meet like a picture frame – no visible seams. I go through this whole process in detail in my DIY Wood Porch Column Wraps post, so head there for the step-by-step.
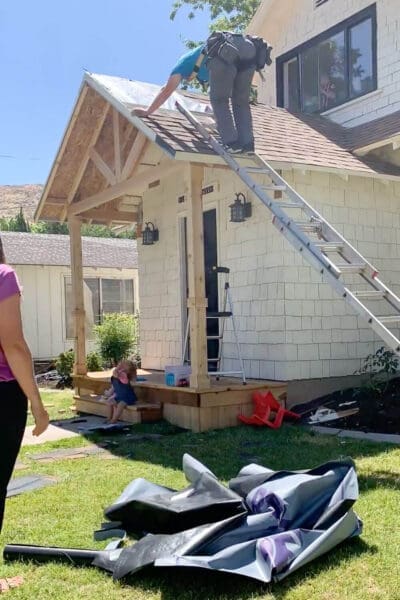
Step 9: Roof It (Underlayment, Drip Edge, Shingles)
Roofing sounds scary, but it’s really just layers, and they go on in an order that makes sure water always runs OVER each seam, never under it. Here’s the order:
Underlayment first. This is your water-resistant backup layer. We actually rolled ours out on the lawn and cut the pieces to size on the ground before carrying them up – same trick as the OSB, and it made the on-the-roof part quick. Start at the BOTTOM edge of the roof and work up, overlapping each new row about 4 inches over the one below, so water sheds over every seam like fish scales. Tack it down with plastic-cap roofing nails.
Drip edge. Screw this thin metal strip along the edges of the roof. It makes water drip off the edge instead of curling back under the wood. (I reused the drip edge I’d saved when I pulled shingles off the house. Free is free.)
Shingles. These also start at the bottom and work up, each row offset from the one below – like how bricks are laid, so no two seams ever line up. Nail each shingle along its middle. I matched the house’s existing shingles (and reused some) so the porch looks like it was always there.
Ridge cap. The peak gets its own special shingles that fold over the top like a little tent, sealing the last seam.
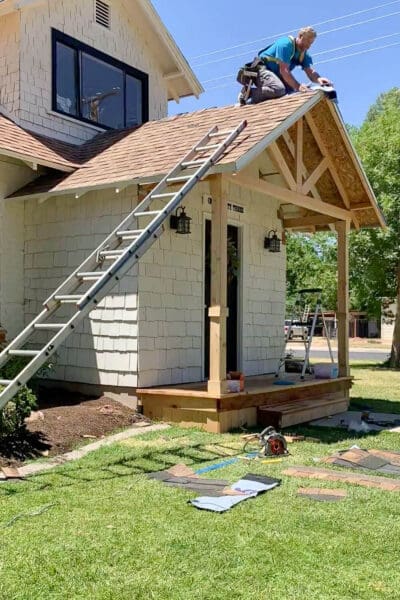
Safety note: Shingles get blazing hot and slick in the sun, and this is the one part of the build that happens fully on top of the roof. My brother-in-law did the roof work – in a safety harness – because I wasn’t confident in my footing up there, and that was 100% the right call. Know your limits up high.
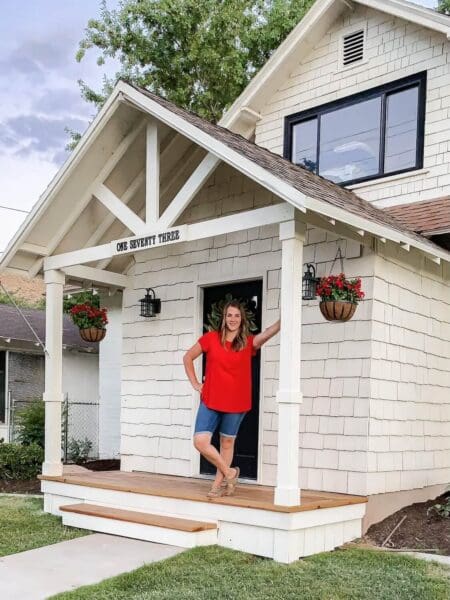
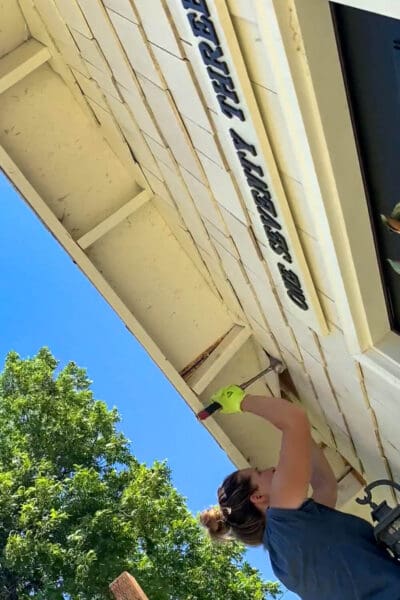
Step 10: Paint and Finish
The last step is what really tied the new porch to the house: paint. First I masked everything off – covered the deck boards with plastic, wrapped the door, windows, and light fixtures, and taped every edge with painter’s tape. It feels tedious, but prepping well here is the whole difference between crisp professional lines and paint speckles on your front door.
Then I sprayed the posts, gable, and trim white to match the house. A paint sprayer is worth it for this – it gets into all that shingle texture and around the gable bracket way faster and more evenly than a brush ever could. I gave it as many coats as it took to cover the raw wood.
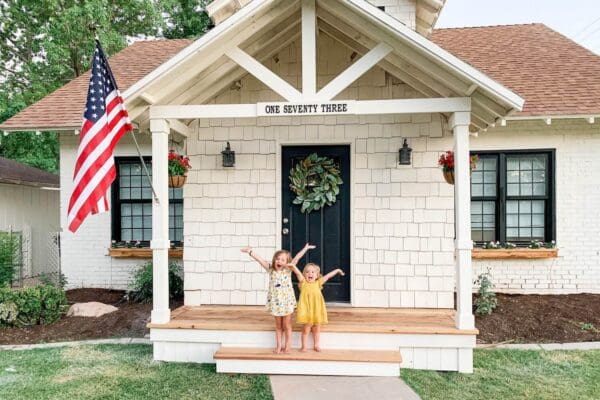
Once it dried, I pulled all the masking, rehung the lights, added the “One Seventy Three” sign, and hung a planter by the door. After weeks of work, standing back and seeing it all crisp and white was the best feeling.
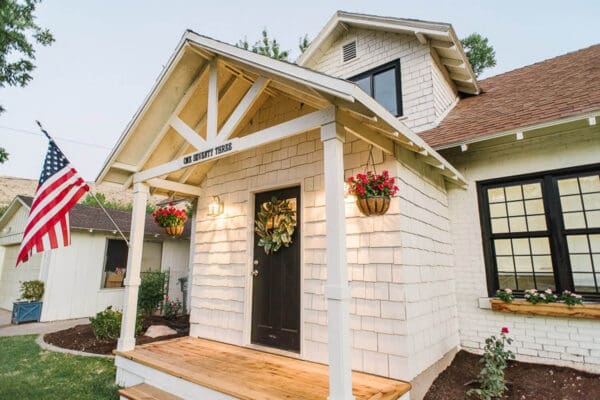
And that’s a porch roof, built from scratch – by someone who’d never built one before.
How Much Does It Cost to Build a Porch Roof?
A DIY porch roof this size runs roughly $300 to $700 in materials, depending on lumber prices and whether you reuse shingles like I did. The big line items are the framing lumber, the OSB sheeting, and the shingles. Hiring this out would cost significantly more, since roof labor is where the real expense is.
Porch Roof Timeline
| Phase | Active time | Notes |
|---|---|---|
| Posts and flat beam frame | Half a day | Level everything twice |
| Attach the frame to the house | Half a day | Open the soffit, brackets into solid framing |
| Ridge board and rafters | 1-2 days | Cut one test rafter first, then copy it |
| Gable bracket detail | Half a day | While the framing is still open |
| OSB panels and fascia trim | Half a day | Cut everything on the ground first |
| Roofing (underlayment to ridge cap) | 1 day | Bottom to top, always overlapping |
| Column wraps | Half a day | Can happen anytime after framing |
| Paint and finish | 1 day | Masking is most of the work |
| Total | About a week of build days | Spread over a couple weekends |
Do You Need a Permit to Build a Porch Roof?
Often, yes. Because a porch roof attaches to your home’s structure, many cities require a permit and sometimes an inspection. Rules vary a lot by location, so check with your local building department before you start. It protects you, keeps the work up to code, and matters when you sell.
How Do You Attach a Porch Roof to the House?
You attach the roof’s frame directly into the house’s wood framing – not just the siding, which isn’t strong enough to carry a roof. On my build, that meant opening up the soffit (the underside of the house’s roof overhang) and removing a few rows of house shingles to expose solid structure, then screwing in metal brackets that carry the beams. The ridge board also ties into the house at the peak, so the whole roof leans on the house the way it’s supposed to.
More Outdoor and Curb Appeal Projects to Try
- DIY Backyard Patio
- How to Make a Flower Bed
- DIY Tall Outdoor Planter Boxes for the Garden
- How to Revive an Old, Weathered Wood Fence
📌 Save This Porch Roof Build for Later
Pin this now and come back when you’re ready to put a roof over your own porch.
How to Build a Porch Roof FAQs
Start with the simplest design: a gable (triangle-shaped) roof attached to the house. Stand two posts, build a flat frame of beams connecting them to the house, run sloped rafters from a ridge board down to the frame, cover it with OSB panels, then shingle it. Take the framing slowly and get a helper for lifting panels and shingling.
Attach the frame into the home’s wood framing, not just the siding. That usually means opening up the soffit or removing a few rows of house shingles to expose solid structure, then using metal brackets so the weight isn’t hanging on a single row of screws.
For a small porch roof, 2×6 boards are common, but the right size depends on how far your roof spans and your local snow load. Check a rafter span table or your local building code for your situation. I used 2x6s for my little roof.
Rafters are typically spaced 16 or 24 inches apart, measured center to center. I ran mine around 24 inches, adjusting a little so the edges of my OSB panels would land on a rafter to screw into. Closer spacing makes a stronger roof.
A gable roof (the classic triangle) is one of the most beginner-friendly, and it sheds rain and snow well. A shed roof (one single slope, like a lean-to) is even simpler but looks more modern. I chose a gable to match the craftsman style of the house.
Usually yes, because it attaches to your home’s structure. Requirements vary by city, so always check with your local building department before you start. Skipping a required permit can cause problems at inspection or resale.
Two things: underlayment and drip edge. Underlayment is a water-resistant layer that rolls out over the wood, overlapping each row about 4 inches so water sheds over the seams. Drip edge is a metal strip along the edges that makes water drip off instead of curling under. The shingles go on top in an offset, bricklike pattern.
A small DIY porch roof runs roughly $300 to $700 in materials, mostly framing lumber, OSB panels, and shingles. Reusing or matching existing shingles saves money. Hiring it out costs much more, because roofing labor is the biggest expense.
Yes, with the right prep and help – I’d never built one before this. The framing is doable for a careful beginner, but lifting the roof panels and shingling really want a second person, and the work happens up high. Use a harness on the roof, know your comfort with heights, and call in help for the risky parts, like I did.
Use the same shingle color and style as your existing roof, and repeat your home’s rooflines and trim details. I matched my house’s shingles (and reused some) and painted the porch trim the same white as the house, so the new roof looks like it was always part of it.
The Bottom Line on Building a Porch Roof
A porch roof looks like the most intimidating project in this series, but it’s the most doable-with-help. Ours came in at a few hundred dollars in materials and took about a week of build days spread over a couple of weekends. The framing is beginner-friendly if you take it one board at a time – the two things that deserve extra care are attaching into your house’s solid framing (never just the siding) and knowing your limits once the work moves on top of the roof. If I could tell you one thing before you start: cut everything you can down on the ground, and line up a helper for panel day and shingle day.
Leave a comment if you have any questions about your own porch roof build – I read every one, and I’m here to help!
About Crystel
I’m Crystel Montenegro, a stay-at-home mom of five turned home DIY expert. I share budget-friendly DIY projects, home design, garden, recipes, and lifestyle content from my own home, and every project here is one I actually built or made. Read more about me or follow along on Instagram.