


How to Build a Front Porch (Trim and Deck Boards)


Updated July 13, 2026
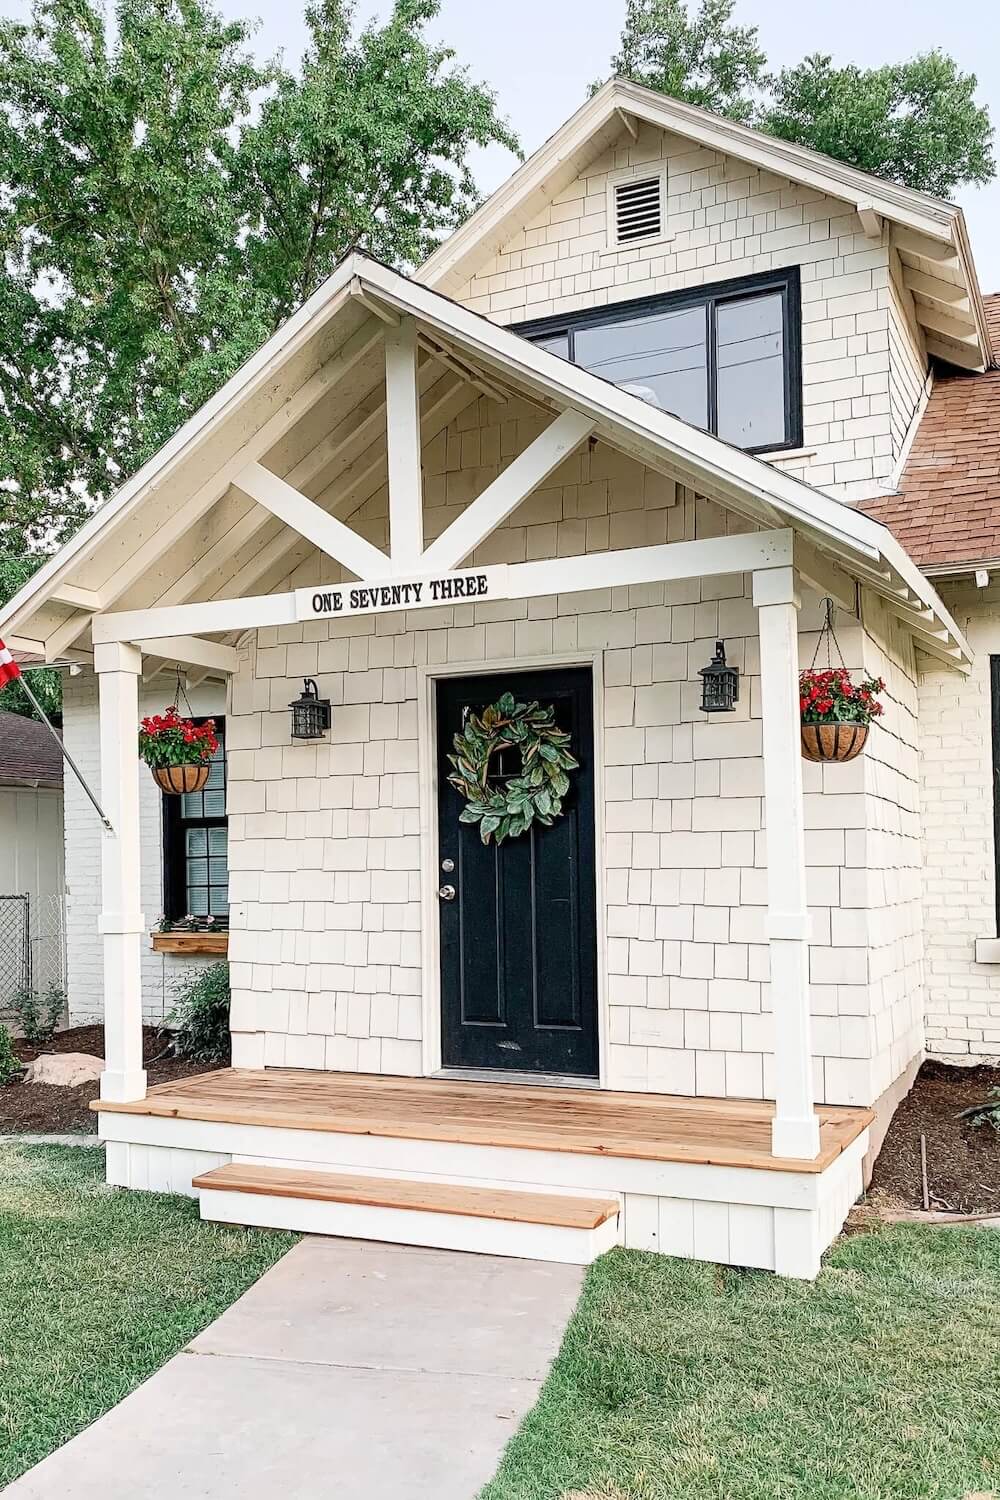
Want to know how to build a front porch that actually looks finished? You’re in the right place: this trim-and-decking stage took us about a day of active work, and the whole DIY porch came in between $500 and $2,000 in materials. In this post I’m walking you through exactly how I trimmed out the porch frame and laid the deck boards. This is the step where building a porch stops looking like a construction zone and starts feeling like part of your home, and it’s totally beginner-friendly.
DIY Front Porch Series, Part 2: Trim and Deck Boards. New here? Start with Part 1: Foundation and Frame – then keep going with Part 3: Building the Step and Part 4: The Porch Roof.
How do you build a front porch?
To build a front porch, you anchor a ledger board to the house, set posts on concrete footings, frame the deck with joists, then trim the frame and lay the deck boards. This post covers the trim and decking stage, which is where your porch finally starts to look like a porch.
Table of Contents
- Watch the Full Front Porch Build
- How to Build a Front Porch: At a Glance
- Materials and Tools I Used
- Step-by-Step: How to Build a Front Porch Deck and Trim
- Step 1: Cut the Back Border Board
- Step 2: Miter the Porch Trim Corners for a Framed Look
- Step 3: Cutting Notches Around Porch Posts
- Step 4: Miter and Install the Front Porch Trim Boards
- Step 5: How to Lay Front Porch Deck Boards
- How Much Does It Cost to Build a Front Porch?
- How Long Does a Wood Front Porch Last?
- More Front Porch and Outdoor Projects to Try
- 📌 Save This Front Porch Build for Later
- How to Build a Front Porch FAQs
Watch the Full Front Porch Build
Want to see exactly how this came together step by step? Watch the full video of our front porch build, from drilling into concrete to pouring posts and framing the deck. It’s packed with tips, tools, and the real-life process behind creating this charming porch.
How to Build a Front Porch: At a Glance
- Cost: $500 to $2,000 for the whole porch – this stage is mostly the redwood decking
- Time: about a day of active work for the trim and deck boards
- Difficulty: beginner-friendly – the miter cuts and one jigsaw notch are the trickiest parts
- Permit: covered in Part 1 – anything attached to your house often needs one
- Helpers: doable solo, but a second set of hands speeds up the long boards
Here’s the whole build, start to finish, so you can see where this trim-and-decking step fits:
- Part 1: Foundation and frame covers permits, the ledger board, setting posts, pouring footings, and the deck joists.
- Part 2 (you’re here): Trim and deck boards covers mitering the border trim, notching around posts, and laying the decking.
- Part 3: Building the step covers the box step and skirting.
- Part 4: The porch roof covers the gable roof, columns, and paint – the grand finale.
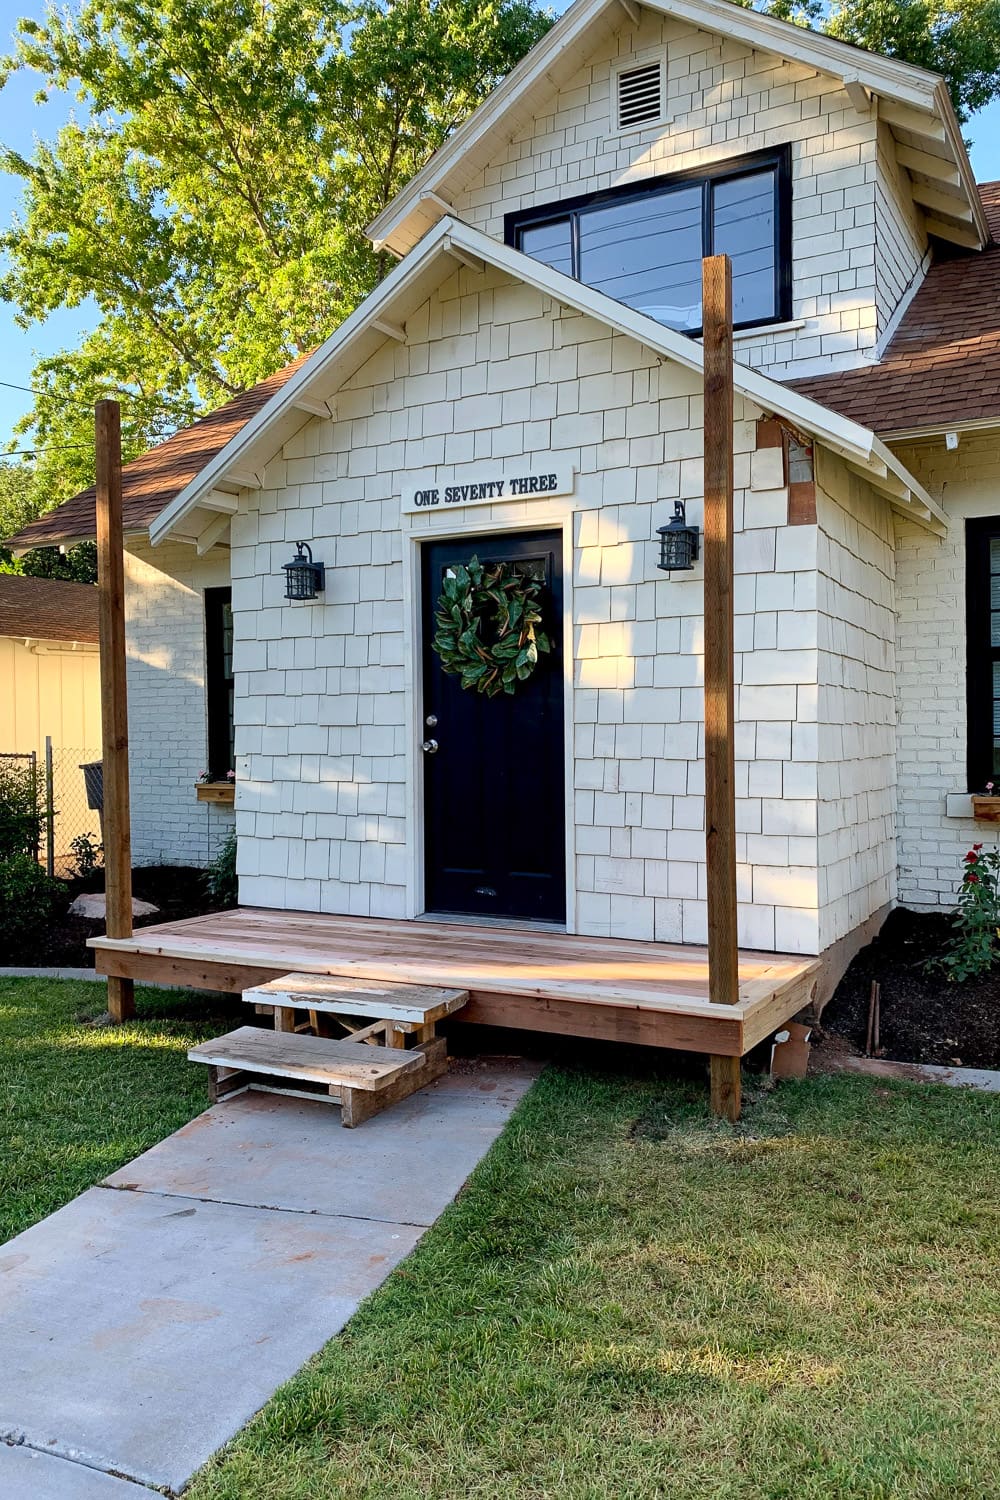
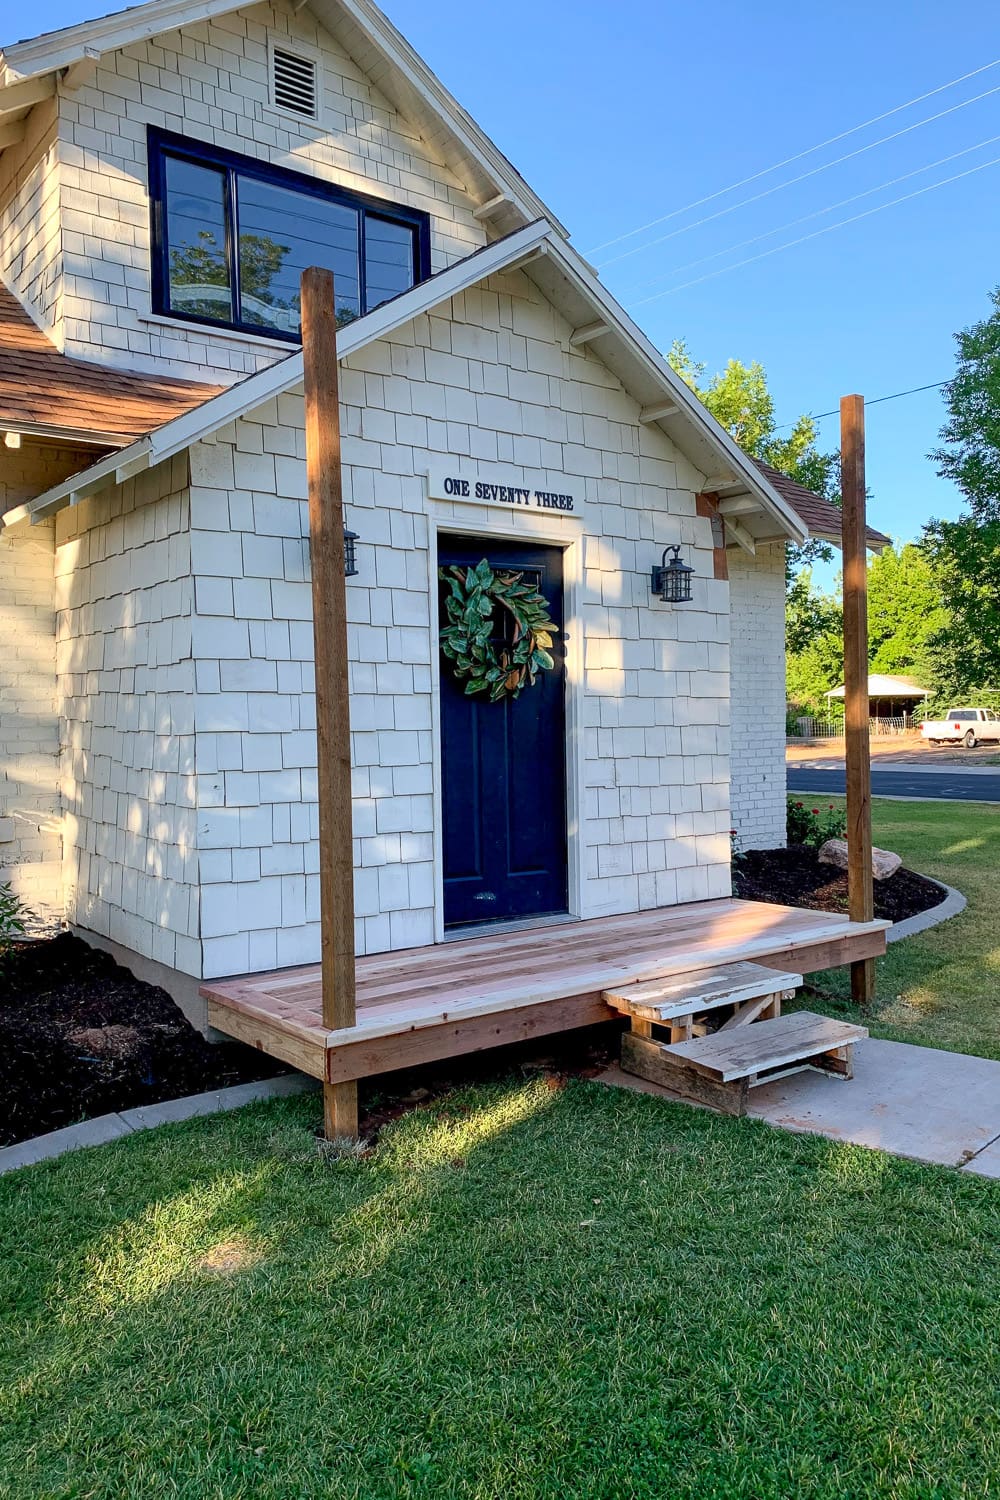
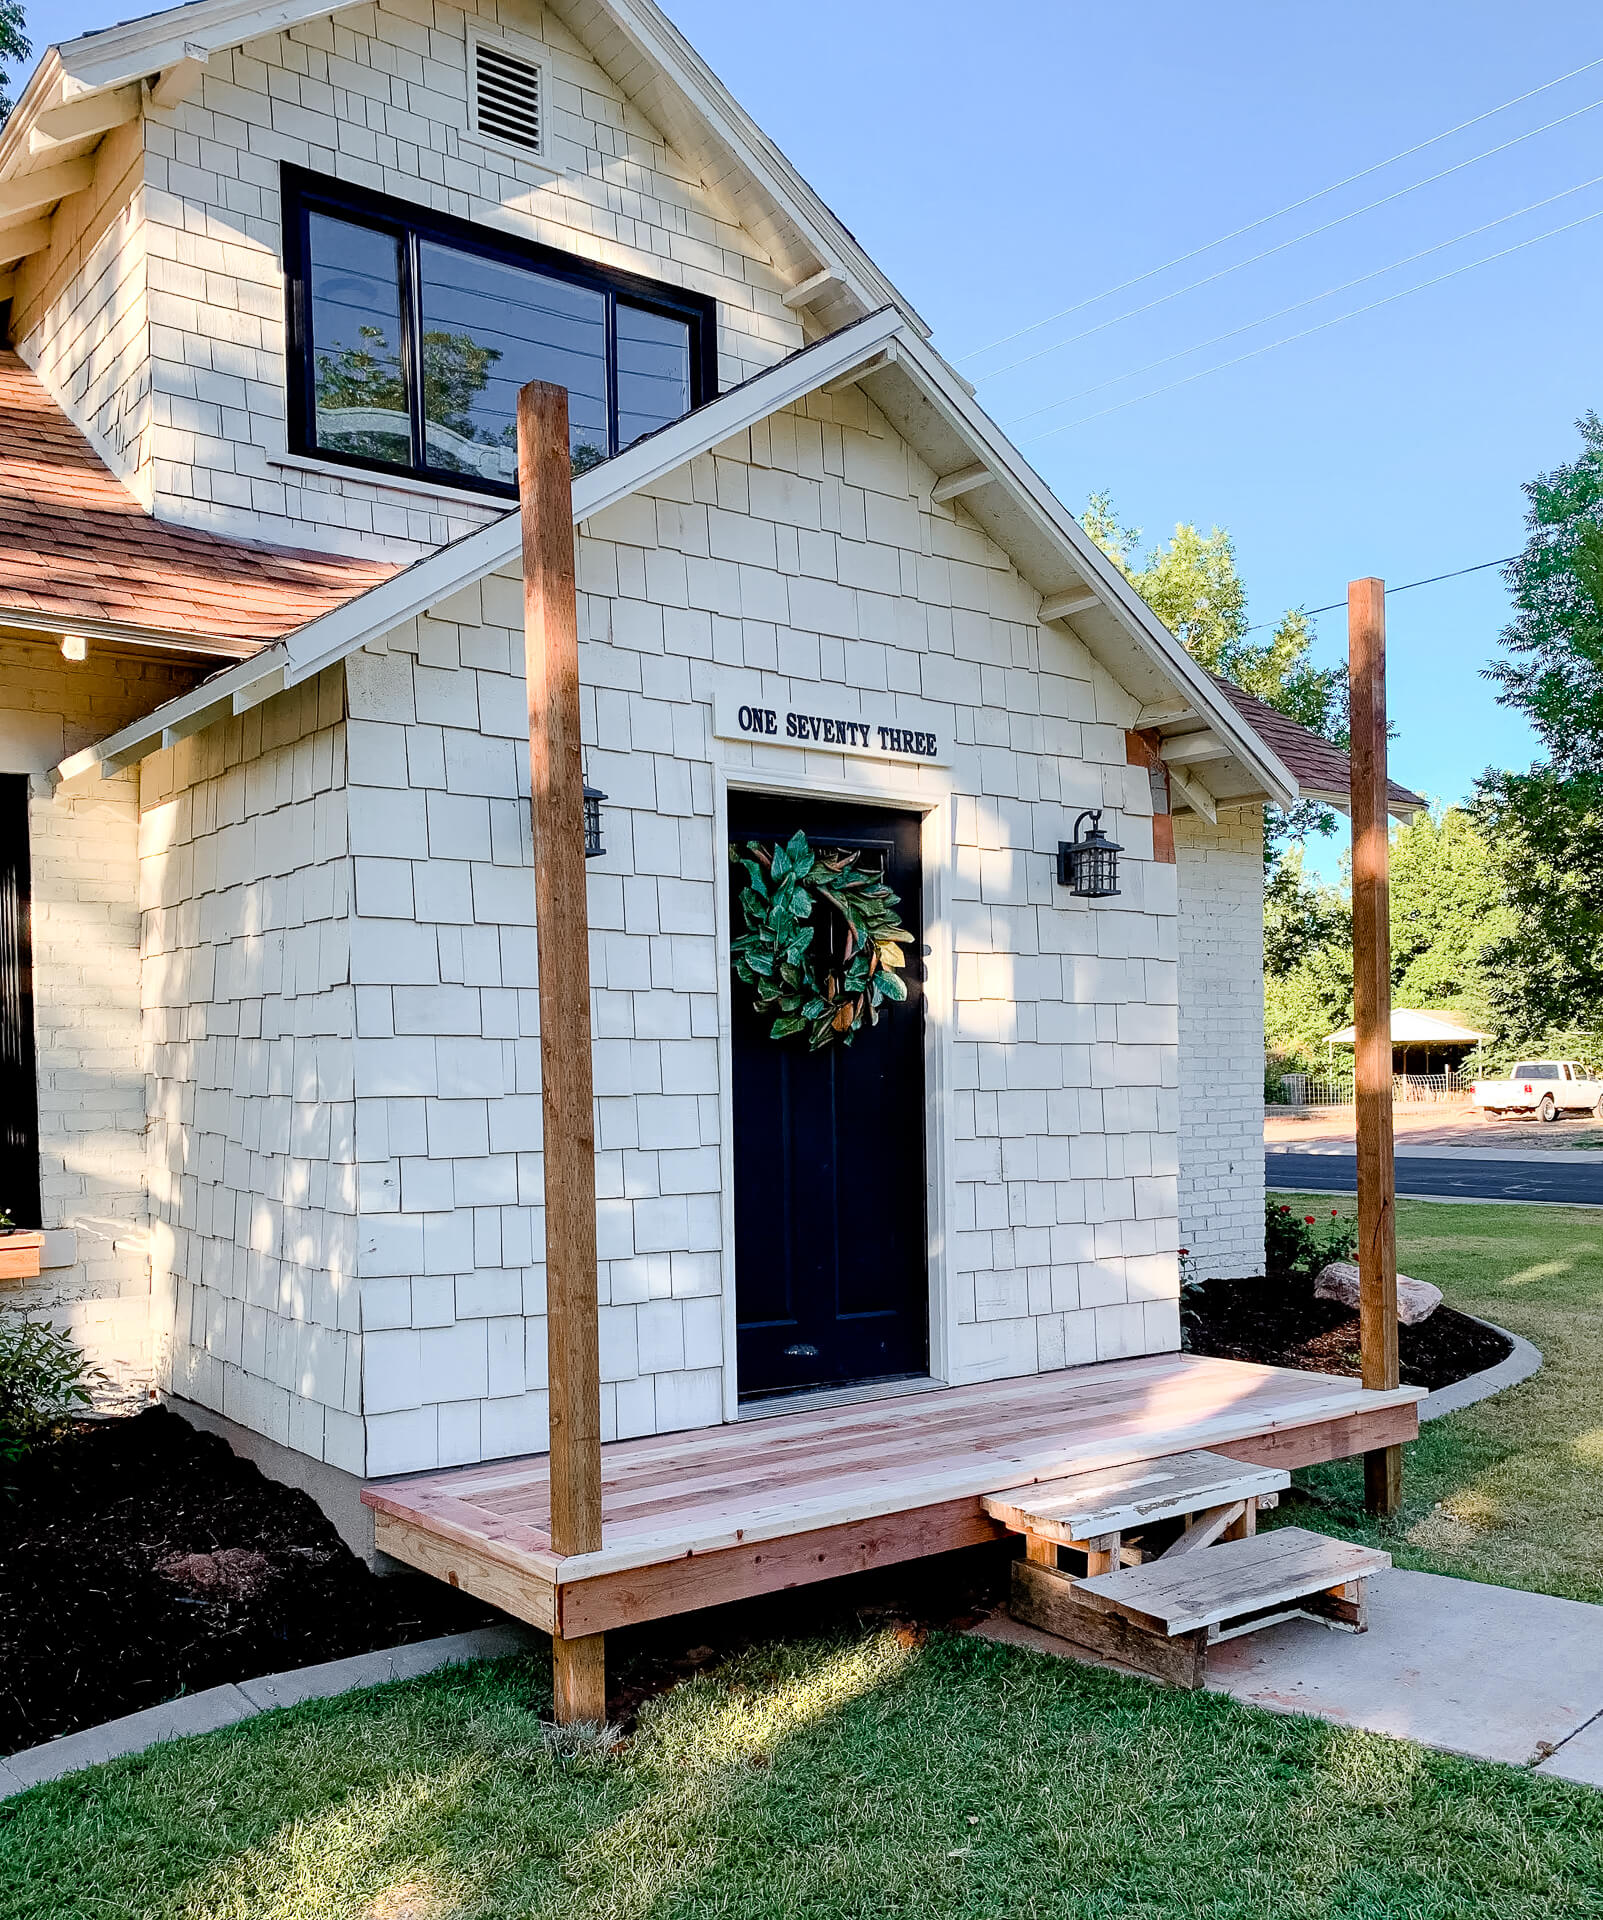
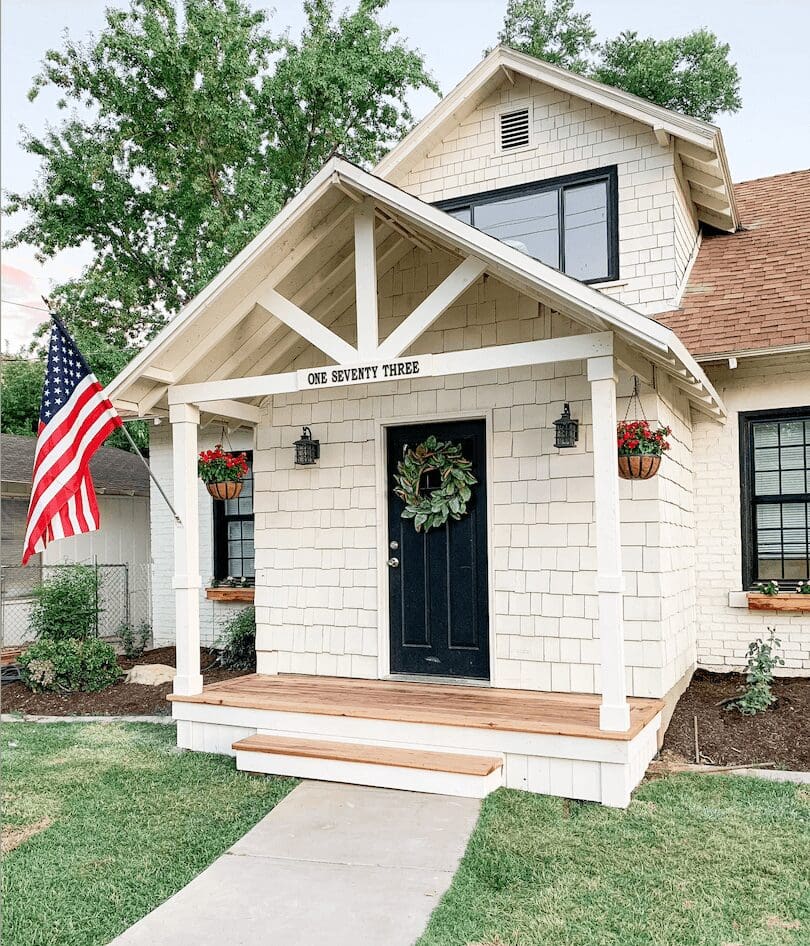
From Bare Frame to Finished Front Porch
Here’s the quick before and after. At the end of Part 1, we had the frame, posts, and joists in place but nothing to actually stand on. By the end of this post, the trim’s on and the deck boards are down, and it finally looks like a porch.
Materials and Tools I Used
Here’s what I used to trim and finish the flooring for our front porch.
Lumber
Power Tools
Misc Supplies
- 2 in. Framing Nails
- Level
- Carpenter Square
- 3″ Star Bit Wood Screws
- Hammer
- Tape Measure
Want more of my go-to gear? Browse my favorite DIY tools and supplies on my Amazon storefront.
Step-by-Step: How to Build a Front Porch Deck and Trim
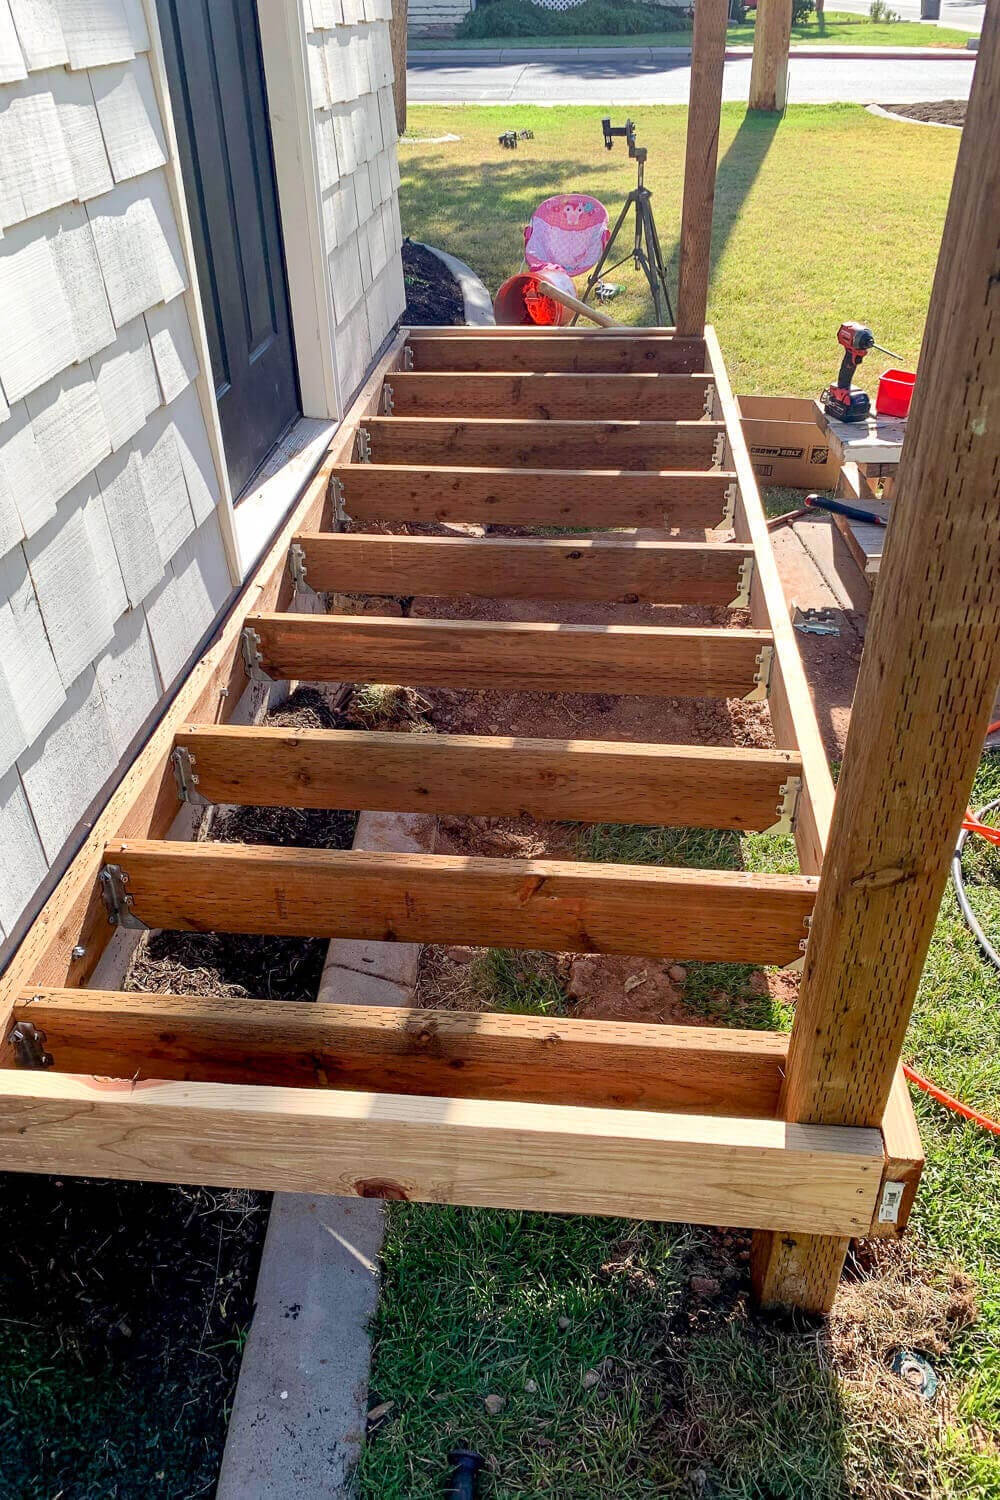
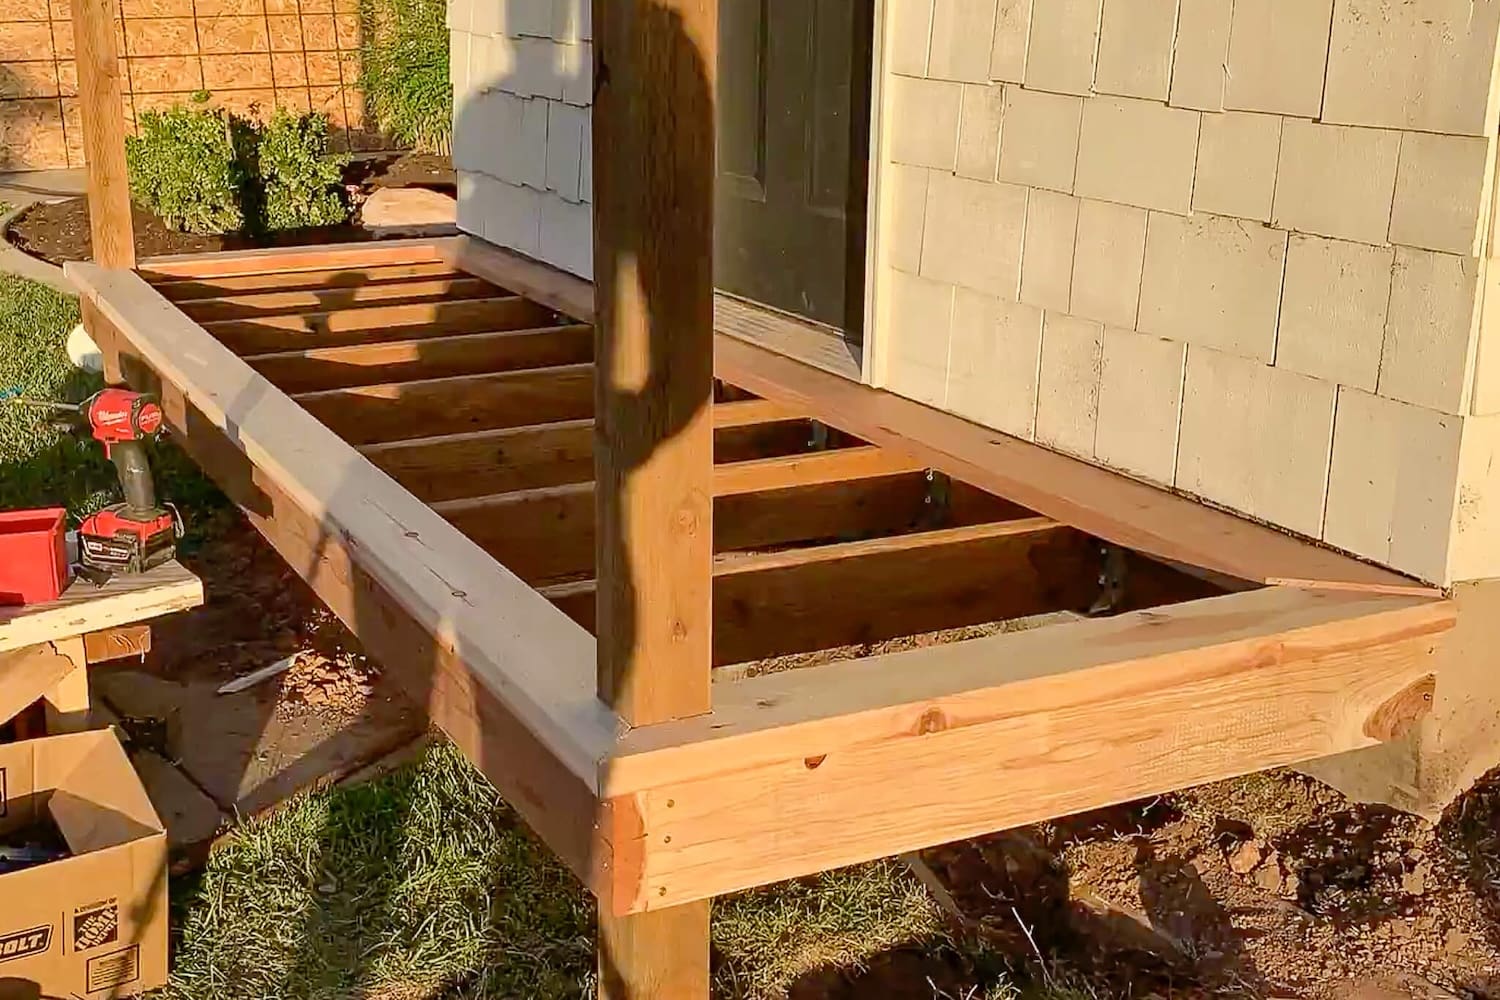
We left off with all the joists in place.
The next step was trimming the frame with border boards. This small detail made a big difference. It instantly gave our front porch a cleaner, more intentional look.
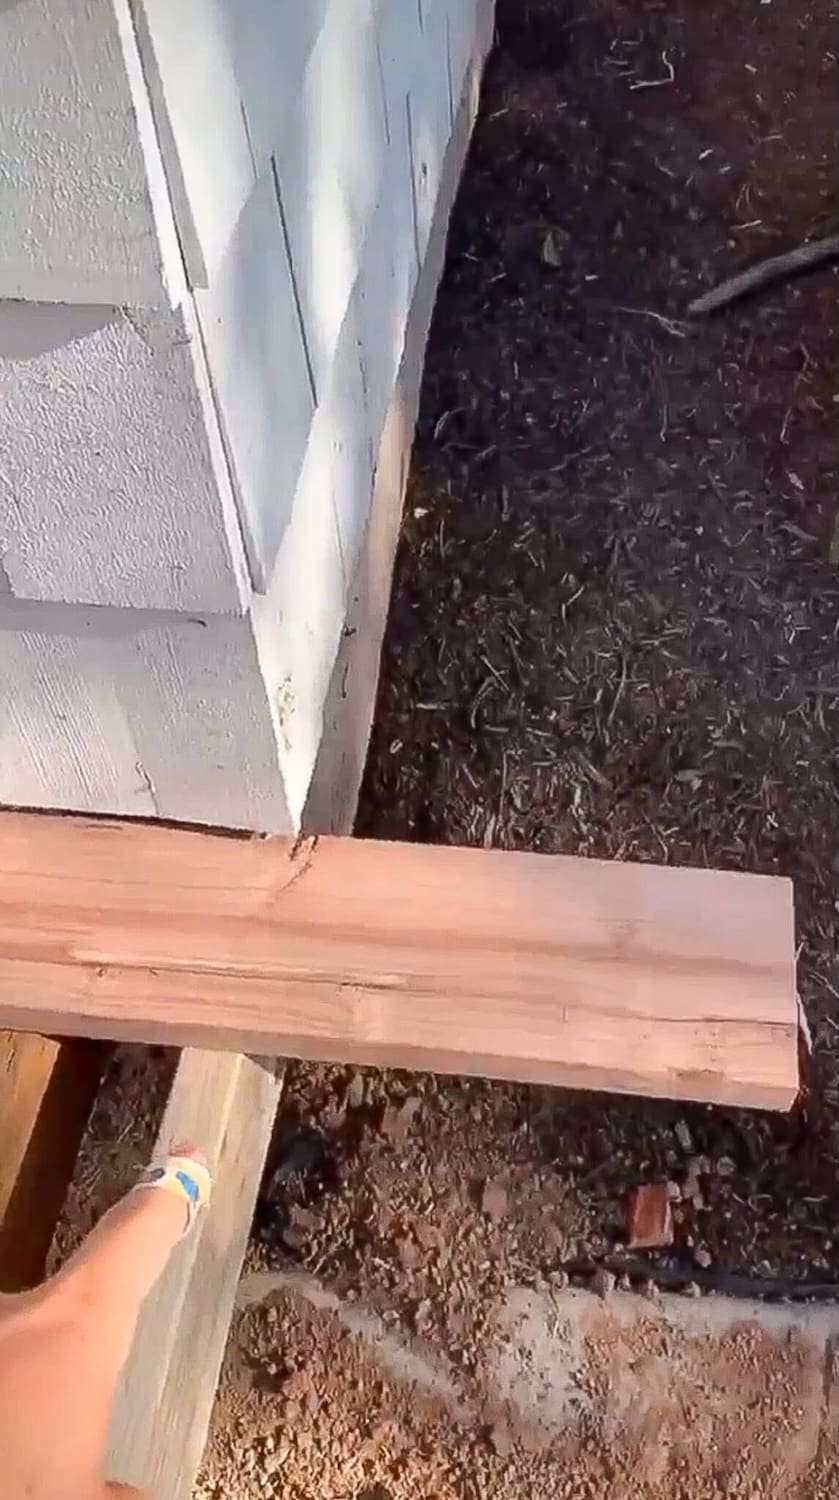
Step 1: Cut the Back Border Board
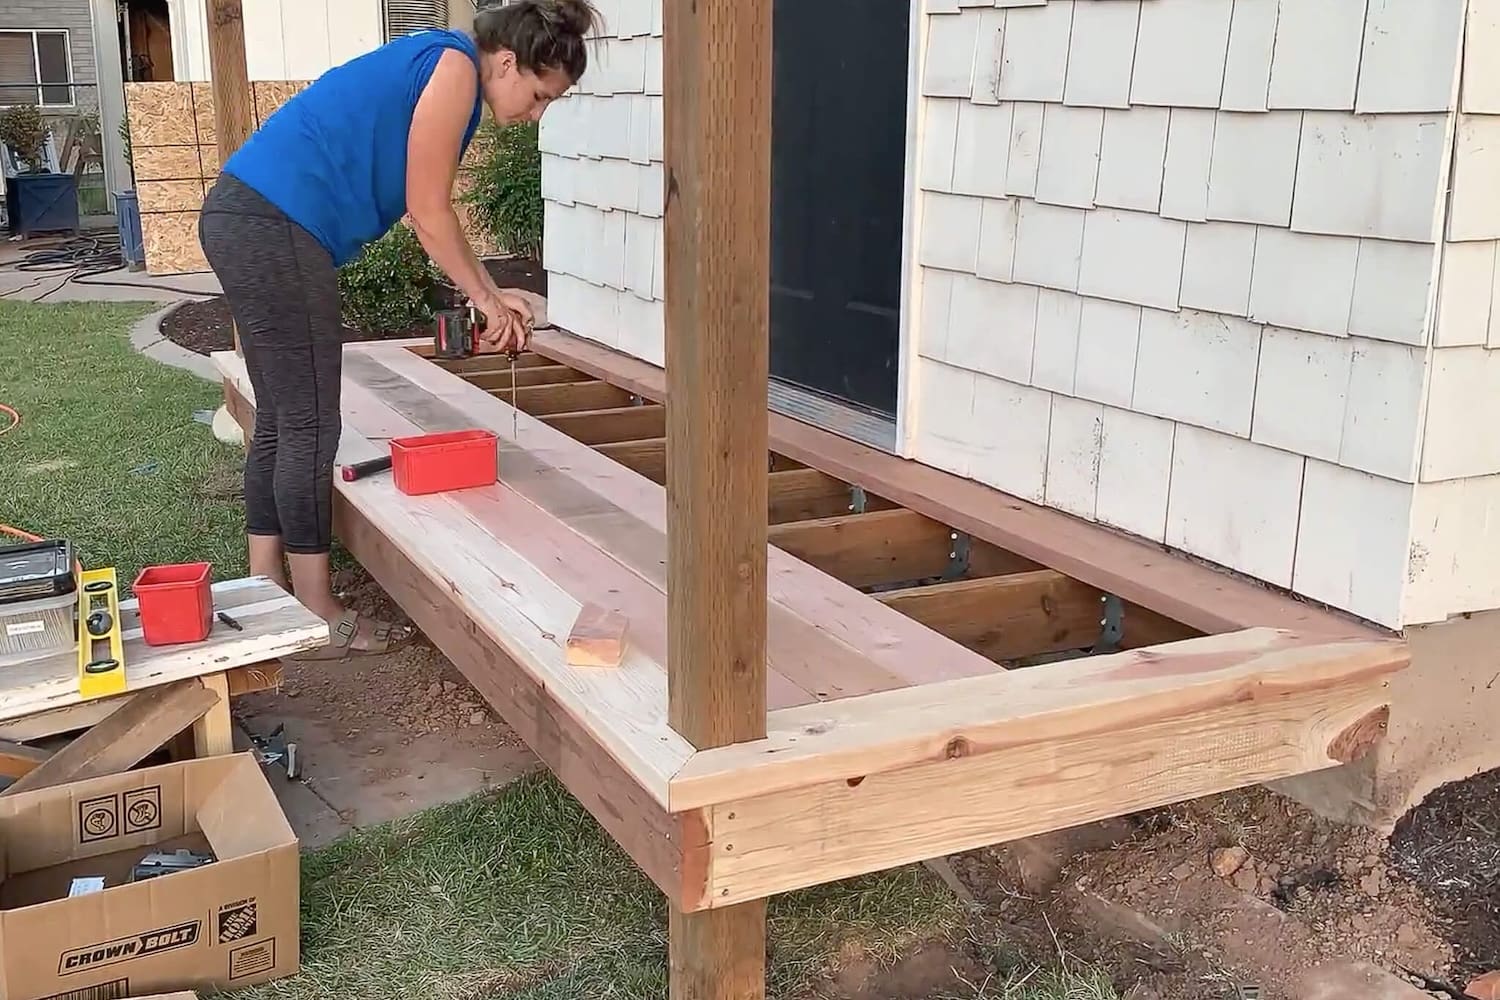
I started with the back board, the one that runs along the house. I lined it up where the ends of the deck boards would land, measured the full width of the porch, and added two inches. That extra bit gives me a one-inch overhang on each side.
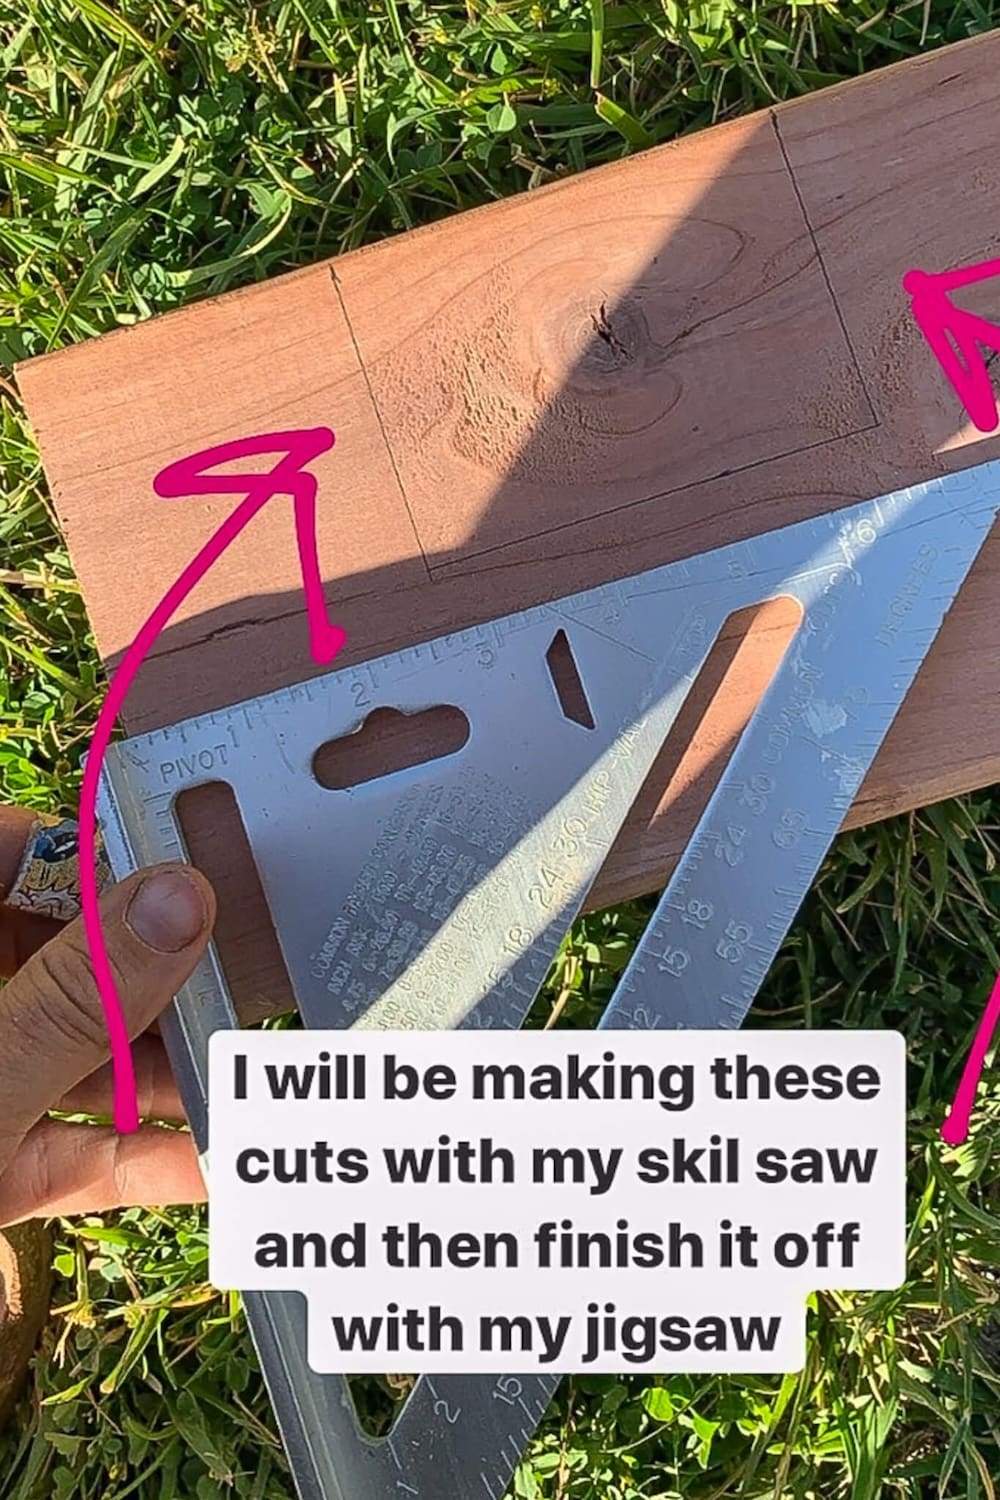
Step 2: Miter the Porch Trim Corners for a Framed Look
Then I used my miter saw to cut a 45-degree angle on the first end. These mitered corners make everything look more professional and polished, even if you’re winging it like I was.
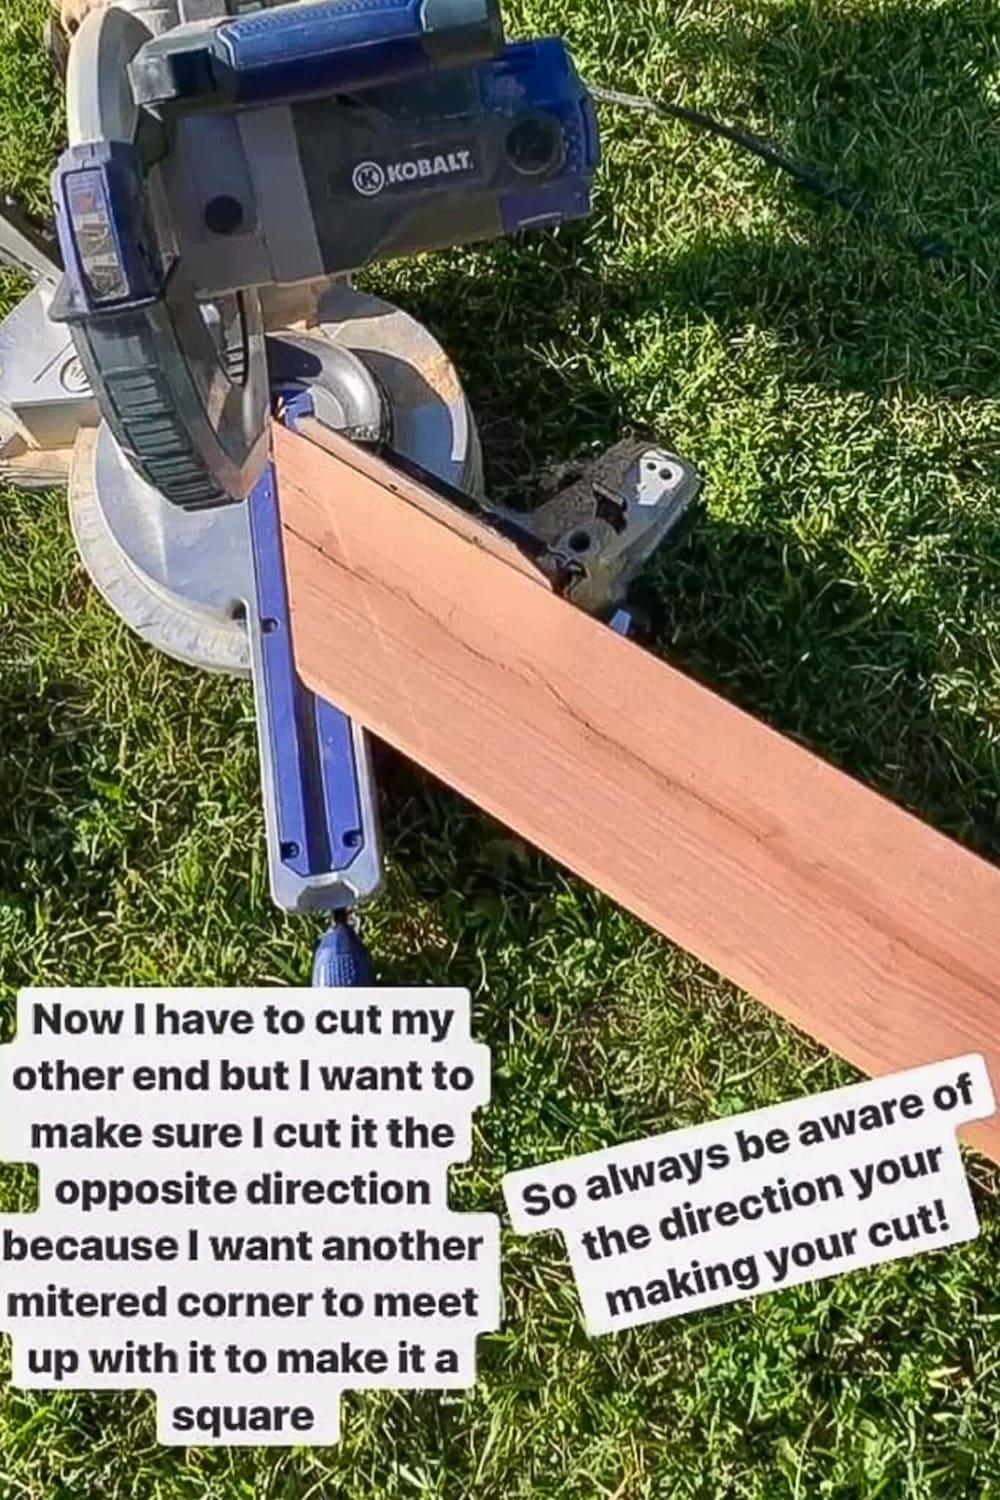
Now I cut the other end, but here’s the part to watch: cut it in the opposite direction from the first end. That way the two mitered corners meet and form a clean square frame, so always be aware of which way your blade is angled before you cut.
Pro tip: both angles should point inward so the corners come together like a picture frame. I dry fit the board first to make sure everything lined up.
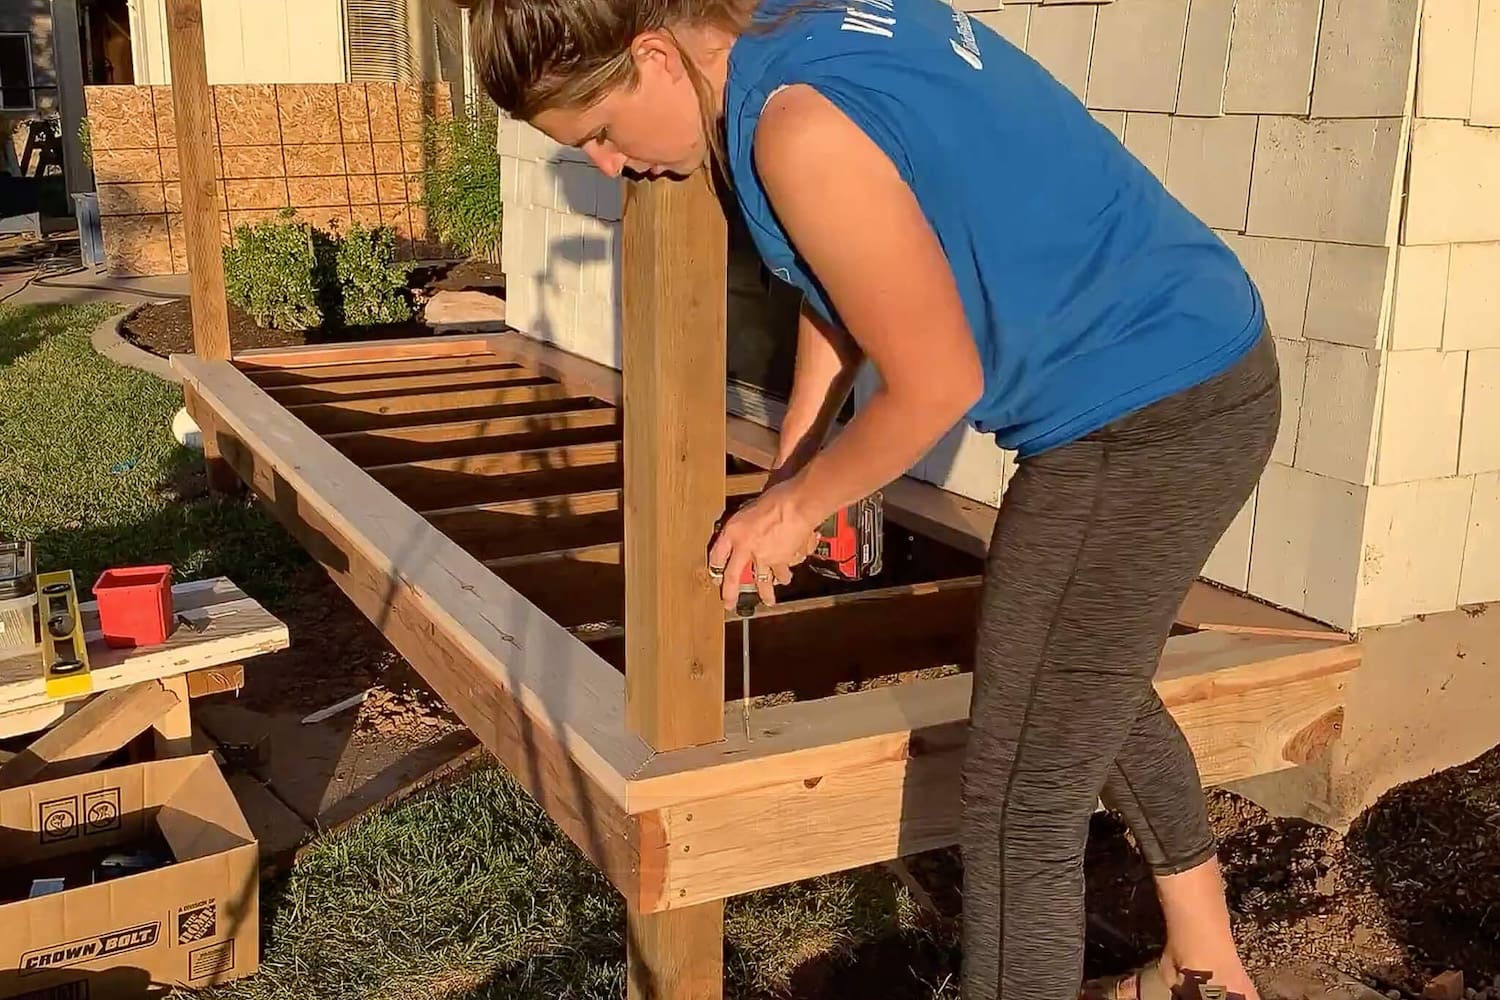
Step 3: Cutting Notches Around Porch Posts
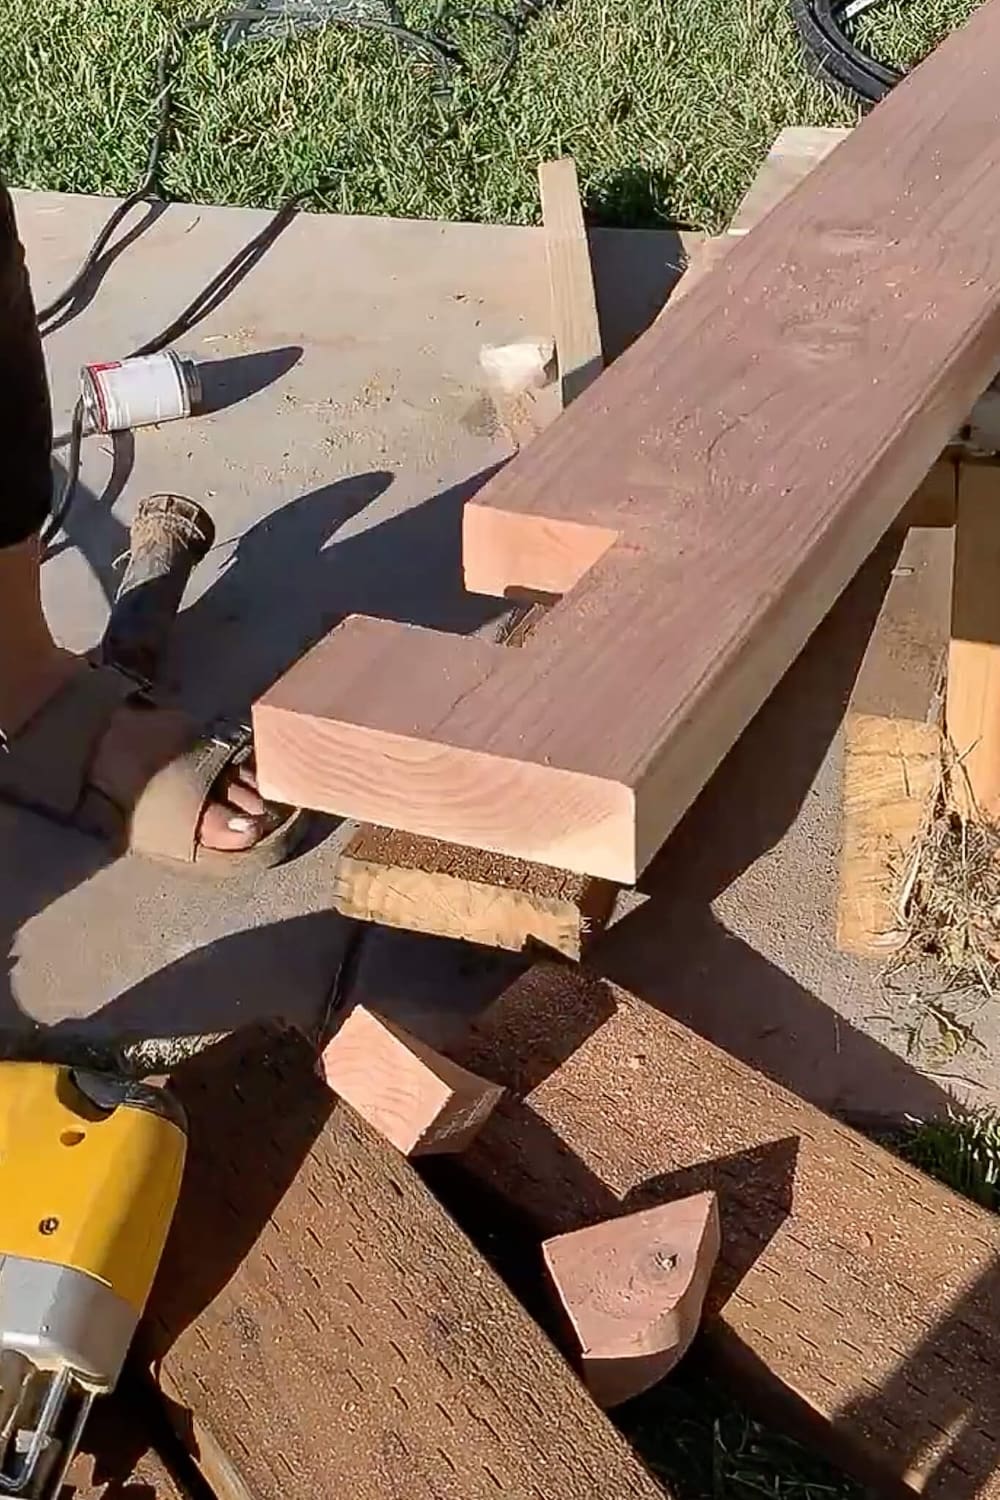
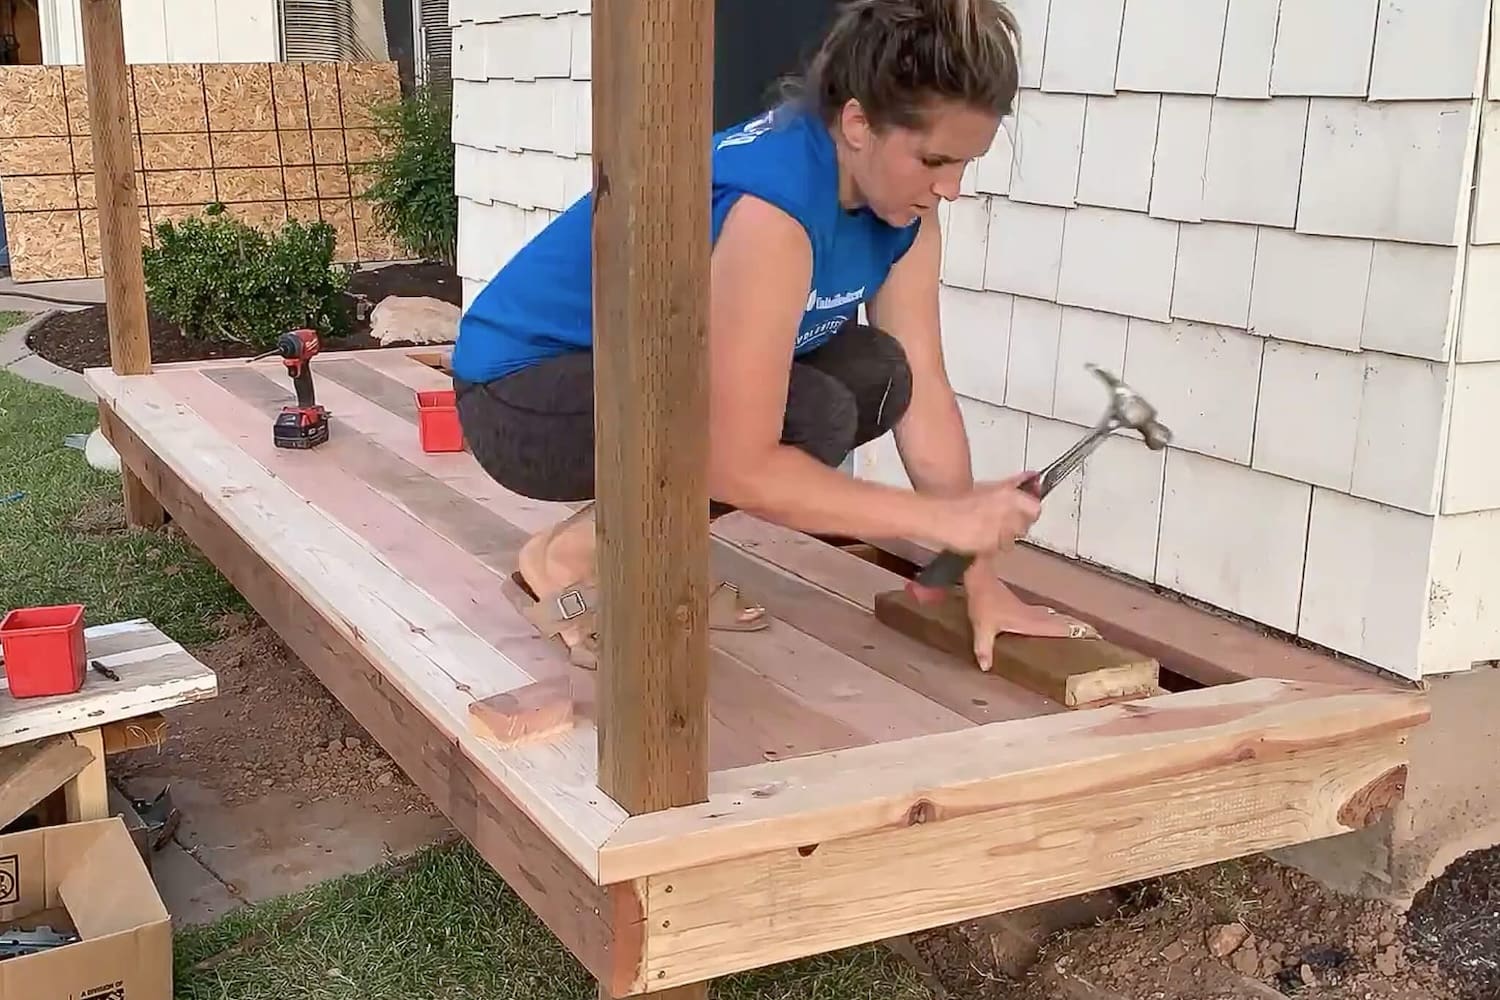
Next up: the side borders. I measured from the house to the outer edge of the rim joist and added 1 inch for overhang on the front end only – the back end butts right up against the house wall, so it doesn’t get one. Since one of the side boards ran into a porch post, I had to cut a notch so the trim would sit flush.
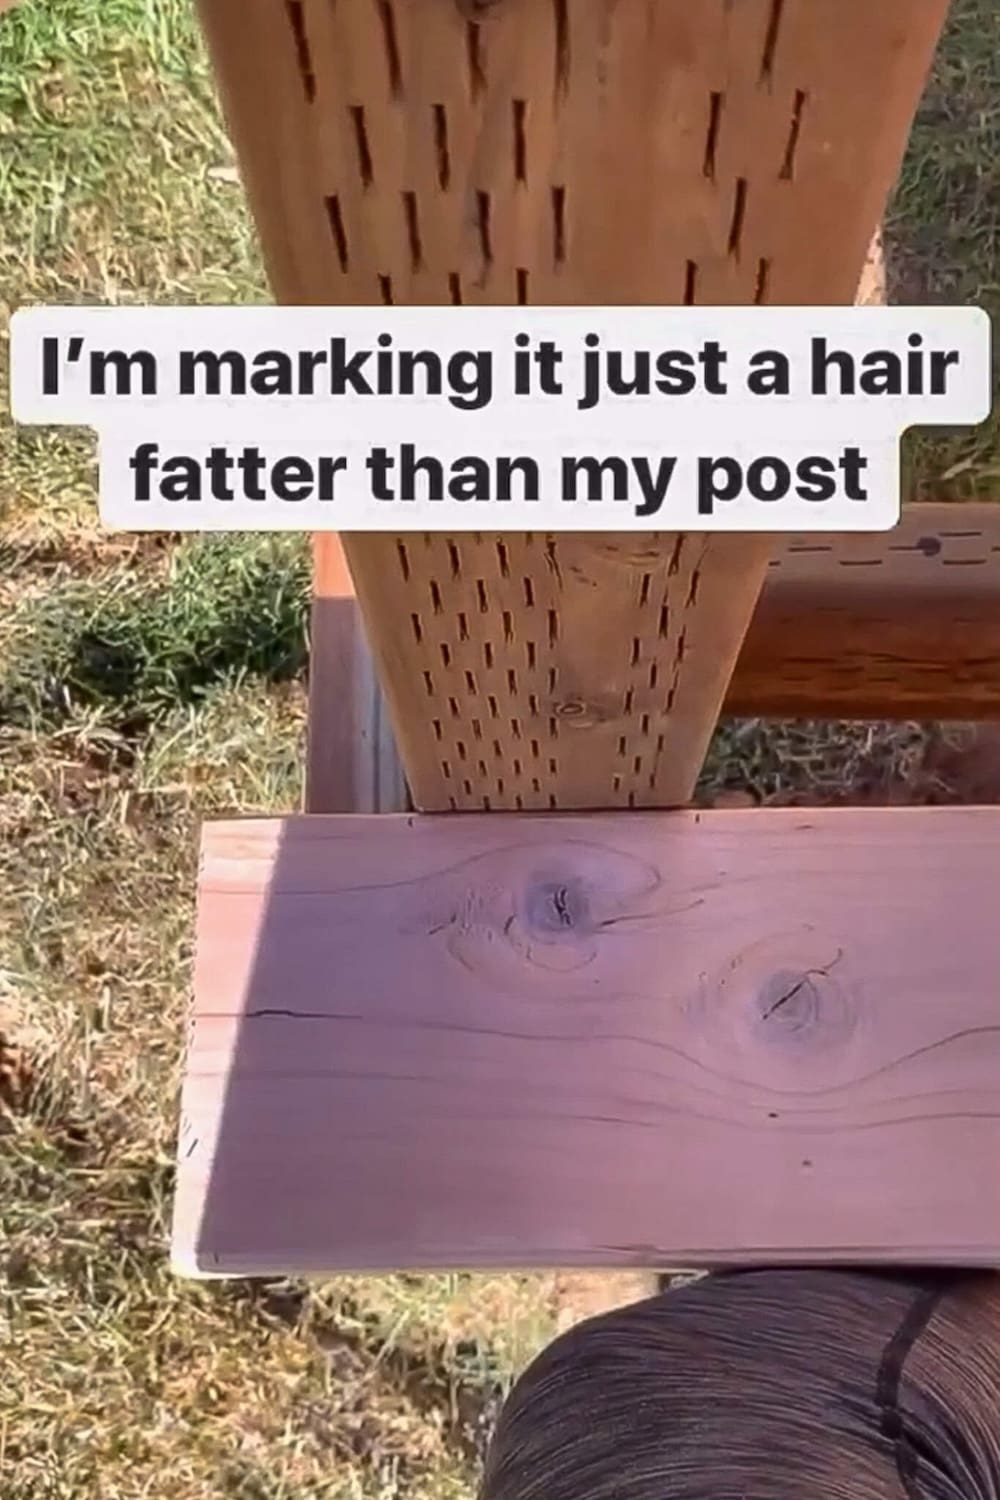
How do you cut a notch around a porch post?
I held the board up to the post and marked the outline with a pencil. Then I used my jigsaw to cut a square notch. It wasn’t perfect, but it fit snug and looked great once in place on our front porch.
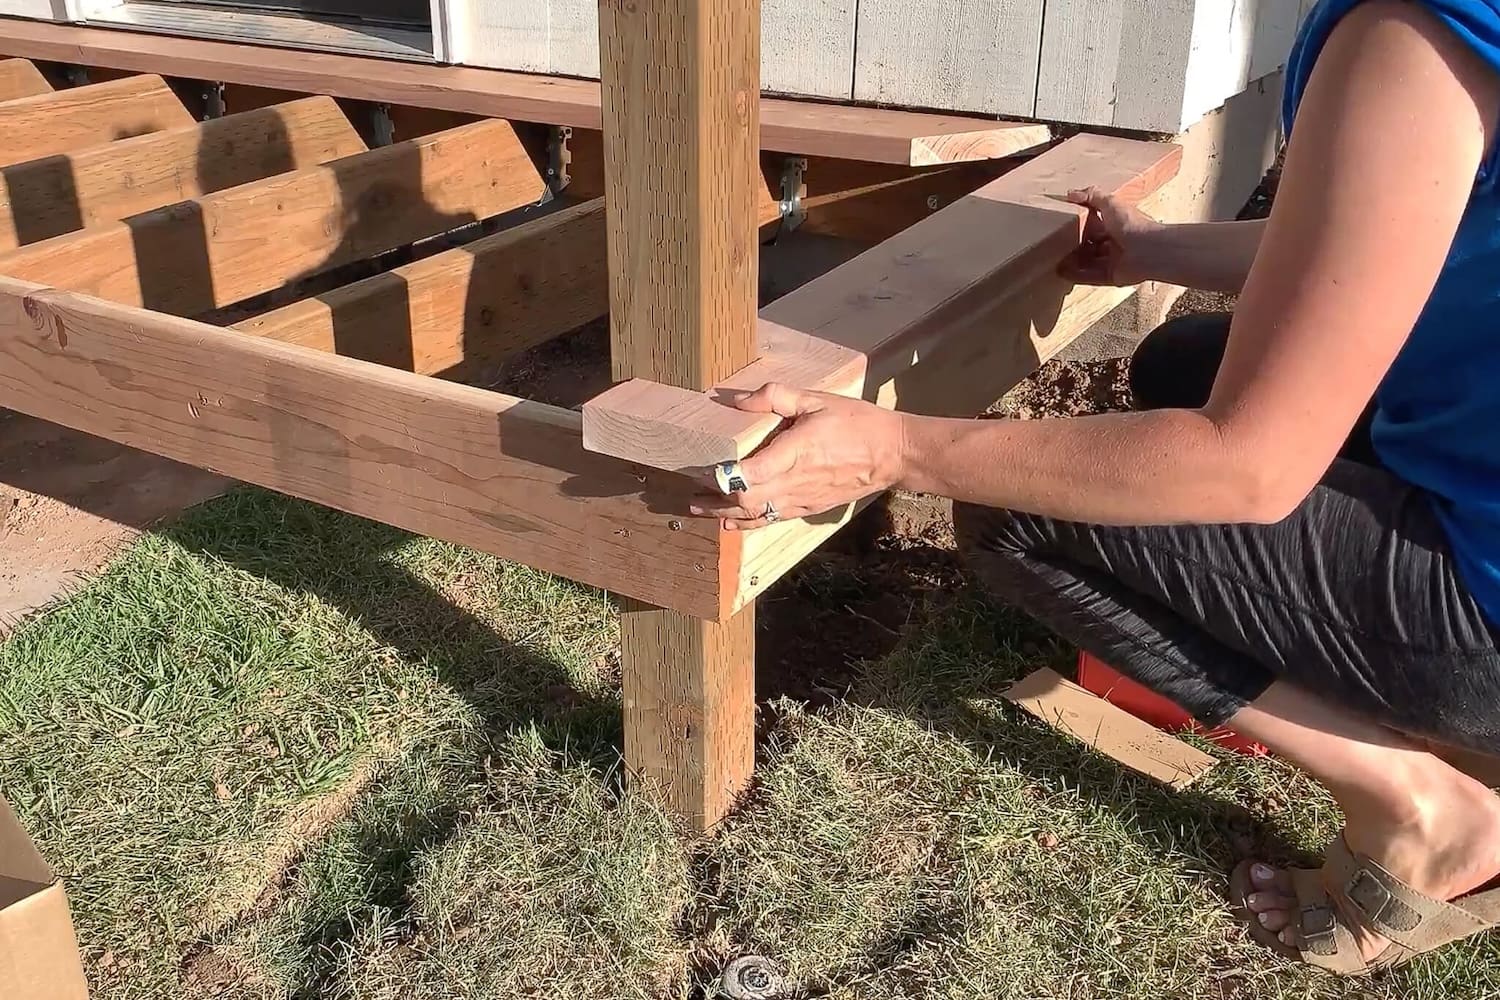
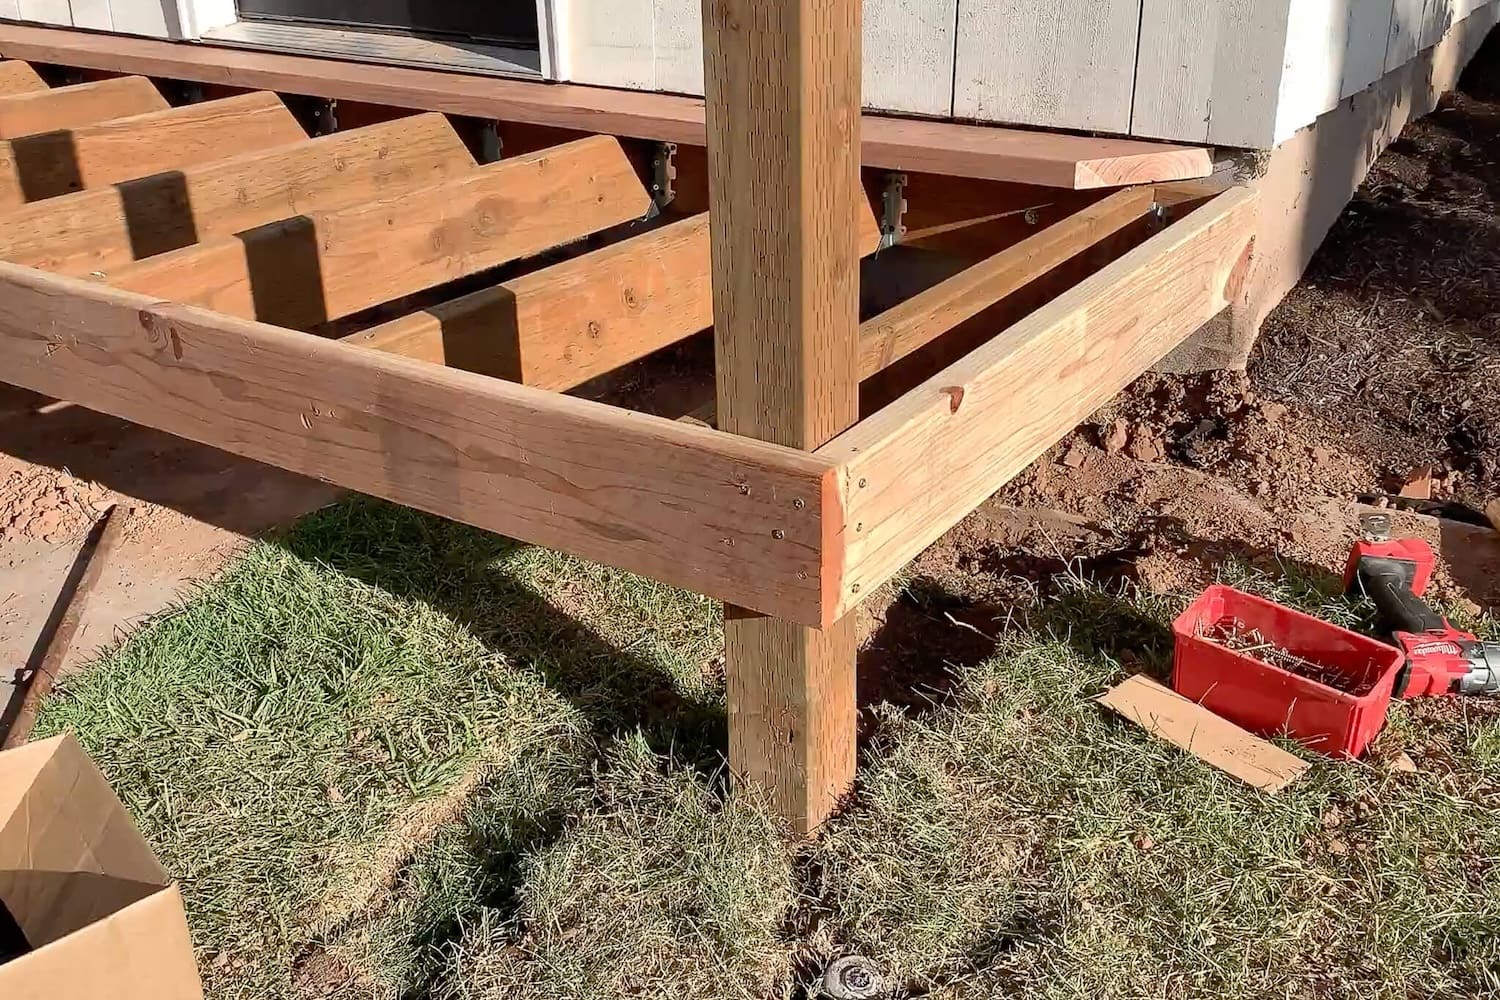
Step 4: Miter and Install the Front Porch Trim Boards
With the back and side trim dry fit, I moved on to the front board. This one needed notches on both ends to wrap around the porch posts.
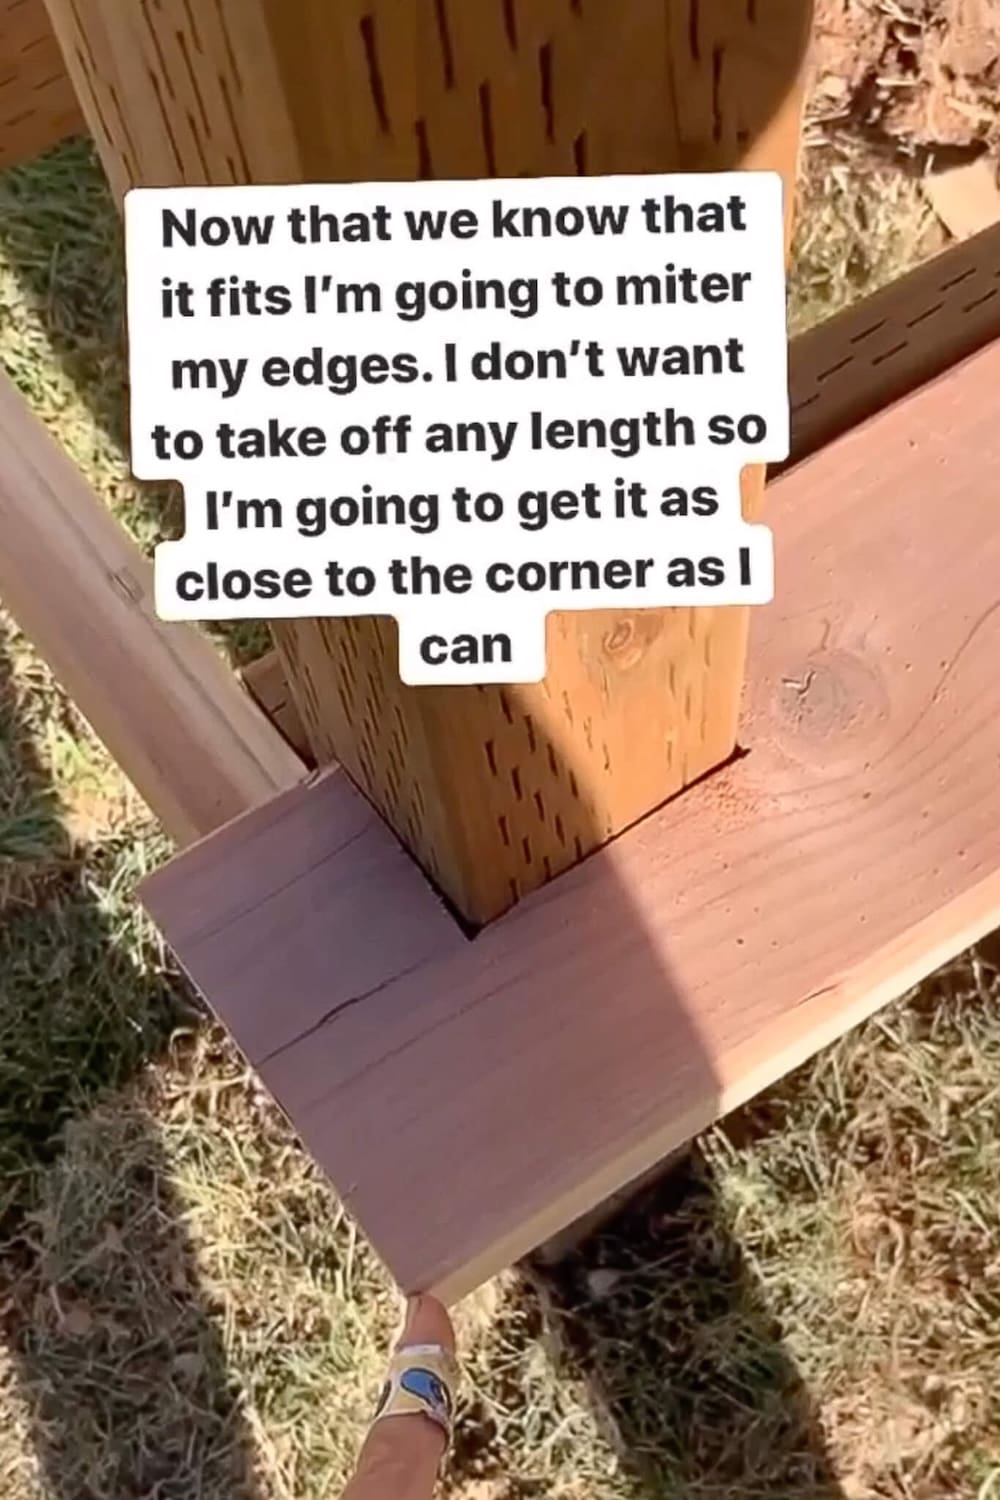
Once those were cut, I mitered the ends so all the corners met cleanly. Everything looked great dry fit, so I screwed the trim boards into the rim joists.

This was the moment I stepped back and thought, okay, this front porch is actually starting to look legit. Let’s lay those deck boards.
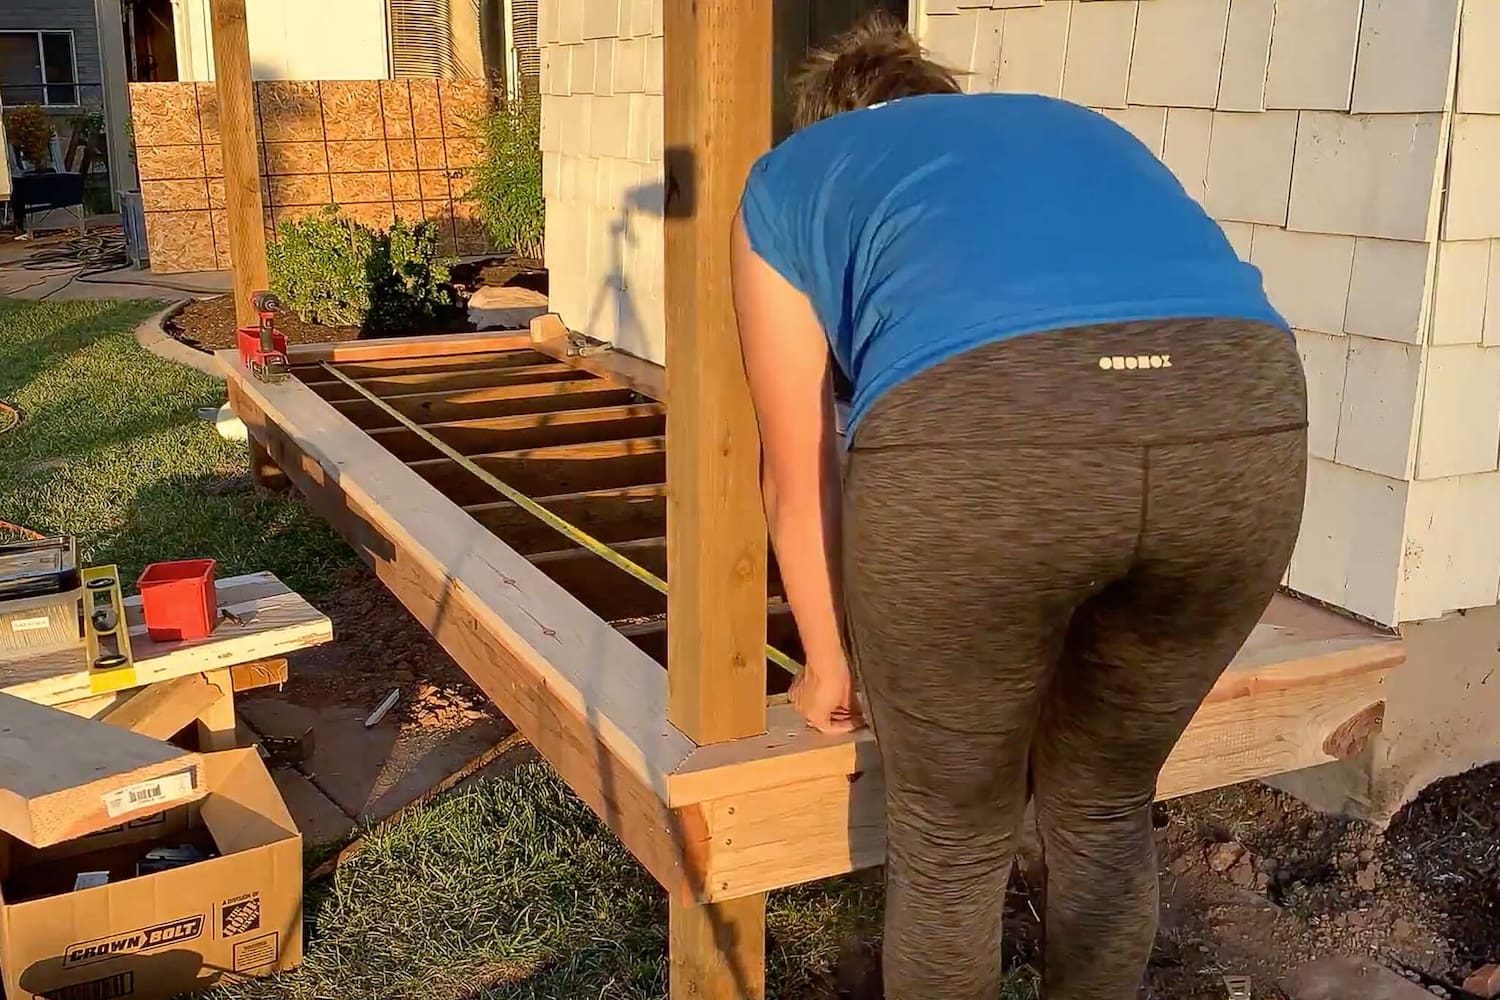
Step 5: How to Lay Front Porch Deck Boards
I measured and cut each board one at a time, starting at the front of the porch and working my way toward the house. Every board was dry fit first to make sure spacing and alignment were just right.
Pro tip: If your deck boards are still a little damp, leave a small gap between them, about a nickel’s width, so they can shrink as they dry without buckling. Mine were dry redwood, so I ran them tight.
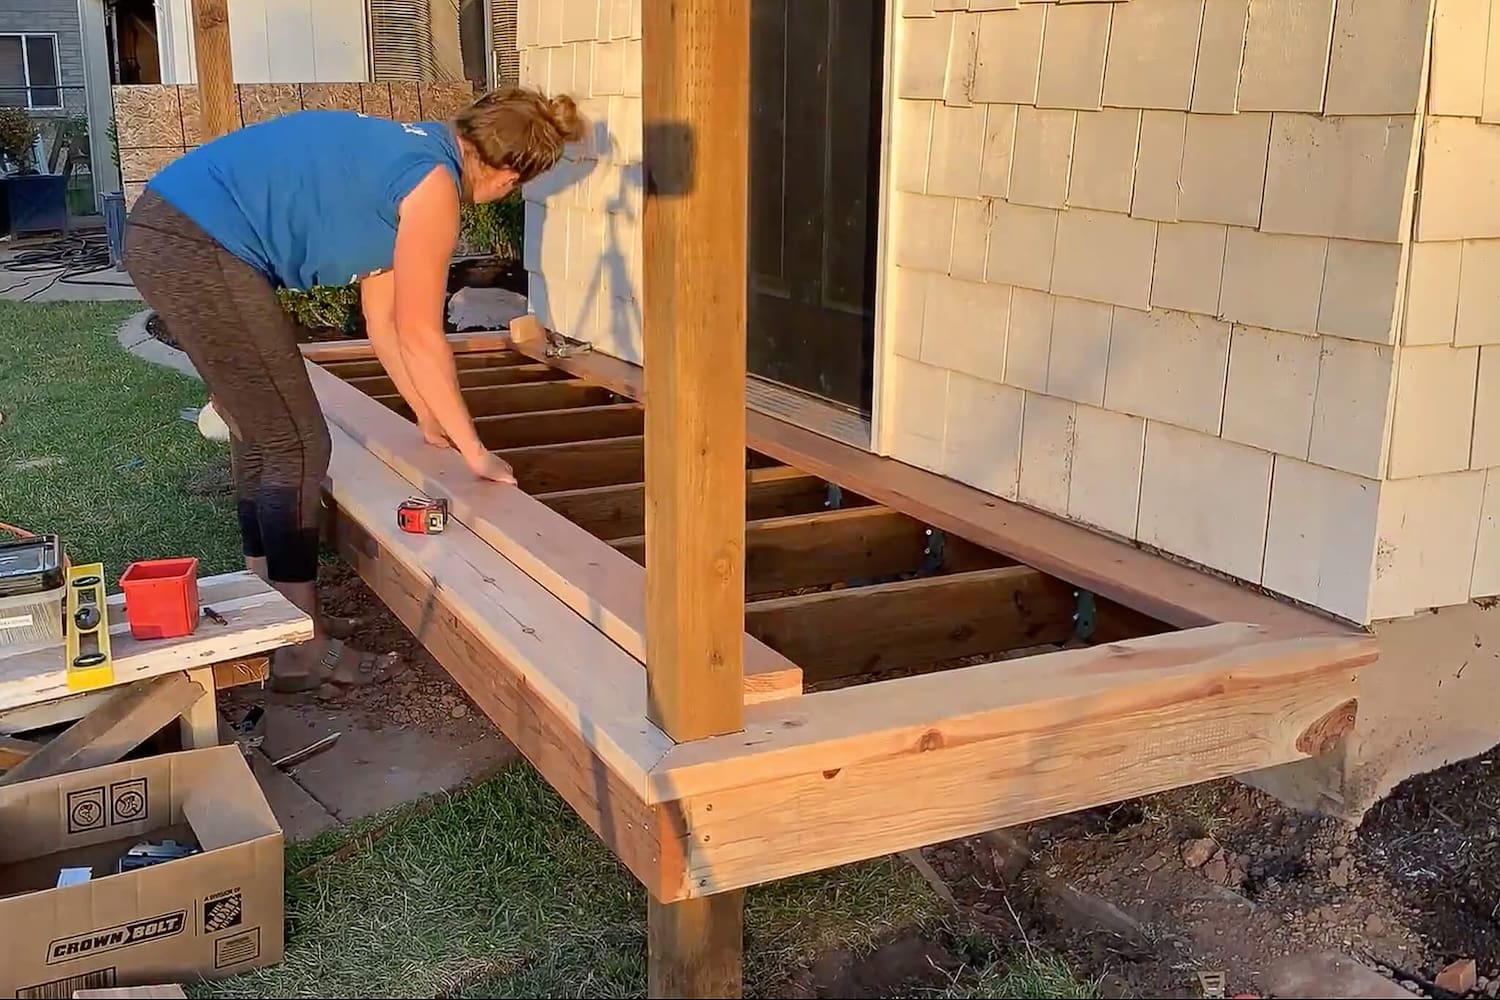
The last board needed a narrow rip cut to fit, but unless you’re down there with a tape measure, you’d never notice. Once everything looked good, I screwed the deck boards into the joists using 3″ wood screws.
Pro tip: Drive two screws into every joist along each board. That keeps the deck boards from cupping or working loose down the road, and pre-drill near the board ends so the wood doesn’t split.
How Much Does It Cost to Build a Front Porch?
A small DIY front porch like this one usually runs between $500 and $2,000, depending on size and lumber prices. The biggest variables are the decking (I used redwood, which costs more than pressure-treated pine but looks gorgeous left natural) and whether you already own the tools.
For comparison, hiring a contractor to build a front porch typically runs $6,000 to $18,000, so doing the build yourself is where the real savings live. Doing it in stages, like this series, also lets you spread the cost out over a few paychecks.
Front Porch Trim and Decking Timeline
| Phase | Active hours | Notes |
|---|---|---|
| Cut and miter the border trim | 1-2 hrs | Measure twice, dry fit every board before fastening |
| Notch the trim around the posts | 1 hr | Trace with a pencil, cut with a jigsaw, fit snug |
| Install the trim boards | 1 hr | Screw into the rim joists once everything is square |
| Lay and cut the deck boards | 2-3 hrs | Work from the front toward the house |
| Total (this stage) | About a day | Not counting the Part 1 foundation and framing |
How Long Does a Wood Front Porch Last?
A well-built wood front porch can last 15 to 25 years, and longer if you keep up with it. Redwood and cedar naturally resist rot and insects, which is part of why I chose redwood for the visible trim and decking.
To get the most life out of yours, seal or stain the deck boards every couple of years, keep standing water from pooling, and sweep off leaves and debris that trap moisture. A quick once-a-year look for loose screws or soft spots keeps small fixes from turning into big ones.
More Front Porch and Outdoor Projects to Try
- DIY Black Window Grid Makeover
- DIY In-Ground Trampoline
- How to Build DIY Tall Outdoor Planter Boxes
- DIY Wood Porch Column Wraps
- How to Paint a Concrete Porch
📌 Save This Front Porch Build for Later
Pin this now and come back when you’re ready to trim and deck your own porch.
How to Build a Front Porch FAQs
You build a front porch by anchoring a ledger board to the house, setting posts on concrete footings, framing the deck with joists, then trimming the frame and laying the deck boards. This post covers the trim and decking stage, which is where it starts looking like a real porch.
A DIY front porch like mine usually runs between $500 and $2,000, depending on size and lumber prices. Hiring a contractor pushes that to $6,000 or more, so doing the build yourself is where the real savings are.
A small front porch like this one comes together over a few weekends. The trim and deck board stage I cover here took about a day of active work. Plan extra time if you need a permit, since approval can add a few weeks.
In a lot of cities, yes. Any structure attached to your house can require a building permit, even a small porch. I did not need one for mine, but always check with your local building department first so you’re not redoing work later.
You attach a porch to an existing house with a pressure-treated ledger board bolted into the rim joist of the house, not just nailed to the siding. The ledger board is the structural connection, and the rest of the frame builds off of it. I cover that in Part 1.
I used untreated redwood for the visible trim and deck boards because it resists rot and looks beautiful left natural or stained. Pressure-treated pine is a budget-friendly option for the framing underneath where it will not be seen.
Standard deck framing puts joists 16 inches on center, meaning 16 inches from the center of one joist to the next. That spacing keeps the deck boards solid with no bounce. I set mine in Part 1 before laying the boards in this post.
Mitering the trim corners at 45 degrees gives your porch a clean, framed look that reads as professional even if you’re winging it. Cut both angles inward so the corners meet like a picture frame, and always dry fit before you screw anything down.
Hold the trim board up to the post, trace the outline with a pencil, then cut the square notch with a jigsaw. It doesn’t have to be perfect to look great once it’s in place. A snug notch lets the trim sit flush around the post.
Yes. A front porch is absolutely a doable DIY project for a confident beginner with basic tools like a miter saw, drill, and jigsaw. Following a step-by-step build like this one, you can get a sturdy, polished porch and save thousands.
The Bottom Line on Porch Trim and Decking
Trim and deck boards are the most satisfying stage of building a front porch: about a day of work, and it finally looks like a porch instead of a construction zone. Dry-fit every board before you fasten it, point your miter cuts inward so the corners meet like a picture frame, and drive two screws into every joist so the boards never cup. Doing the redwood decking ourselves is a big part of why the whole porch stayed between $500 and $2,000 instead of a contractor’s $6,000-plus.
Building the whole thing? This trim-and-decking tutorial is Part 2 of my 4-part DIY Front Porch series. Start at Part 1: Foundation and Frame, then keep going with Part 3: Building the Step and Part 4: The Porch Roof.
Leave a comment if you have any questions about your own front porch build – I read every one, and I’m here to help!
About Crystel
I’m Crystel Montenegro, a stay-at-home mom of five turned home DIY expert. I share budget-friendly DIY projects, home design, garden, recipes, and lifestyle content from my own home, every project here is one I actually built. Read more about me or follow along on Instagram.
How deep is your little porch?
I believe we made it 5 feet deep
Where is part 3 of cute little DIY Porch?
I’m writing it this week actually!