


DIY Concrete Curbing in Your Yard: How to Make a Concrete Curb


Updated July 13, 2026
A concrete curb is a great way to add style and definition to your yard’s landscaping. Concrete curbing may seem intimidating, but it’s totally doable for the average DIYer. Follow along as I show you step-by-step how easy it is to tackle this weekend project.
I’ve done paver borders around my flower beds, and I’ve tried borderless landscape edging too. As I overhaul my front yard, I thought it would be fun to try something new and add a winding, concrete curb for a border. I looked into all the different options to do this, including renting a curbing machine, but ultimately I decided this method was going to be way cheaper and more DIY-friendly. This was my first time making a concrete curb, and I learned a lot. I’m sharing step-by-step instructions and telling you all the tips and tricks I learned along the way as I take on this project to upgrade my “curb” appeal.
Quick Answer: How Do You Make a DIY Concrete Curb?
To make a DIY concrete curb: mark the curb path with spray paint, dig a 3 to 6 inch trench along the line, build a 2-sided form using composite siding or thin plywood (with stakes hammered in every 12 to 18 inches), space the sides exactly 6 inches apart with scrap wood spacers, add a layer of road base for support, mix bagged concrete in a wheelbarrow to a thick oatmeal consistency, fill the form, tap the sides with a hammer to release air bubbles, smooth the top with a float, make relief cuts every 7 to 8 feet, round the edges with a concrete edger, then remove the forms after 24 hours of drying. Total cost for a 25 to 30 foot curb is around $150 to $200, plus 4 to 6 hours of active work.
DIY Concrete Curbing: At a Glance
The full process for pouring your own concrete curb comes down to seven main steps:
- Mark the curb path with spray paint and dig a 3 to 6 inch trench
- Build a 2-sided form using composite siding or thin plywood, staked into the ground
- Space the sides exactly 6 inches apart and add a layer of road base inside the form
- Mix bagged concrete in a wheelbarrow to a thick oatmeal consistency
- Fill the form, tap the sides with a hammer to release air bubbles, smooth the top with a float
- Make relief cuts every 7 to 8 feet and round the edges with a concrete edger
- Wait 24 hours, then unscrew the stakes and pry the forms off
Watch the DIY Concrete Curbing Tutorial
Table of Contents
- Quick Answer: How Do You Make a DIY Concrete Curb?
- DIY Concrete Curbing: At a Glance
- Watch the DIY Concrete Curbing Tutorial
- Tools and Materials for a DIY Concrete Curb
- Preparing the Ground for a Concrete Curb
- Building Forms for the Concrete Curb
- Adding Concrete to the Curb Forms
- Finishing Your Concrete Curb
- Removing the Concrete Curb Forms
- 📌 Save This Concrete Curbing Tutorial for Later
- Frequently Asked Questions About DIY Concrete Curbing
Tools and Materials for a DIY Concrete Curb
Tools
- Shovel
- Circular saw or miter saw
- Mini sledge hammer
- Level
- Drill or impact driver
- Wheelbarrow
- Utility knife
- Float
- Concrete edger
- Hammer
Materials
- Marking paint
- Composite siding
- 1/5″ plywood
- 1×2 furring strips
- 1×3 furring strips
- 1 1/4″ screws
- Road base
- High strength concrete
Preparing the Ground for a Concrete Curb
Marking the Curb Path
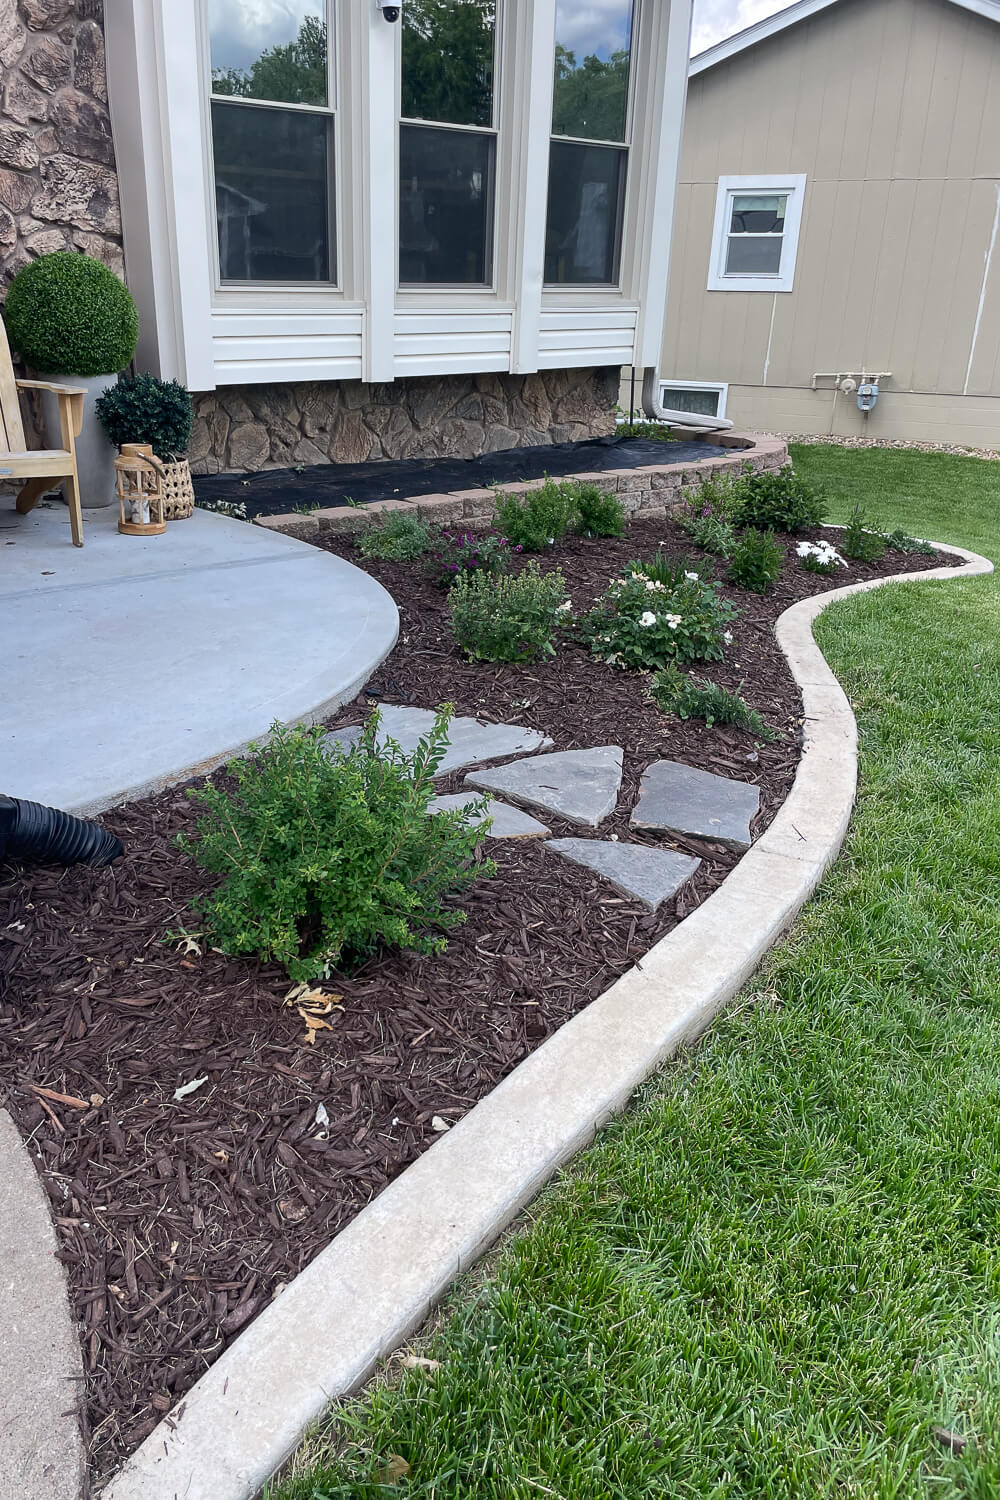
This is the area in my front yard where I wanted to add the concrete curb. Originally it was all grass, but I wanted to add more flower beds to liven up the landscaping a little bit. And I love the idea of a two-tiered flower bed for lots of interest.
My vision is for a lovely, winding landscaped bed just off of the front patio that we put in a few weeks ago, that will create a clean definition between lawn and flower bed. I’m going to be ripping out this awful, weedy, patchy lawn and replacing it with sod, so this concrete curb needs to go in ASAP to allow me to put the sod right up against it.
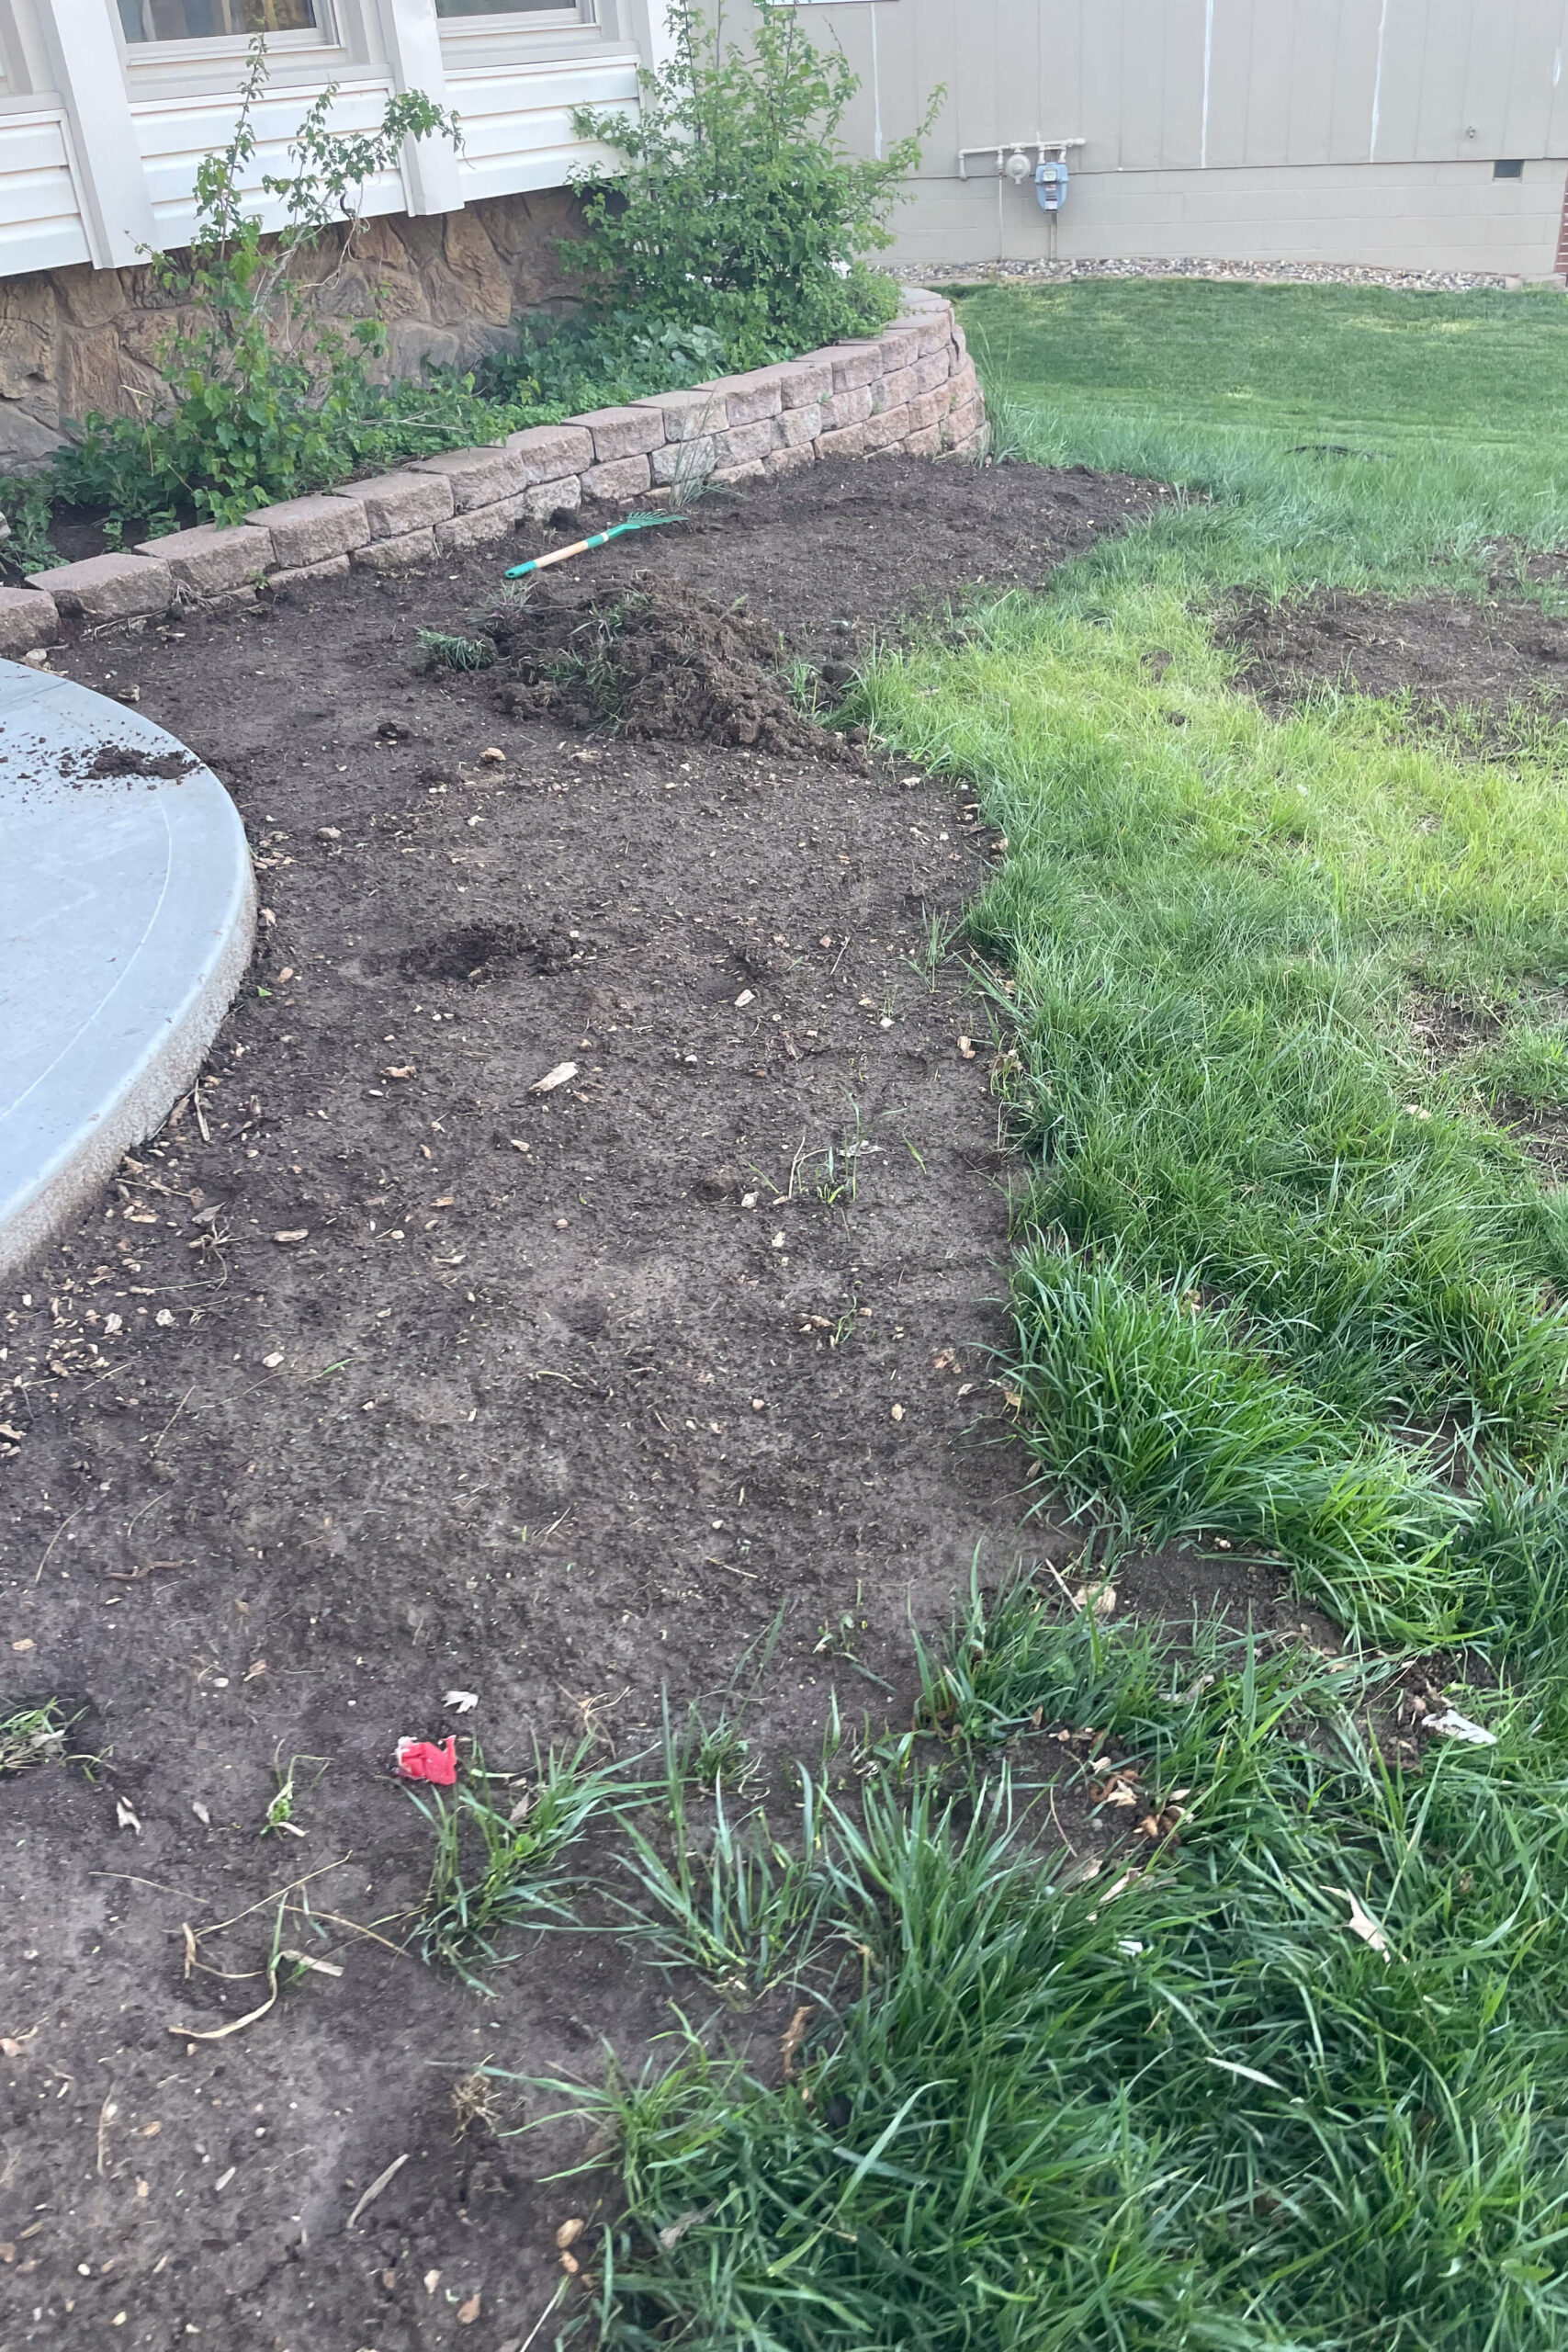
First step, using a can of spray paint, I marked out where I wanted the curb to go.


Digging the Trench
Then it’s time to dig in, literally. The curb won’t be sitting on top of the grass as that will break down underneath it and cause premature cracking. You want to be sure to dig a trench for my concrete curb following the guideline I’d already marked out for myself with the spray paint.
I worked my way down the path, digging and removing the dirt until I had completely cleared out the trench for installing my concrete curb. I wanted my curbing to be at least 6 inches tall, so I dug maybe 3 inches down into the soil at the lower spots. I dug deeper in the higher spots. As you can see, I’m working on a sloped area. It ended up being a little more than that in some spots, but in the end it doesn’t really have to be exact because your forms will determine how high above the soil line your concrete will be.


Building Forms for the Concrete Curb
Choosing Form Material
When pouring concrete of any shape, it needs a mold. For my concrete curbing, I’m building forms using composite siding. They’ve got a good amount of bend and are sturdier than plywood while still being affordable, although in the future for something this bendy I would probably use something else. We did end up snapping a couple of boards because it didn’t have quite the amount of give I needed it to have. Other options are trex decking boards or you could get fancy and buy bender boards that are made to do this sort of thing. They can be a little tricky to find though and are probably more expensive.
Setting and Staking the First Side
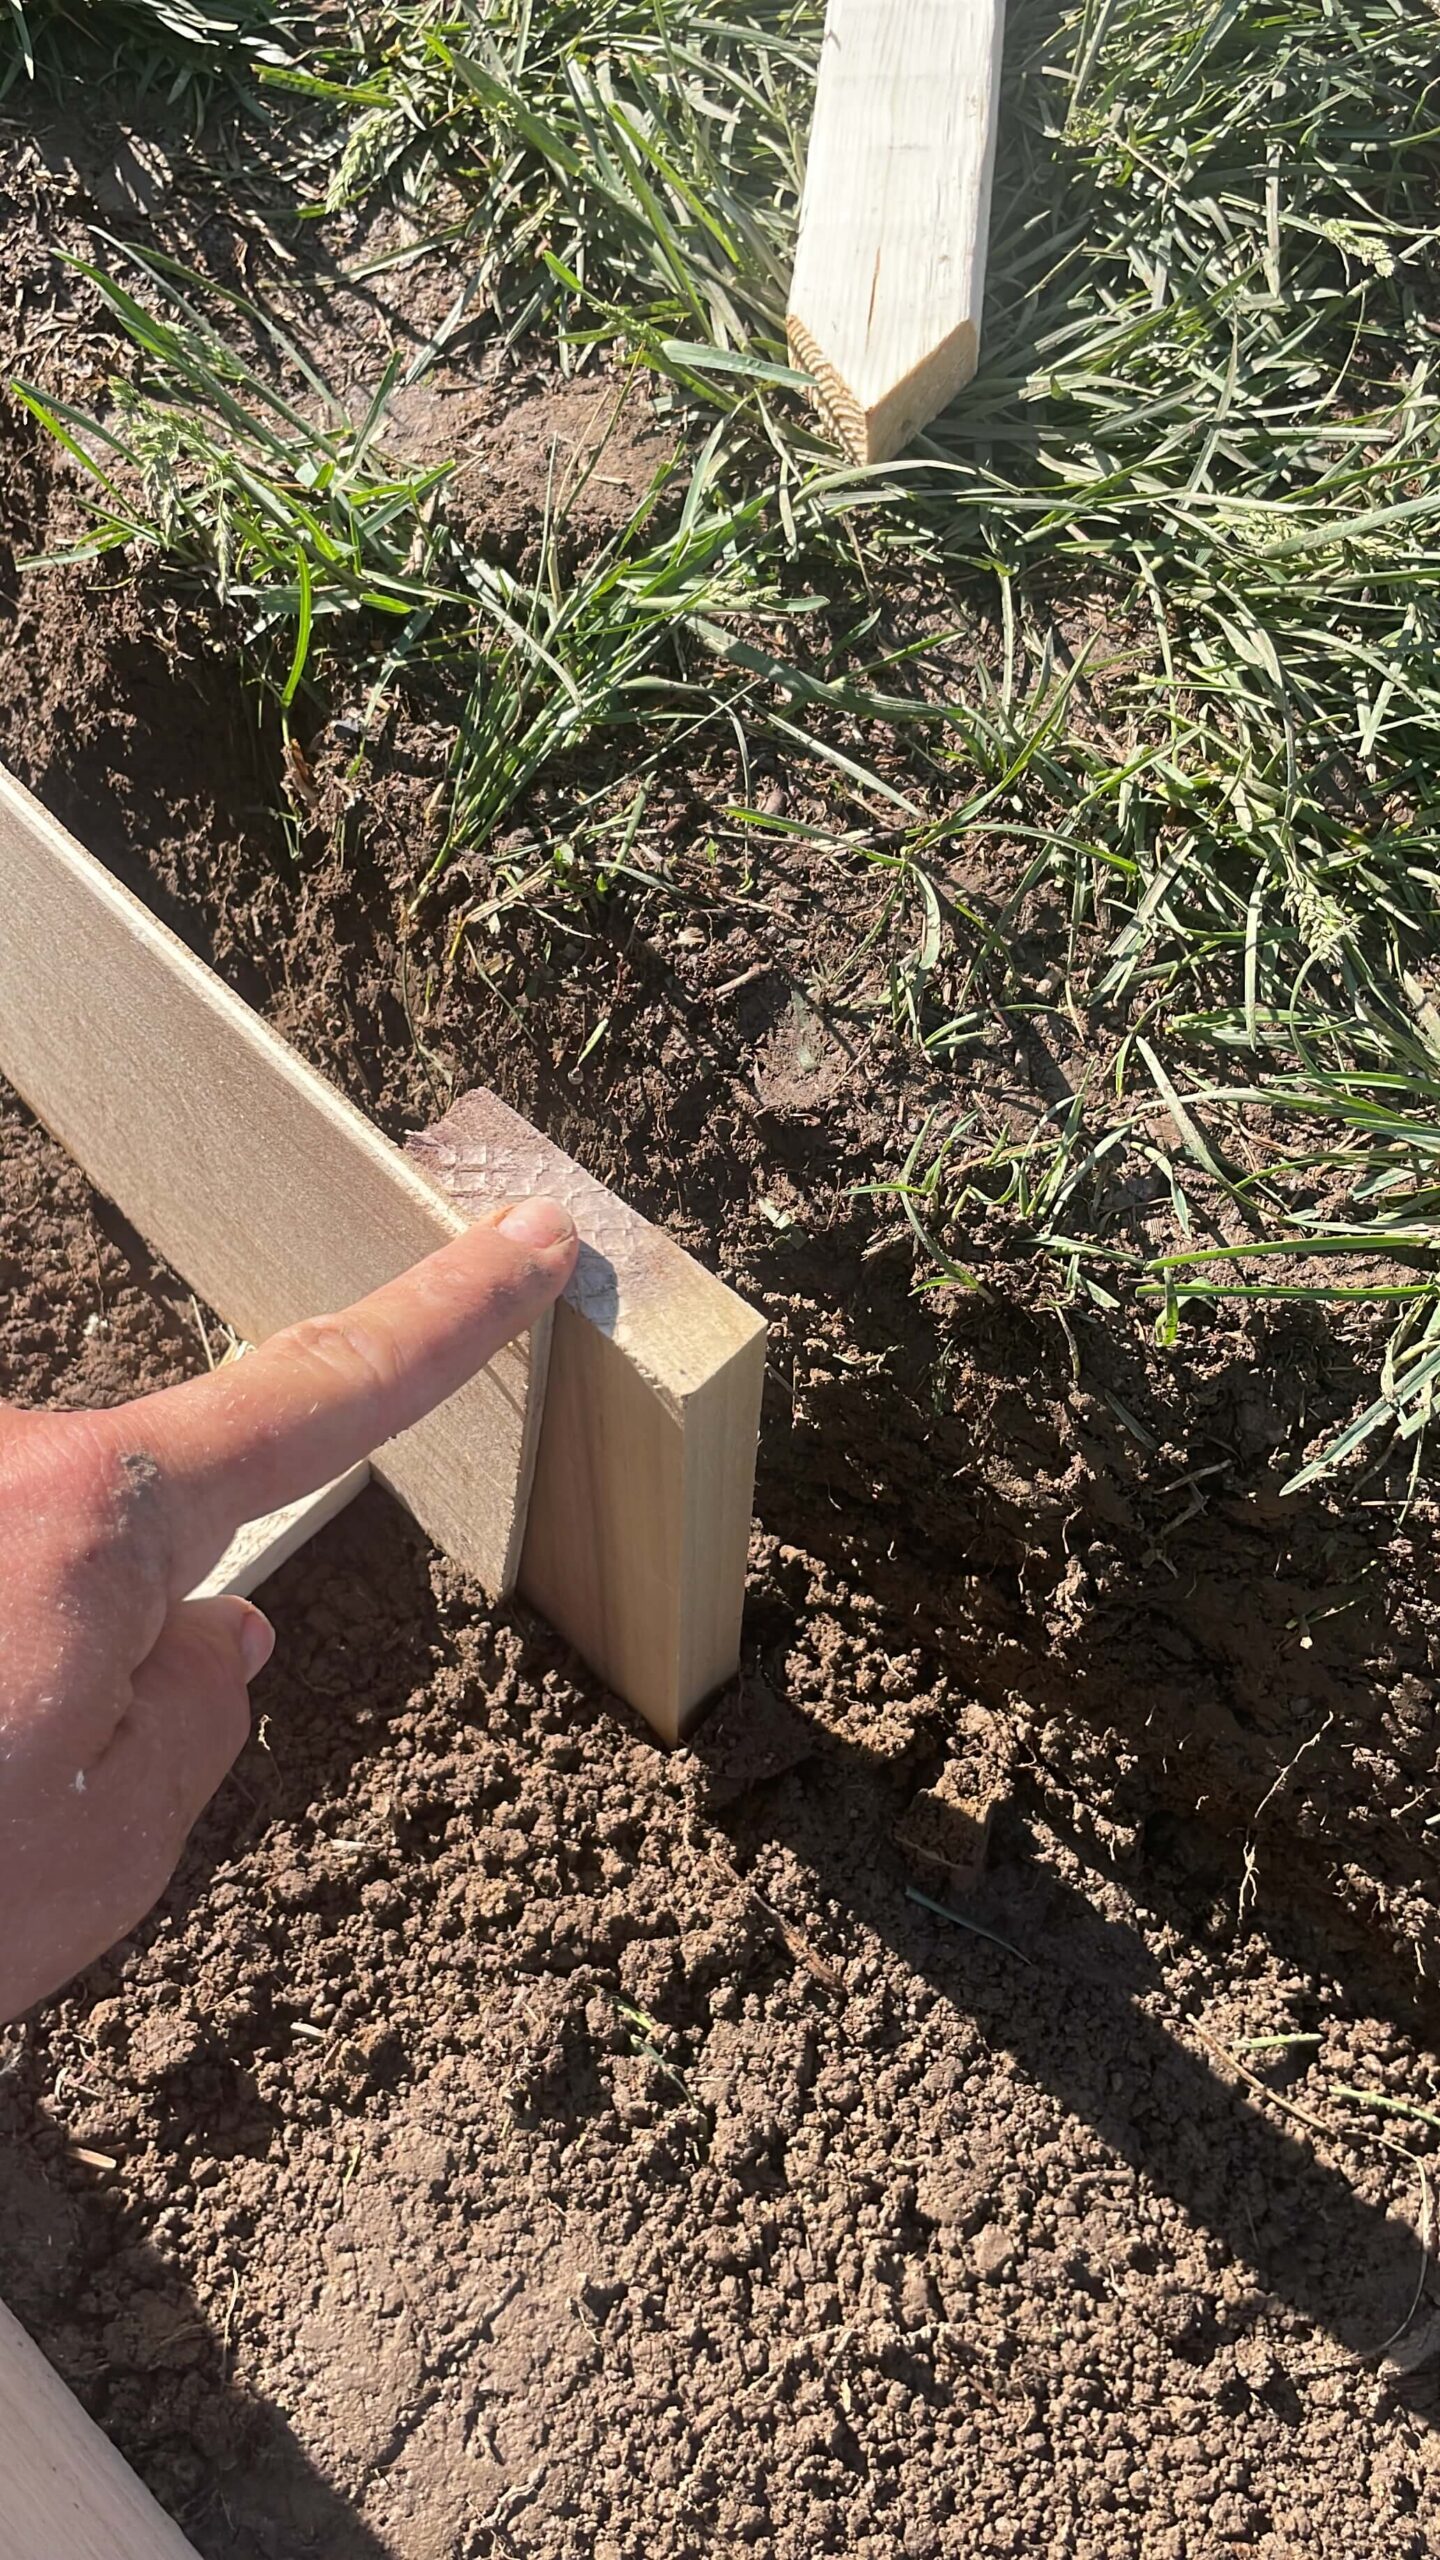
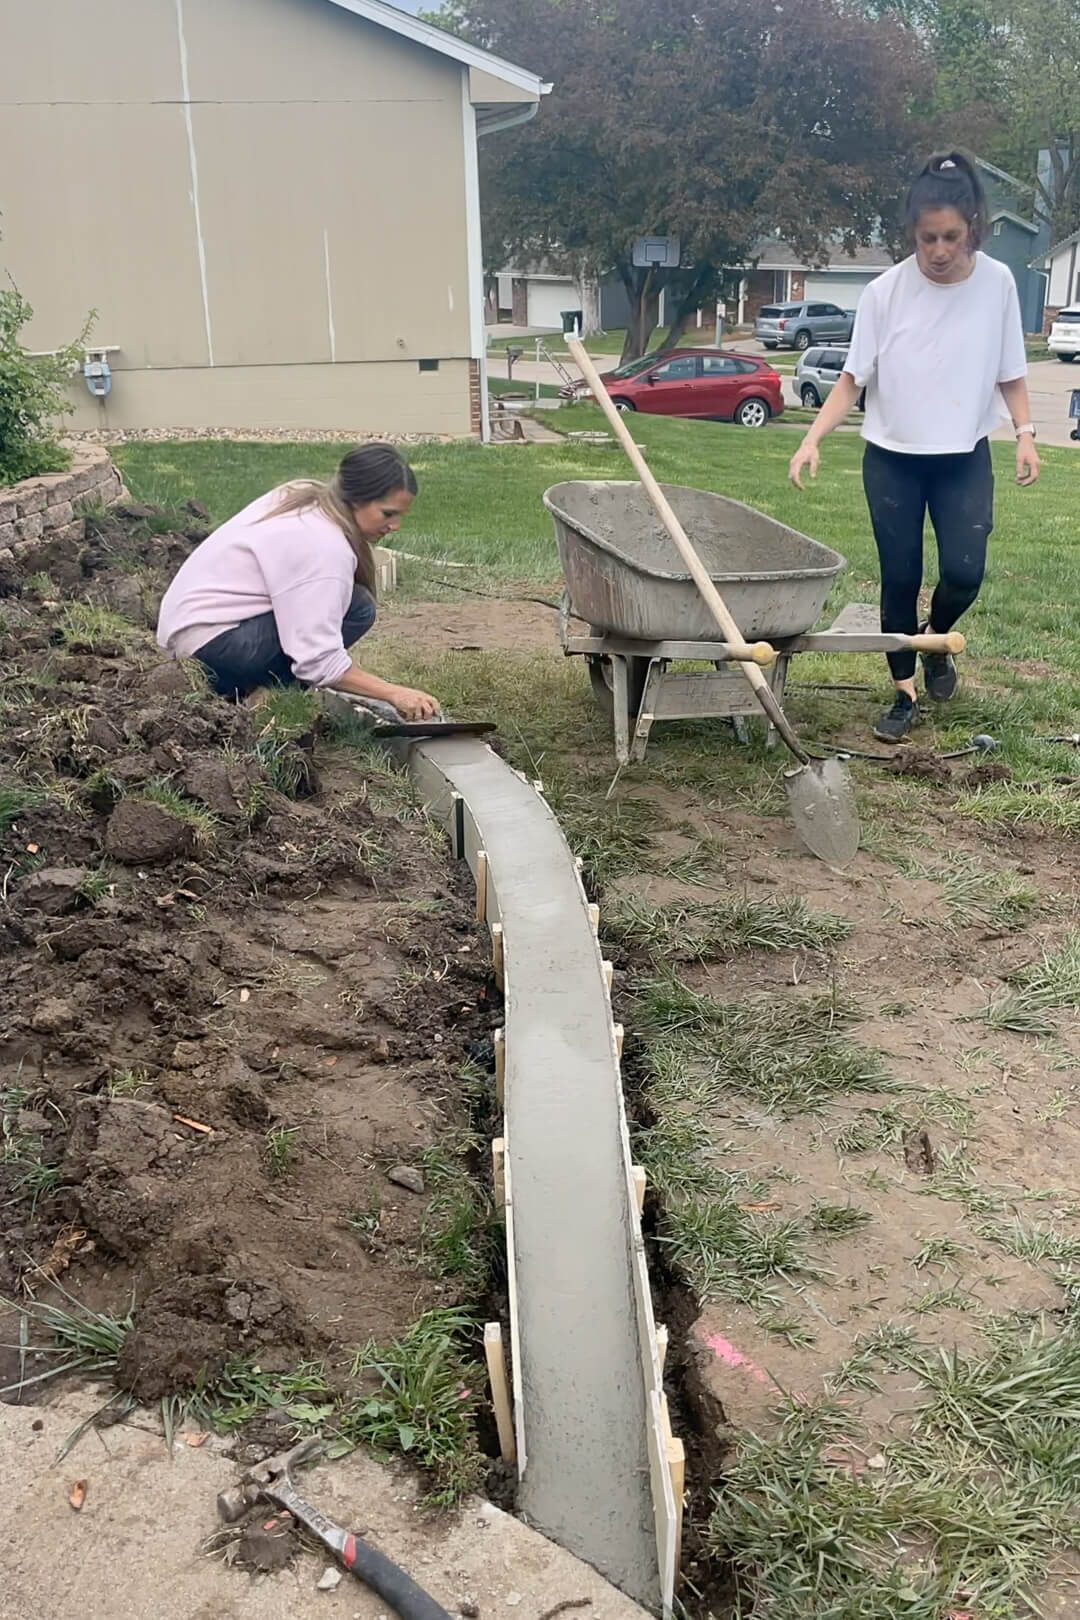
I set the composite boards on the edge where I want my curb to be. Then, I hammered in stakes to hold those boards in place. I made my own 10 inch stakes by cutting down furring strips with my miter saw.

Once you have one side of the form up, you have to repeat this on the other side, slowly working your way down the trench to build out the form for your concrete curb.

Spacing the Two Sides at 6 Inches
You want the two sides of your form to be equally spaced apart, so we used some scrap pieces of wood cut down to 6 inches to keep our spacing consistent. This is much easier and faster than constantly pulling out a tape measure. You also want both sides of the form to be exactly the same height and level to each other, so as you work along the forms, keep checking your progress with a level.
This job can be done alone, but it’s much easier with the help of a friend. An extra set of hands goes a long way here.

When you have the stakes and the edges of your forms all exactly where you want them, you screw them into place using 1 1/4″ screws and your drill or impact driver.

Anywhere I had two boards meeting, I used a 12 inch piece of a 1×3 instead of the thinner stakes. The wider board is perfect for me being able to screw into both form boards and hold that seam together.
Handling Tight Curves and Joints
For this section that was extra curvy, I wasn’t able to use the composite siding boards. They unfortunately snapped and broke when trying to bend this far. The piece here that is a slightly different color is actually 1/5″ plywood. It’s really thin plywood made for underlayment, and it’s inexpensive to buy in a 4×8 sheet. I simply cut it down into a strip the same height as the composite boards I was using. In the future I’d probably not use anything thinner than 1/4″ plywood, though, as this can be pretty flimsy against the heavy concrete and become wavy if it’s not staked up really really well.

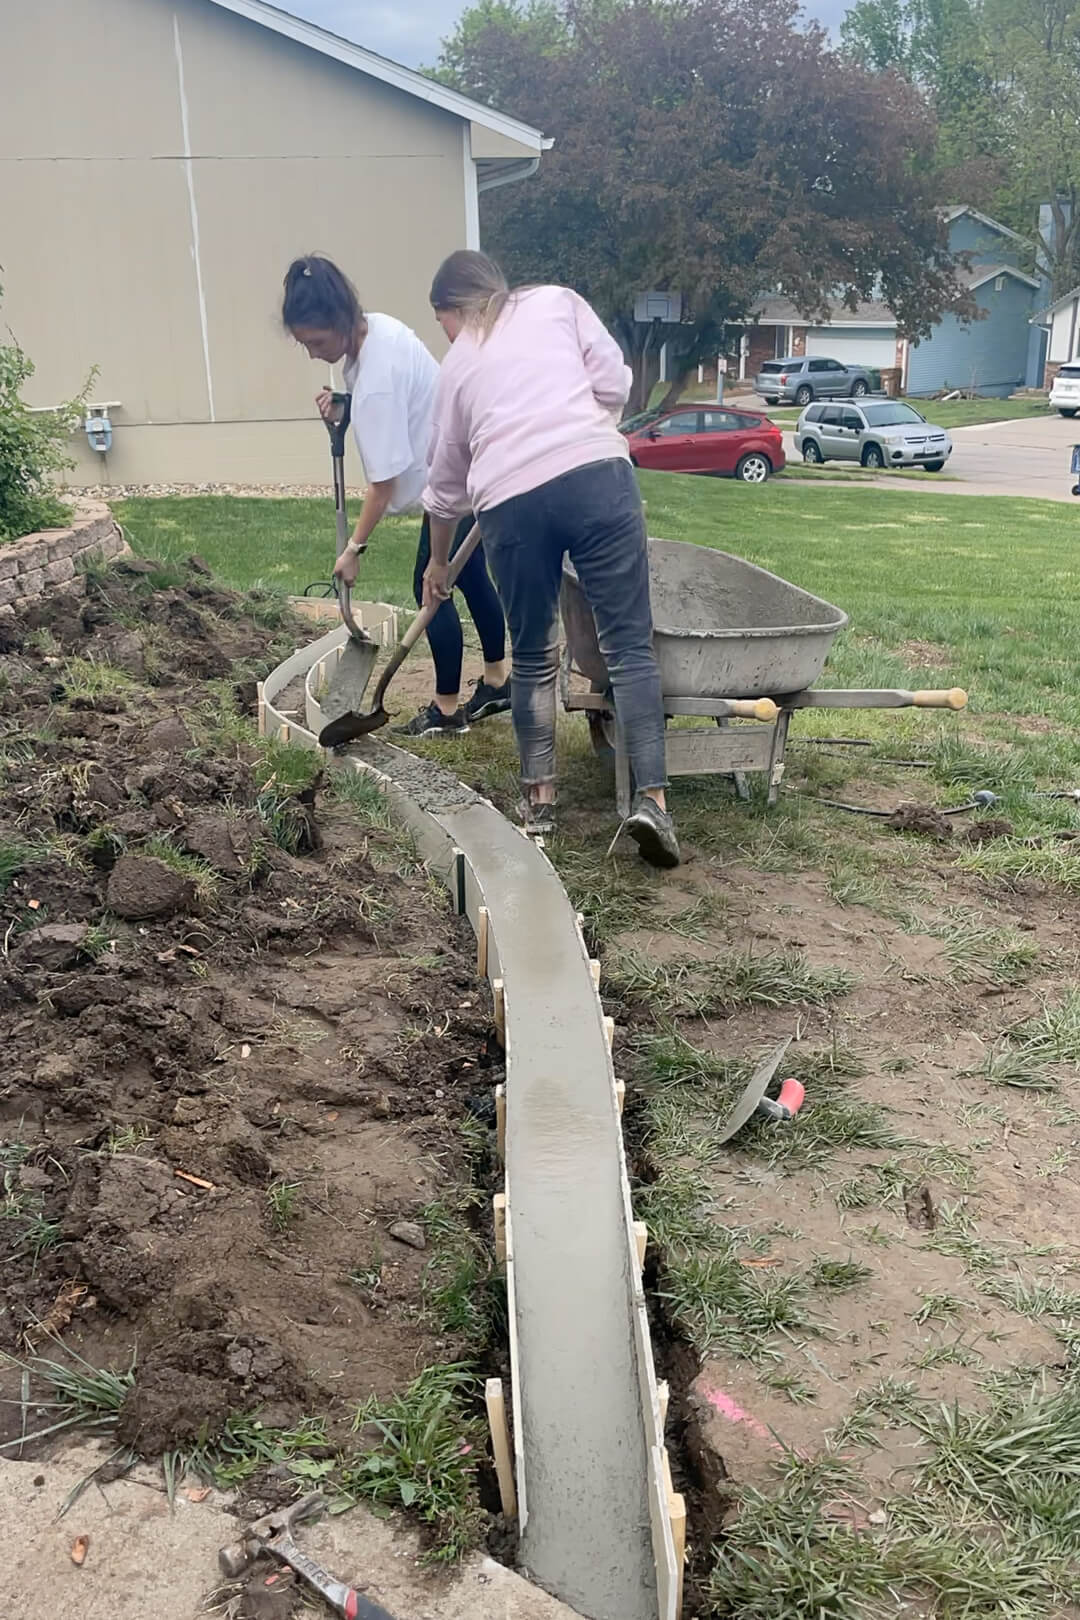
While my friend Breaunna finishes screwing all the stakes into the composite boards, I’m adding a layer of road base to the bottom. The dirt isn’t enough support for the concrete, so by adding the road base underneath I’ll get a better foundation for the concrete curb, which will make it last longer and help prevent cracking and shifting as the ground expands and contracts from changes in temperature.

Adding Concrete to the Curb Forms
Mixing Concrete in a Wheelbarrow
Now that our forms are done and ready to go, we can add the concrete. I almost always mix bags of concrete in my wheelbarrow. It’s the easiest way to do it.
First, put the bag of concrete right in the wheelbarrow and cut a slit across the middle using a utility knife.

Flip the bag over and bend it in half along the slit that you just cut, then pull up. The concrete will fall right out of the bag. This method is much easier and makes way less dust than pouring it from the bag to the wheelbarrow.


Next, I added water to the dry concrete using my Giraffe hose reel. You can always add more water later, but you can’t take it out. So start with a little bit and add it slowly until you get the right consistency.

Right Consistency for Pouring
Then, stir it up with a shovel. Add more water and stir again as many times as necessary. You don’t want any dry bits left in the wheelbarrow, so stir thoroughly.
When mixed properly, your concrete will be thicker than pancake batter, more like a thick oatmeal. It should still be able to hold its shape somewhat and not be runny.

Filling the Forms and Smoothing the Top
One shovelful at a time we filled up the concrete forms.

Mix more concrete as needed (I used 15 bags of concrete for this curb, which is between 25-30 ft long).

As you fill the form, you’ll need to smooth out the top of the concrete using a tool called a float. This first part I freehanded a slope down to the concrete patio, but for the rest of the curb I’ll smooth it out with the top of the forms.

We continued down the form, mixing more concrete as needed, and smoothing it out with the float as we went.
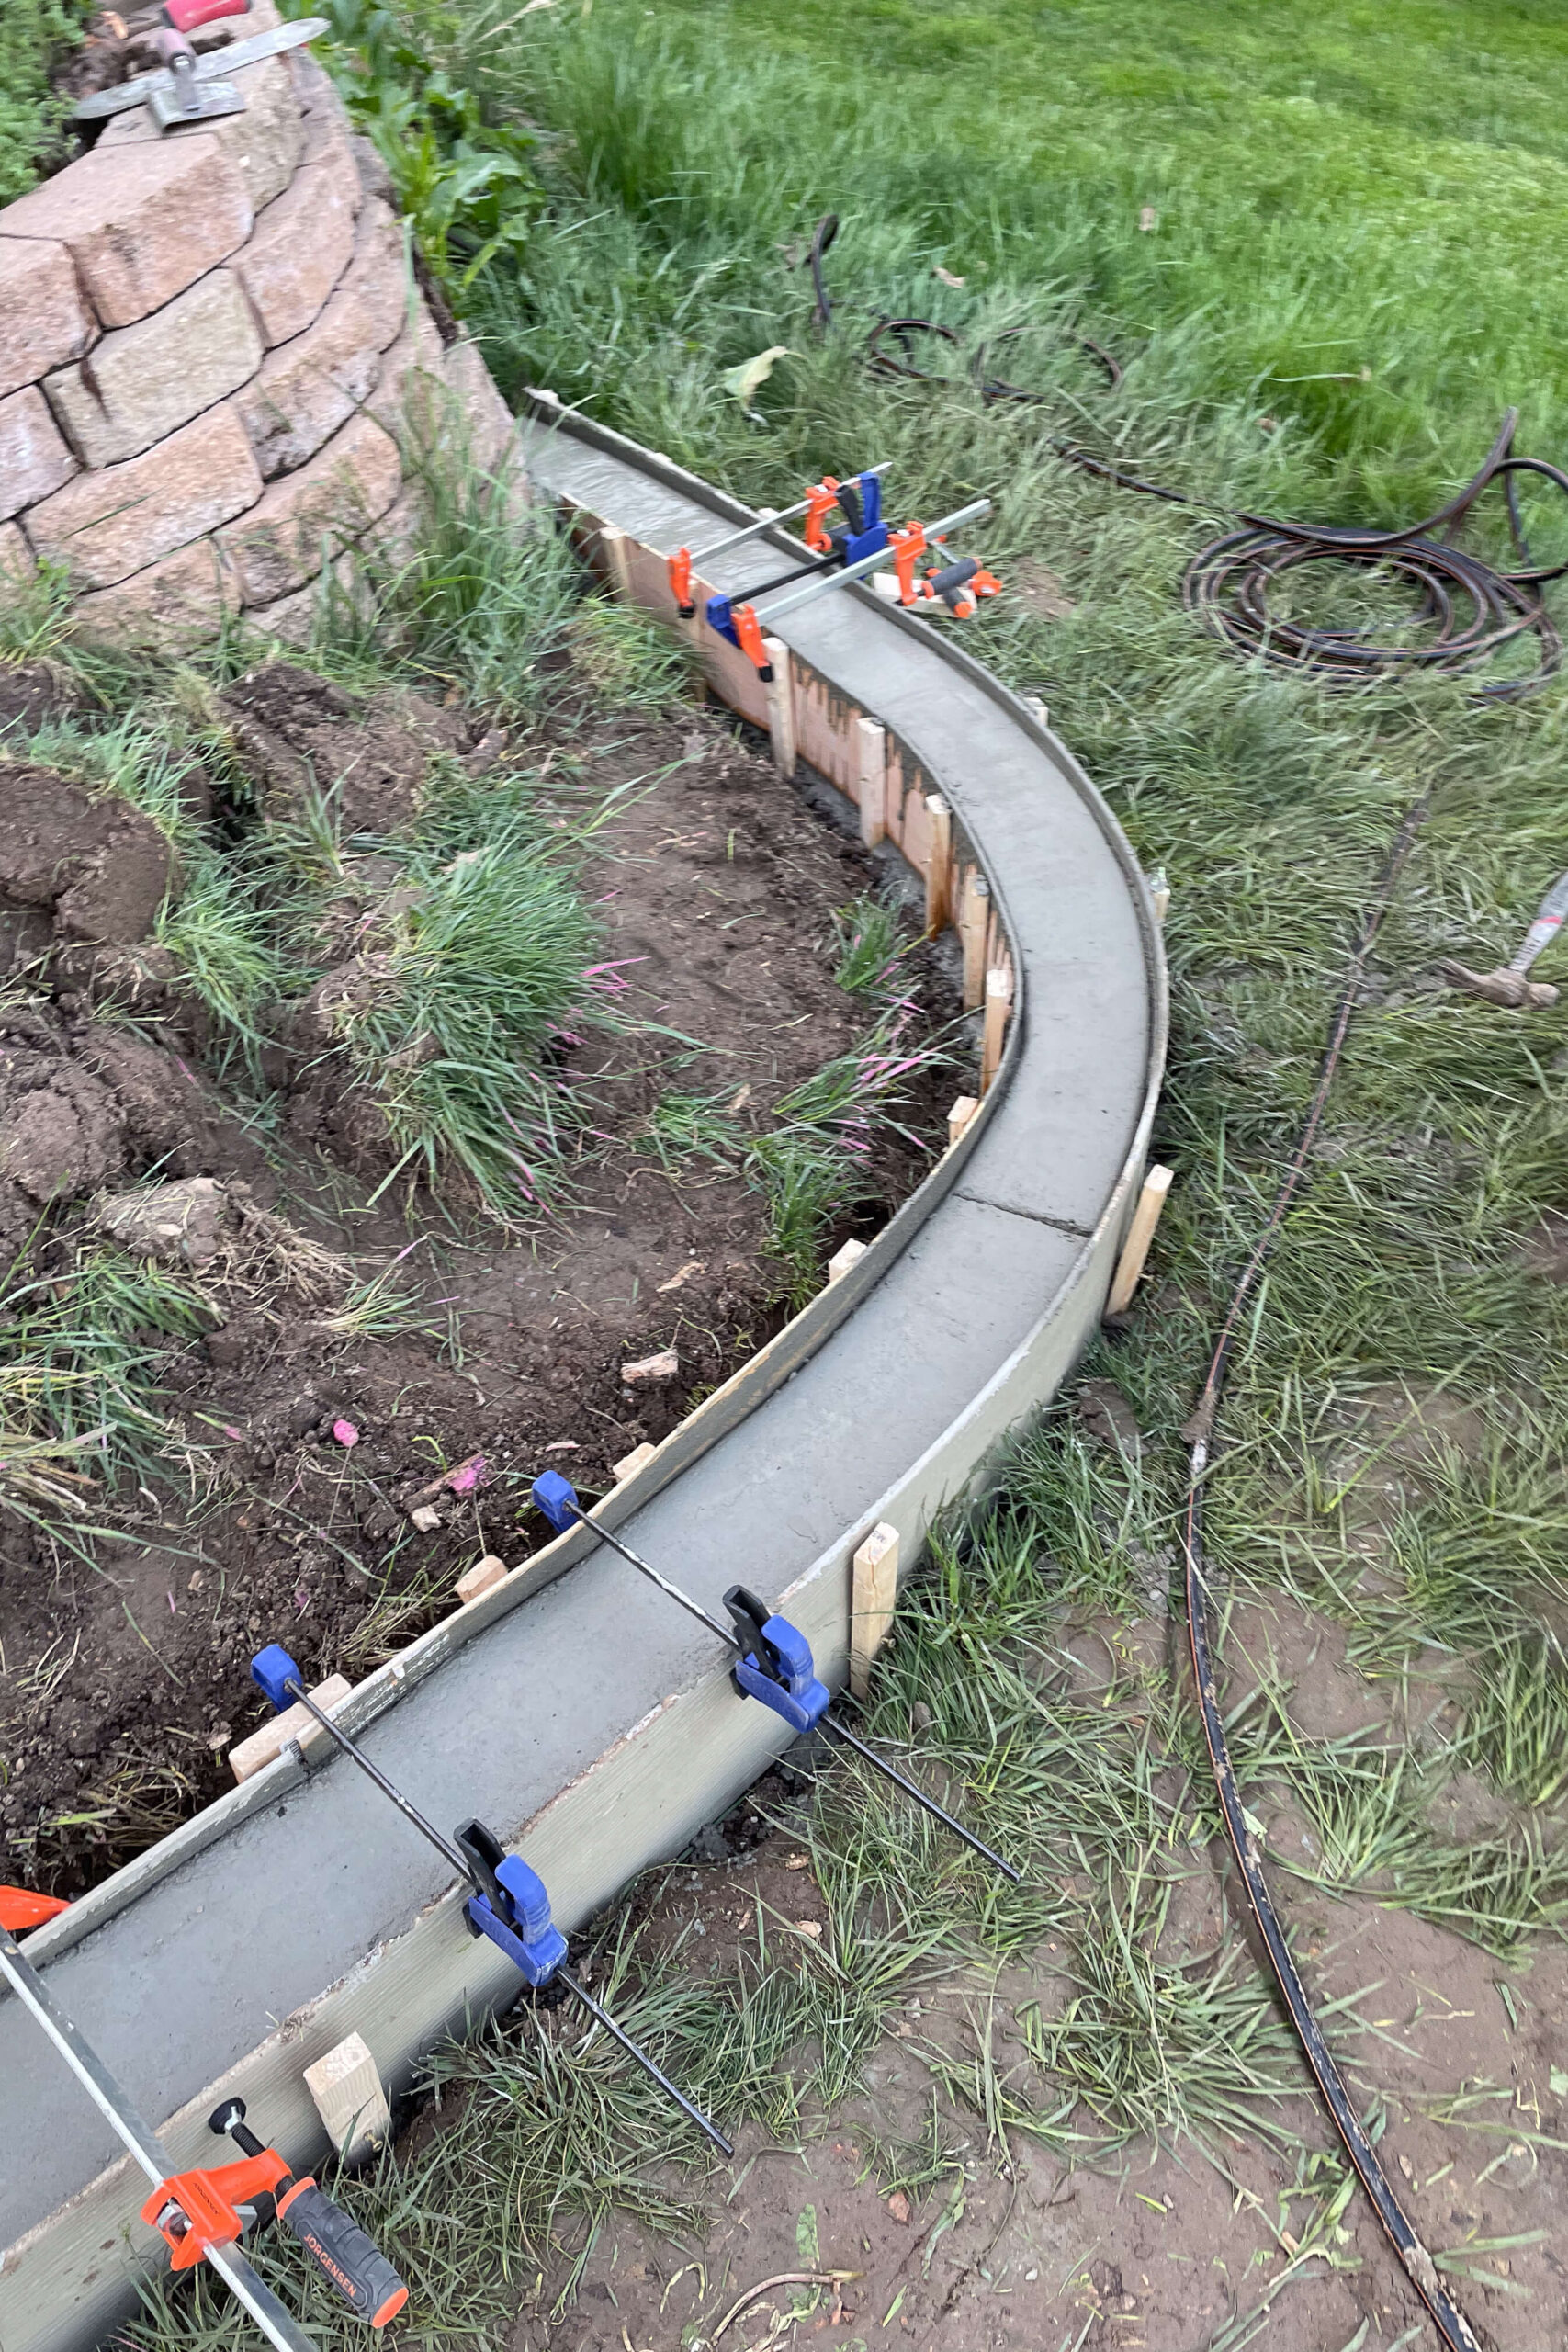
Catching Bulges with Clamps
As we got further down the curb we could see that this section right here was starting to bulge. I grabbed a clamp to pull it back together to the 6 inch width that I was going for. I think it bulged because my stakes weren’t long enough. We had used leftover ones from another project and they weren’t sunk into the ground far enough to be strong enough to hold the heavy concrete in. As long as you’ve got at least 12 inches, you should be good assuming your concrete forms aren’t much deeper than 6-8 inches.
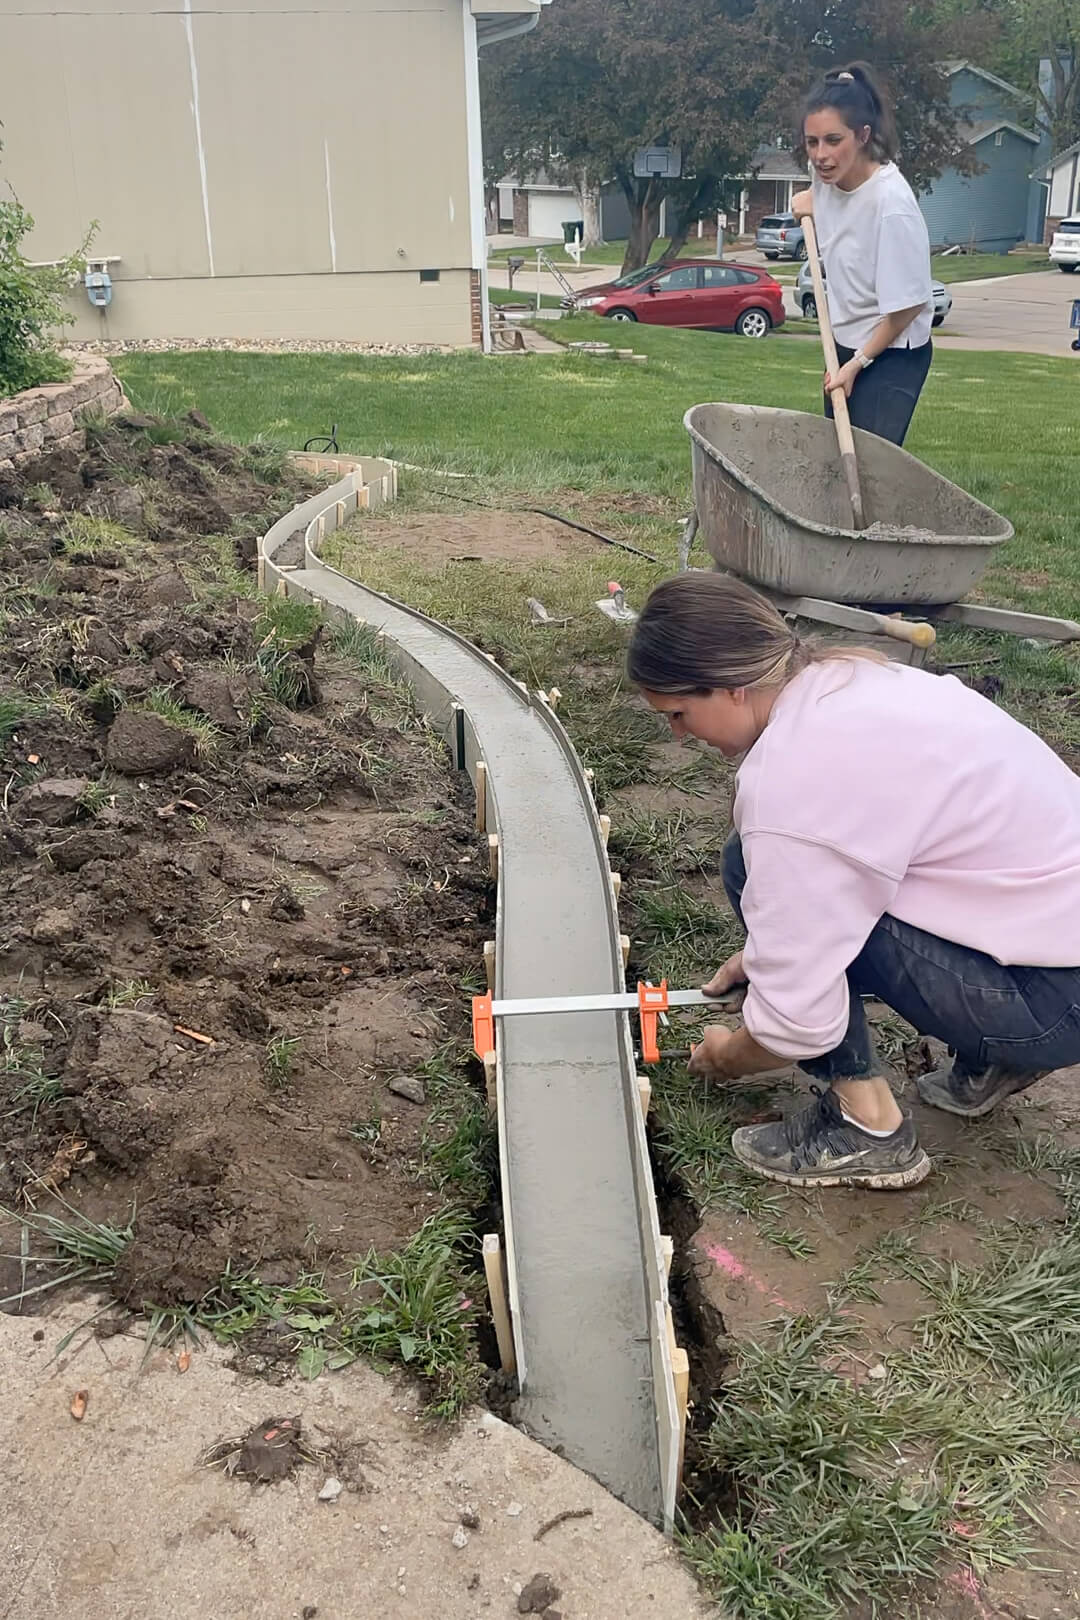
I added a few more clamps to make sure everything was spaced 6 inches apart. You can see how much the clamps helped as that bulge in the photo above just disappears.
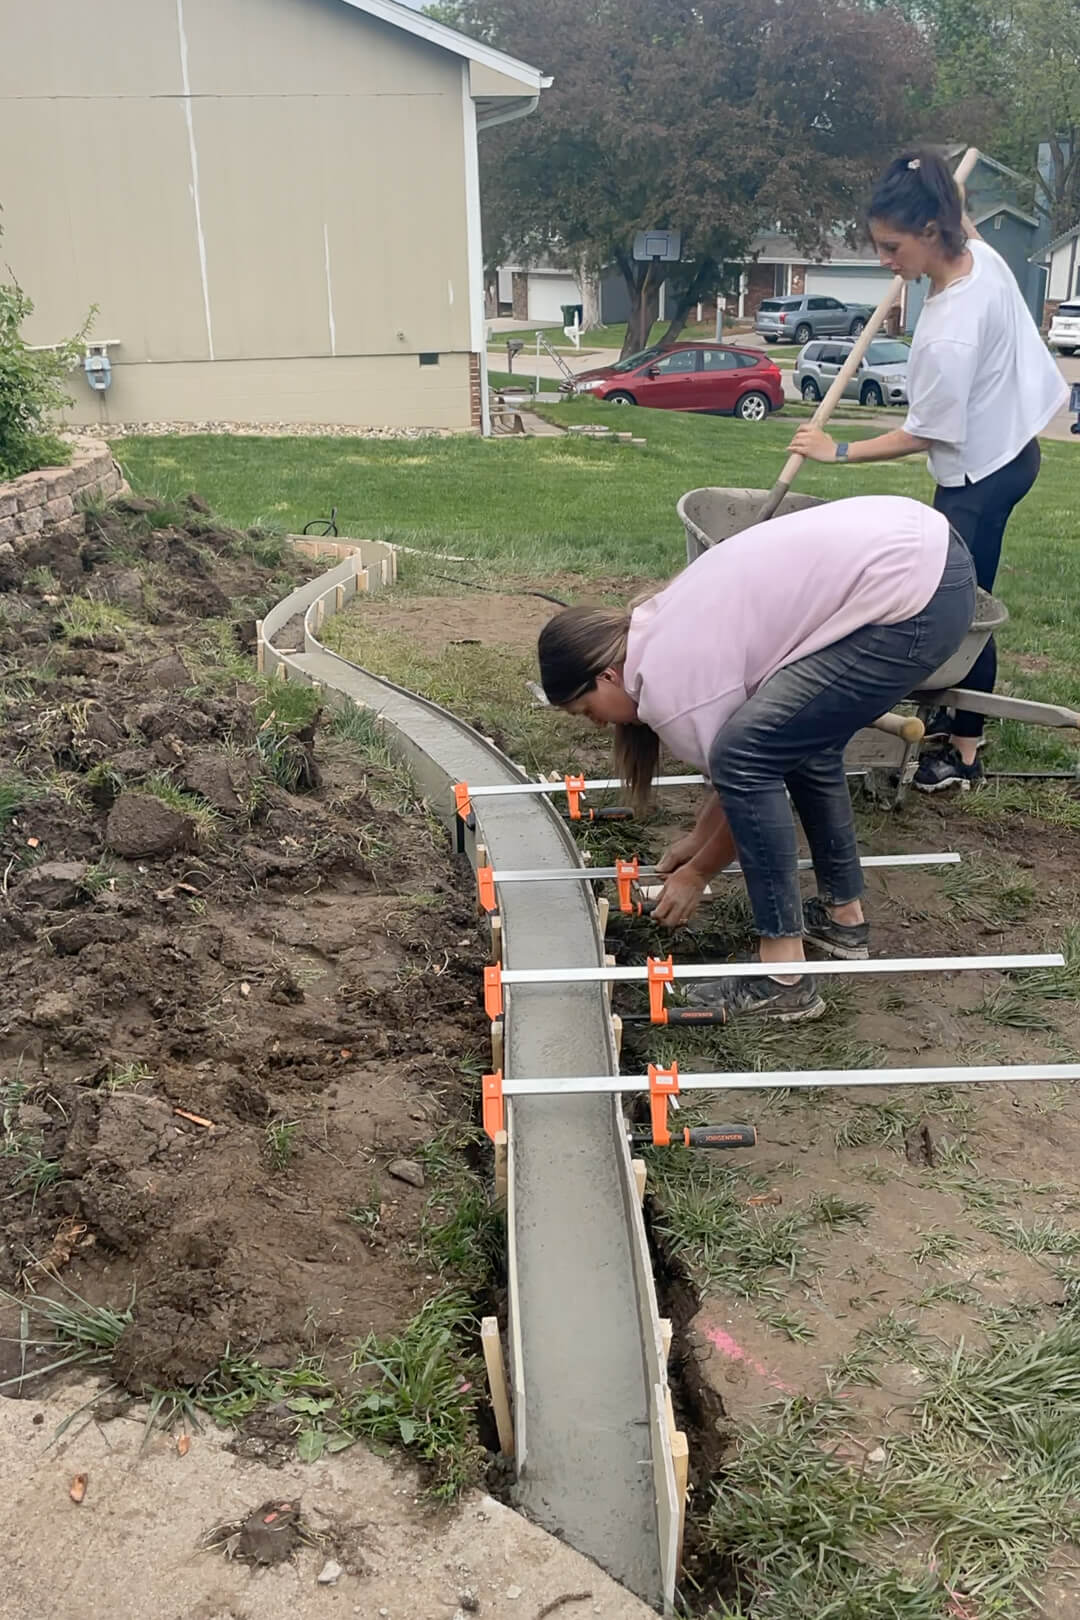
I ended up needing to add clamps in a few other spots where I noticed a bit of a bulge happening.
Finishing Your Concrete Curb
After you have your forms filled, there are a few things you need to do to have a beautifully finished concrete curb.
Tapping Out Air Bubbles
First, grab your hammer. While we wait for the concrete to set you need to work out any air bubbles that are trapped in the concrete. The way you get this done is by tapping the forms with a hammer.

Do it on both sides of your curb, all over the forms, up and down the length of your entire curb, over and over again. Tap, tap, tap. You can’t overdo this step.

This is a curb I made where I didn’t do any tapping to work out the air bubbles and allow the wet concrete to settle. See how pitted and uneven the edge of my curb is? To end up with a nice smooth curb, you have to tap those air bubbles out. It’ll cause the concrete to settle below the top of your forms, so you may want to add more concrete to keep it as tall as your forms are. I chose to just let it settle and leave it as it was.

Making Relief Cuts
Next, you’ll need to make some relief cuts. Concrete naturally wants to crack and break as it dries. By making a few relief cuts, you give the concrete a place to pull from so it doesn’t crack in random, unsightly places.
To make the relief cut, you just use a concrete edger tool, and press down where you want the relief cut to be. I did one relief cut every 7-8 feet along my concrete curb.

Rounding the Edges
Then use that same edger tool to run along the edge of the curb. Even though we smoothed out the top of the concrete curb, the top edges where they touch the form are not very clean looking. When you run this edger tool along the edges of your curb it slightly rounds the edges and gives your concrete curb nice, clean corners.

This concrete curb already looks so good. I can’t even tell you how excited I was to see my vision for this curb coming to life.

Removing the Concrete Curb Forms
After a day or so, the concrete will be dry enough to remove the forms. Taking the forms off is easy. Use your drill to unscrew the screw just enough that you can get the back of a claw hammer onto the head. Use the claw side of your hammer and hook it underneath the screw head, then pull up. You need a little leverage to lift those stakes up out of the ground.

Work your way down the concrete curb, prying and lifting the form with your hammer.

And that’s it. Look at my beautiful, new concrete curb.
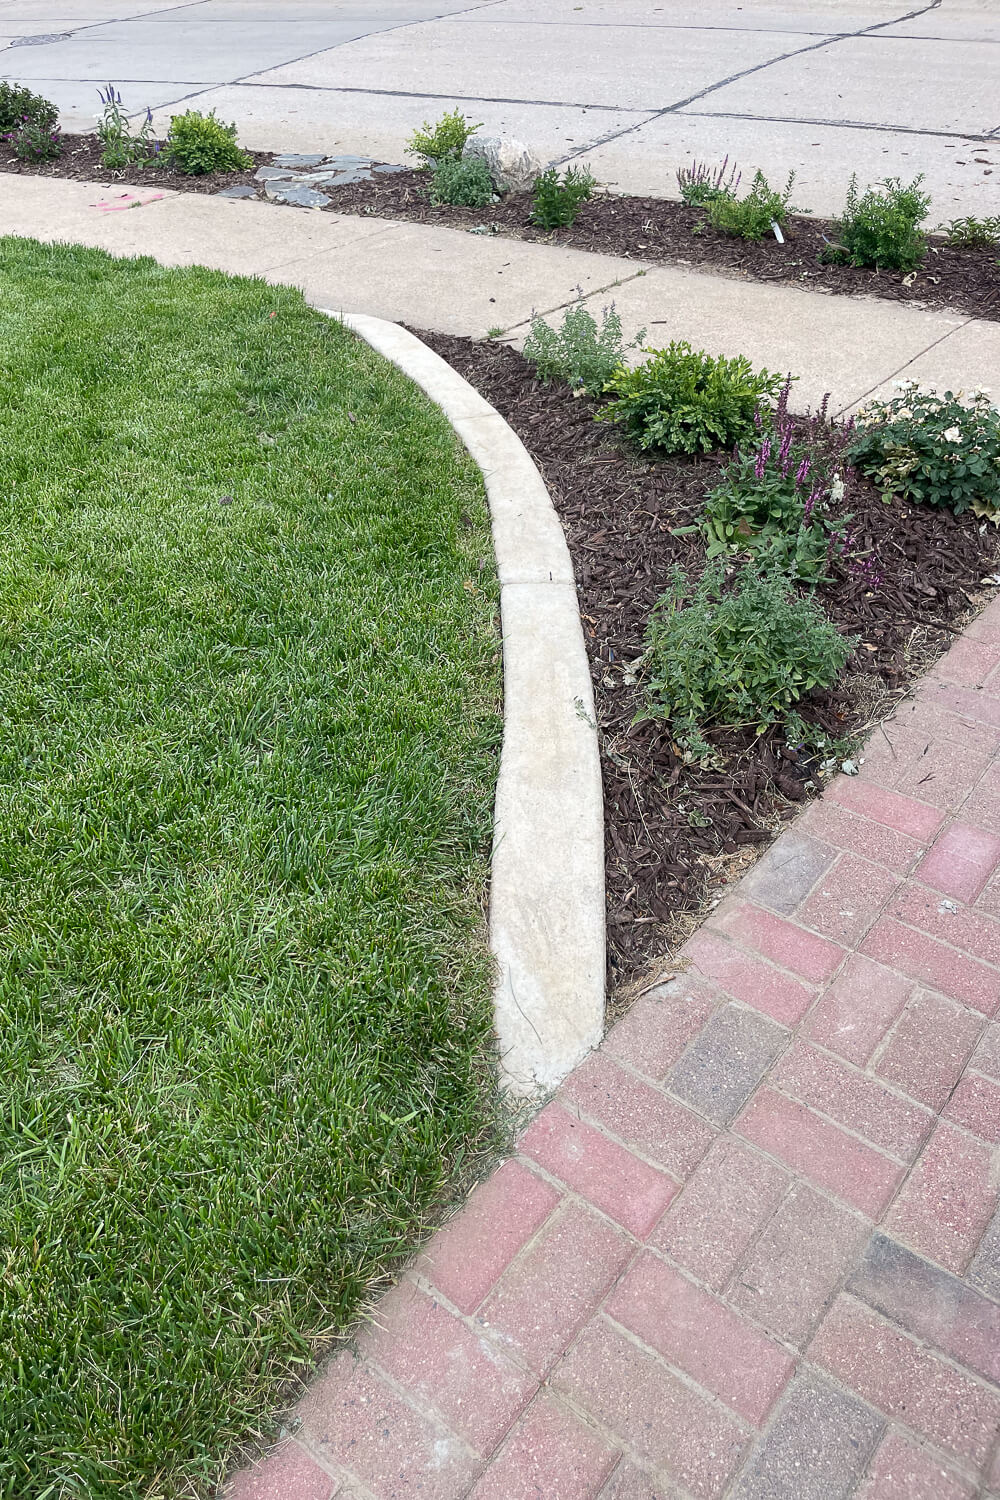
I’m so happy with how this project turned out, and I can’t wait to get this garden bed planted and the sod in. Stay tuned for that.
Cost and Time: How Much It Takes to DIY a Concrete Curb
Honest breakdown of what a 25 to 30 foot DIY concrete curb actually costs and takes:
Materials: 15 bags of high-strength concrete ($75 to $105), composite siding boards for forms ($30), 1/5″ plywood for tight curves ($15), 1×2 + 1×3 furring strips for stakes ($10), 1 1/4″ wood screws ($5), road base ($20), marking spray paint ($5). All-in: $150 to $200 for a 25 to 30 foot curb. If you already own scrap lumber and an edger tool, you can come in closer to $100.
Time: About 4 to 6 hours of active work spread across one to two days, plus 24 hours of waiting time between pouring and removing the forms.
| Phase | Active time | Notes |
|---|---|---|
| Mark the curb path | 30 min | Spray paint, walk it before digging |
| Dig the trench | 60 min | 3 to 6 inches deep depending on slope |
| Build and set forms | 2-3 hours | Stake every 12-18 inches |
| Add road base | 30 min | Improves longevity, prevents cracking |
| Mix and pour concrete | 1-2 hours | ~15 bags for 25-30 ft curb |
| Tap and smooth | 30 min | Remove air bubbles, float top |
| Make relief cuts and edge | 30 min | Every 7-8 feet |
| Wait for cure | 24 hours | Minimum before removing forms |
| Remove forms | 30 min | Pry stakes with claw hammer |
Looking for more DIY projects to upgrade your curb appeal? Check out this post where I give my mailbox a complete makeover, or this one for expanding a narrow driveway with pavers. If you’re working on more concrete projects, my DIY dry pour concrete pad tutorial is a faster method for small slabs, and once your concrete curb is done you’ll want my DIY concrete cleaning method for keeping it stain-free.
📌 Save This Concrete Curbing Tutorial for Later
Pin this tutorial so you can come back when you’re ready to pour your own DIY concrete curb.

Frequently Asked Questions About DIY Concrete Curbing
Mark the curb path with spray paint, dig a 3 to 6 inch trench, build a 2-sided form using composite siding or thin plywood with stakes every 12 to 18 inches, space the sides 6 inches apart, add a layer of road base, mix bagged concrete in a wheelbarrow to a thick oatmeal consistency, fill the form, tap the sides with a hammer to release air bubbles, smooth the top with a float, make relief cuts every 7 to 8 feet, edge the top corners, and remove the forms after 24 hours.
Around $150 to $200 for a 25 to 30 foot curb. The biggest line items are concrete bags ($75 to $105 for 15 bags) and composite siding for the forms ($30). If you already own scrap lumber and a concrete edger tool, you can come in closer to $100.
The forms can come off after about 24 hours. Full cure takes 28 days, but the curb is structurally usable within a week. Don’t put heavy weight or pressure on it for the first 24 to 48 hours.
No, you can absolutely DIY a concrete curb without renting a curbing machine. Curbing machines are faster for long, professional installs, but for a 25 to 100 foot home curb the DIY form-and-pour method is much cheaper and more flexible (you can pour curves a curbing machine can’t handle).
Composite siding boards are flexible enough to bend around moderate curves while being sturdy enough to hold the concrete weight. For tight curves, switch to 1/4 inch plywood (avoid 1/5 inch as it’s too flimsy). Bender boards designed for landscape work also work great if you can find them.
At least 6 inches tall is the standard for a landscape curb. Of that, plan for 3 inches below the soil line for stability and 3 inches above. On sloped ground, dig deeper at the high end so the top of the curb stays level.
Use a flexible form material that can bend around your curve without snapping. Composite siding works for moderate curves; thin plywood (1/4 inch) handles tight curves. Stake every 12 inches around curves (more often than the 18 inches you can use on straight runs) to keep the curve smooth.
For a small landscape curb (4 to 6 inches wide and 6 inches tall), wire mesh or even just well-mixed concrete is enough. Rebar is overkill at this scale. For larger curbs (8+ inches wide) or commercial installs, add rebar for crack resistance.
A properly poured concrete curb with road base underneath should last 15 to 25 years before needing replacement. Adding relief cuts every 7 to 8 feet helps it crack predictably (and minimally) along those lines instead of randomly across the surface.
Curbing usually refers to a taller, more substantial border (4 to 6 inches above the soil) that physically separates a lawn from a flower bed and can stop a mower wheel. Edging is often shorter or thinner and is more about visual definition than physical containment. The DIY method in this post produces a curb but the same technique scaled smaller produces edging.
About Crystel
I’m Crystel Montenegro, a stay-at-home mom of five turned home DIY expert. I share budget-friendly DIY projects, home design, garden, recipes, and lifestyle content from my own home – every project here is one I actually built or made. Read more about me or follow along on Instagram.
Just curious what your total cost all in was ? Love how it turned out!
All in was about $100 for about 15 ft of curbing
Curbing that with a machine would literally take 20 min. Cmon now. Pay somebody $400.