


How to Build a DIY Bay Window Bench With Storage


Updated September 18, 2026
The bay window nook in our dining area sat empty for a little over a year after moving in. I finally built a bay window bench with storage right into the space, and couldn’t be happier with this cozy seating and storage solution.
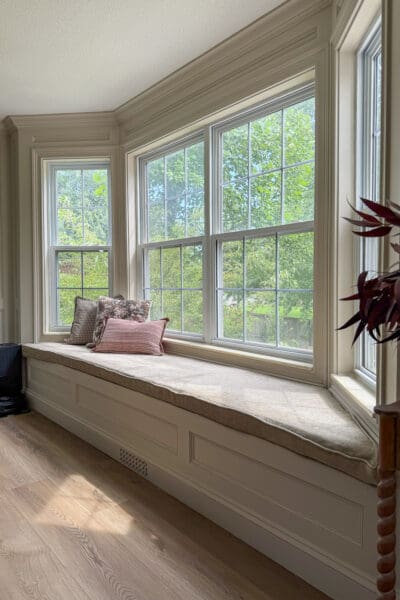
Seating and storage are two things a house can never have too much of, especially in the room where everybody ends up gathering anyway. This bench gave me both, in a spot that was not being used for anything else.
I built the whole thing from scratch, working around the trim I had already installed and a floor air vent sitting right in the middle of where the bench needed to go. Here is exactly how I did it.
My DIY Dining Remodel Progression
These two photos are taken months apart, which tells you everything about the pace of our DIY remodel. The first one is mid-renovation, back when I had just skim-coated all the textured walls smooth and the whole space looked like a construction zone. The second one is after we added the crown molding and the picture frame trim on the walls. Beautiful, but missing something.
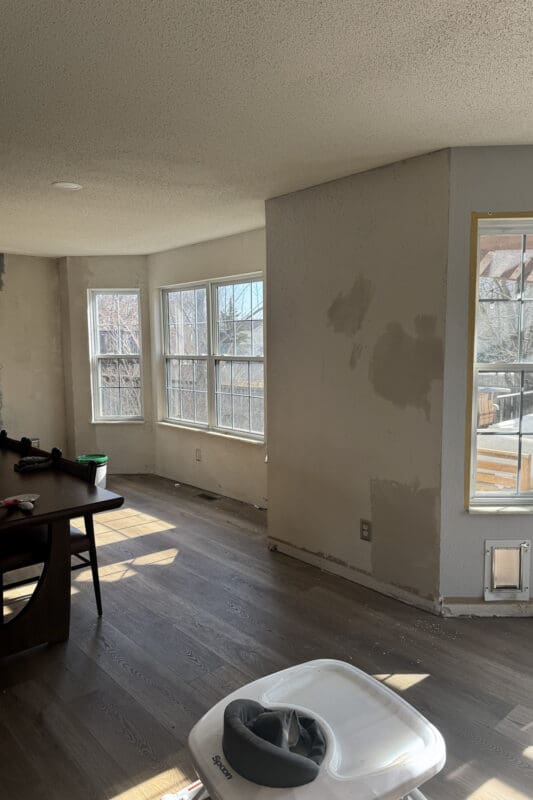
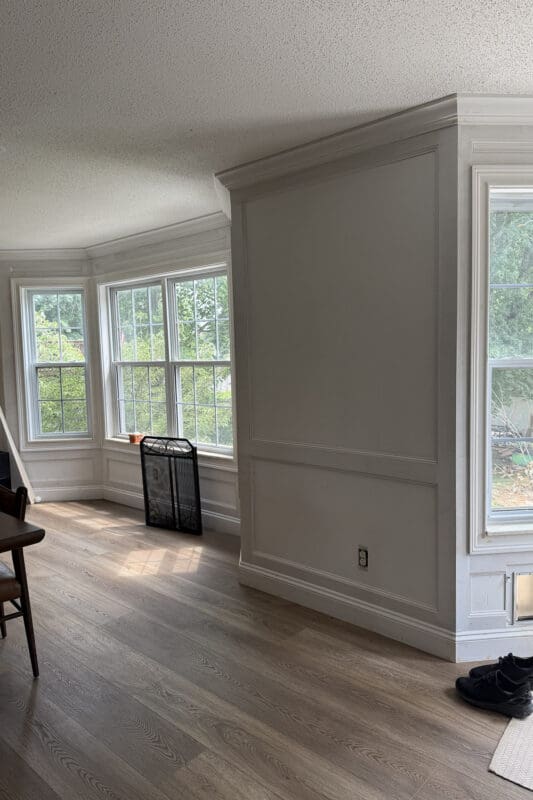
Using AI to Plan My Window Bench With Storage
Before I cut a single board, I made an AI inspiration image of what I wanted my bay window bench with storage to look like in this little nook.

This is not a photo of my finished bench. This is the image I generated ahead of time so I could see the idea before committing to it. I do this for basically every project in our house now. I love playing around with design, style, placement, and colors right on my phone. If you want to try it, I walk through my whole process in this blog post: Using ChatGPT for Interior Design Help.
Tools and Materials for Building a Storage Bench
This is what I used to build my bay window bench with storage.
- 2x4s for the base frame and seat frame
- Plywood for the base deck, seat top, and front panel
- Trim to match the existing wall molding: DIY Box Molding Wall Trim Tutorial (Step-by-Step Guide)
- Framing nailer and an air compressor
- Brad nailer
- Drill and drill bits
- Laser level
- Tape measure
- Speed square
- Torpedo level
- Hinges for the lift top
- Lid supports – soft close for the storage lid
- Zinsser BIN primer
- Paint (I used Sherwin-Williams Accessible Beige)
Step One: Measure the Nook and Build the Base Frame
Bay windows are almost never square. Mine certainly is not. So I started by measuring the whole nook and dry-fitting the base frame right on the floor before attaching anything.
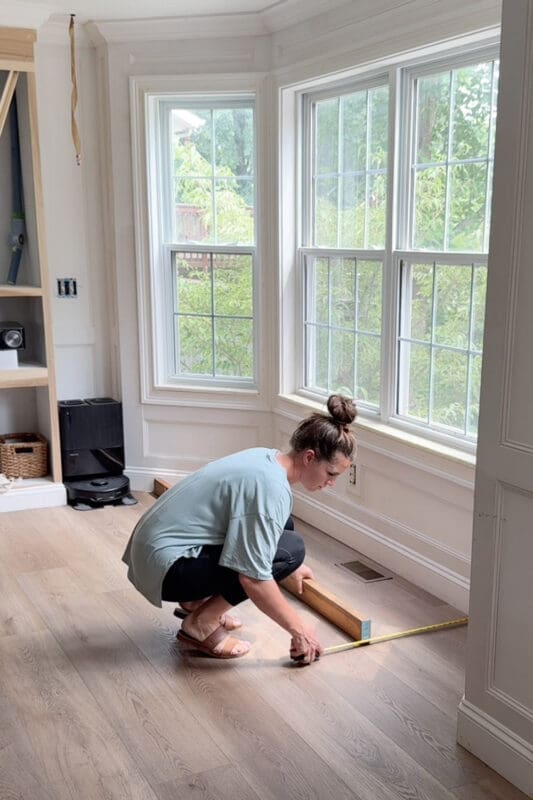
Here is the part that made this build different from most tutorials you will find: I left a gap in the middle of the base frame. There is a floor air vent in that section, and I was not about to build a beautiful bench and then suffocate half the heat in our dining room.
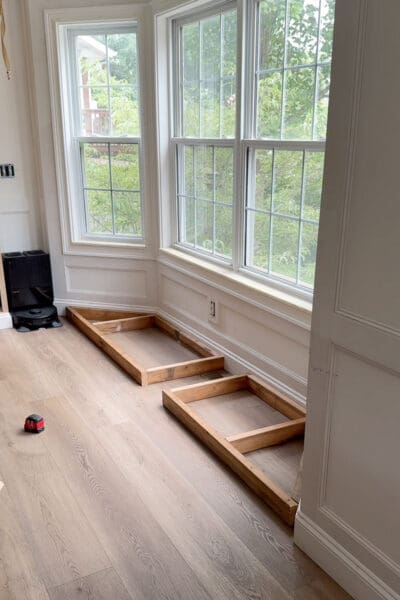
So the base is really two separate frames with an open channel between them, and that channel stays open all the way to the front of the bench. More on how I finished that off later, because it turned out to be my favorite detail in the entire project.
You may have noticed that I didn’t remove any of my existing trim. Most built-in bench tutorials start with “rip off your baseboard.” I didn’t do that; I built the bench to sit right up against the existing trim and work with it instead of risking tearing up my wall.
Step Two: The Plywood Base Deck
Once the base frame was done, I sealed off the top of it with plywood, using my framing nailer to attach the plywood to the frame I had built.
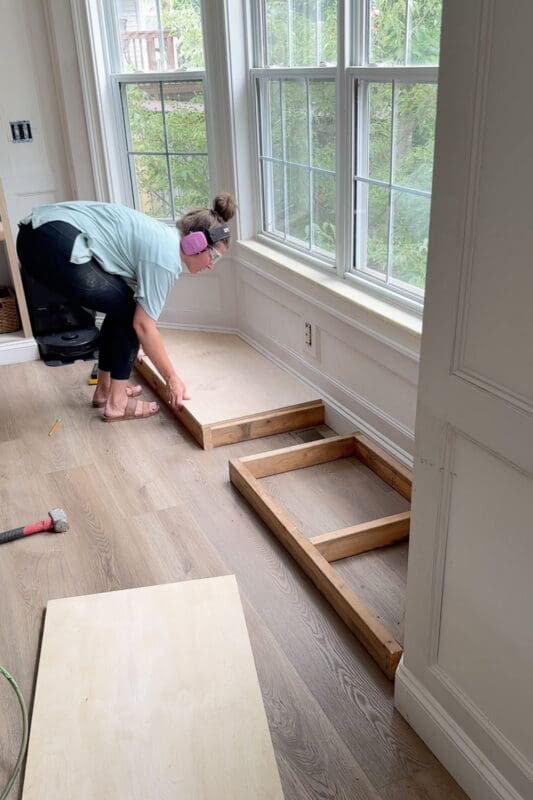
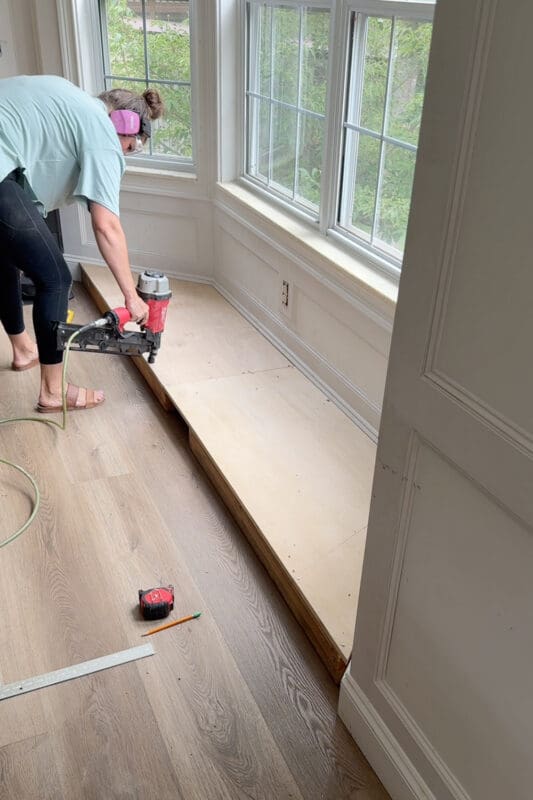
Two things about these photos. One, I am wearing hearing protection and safety glasses, and you should too. A framing nailer inside a room with hard floors is genuinely loud. Two, the vent channel is still open. It stays open through every single step of this build.
Step Three: The Seat Frame and the 2×4 Ledger on the Wall
I built a separate frame for the top of the bench out of 2x4s. The seat frame top is the same depth as the base, minus the width of a 2×4. That difference is intentional because a 2×4 gets attached flat to the wall as a ledger, and the seat frame attaches to that ledger board.
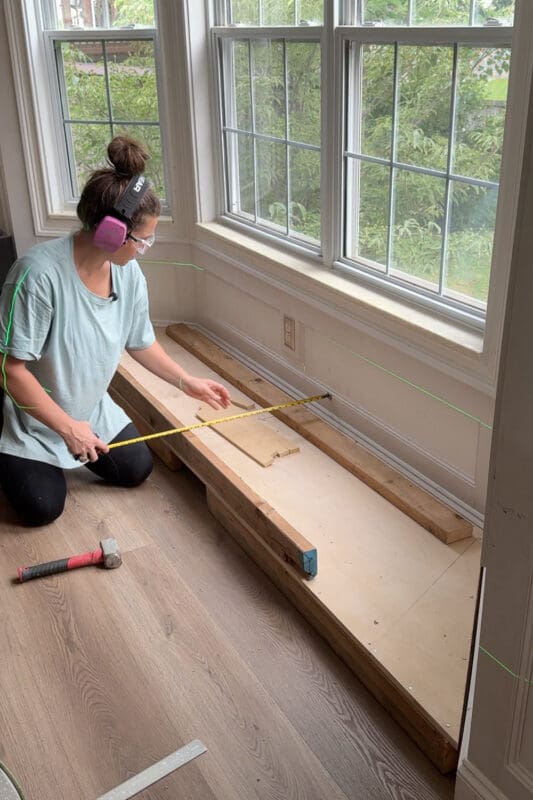
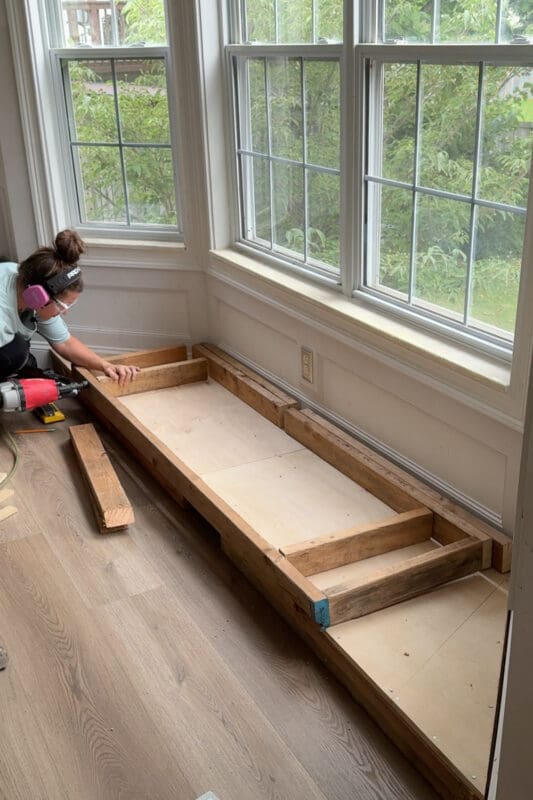
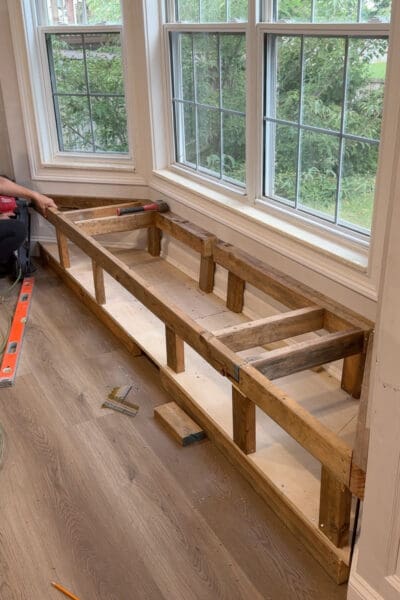
I used a laser level to set a consistent line across the whole nook. Since the bay is not square and the floor is not perfectly flat, eyeballing this would have given me a bench that visibly slopes. Then the seat frame gets attached to that wall ledger, plus vertical legs running down to the plywood base along the front.
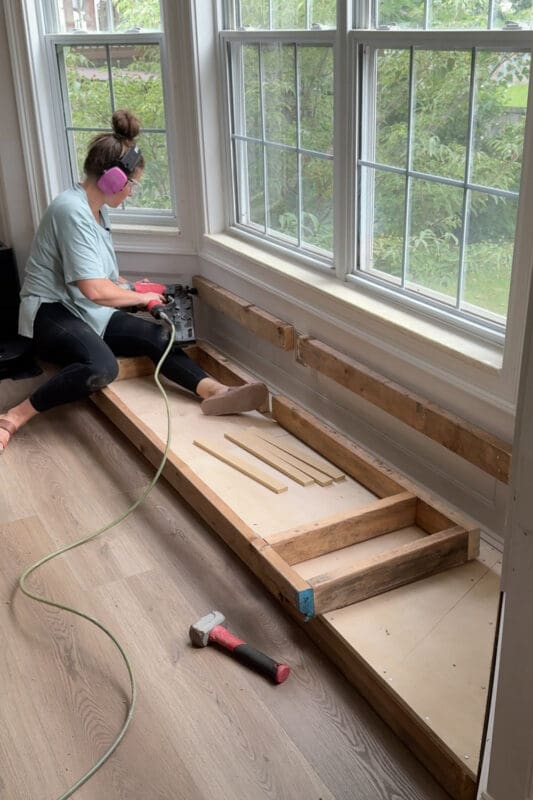
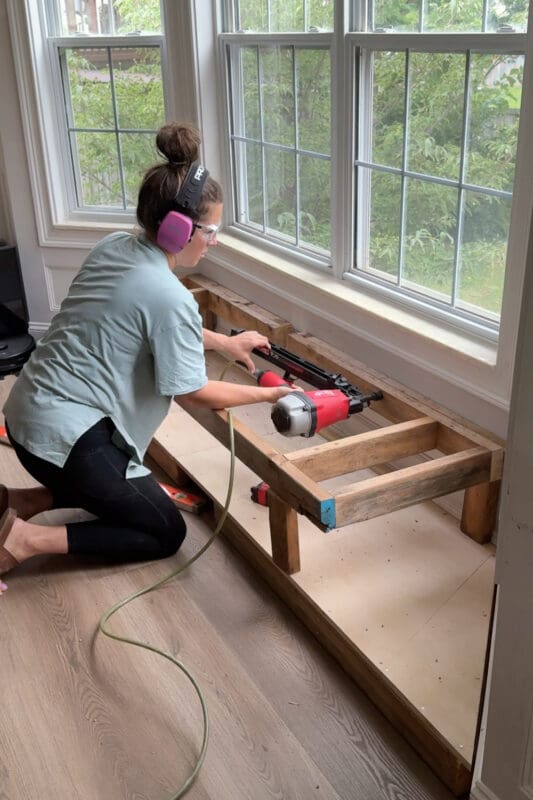
That is the whole skeleton. A hollow cavity in the middle, legs carrying the weight in the front, ledger board and legs carrying it in the back. This thing does not budge. It is solid!
Step Four: The Top of the Storage Bench
Here is where we create the seat and the opening to our storage bench. It’s simpler than it looks.
The top is four pieces:
- A fixed panel on the left side, nailed down
- A fixed panel on the right side, nailed down
- A narrow fixed strip along the back of the center section
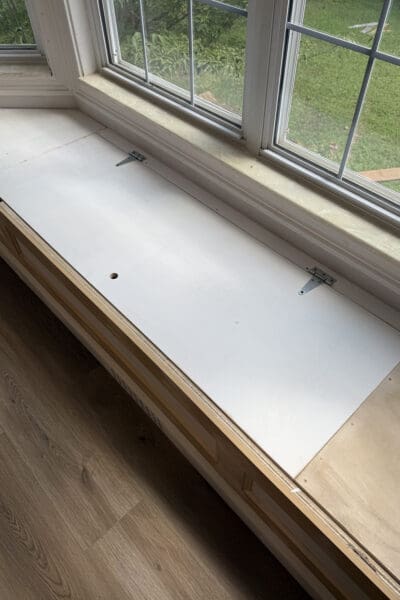
- The center panel, which is hinged and lifts open
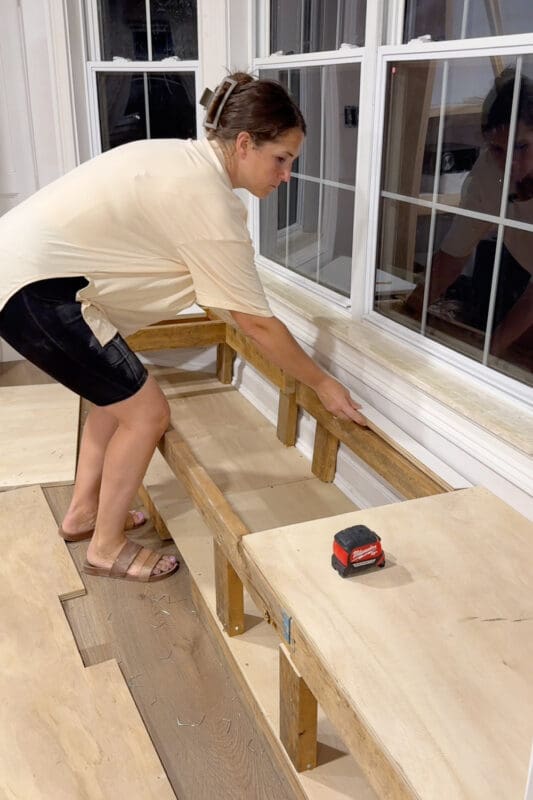
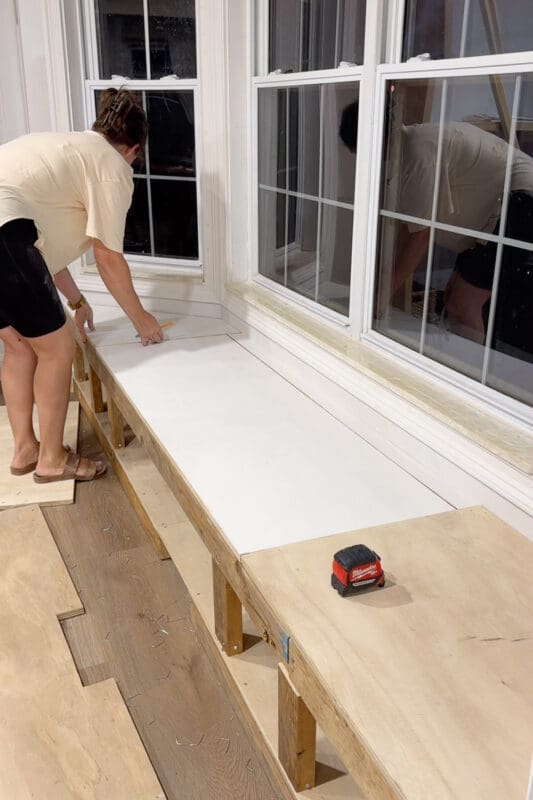
Note: the white boards you see in the above pictures are still just plywood. I had some pieces that I had pre-primed leftover from another project.
Step Five: Hinges and a Finger Hole Instead of Hardware
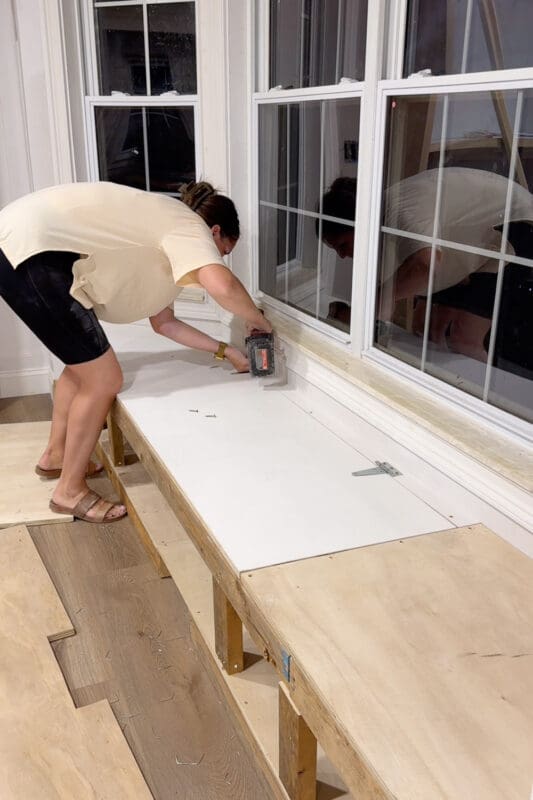
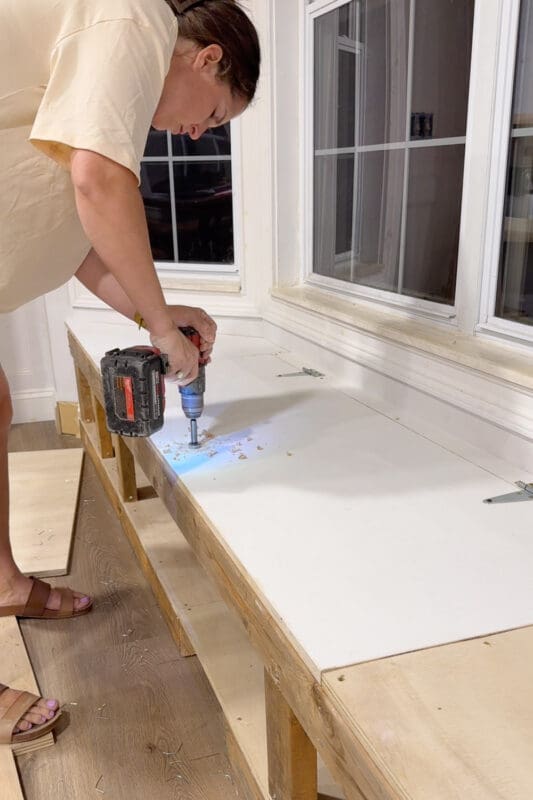
The hinges go on next, and the placement matters. They mount to the narrow fixed strip along the back, and then over onto the center panel that will be doing the opening. That way, the lid pivots off the fixed strip rather than the wall or the trim behind it. I used two hinges and attached mine using my drill and screws.
Instead of buying a pull or a handle, I drilled a simple round finger hole near the front edge of the lid. It costs nothing, there is no hardware sticking up to catch on the cushion, and it disappears completely once the cushion is on.
Step Six: The Front Panel Trick That Hides Every Plywood Edge
If you take one thing from this post, make it this one.
I ran the plywood front panel up flush with the top surface of the bench, not underneath it. That means the raw edges of all those top pieces are hidden behind the front panel instead of staring at you every time you walk by. The top edge of the front panel then gets covered by the cushion.
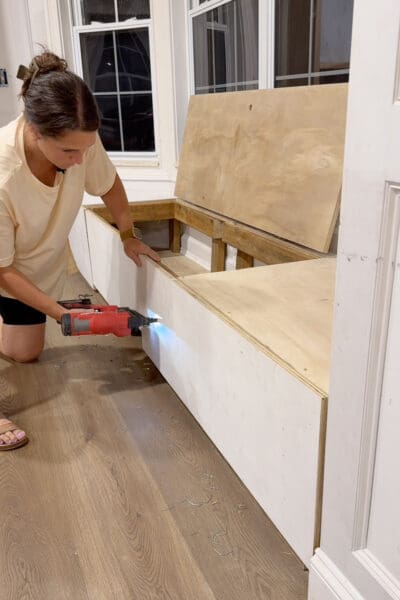
This is the difference between a bench that reads as built in and a bench that reads as a box someone set in front of a window. It costs nothing extra. It is purely the order you attach things in.
Step Seven: Trim the Bench to Match the Walls
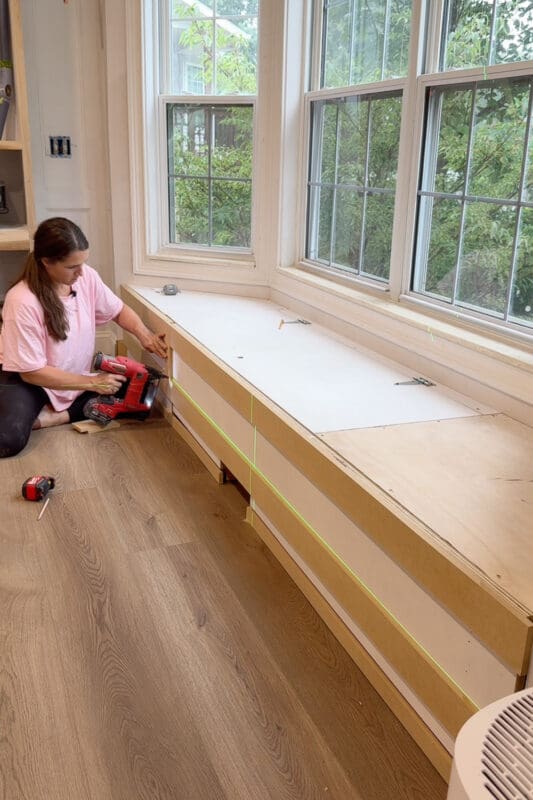
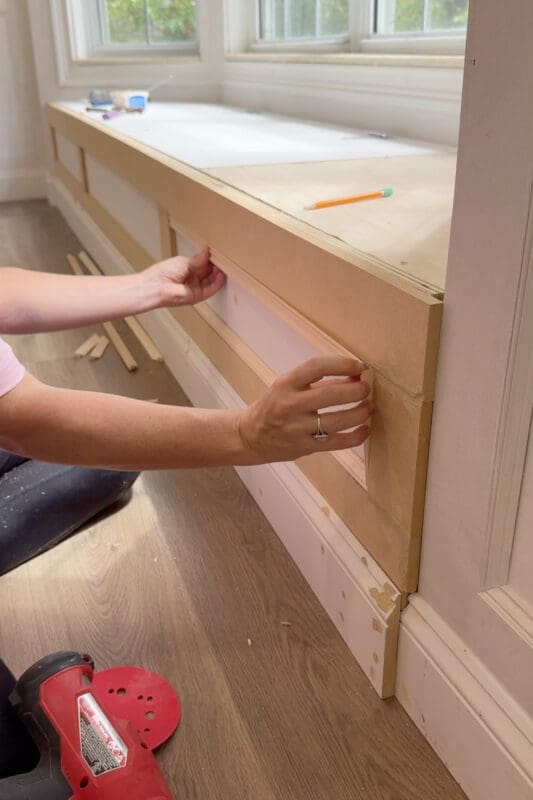
To make the bench look like it came with the house, I added the same picture frame molding profile to the front that I already had on the walls. Matching the existing trim is honestly what sells the whole thing. Same profile, same proportions, same spacing. Your eye reads it as original. See the full details for installing this trim here: DIY Box Molding Wall Trim Tutorial (Step-by-Step Guide).
The DIY Air Vent I Drilled Into the Baseboard
Okay, this is my favorite part of the entire build.
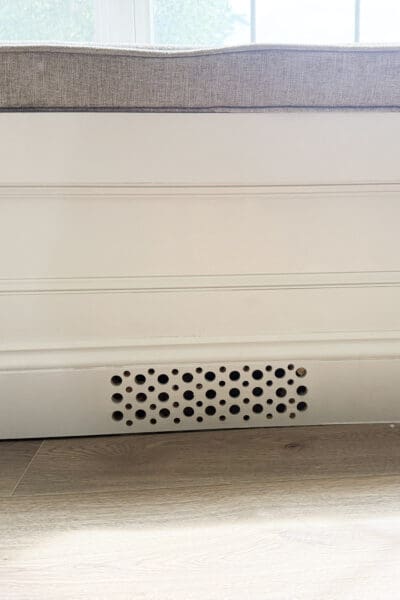
Remember that open channel I left in the base frame for the floor vent? The air needed somewhere to come out. Rather than buying a toe-kick register, I drew a grid on the baseboard with a pencil and drilled it out by hand.
That’s it. That is the vent. It cost me a drill bit and about twenty minutes of my life.
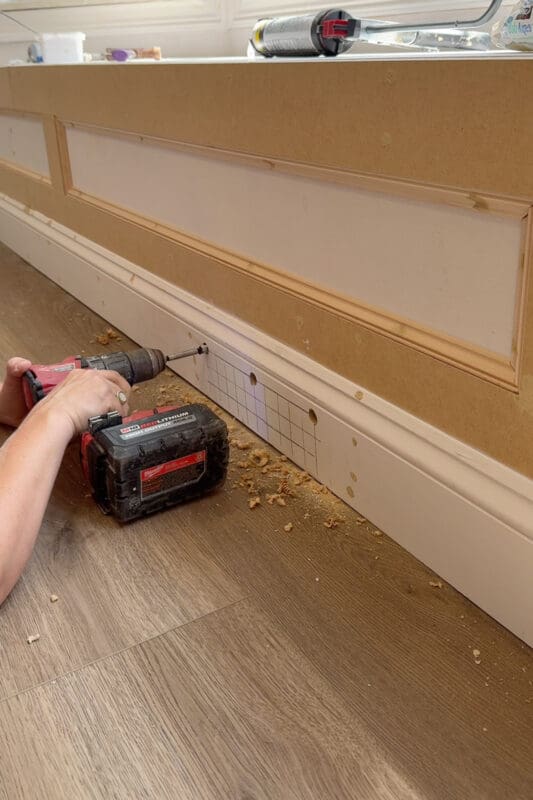
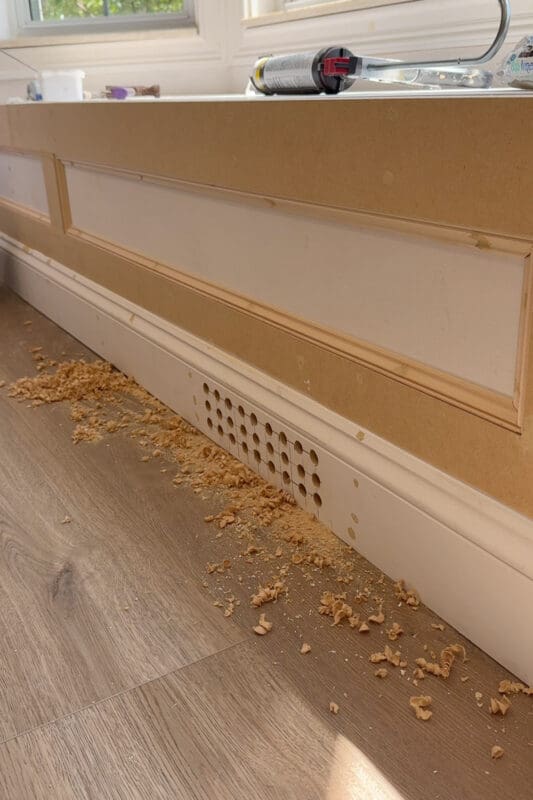
I ended up going back and adding more holes in a smaller size, just to make it more interesting. And as you can see, once it’s all painted the same color, it cohesively blends into the rest of the bench and looks like a custom vent.
The build is done on this window bench seat with storage. Now it’s time for primer and paint!
Step Eight: Primer and Paint
I primed the bay window bench with a shellac-based primer. Do not use a water-based primer. Raw plywood and knotty trim will bleed tannins through regular paint, and you will see yellow spots show up weeks later. Shellac primer blocks that. It’s also better for helping your paint bond to the surface of your window bench.
Then I painted the wall, the trim, and the bench all the same color: Sherwin-Williams Accessible Beige. It’s the same color I used in our hallway makeover, and I plan to use it on most of the first-floor walls.
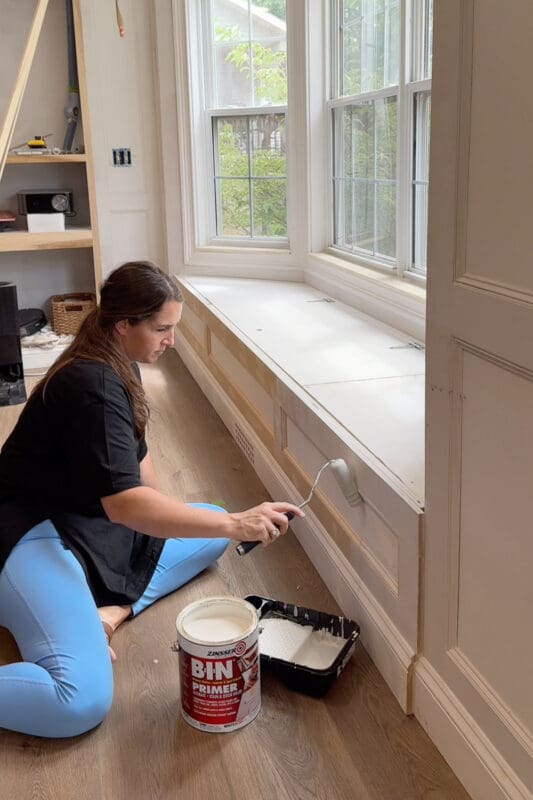
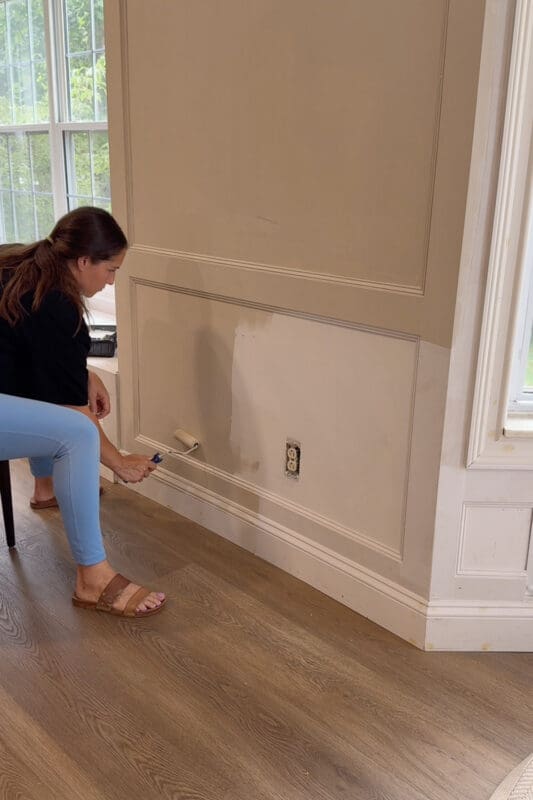
Painting everything one color like this is sometimes called color drenching, and it is the reason the bench stops looking like furniture and starts looking like architecture. When the wall, the trim, and the built-in all match, your brain stops separating them.
Installing Lid Supports for Storage Bench
A lift-top bench lid is heavy, and a heavy lid that can fall is a smashed finger waiting to happen. So before this bench went into service, I installed soft-close lid supports so the top stays where I put it and cannot come slamming down on any of my kids.
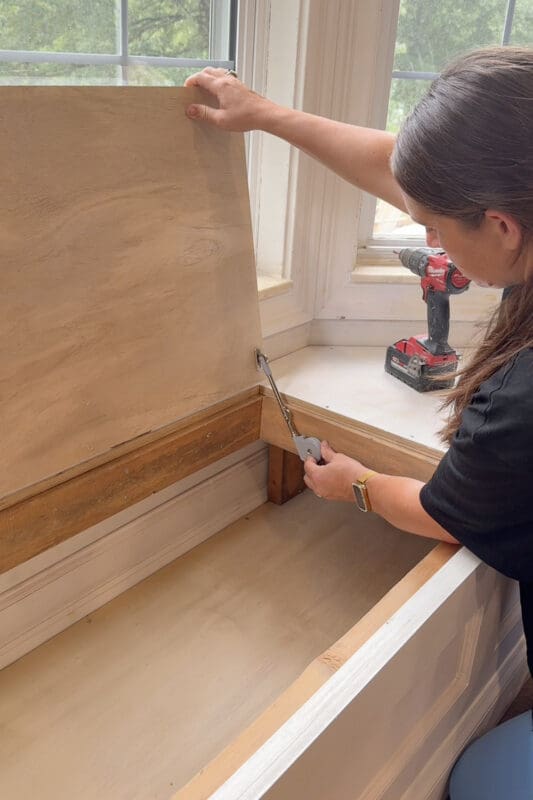
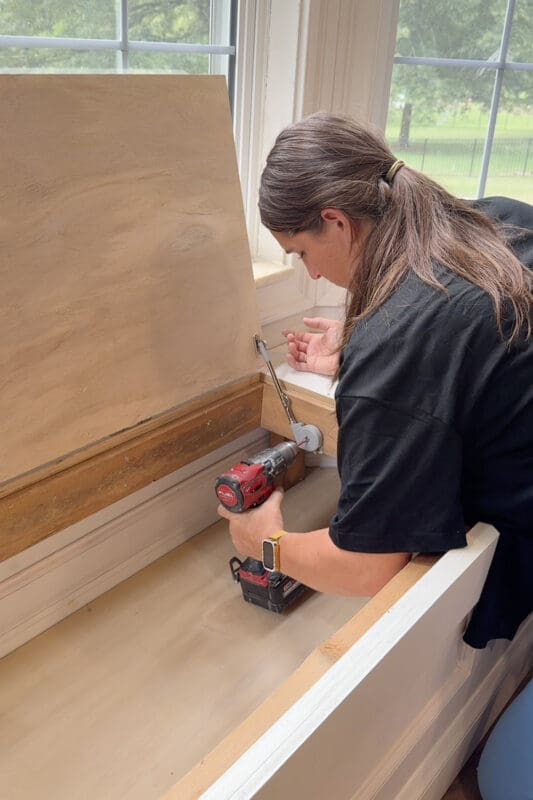
Custom Cushion for Bay Window Bench
My friend Carol came over and helped me make the cushion, and I could not have done it without her. The bench is longer than any single piece of foam I could buy, so we butted two pieces together, sprayed the seam with adhesive, and taped it, which you cannot see or feel at all once the cover is on. Carol did the sewing on her machine at my dining table. I did the cutting and the crawling on the floor. Teamwork!
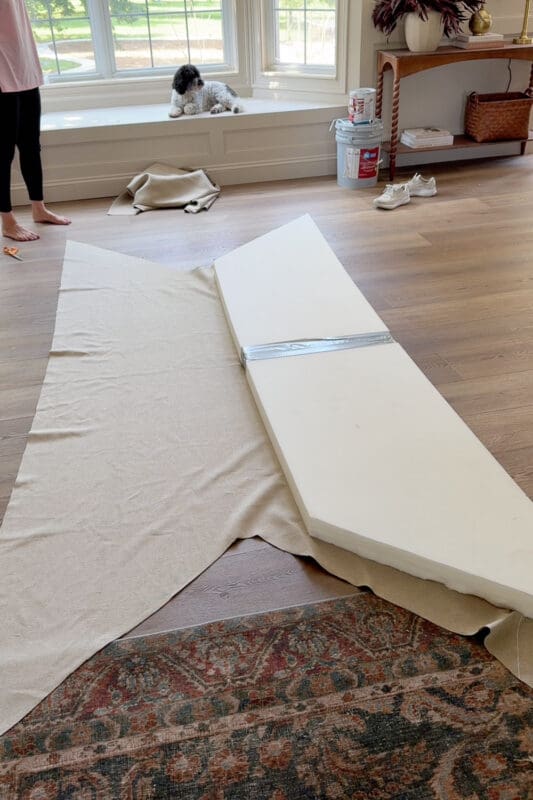

Making a custom cushion for a window bench could be a whole post in itself. I’ll have to share everything Carol taught me in a separate post or video.
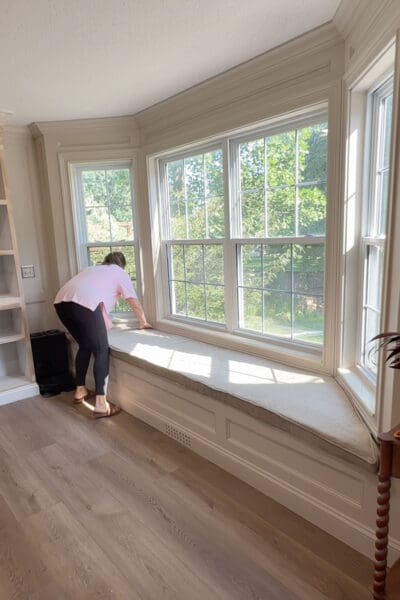
The Finished Bay Window Bench With Storage
And here it is. The nook that sat empty for so long is now a bay window bench with storage, and it is easily the coziest seat in the house. The bench trim matches the wall trim, the paint matches everything else, and that little drilled vent sits down in the baseboard doing its job without anybody ever noticing it is there.
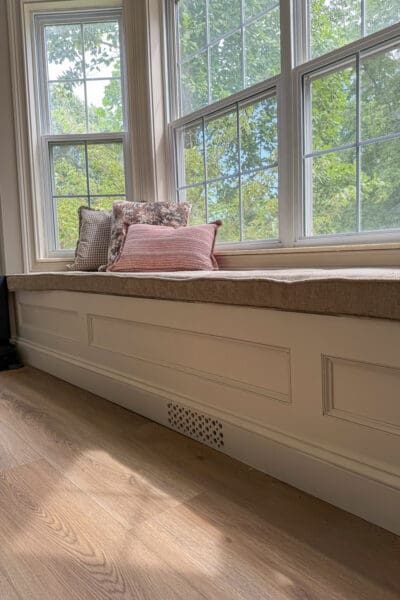
My favorite part is the part you cannot see, which is how much we have tucked away under that lid. Our dog claimed the whole thing before the rest of us got a turn, and honestly, she is not wrong.
📌 Pin This Bay Window Bench With Storage for Later
Building a bay window bench with storage is one of those projects that looks complicated and really is not. Save this to your home projects board so you have the steps when you are ready to build yours.
FAQ: DIY Bay Window Storage Bench
Yes. I built mine right up against the existing baseboard and picture frame molding without removing any of it. The bench frame sits in front of the trim, and the front panel and new trim tie it all together visually. If you have already done trim work in the room, you do not have to undo it.
Do not cover it. I left an open channel in the base frame right where the floor register sits, carried that channel all the way to the front of the bench, and then drilled a grid of holes in the baseboard to let the air out the front. You can also buy a toe kick register if you would rather not drill your own.
Mine has a lift top. The seat is made of four pieces: two fixed side panels, a fixed strip along the back, and a hinged center panel that opens. The other common option is doors or drawers in the front, but a lift top gives you the biggest opening and the simplest build.
I used Zinsser BIN, a shellac based primer. Raw plywood and knotty trim can bleed through regular paint and leave yellow spots weeks after you finish. Shellac primer blocks that from happening.
Two things did the most for mine. First, I matched the trim on the bench front to the picture frame molding already on the walls. Second, I painted the wall, the trim, and the bench all the same color. When everything matches, your eye reads the bench as part of the architecture instead of as furniture.