

Updated May 9, 2026
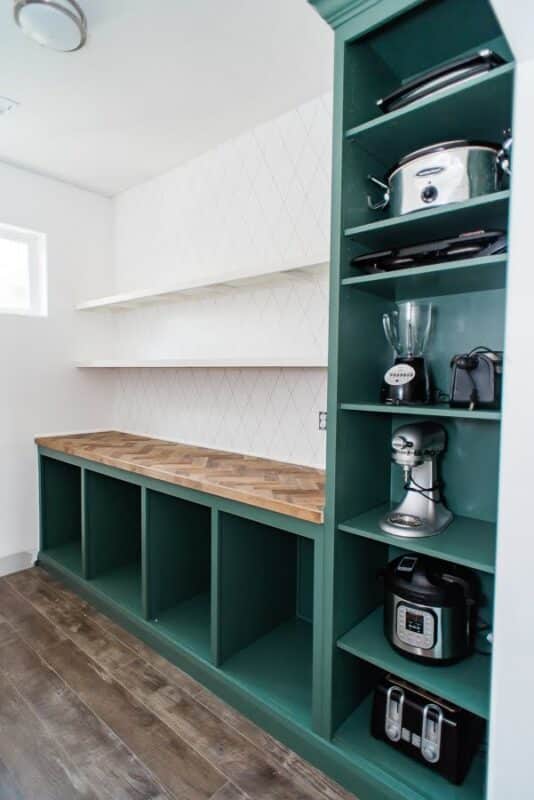
When the 19th century household first introduced the concept of a Butler’s Pantry, it functioned as a place to store china and hide waitstaff. Now it’s a place to store canned peas and hide air fryers. This design is attractive enough to be built out in the open, and the measurements can be adjusted to fit any size room. I didn’t have the right type of area to build a butler’s pantry, but my sister-in-law did, and it made her imaginary butler so happy to have a beautiful place to store the plastic forks.
This post includes affiliate links. If you purchase from these links, I may get a small commission from the seller. But the great thing is, this doesn’t cost you any extra money!
SUPPLIES
- (5) 3/4 x 48 x 96 inch Sande Plywood – (# of boards to purchase is dependent on the overall size of pantry)
- (1) 1/4 x 48 x 96 inch Sande Plywood
- (2) 3/4 x 15 3/4 x 96 inch Laminate Wood Closet Shelf
- (6) 1 x 2 x 96 inch Select Pine
- (1) 1 x 4 x 96 inch Select Pine
- (4) 2 x 4 x 96 inch Stud Board
- (3) 7/16 x 11/16 x 96 inch Shoe Moulding
- (2) 1/2 x 1/2 x 96 inch Quarter Round Moulding
- (1) 96 inch Crown Moulding
- (1) 4 1/2 x 96 inch Baseboard Moulding
- Latex Caulk
- Primer
- Paint color of your choice
- Pegs
- Painters Tape
- Plastic Drop Cloths
- 1 1/4 inch Brad Nails
- 2 1/2 inch Spax Wood Screws
- Star Bit
TOOLS
- Circular Saw
- Table Saw
- Miter Saw
- Drill
- Nail Gun
- Stud Finder
- Caulk Gun
- Straight Edge
- Graco Paint Sprayer
How to Cut, Assemble, and Install the Pantry Foundation
Pop quiz: What’s the first and most important step when building a structure? That’s right. Find a good podcast. And the second? You got it. Build a sturdy base.
The taller cabinet would be housing appliances and the shorter cabinet would be storing canned goods.
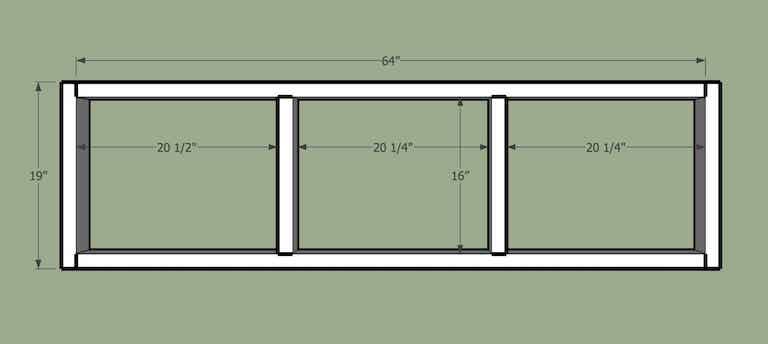
For the canned good cabinet foundation, I used my miter saw to cut:
- (2) 16 inch stud boards
- (2) 19 inch stud boards
- (2) 64 inch stud boards
I will be providing my exact measurements here, but keep in mind these are likely to change based on the dimensions of your space and your needs.
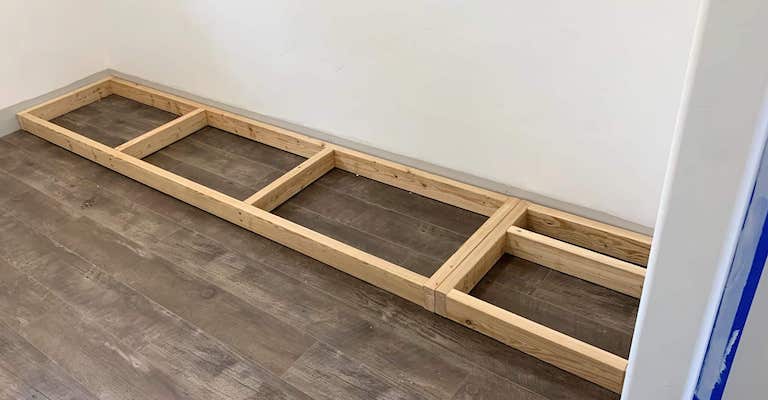
I drilled pilot holes into the wood before screwing everything together with 2 1/2 inch wood screws, as shown below:
For the appliance cabinet foundation, I used my miter saw to cut:
- (2) 19 inch stud boards
- (3) 14 inch stud boards
I included an offset base in the foundation because the laminate boards are 15 3/4 inch wide, and I needed to accommodate for the different depth. As I continue explaining, this will make more sense.
I drilled pilot holes into the wood before screwing everything together with 2 1/2 inch wood screws, as shown below:

The reason I offset the middle brace is because I didn’t want my appliance cabinet to be too deep. 19 inches is just too deep and things tend to get lost, so I made sure that each of my small appliances could fit comfortably within a 15 3/4 depth. I set the middle brace accordingly so that the back of my cabinet could rest squarely on the base on all 4 sides.
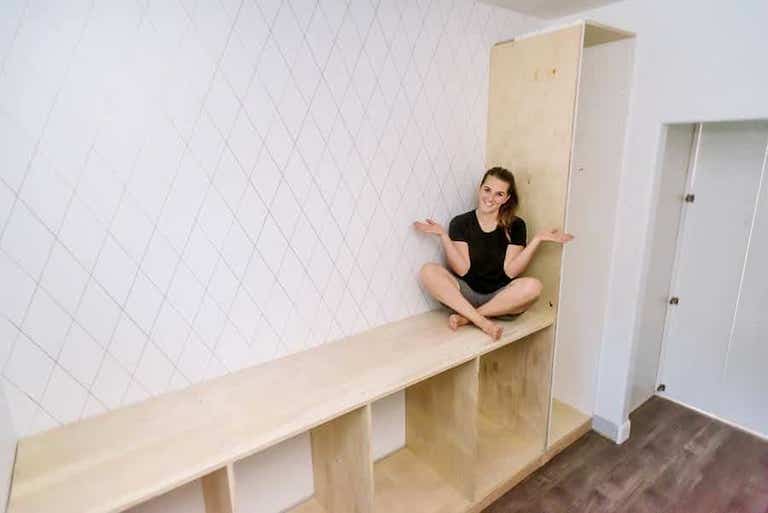
When the bases of both the appliance cabinet and countertop cabinets were side by side, it spanned a total of 19 x 84 inches.
Since I’d be securing much of this cabinet directly into the studs, I used a stud finder to locate and mark each stud in the three walls the cabinet would be up against.
After removing the baseboards, I used 2 1/2 inch wood screws to attach each foundation piece into the studs, as well as into each other.
How to Cut the Tall Pantry Cabinet
Using my circular saw, I cut the appliance cabinet first.
For the appliance cabinet, I cut:
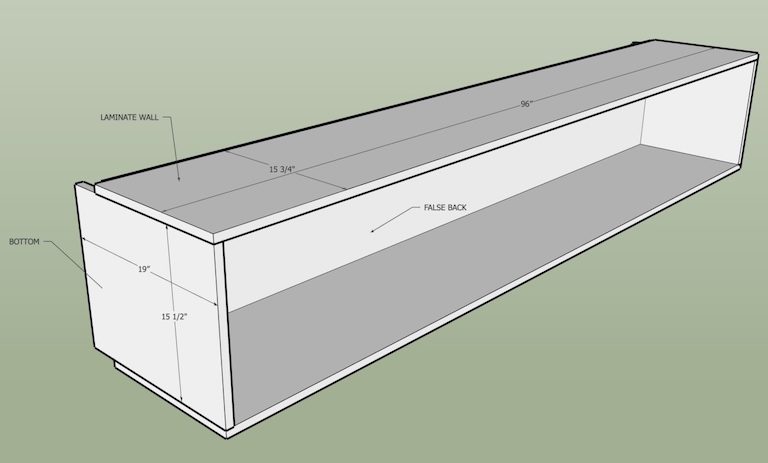
- (2) 3/4 x 15 1/2 x 19 inch Plywood for the top and bottom
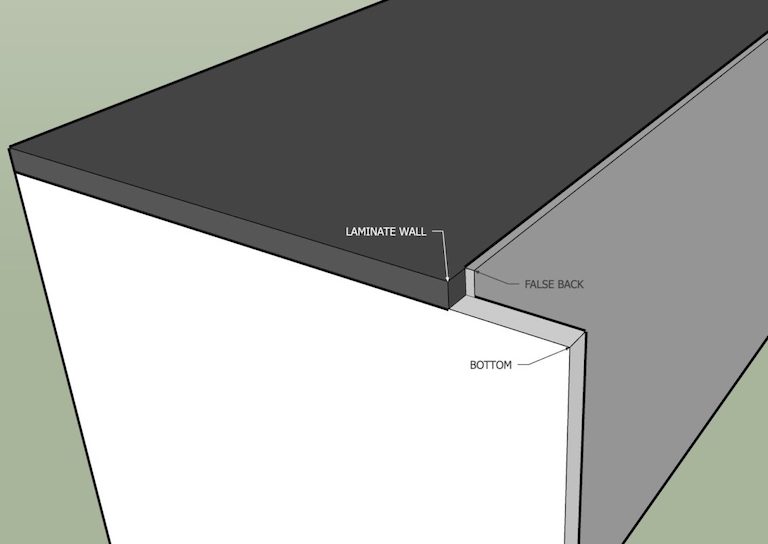
- (1) 1/4 x 17 x 94 1/2 inch Plywood for the false back
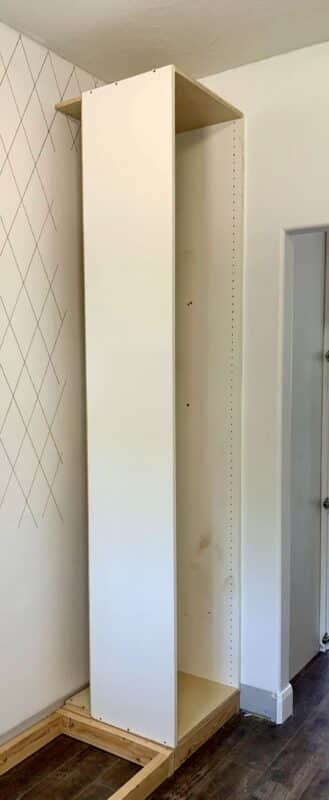
The total height of the appliance cabinet from floor to top was 99 1/2 inches, giving me plenty of clearance to set the cabinet upright without gouging the ceiling on the way.
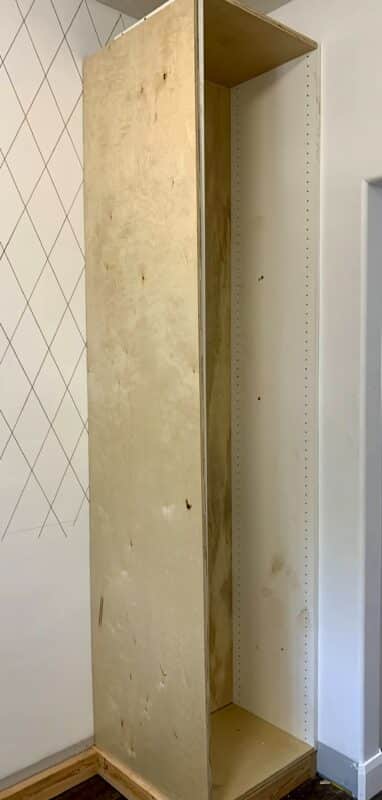
Since my appliance cabinet was not resting on the back wall, I added a 1/4″ piece of plywood that would act a false back. I probably would have done this anyway just because it would have painted up better than the wall texture, and also ensured there would be no gaps in the event of a bowed wall. If you’d like to fancy up the back of your cabinet, you could substitute with bead board.
How to Assemble the Tall Pantry Cabinet
It’s definitely easier to assemble the cabinet horizontal rather than vertical. First, making sure the peg holes were facing inside, I used brad nails and then wood screws to attach the plywood top and bottom to the laminate walls. Since the entire butler’s pantry was being painted, I didn’t worry which side of the plywood was visible.
The backing was attached to the laminate walls using first brad nails and then screws.
The back of the cabinet fit together in an unusual way, but I wasn’t worried since it would all be hidden.
How to Install the Tall Cabinet
I lifted my cabinet upright and made a mark on the inside of my cabinet to correspond with the location of the stud, then screwed the cabinet directly into the stud with 3 wood screws. Then I screwed the cabinet to the foundation through the cabinet bottom directly into the base, but only in the back since I didn’t want screws to be seen on the cabinet bottom inside.
To hide all the janky dead space in the back of the appliance cabinet, I cut another wall out of 3/4 inch plywood measuring 19 x 96 inches, and nailed it to the the laminate wall.
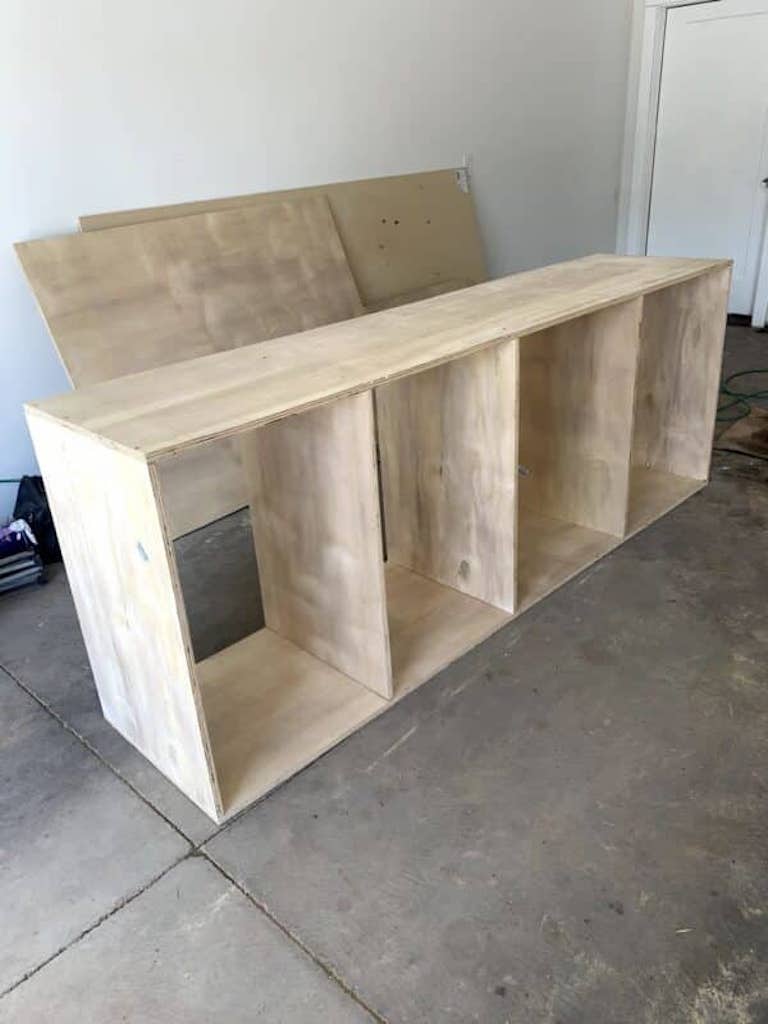
How to Cut the Short Cabinet
I used my circular saw to cut:
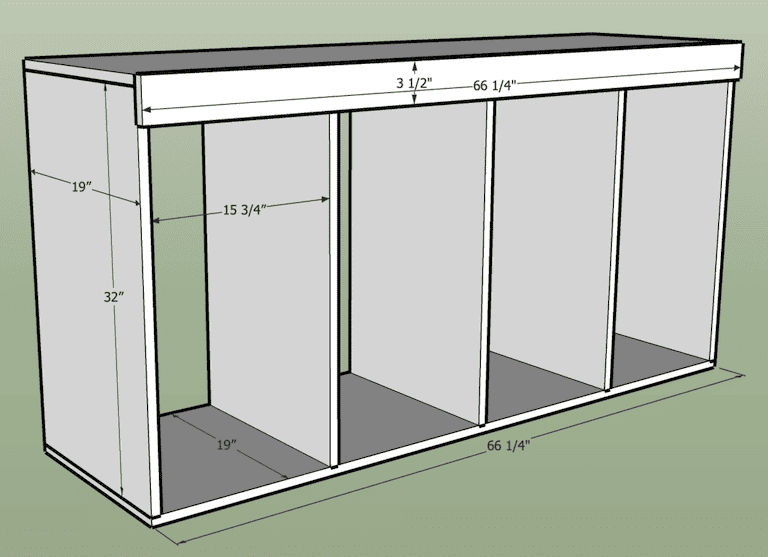
- (2) 3/4 x 19 x 66 1/4 inch plywood for the top and bottom
- (5) 3/4 19 x 32 inch plywood for the walls
- (1) 3 1/2 x 66 1/4 inch select pine for the face frame
I used brad nails to keep everything in place, and then wood screws to secure everything together, with the exception of the face frame; that only needed brad nails. If you were worried though, you could drill pocketholes on the back side of each face frame piece and screw them together before adding them to the cabinet for a stronger hold.
There wasn’t exact equal space between the divider walls, but each was about 15 3/4 inch. I wasn’t worried about the screws being visible on top since it would be covered by a countertop.
Choose Your Own Adventure
I had several options for the countertop at this point:
- Cover the screws on the cabinet top with some wood filler, sand it smooth, and paint it the same color as the rest of the pantry.
- Find several boards of poplar, screw them together, and cut them down to 19 3/4 x 66 1/4 inch. I did something similar on a built-in desk.
- Get creative and build a show stopping countertop. This is what I opted for.
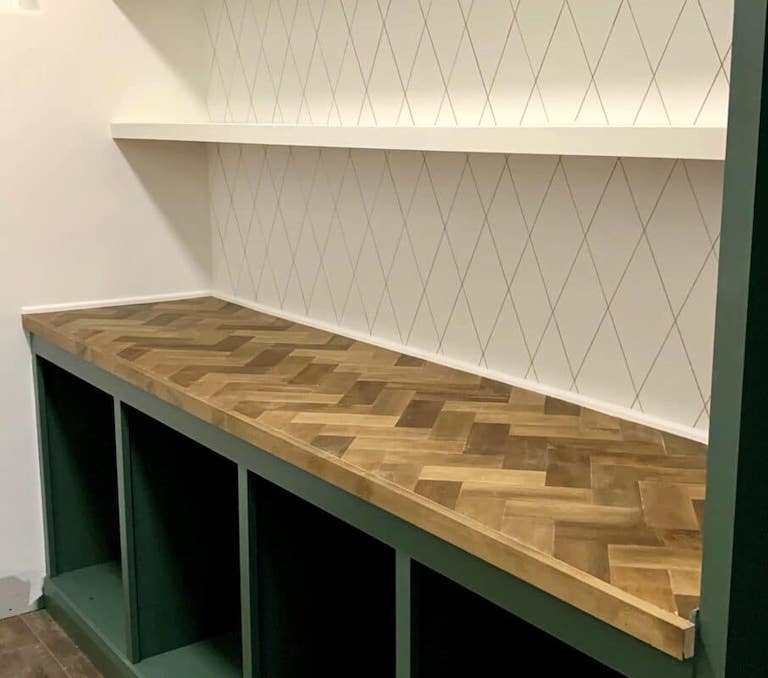
Check out how I made a beautiful herringbone counter for this cabinet top.
If you’d like to skip over the herringbone countertop because you don’t like beautiful things, check out the 2nd part to see how I finished building a butler’s pantry.
These are the floating shelves I built for all the appliances that need quick access.
Do you like the wallpaper design you see in the pictures? I did that with a sharpie!
And lastly, if you’re a visual learner, all of my stories for my projects can be found in my highlights on my instagram account @crystelmontenegrohome.
Please leave a comment and let me know if you’ve every attempted to build a Butler’s Pantry, or if you have any questions. I’ll be sure to respond!


Can you tell me what color green that is? Thank you!
I’m pretty sure it’s Benjamin Moore Caldwell Green