Building a Fireplace That Looks Custom But Was Totally DIY


Updated August 6, 2025
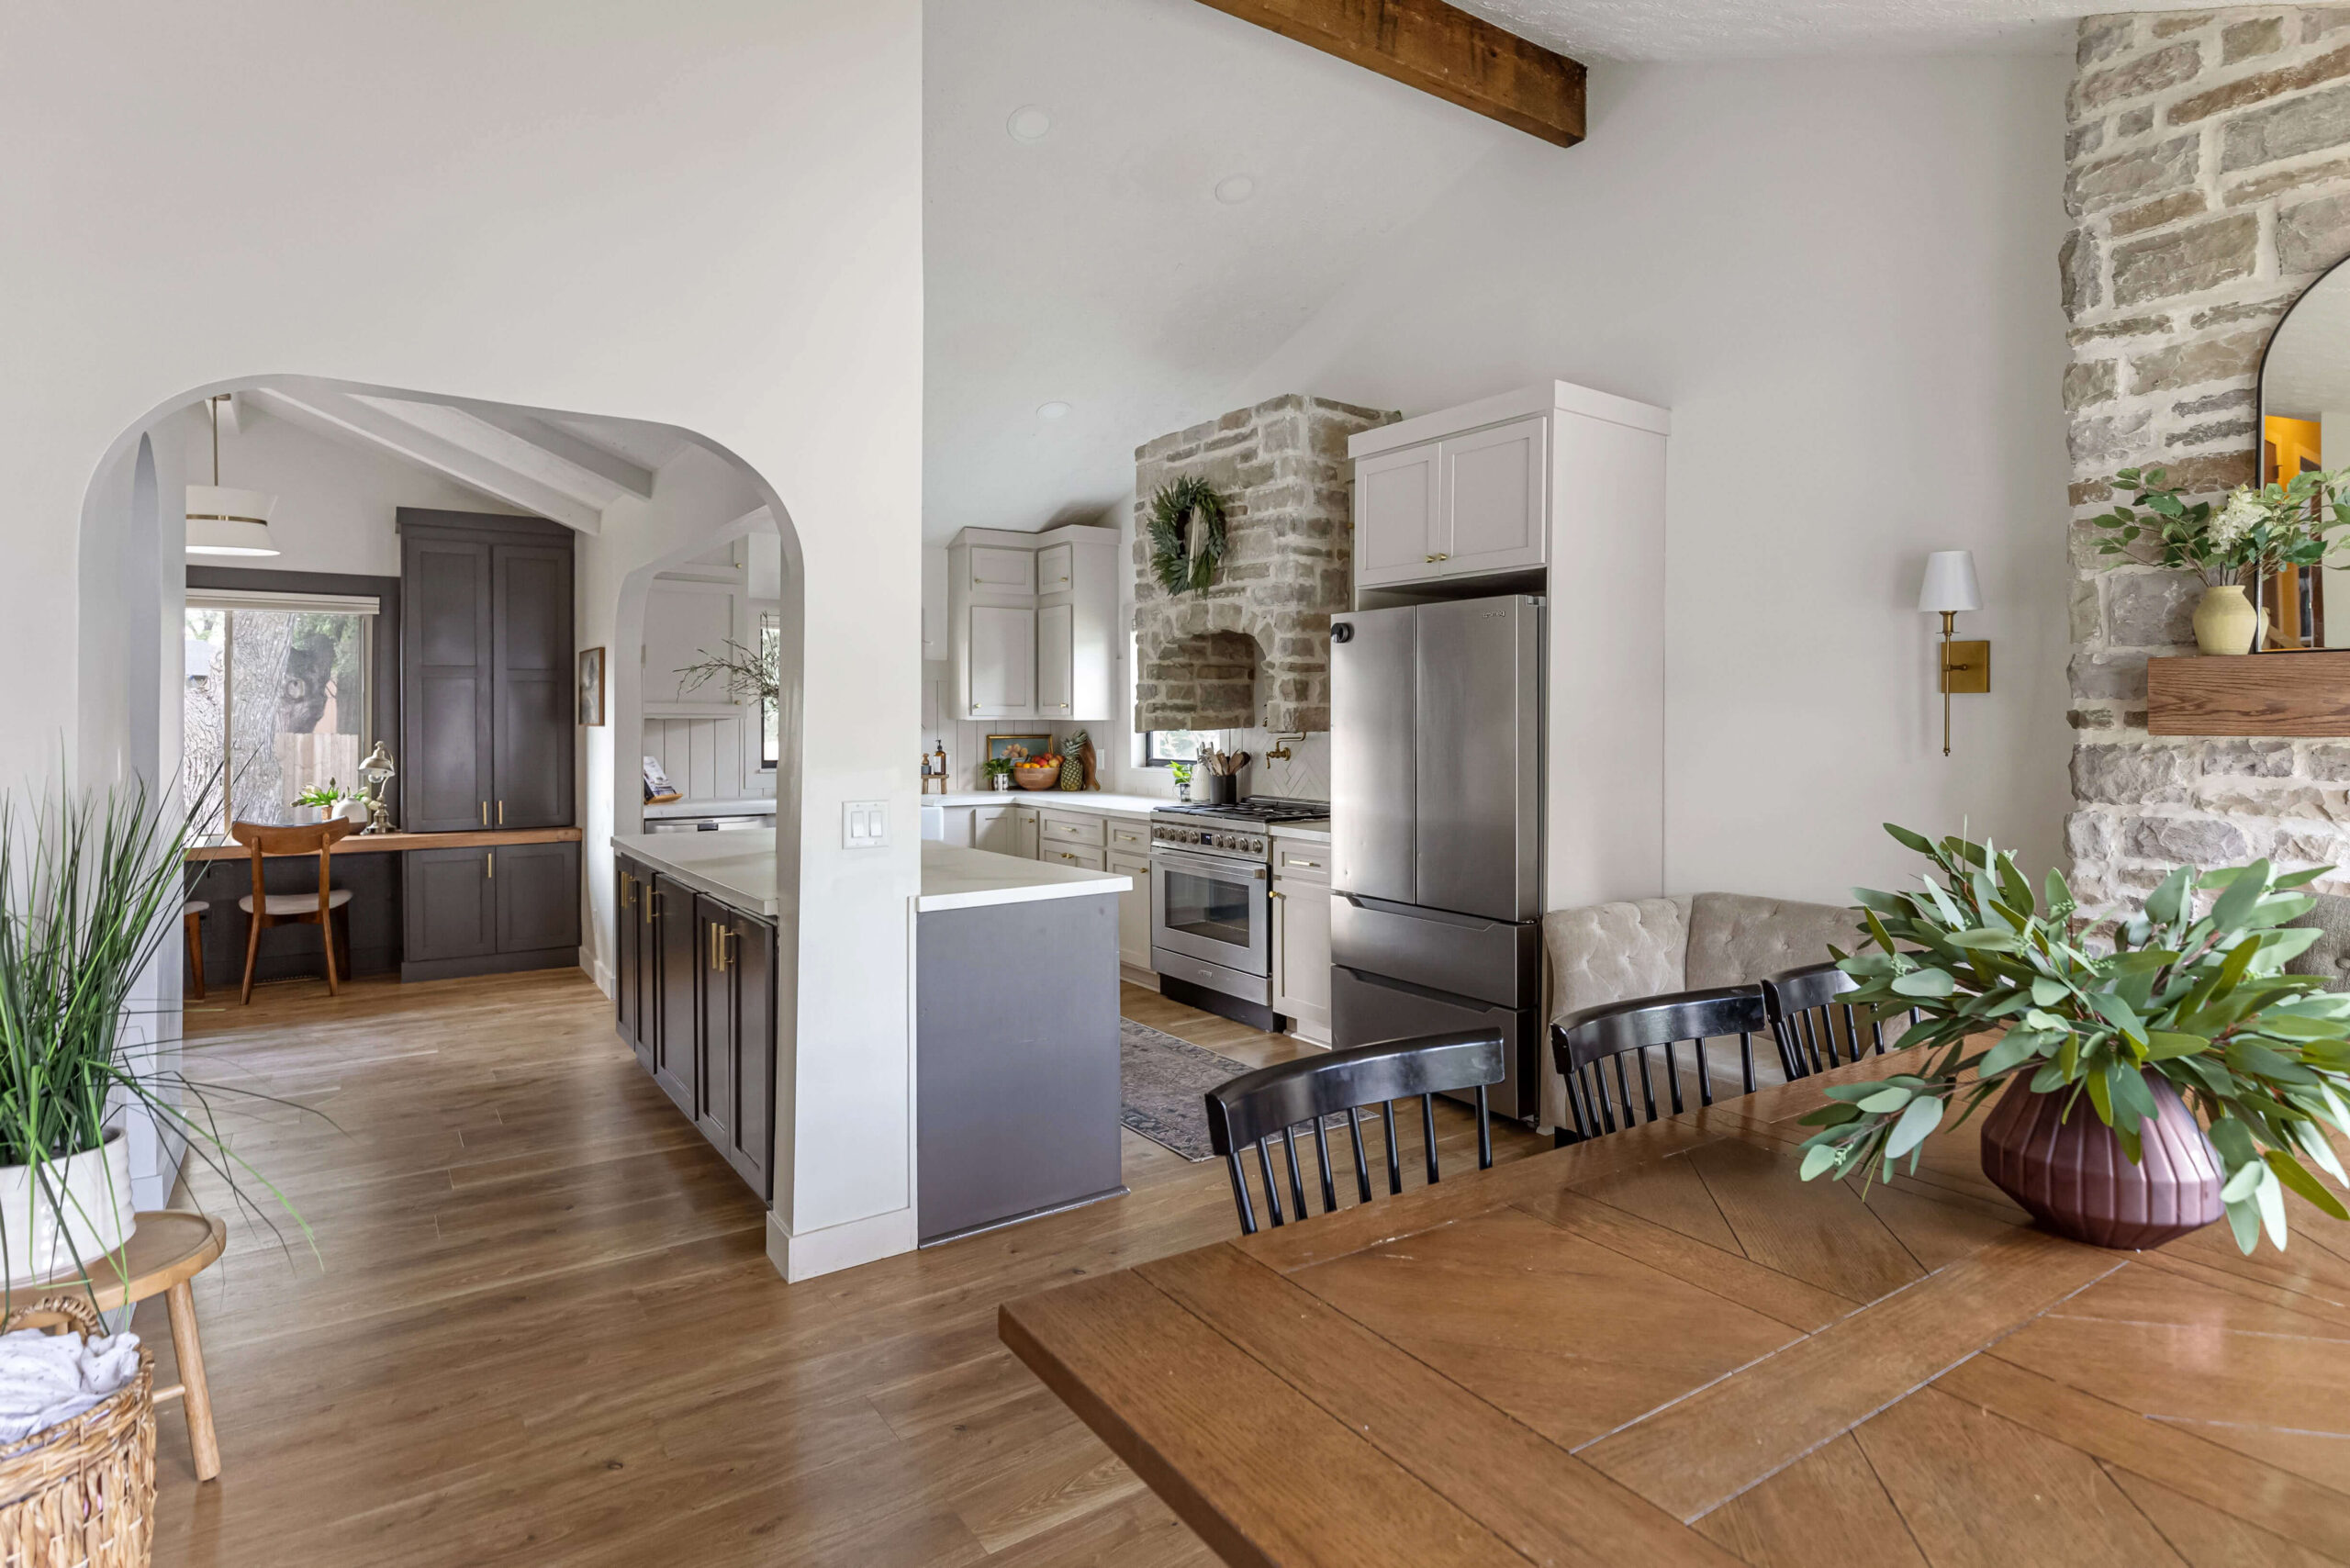
When we first toured this house, I instantly imagined this room with a floor-to-ceiling stone fireplace. Even though we ended up using the space as a dining room (and not the formal sitting room I initially pictured), I couldn’t shake the idea. I had this vision of cozy winter dinners, a crackling fire, and yep—a giant Christmas tree twinkling in front of the windows. So even with a fireplace already in the living room, we dove into building a fireplace right here too… and I have zero regrets!
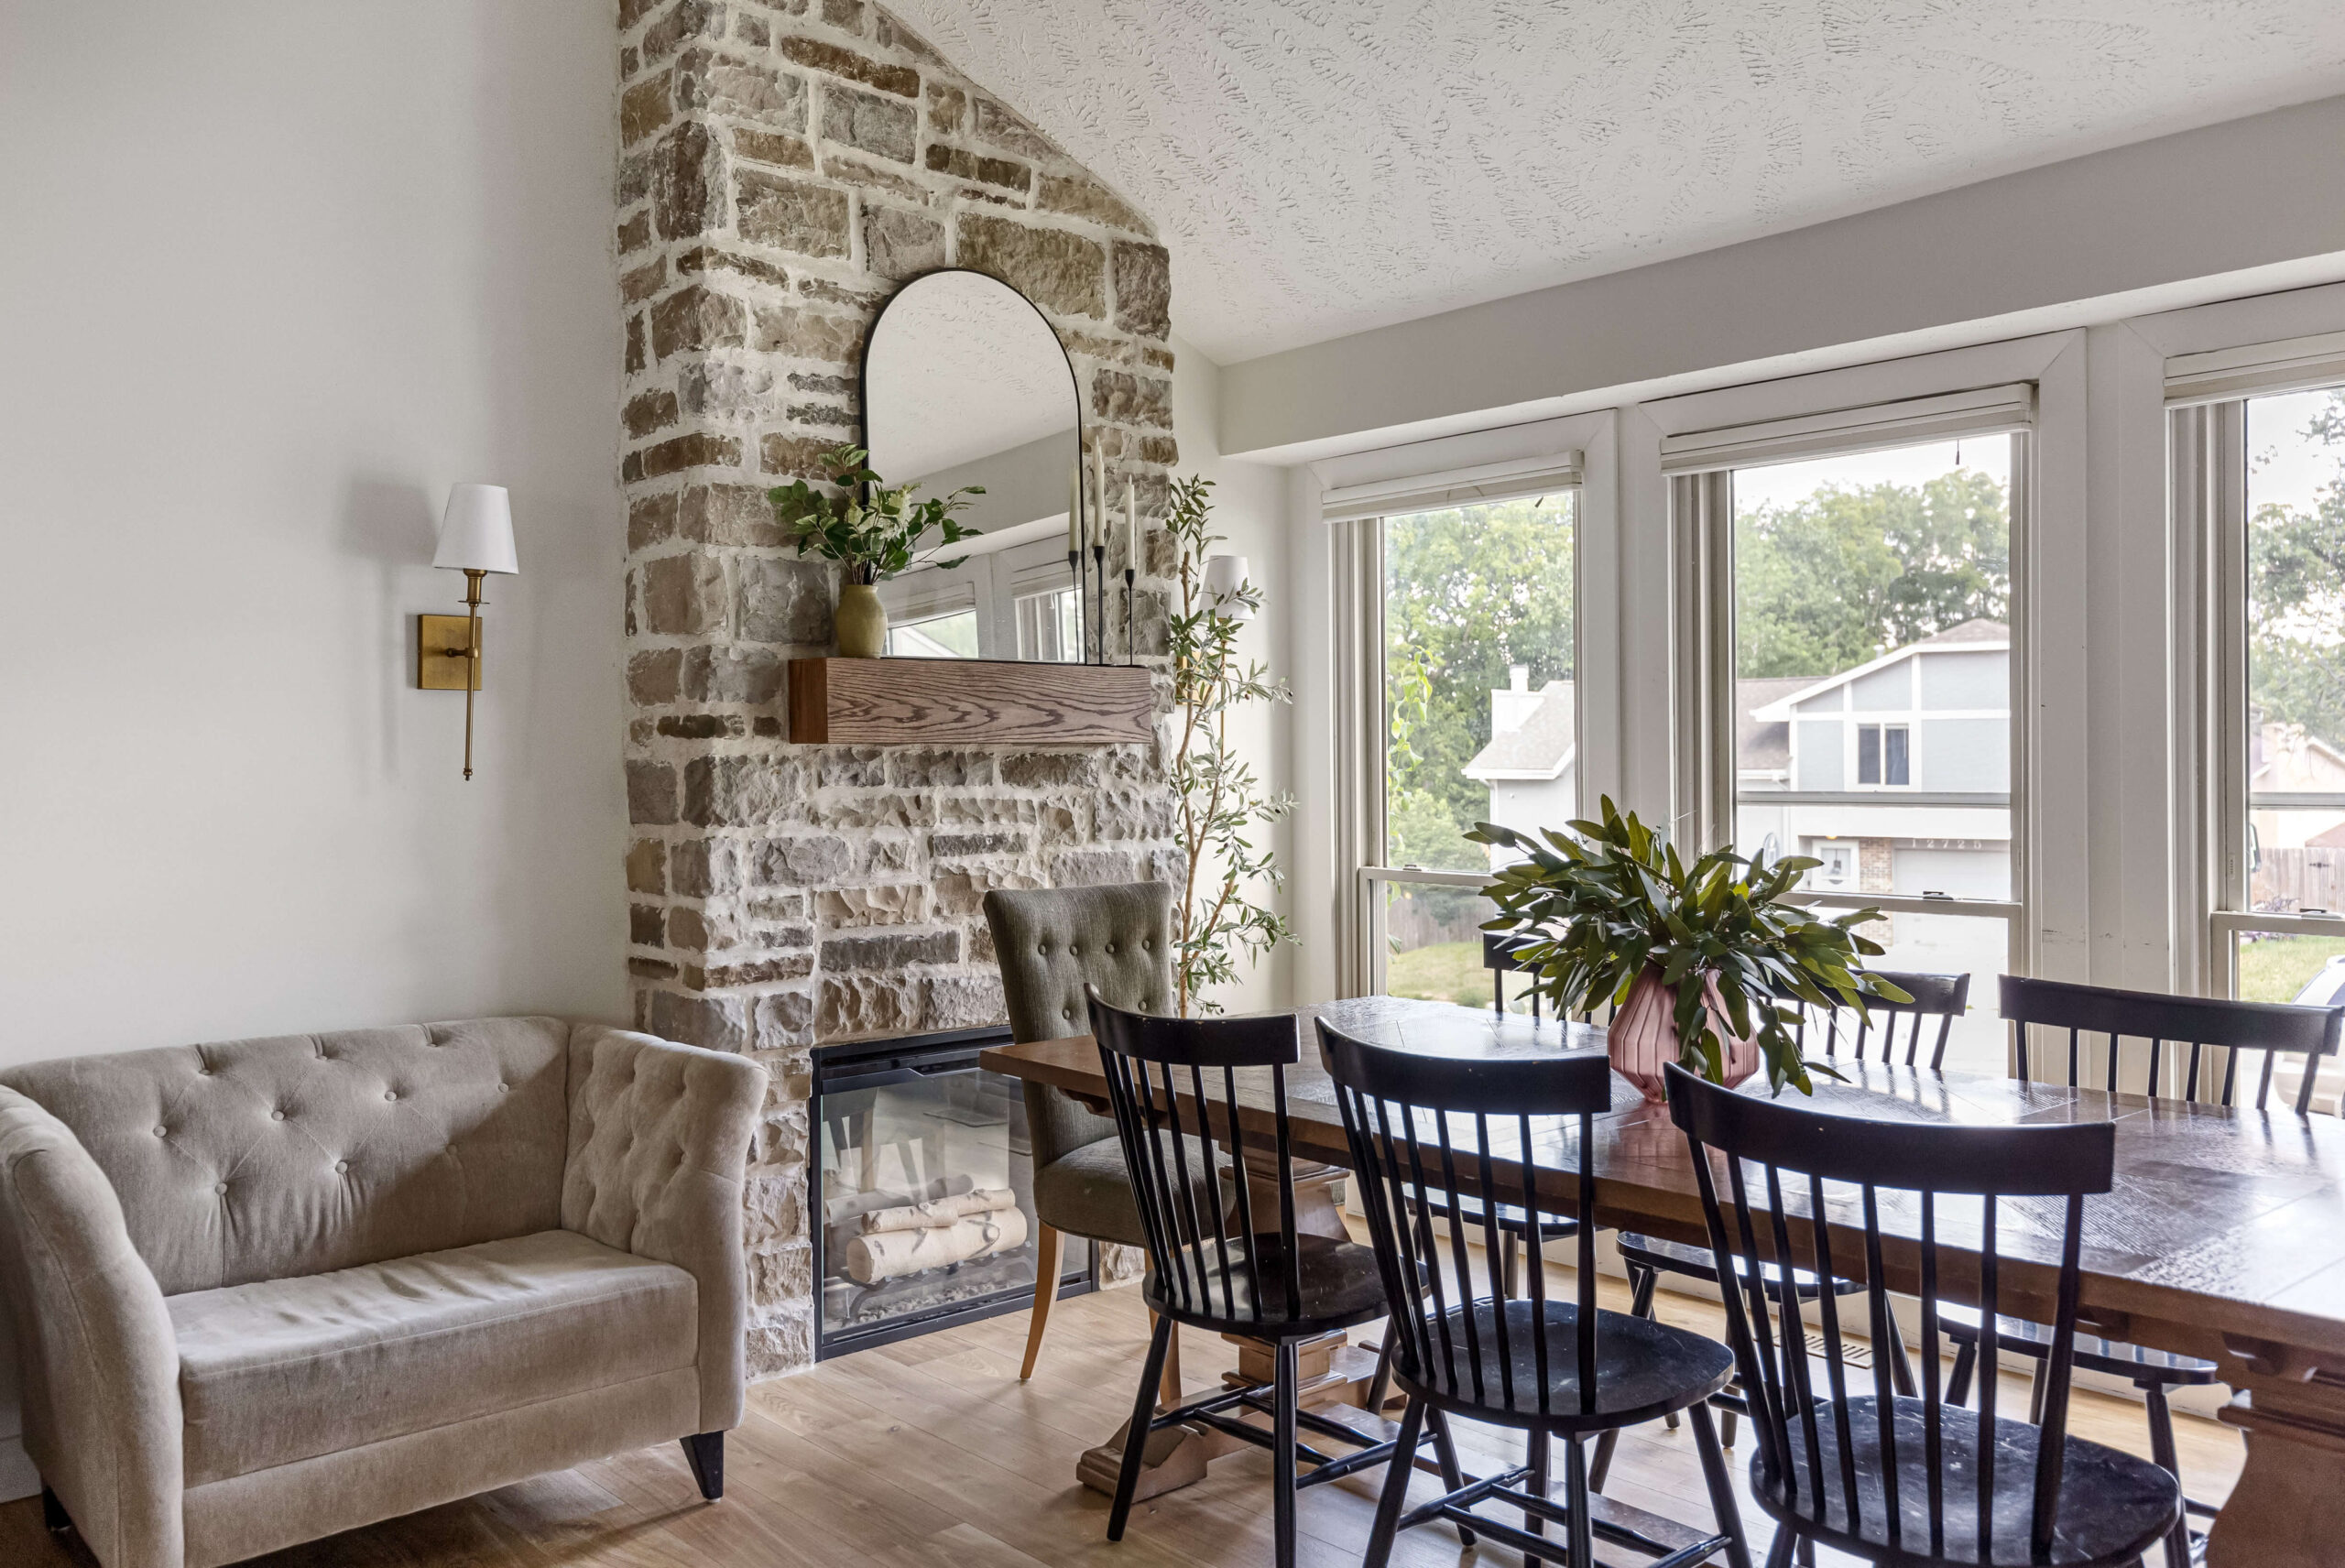
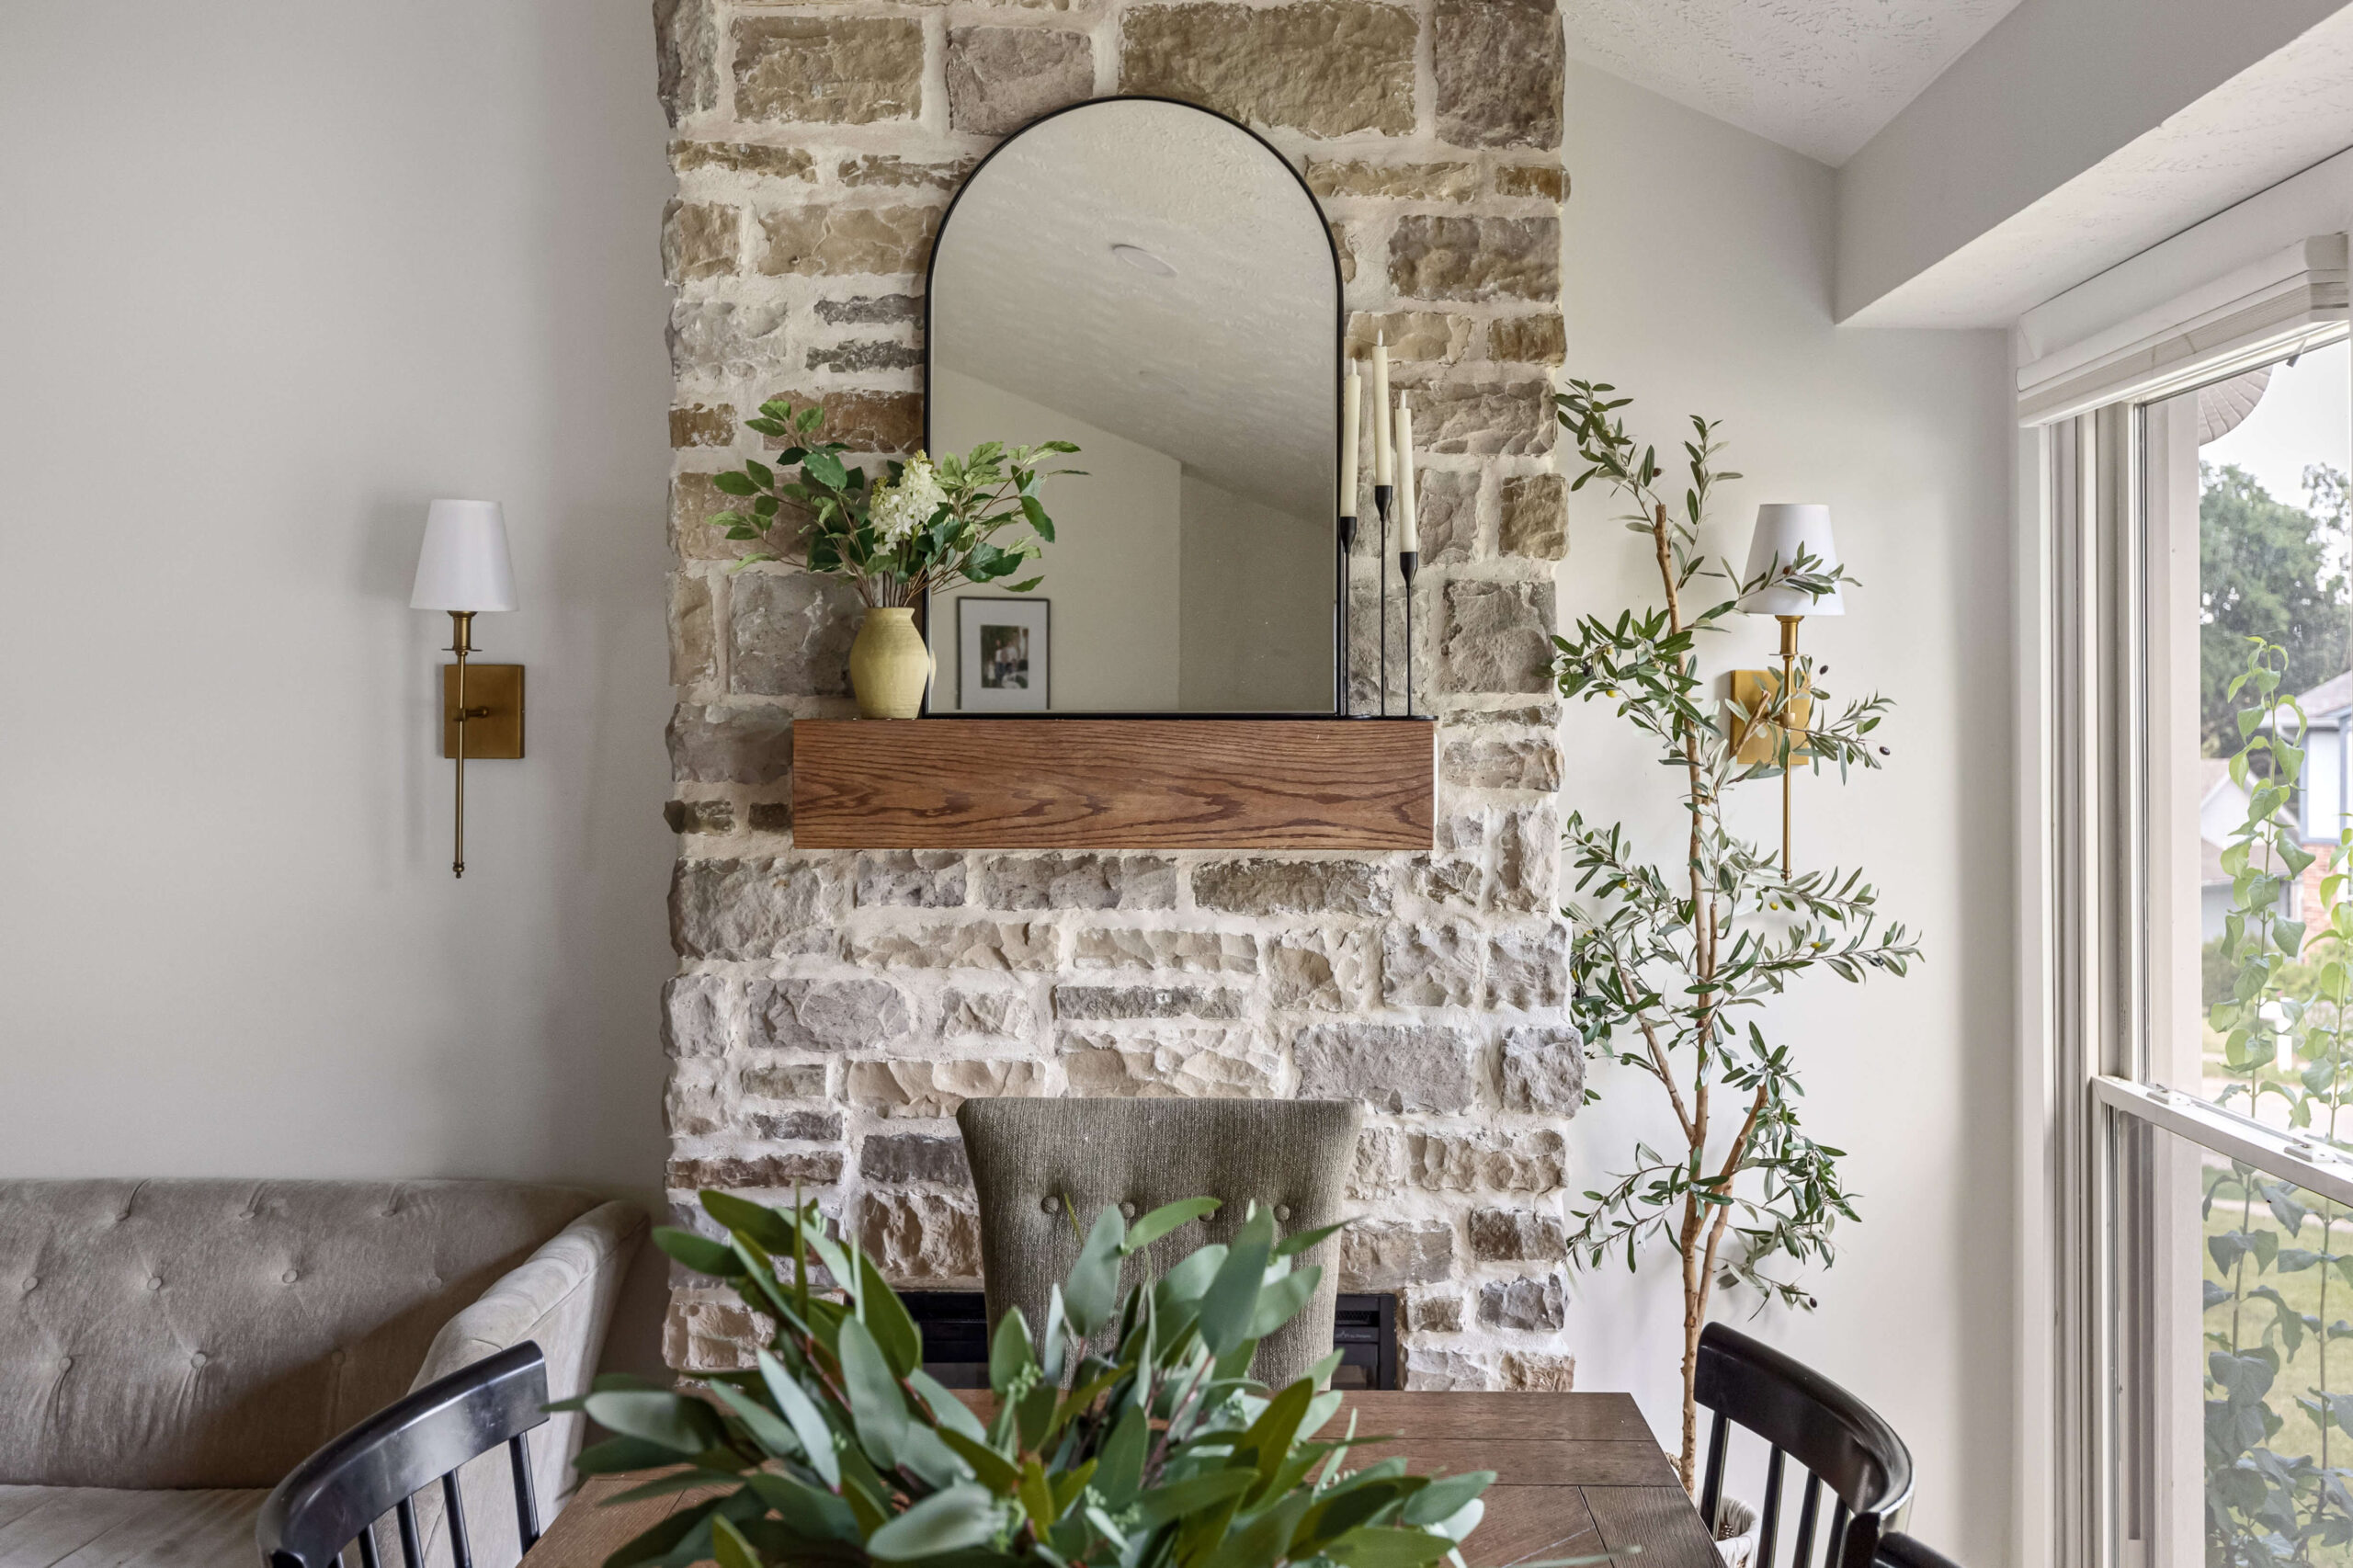
Table of Contents
- Tools I Used to Build a Fireplace Wall
- Materials for Building a Fireplace Surround
- Watch this Fireplace Project on YouTube
- Step 1: Framing the DIY Fireplace Wall
- Step 2: Prepping the Fireplace for Sheeting
- Step 3: Getting the Fireplace Ready for Stone
- Step 4: How to Attach Stone Veneer to a Fireplace
- Step 5: How to Cut Stone Veneer for a DIY Fireplace
- Step 6: Filling Gaps Between Stones When Building a Fireplace
- Before and After: DIY Fireplace Transformation
- 📌 Save this Project for Later
- DIY Stone Fireplace FAQs: What You Need to Know Before Building
Tools I Used to Build a Fireplace Wall
If you’re planning on DIYing a fireplace surround, here’s what I used:
- Laser level
- Tape measure
- Straight edge
- Drill
- Level
- Miter saw
- Circular saw
- Table saw
- Hammer
- Grinder
- Mixing paddle
- Bucket
- Wire brush
- Tile saw
- Mortar bag
- Trowel
- Putty knife
Materials for Building a Fireplace Surround
- 2x4s
- Masking tape
- Roofing nails
- Gloves
- Stucco netting
- Mortar (for attaching stone)
- Mortar (in color of choice for filling gaps between stones)
- Stone – I purchased my stone from Centurion Stone of Iowa, you can also use a stone dealer local to you. I chose their Oak Park Summit Blend
- Glen Dimplex Revillusion 36-inch
- Glen Dimplex Fresh Cut Logs
Watch this Fireplace Project on YouTube
Want to see the full process? From framing to stone to final styling – here’s the full DIY stone fireplace video tutorial you can watch:
Step 1: Framing the DIY Fireplace Wall
First, I measured and mapped out the spot to install the electric fireplace insert. This is my favorite laser level and straight edge to use for precision.

Since I was using an electric insert, I had to run wires to the basement. With some help from my father-in-law, we handled the tricky parts of the wiring. Definitely call in a pro if you’re not feeling confident about the wiring!

Next, I built the frame using 2x4s, starting with a rectangle on the ceiling to match the fireplace’s depth and width. I secured the framing to the studs and adjusted for the sloped ceiling. Silly me had assumed my boards were long enough to go from the floor to the ceiling, but I was wrong. So I built a small platform where needed. Don’t be like me folks: go buy longer 2x4s.


I built the shell by running my 2x4s from the small platform and floor up to the ceiling framing.
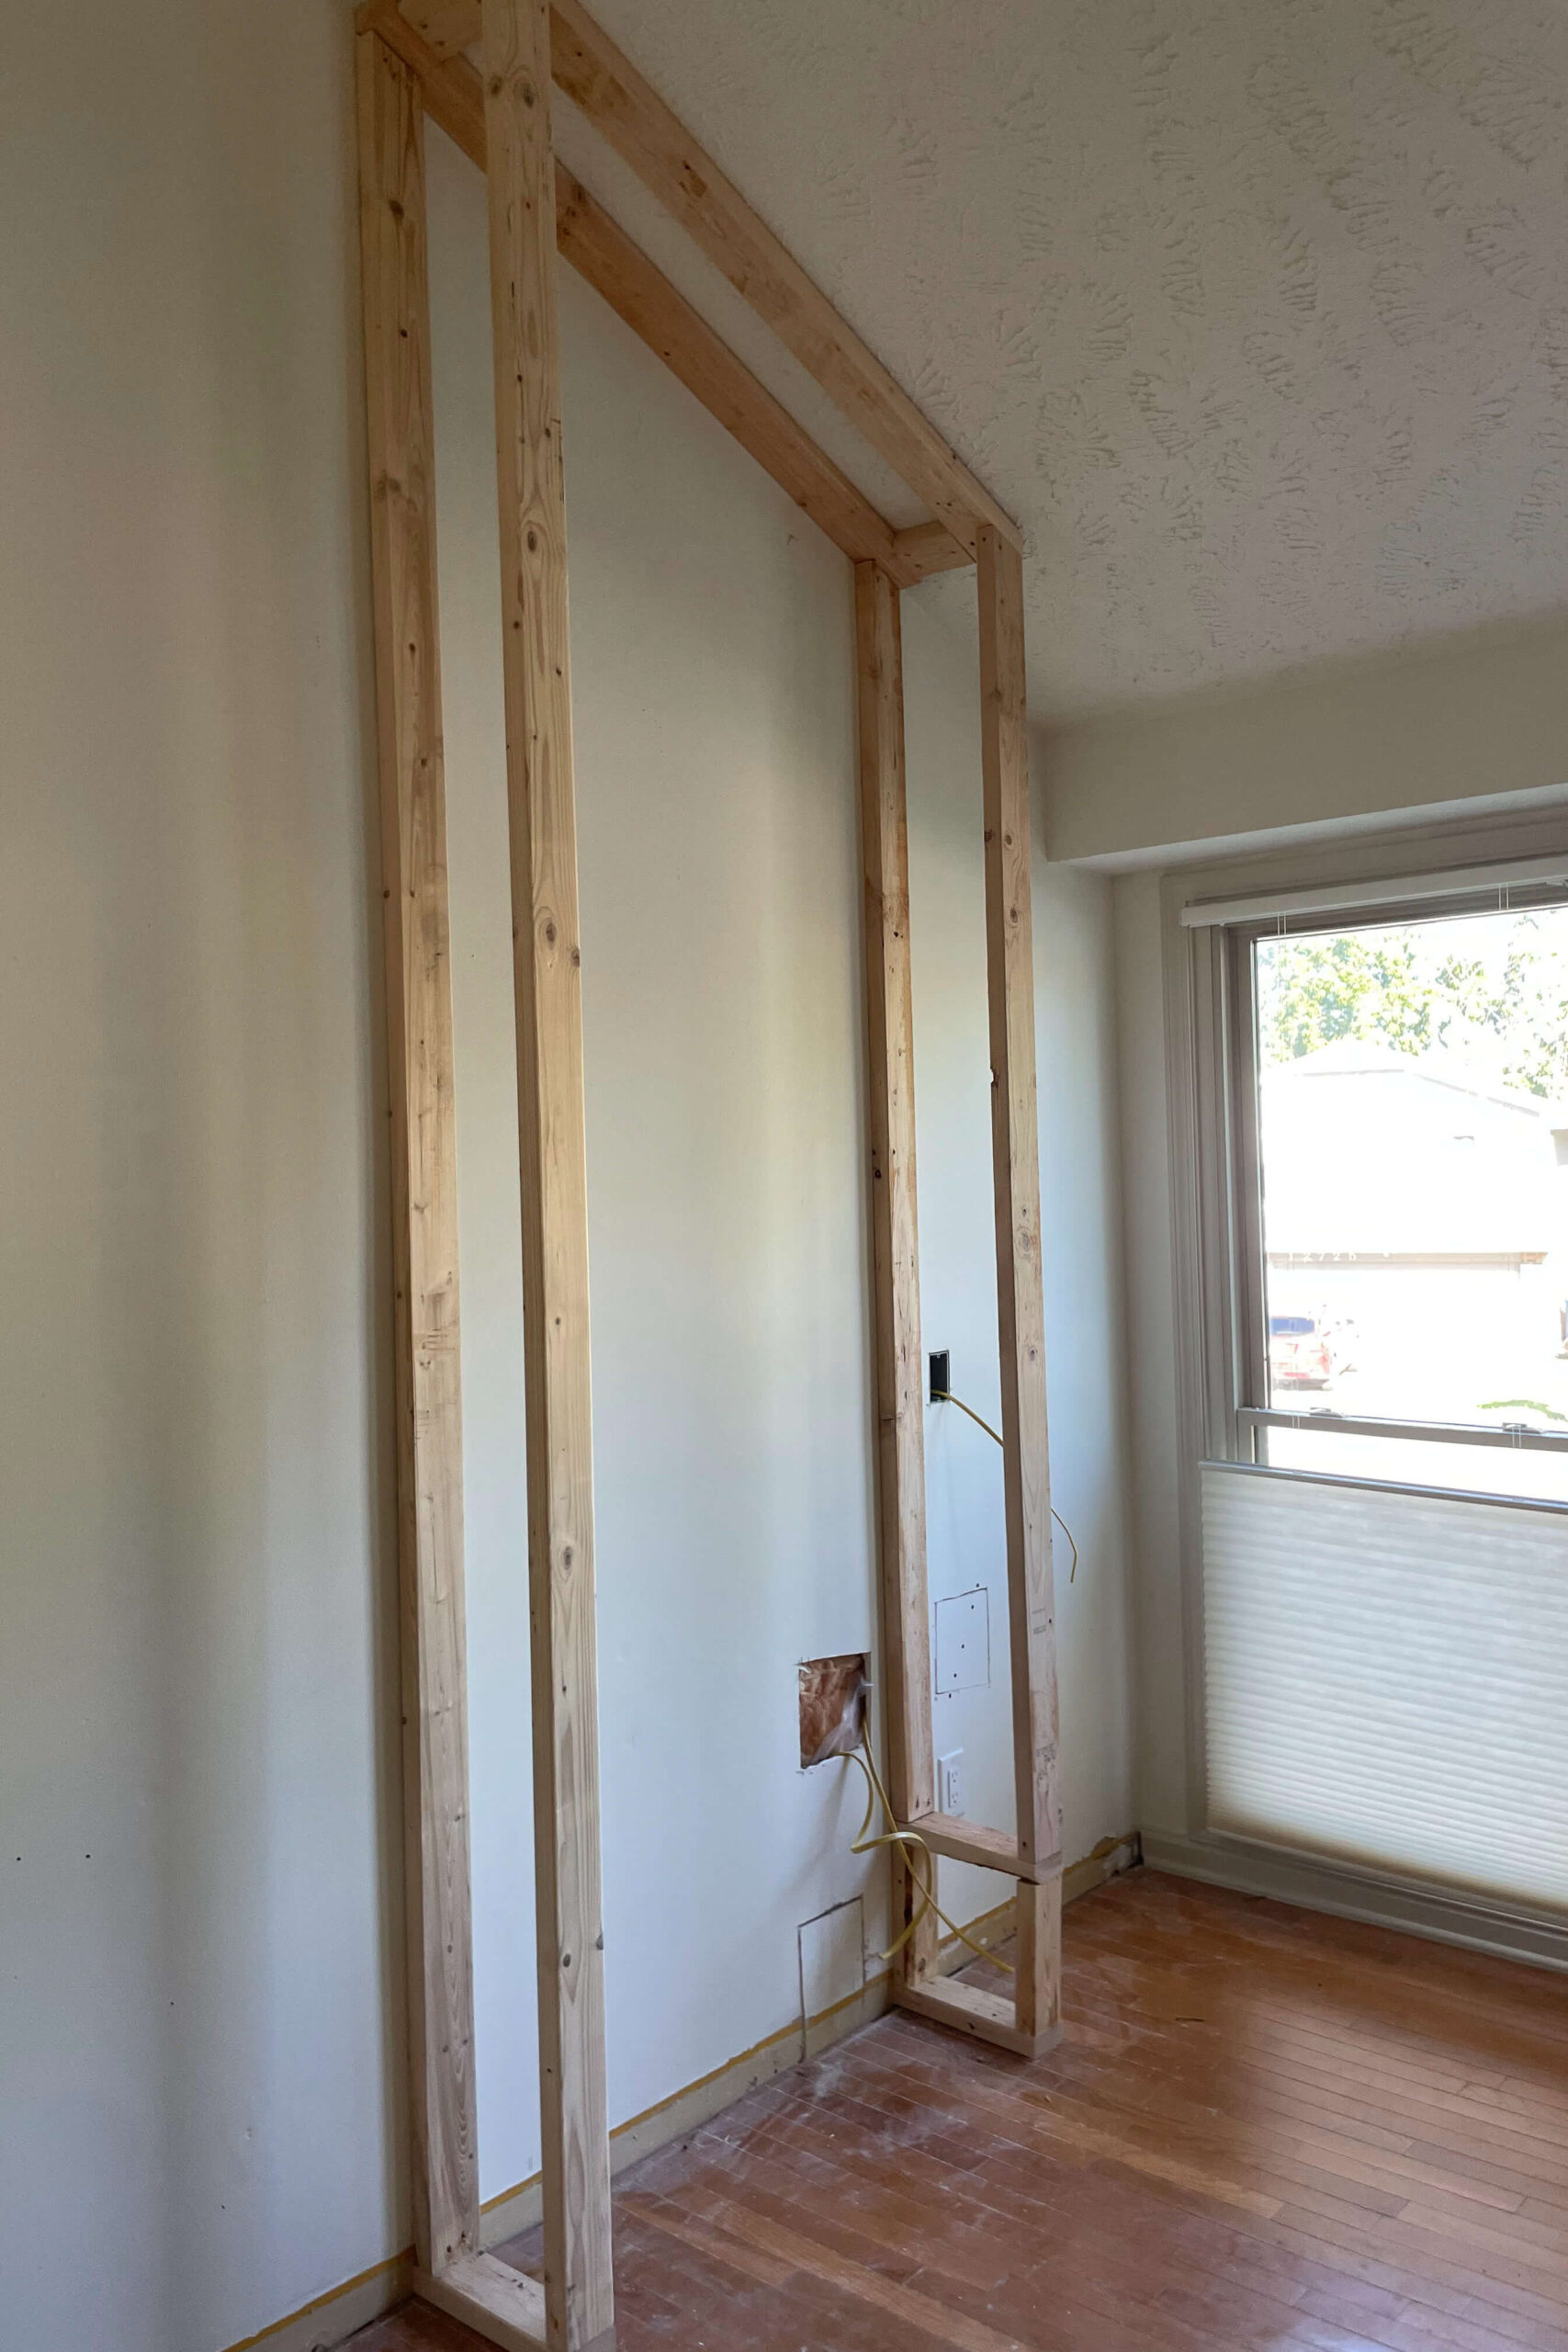
I wanted a mantel, so I measured the perfect height and added a 2×4 as a crossbeam. Then, I framed out the opening for the fireplace insert.

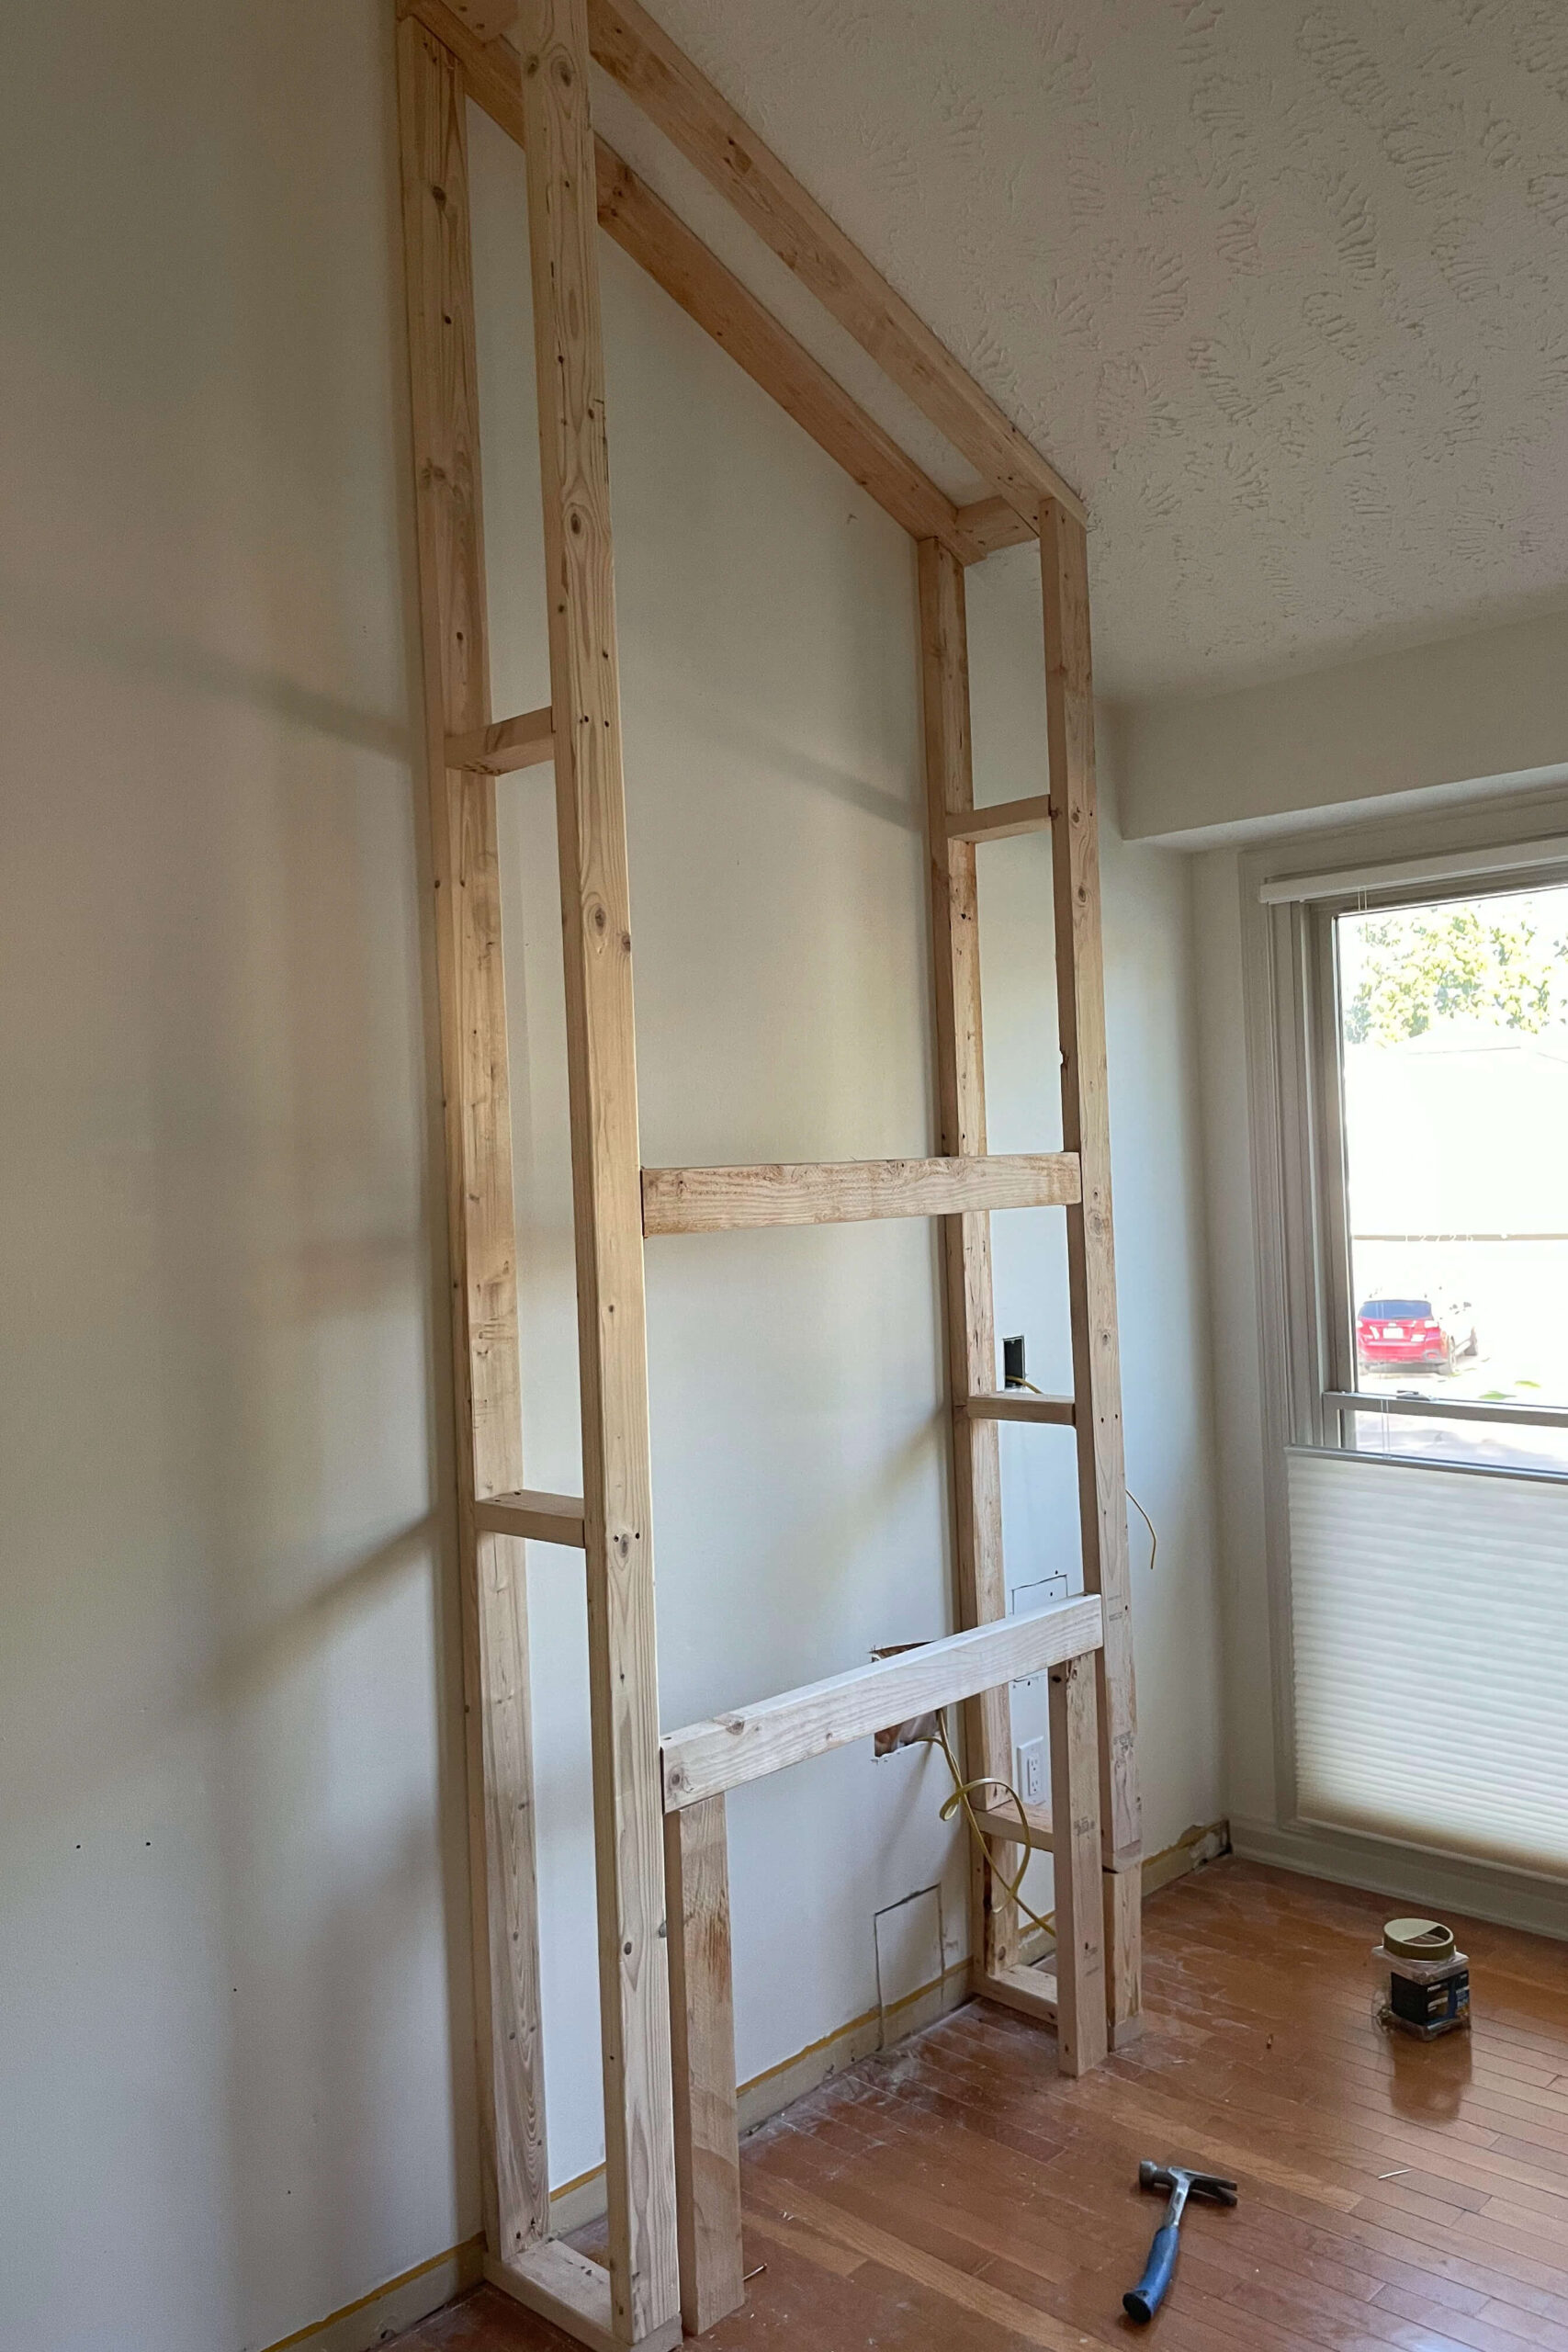
The next step in building a fireplace is adding 2x4s on each side for extra bracing. This kept the vertical beams nice and straight and provided a solid base for attaching the sheeting later.
With that, the framing was done! I slid the fireplace insert in to double-check the fit – thankfully, it fit perfectly. If it hadn’t, this would’ve been the moment to make adjustments. Always make sure your insert fits snugly before moving on to the next step!
Step 2: Prepping the Fireplace for Sheeting
I used OSB sheets to cover the framing, cutting them to size with a circular saw and table saw.


Then I attached them to the framing using my drill and some wood screws.

Before sealing up the right side, I added an electrical outlet for future Christmas lights! After wiring it in, I closed up the rest of the fireplace.


Step 3: Getting the Fireplace Ready for Stone
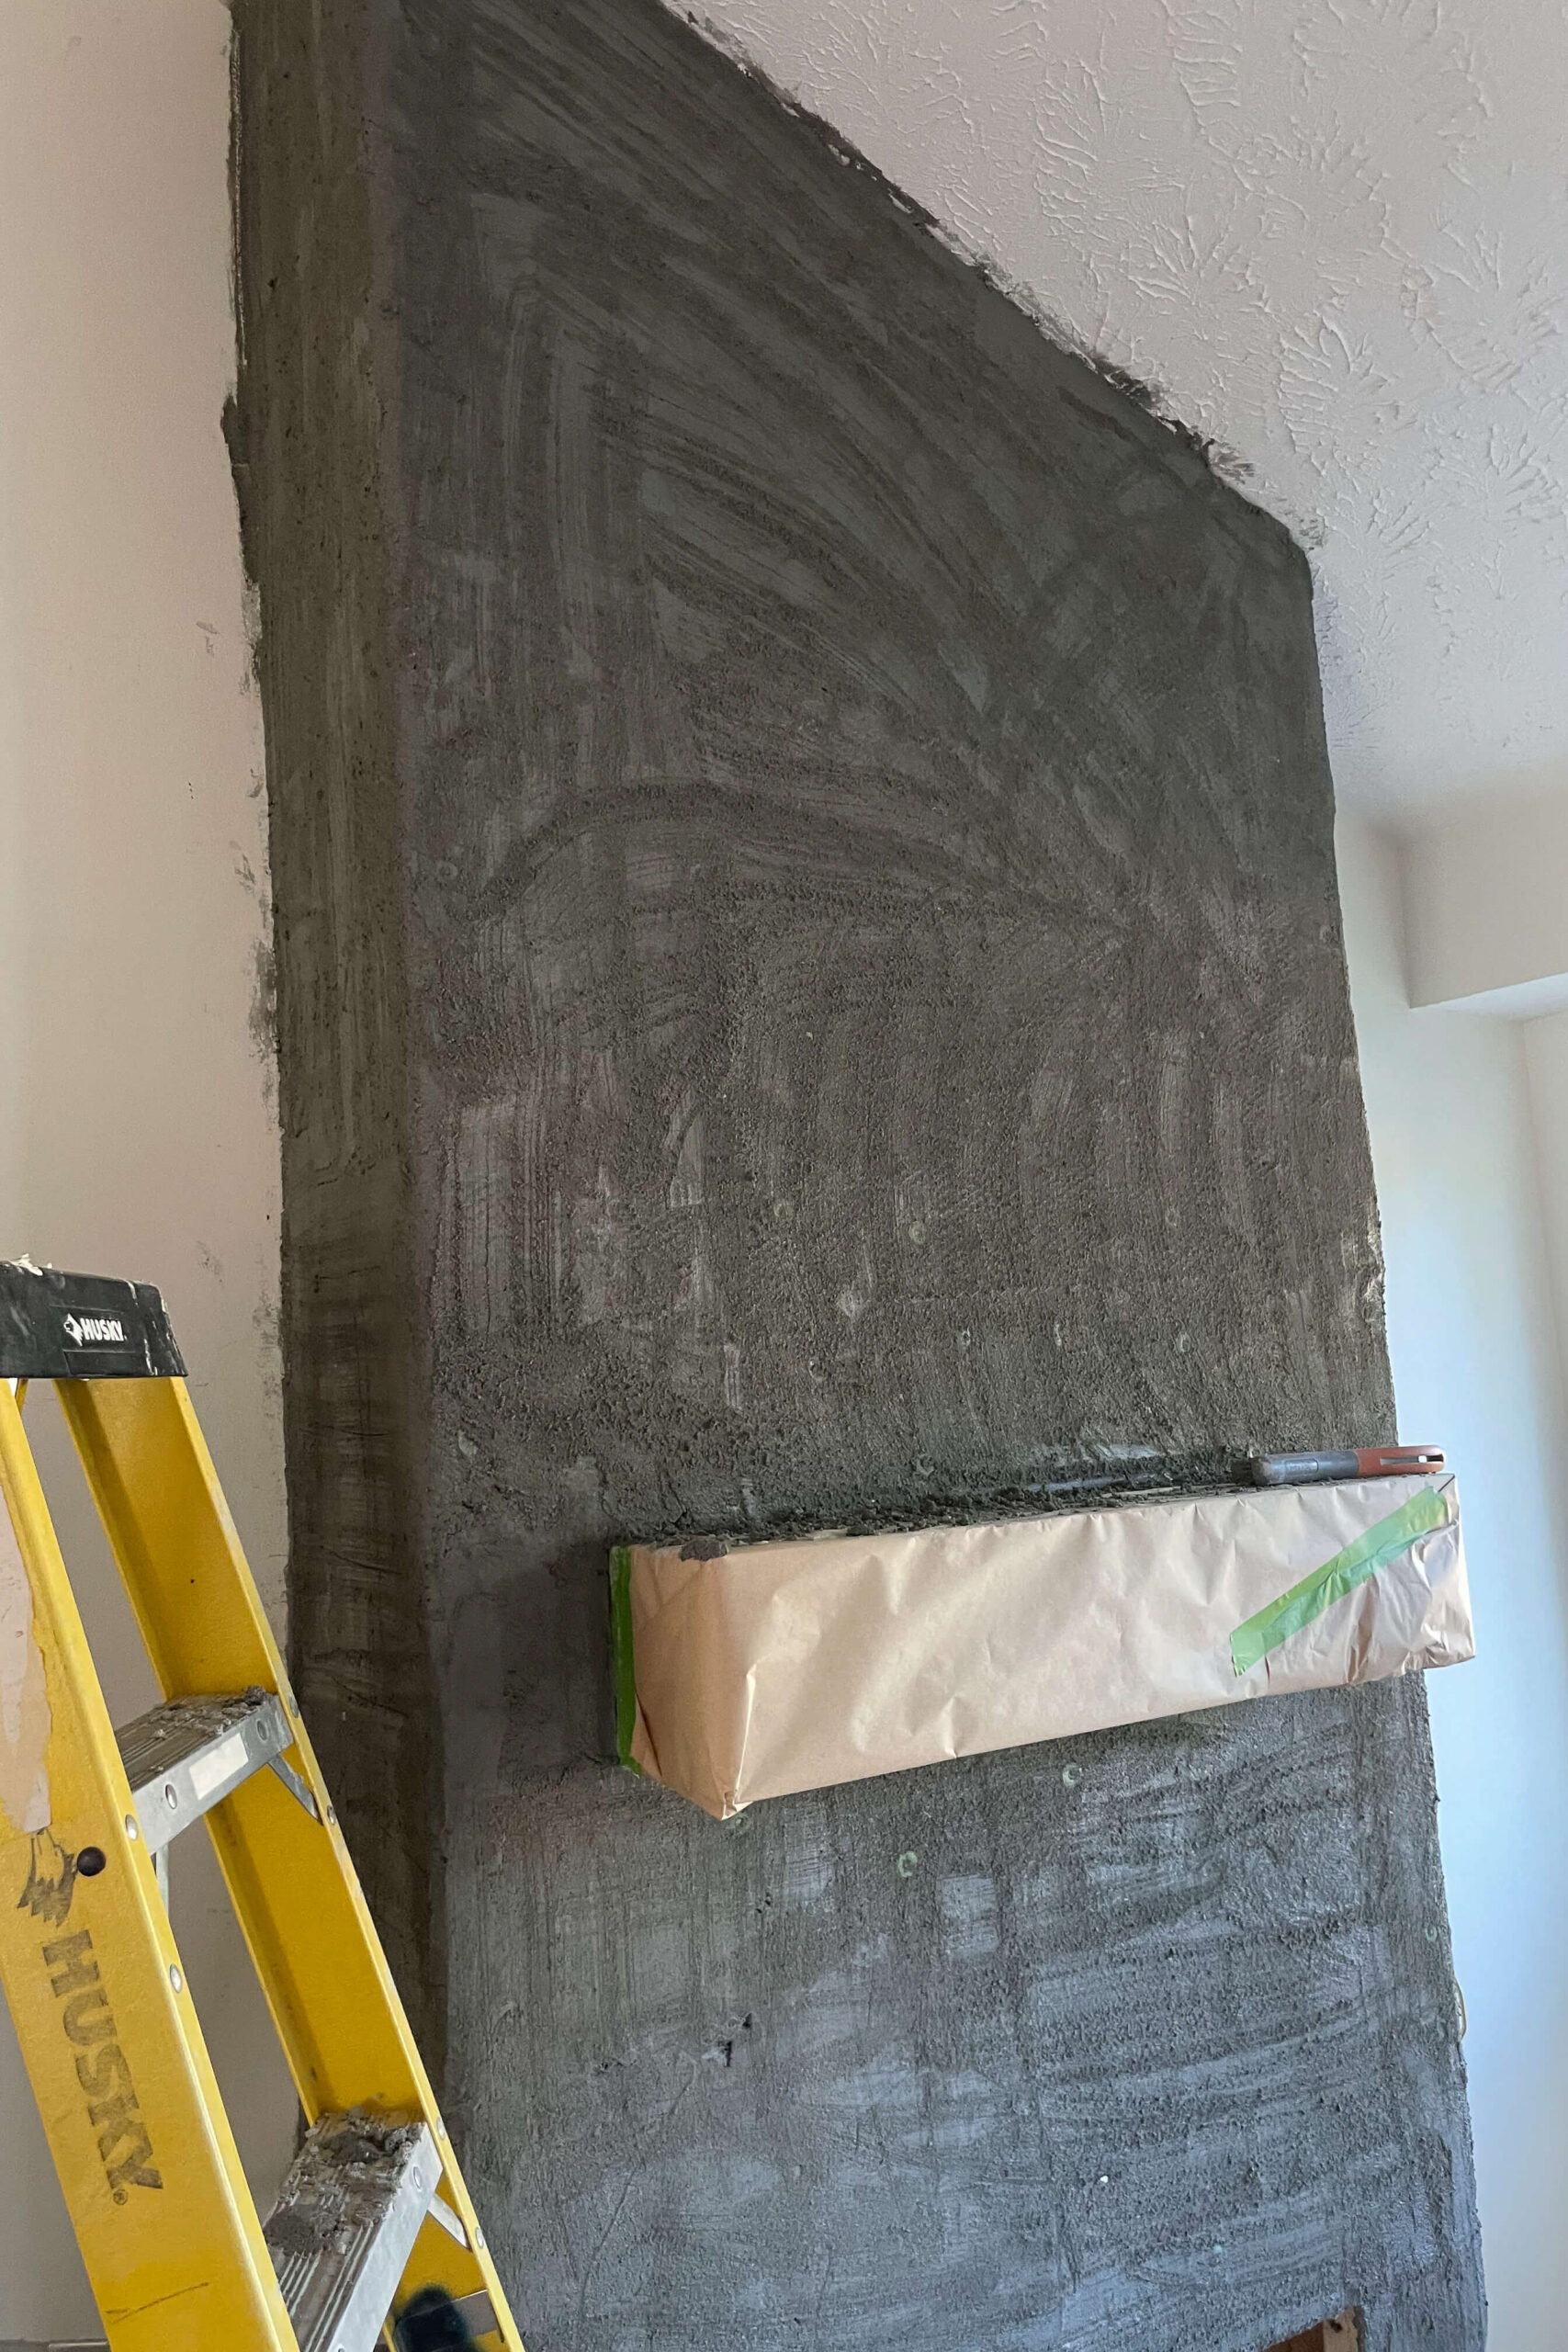
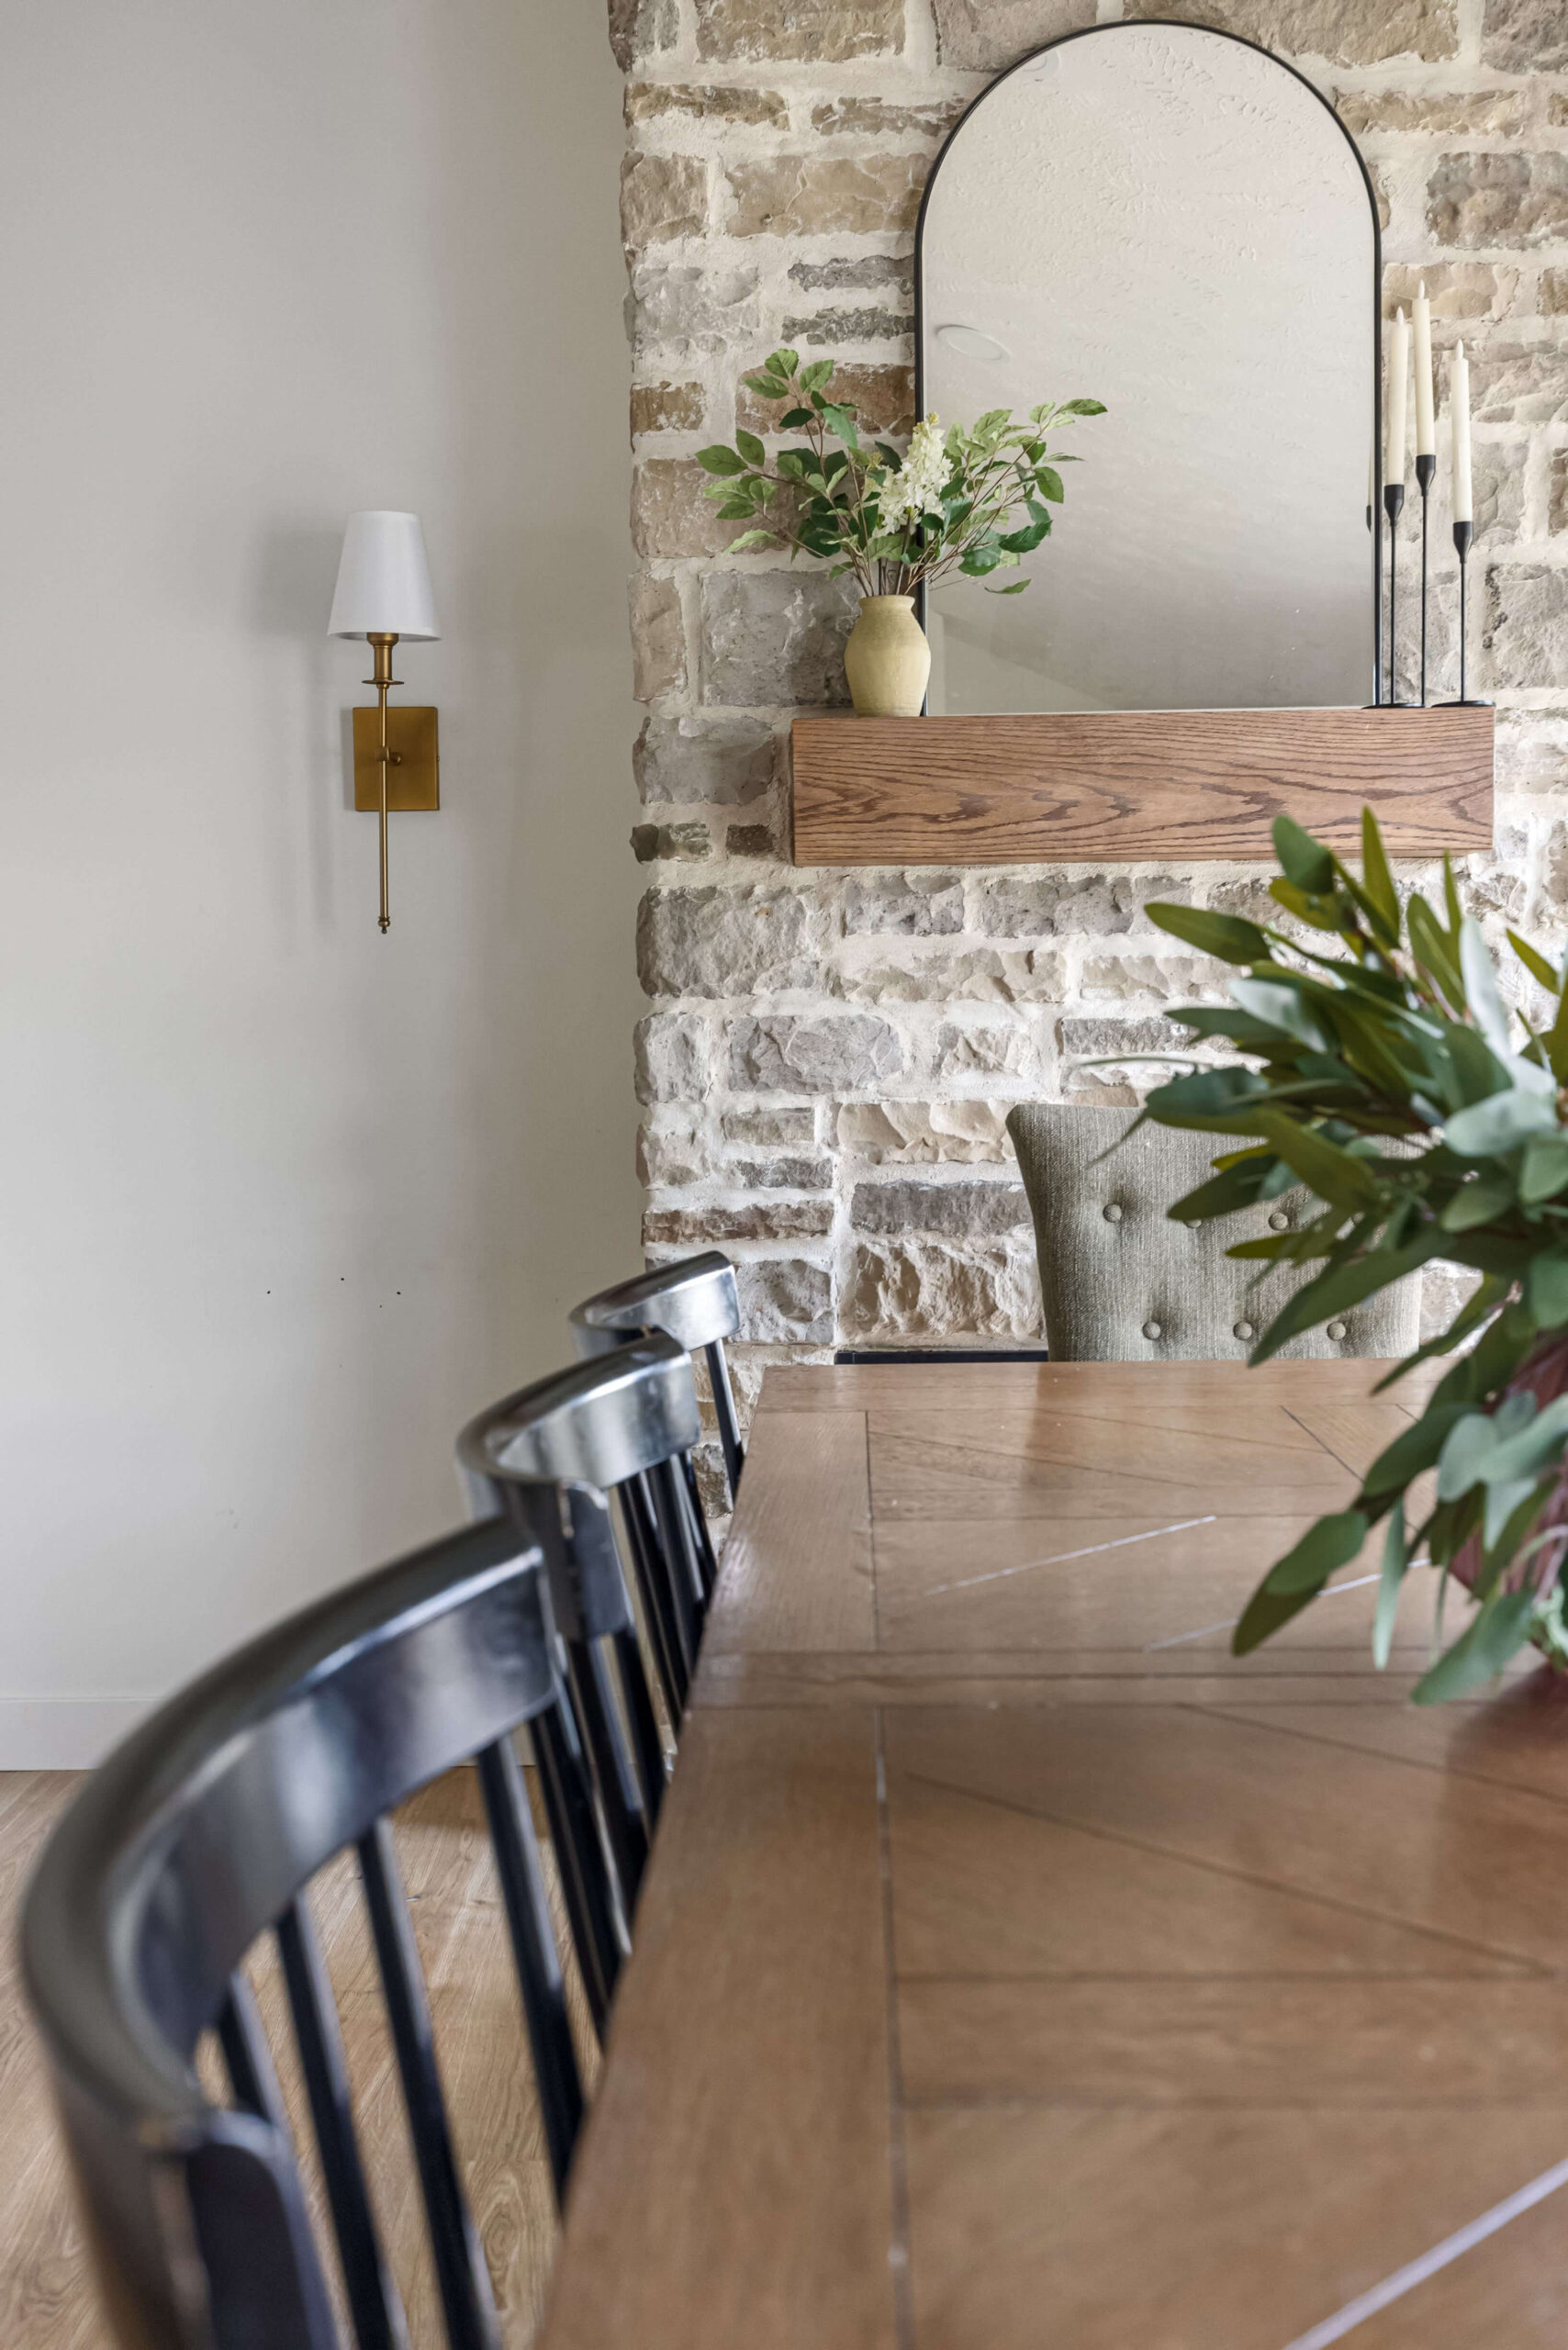
We’re almost at the part of building a fireplace that I’m most excited for—adding the stone! But first, I built and attached a beautiful red oak mantel. Check out that blog post if you want to build one yourself!
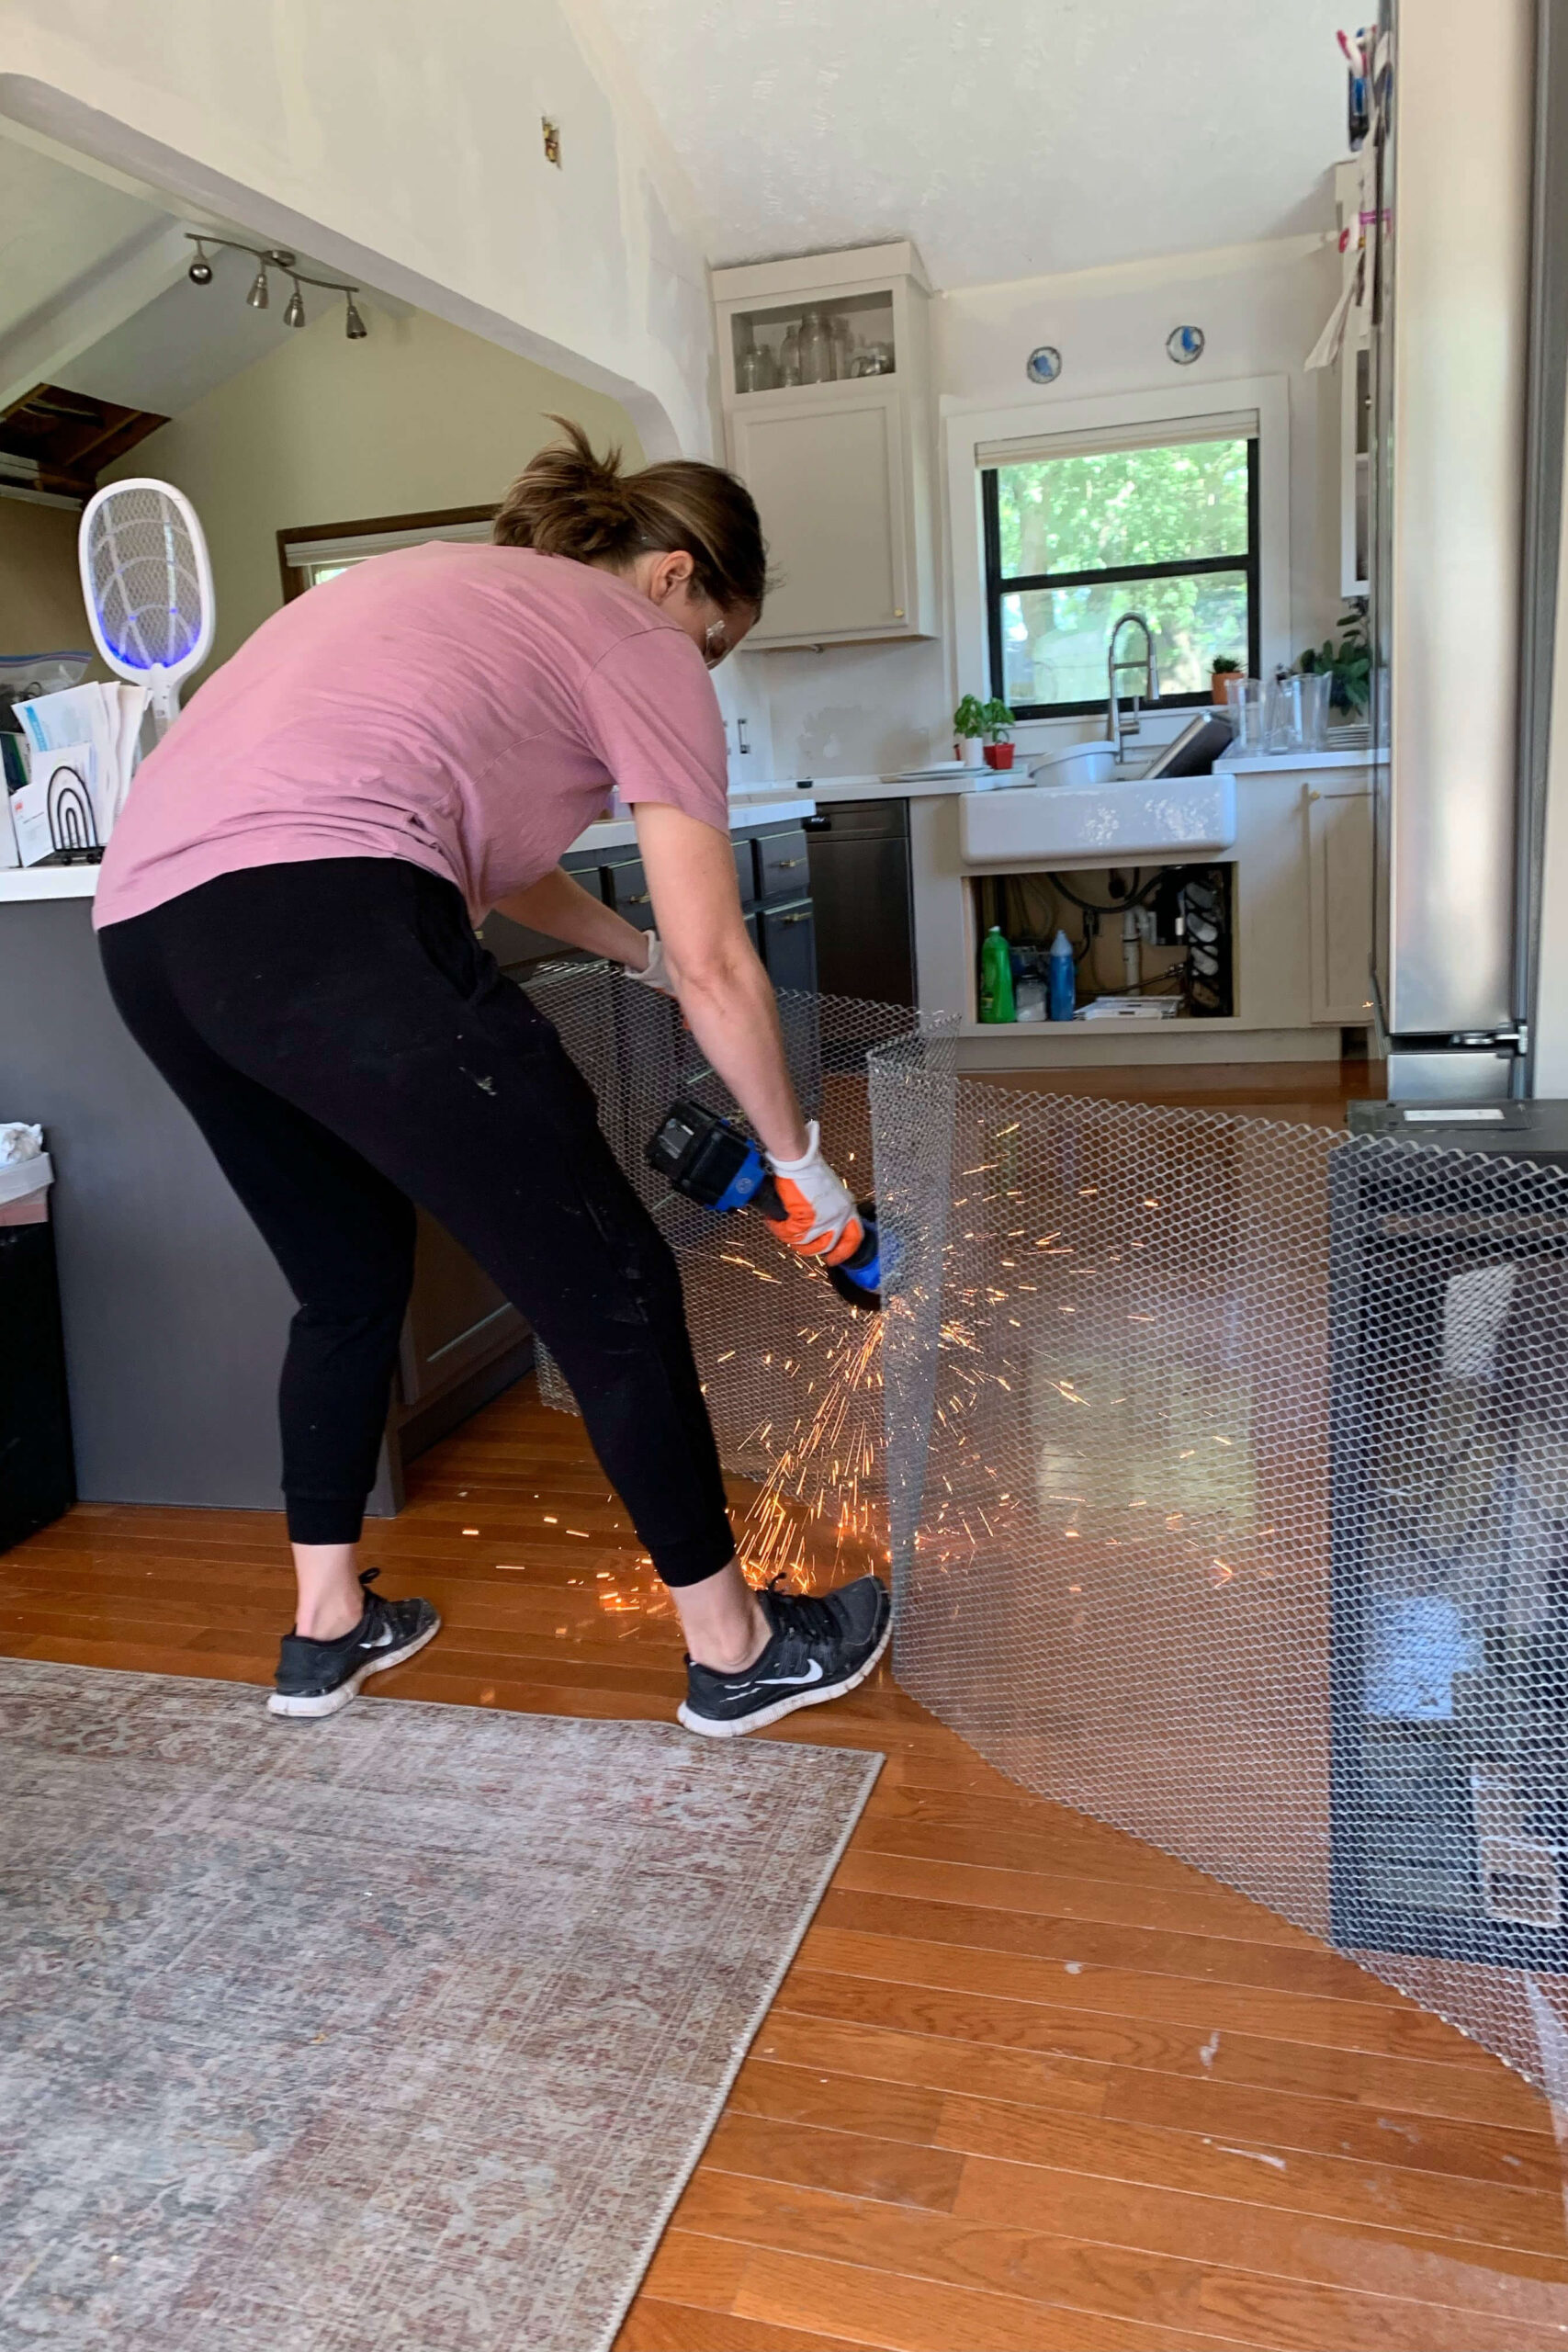
Before adding the stone, I covered the sheeting with stucco netting for the mortar to grip onto, securing it with roofing nails. They’re just like regular nails but with a big cap that helps firmly hold the wire mesh.
I initially tried using tin snips to cut the netting but quickly found that a grinder works better.
Pro Tip: Wear gloves! The wire can really tear up your hands if you don’t!
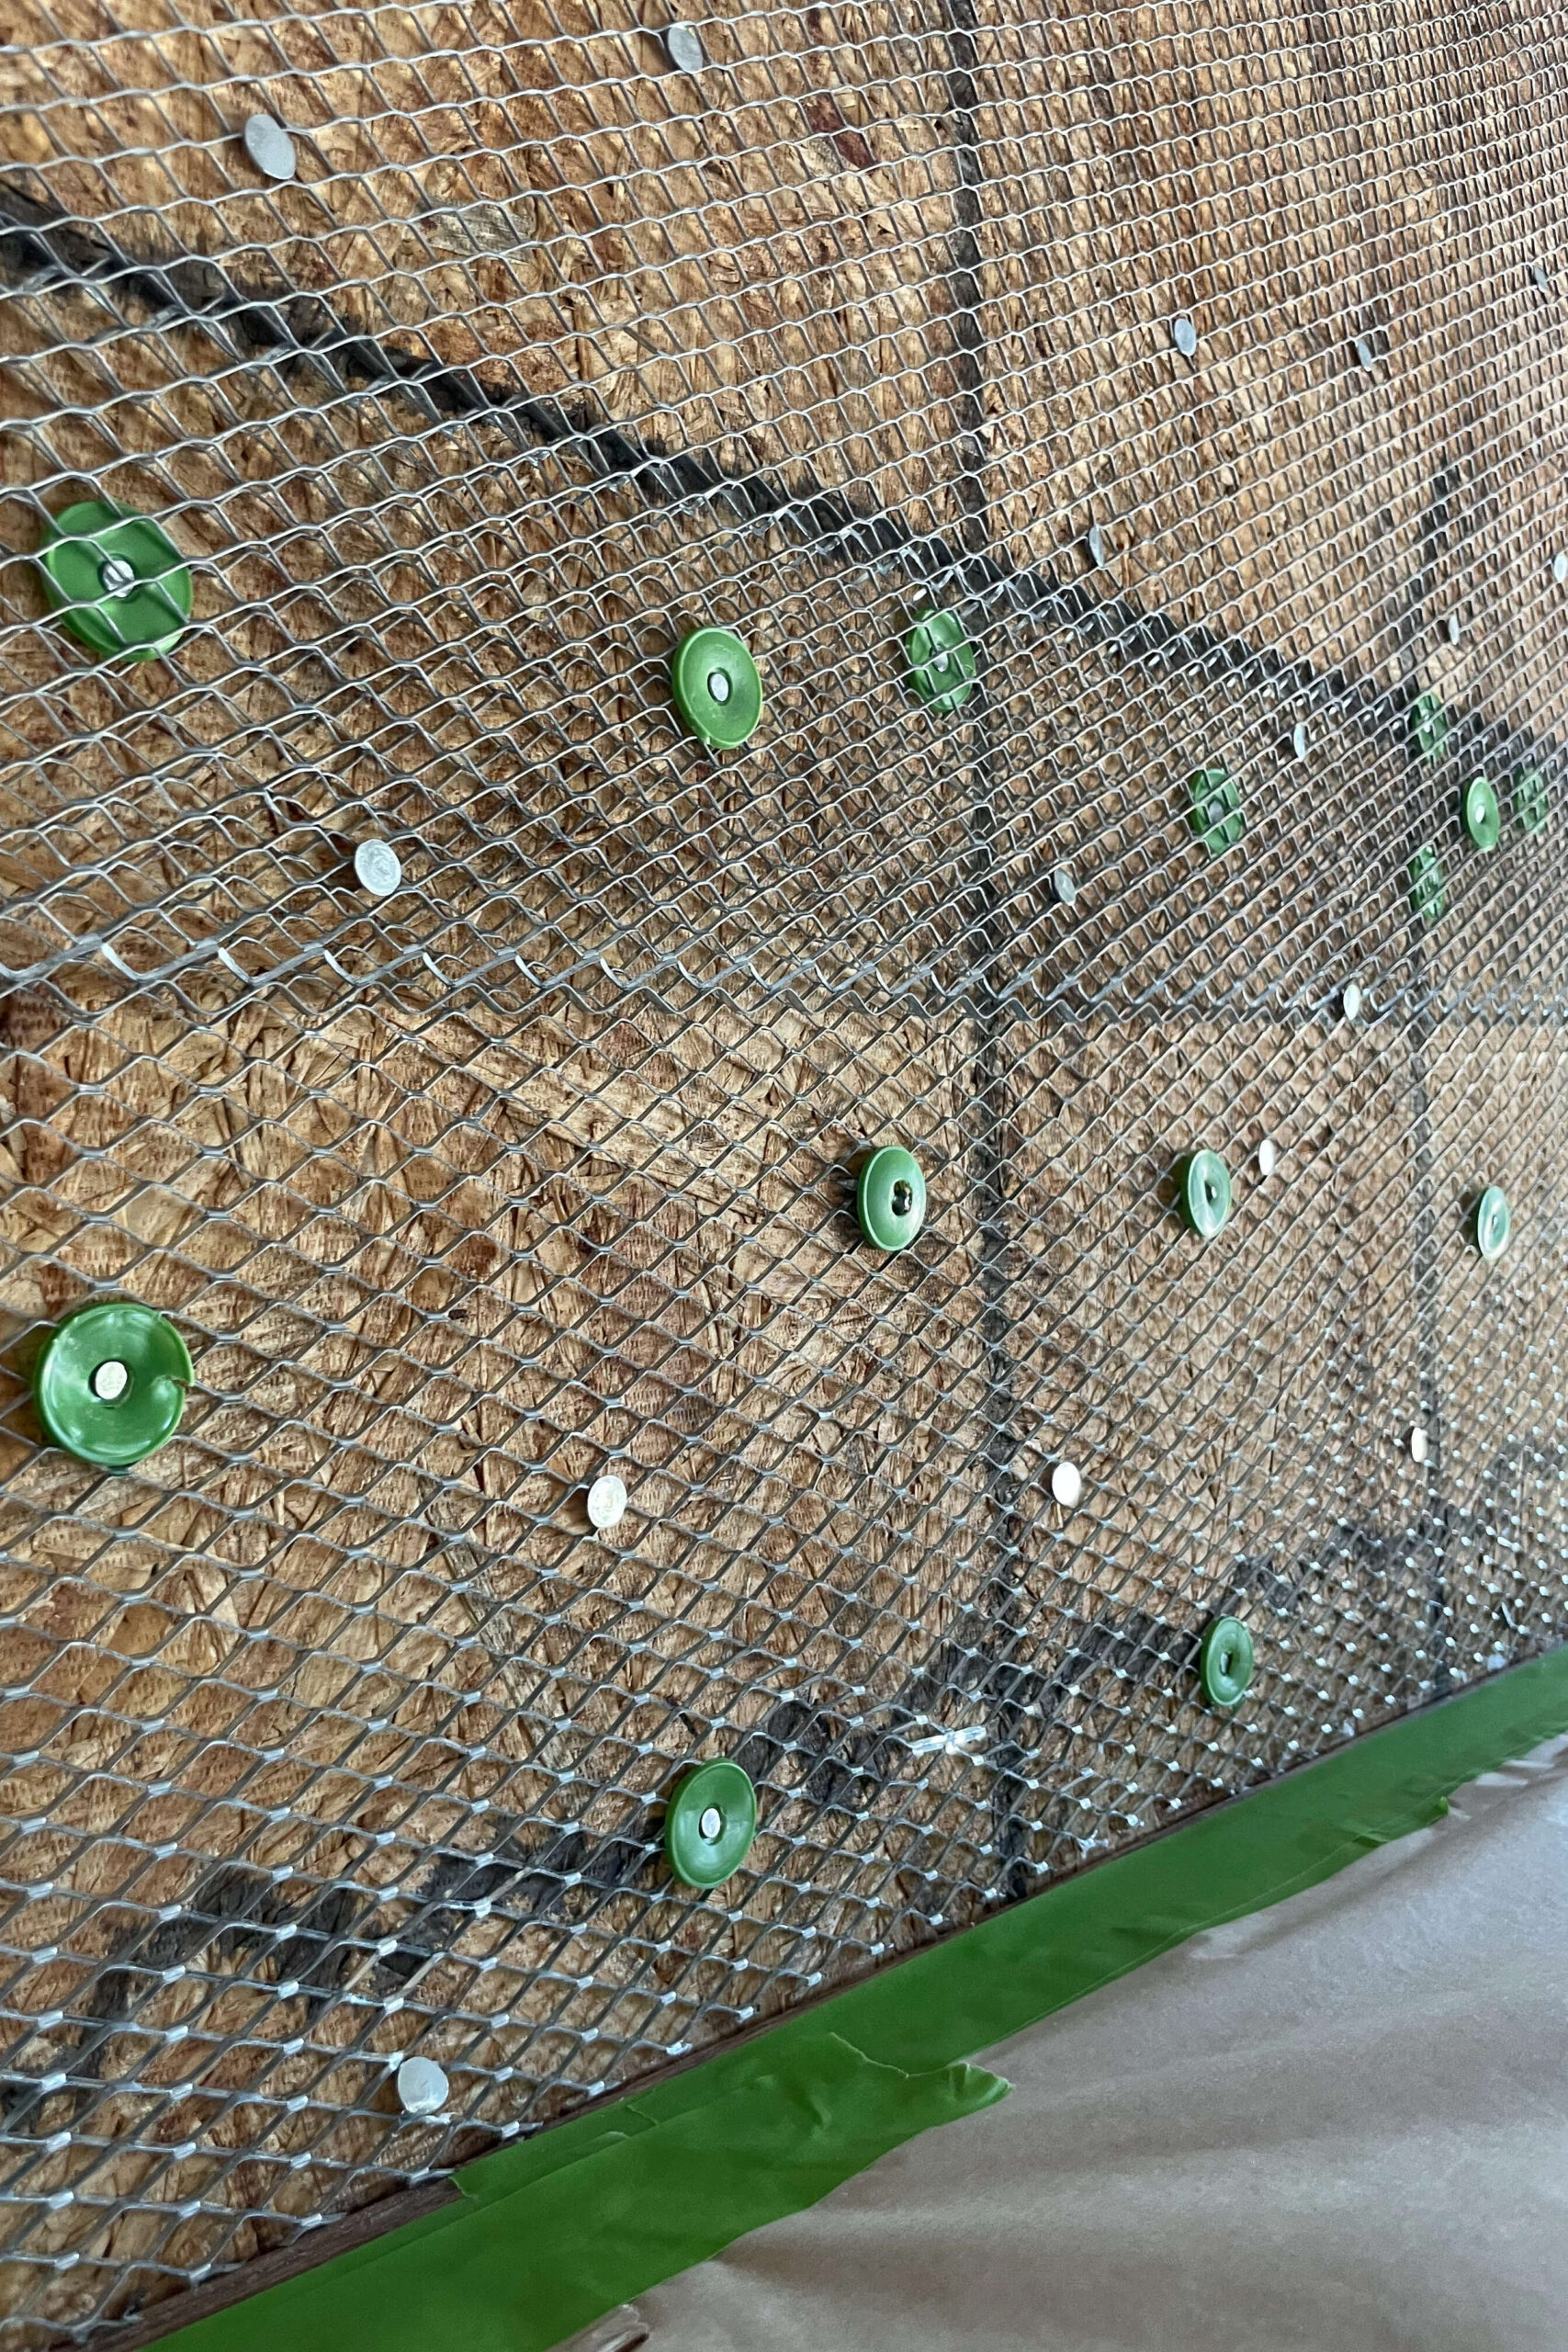
Next, I masked off anything I didn’t want the mortar to get on. Just mix up a little at a time because it dries quickly. After mixing and applying a coat of mortar, I used a wire brush after it had dried to roughen the smooth surface for better stone adhesion.

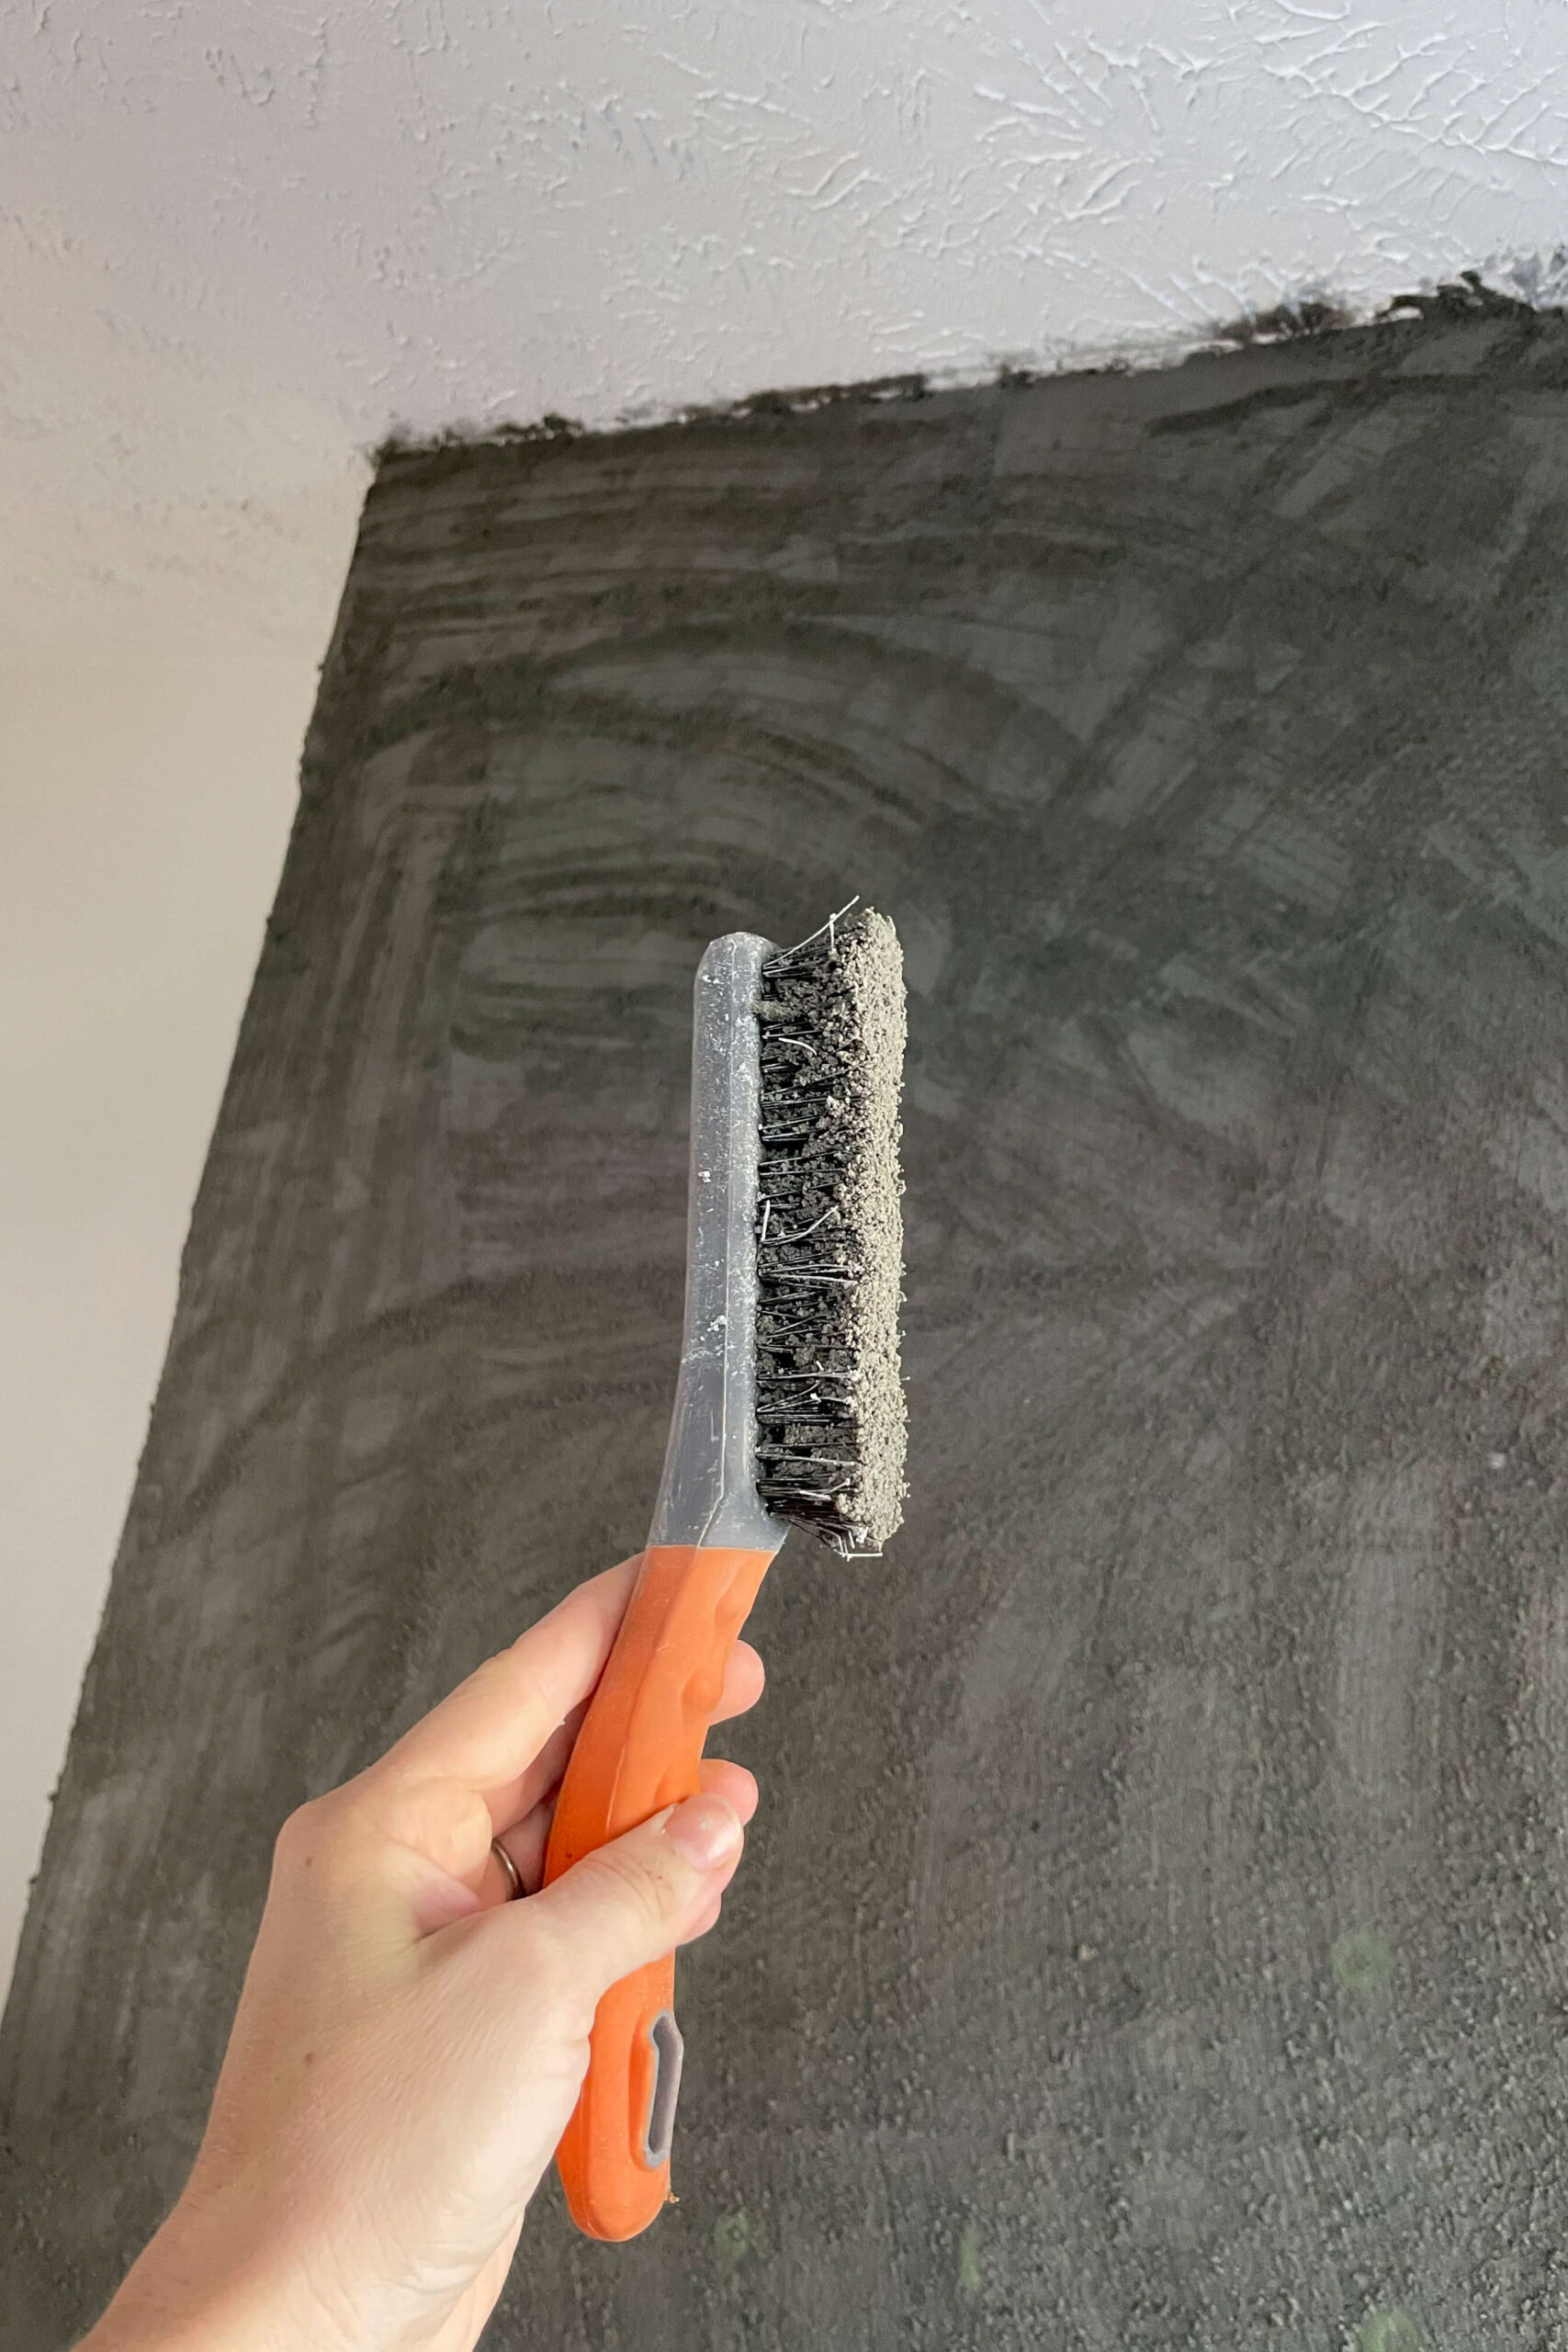
You might notice some mortar smudges on the wall, but I’m not worried. The stone I’m adding is a couple of inches thick, so it will easily cover any messy spots along the edges of the wall and ceiling.
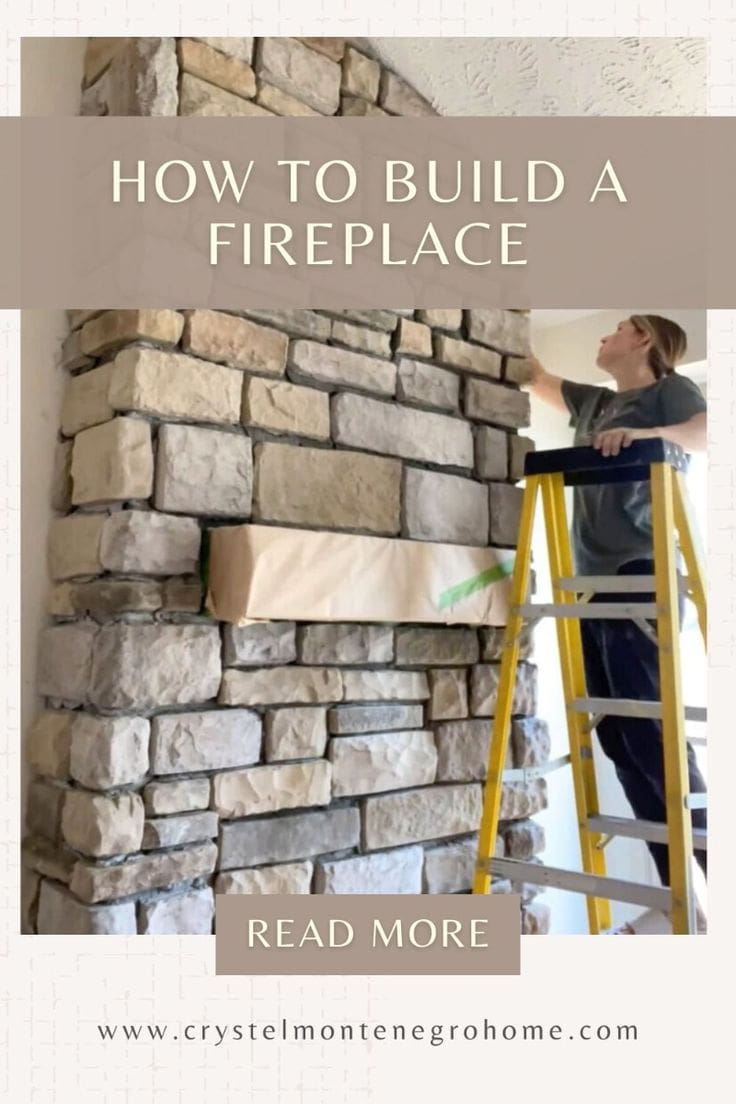
Step 4: How to Attach Stone Veneer to a Fireplace
Finally, I could start placing the stone! If you haven’t already, slide your insert in now.
I prefer to start building a fireplace with the corners and work my way up the fireplace. After mixing the mortar to a smooth, peanut butter-like consistency, I used a putty knife to back-butter each stone before pressing it firmly into place.
One stone down, and countless more to go!


I brought all my stones inside and sorted through the piles to find the perfect pieces for each spot.
I find it easiest to place as many whole stones as possible first, then come back to cut and fit the smaller ones. Be sure to mix only a small batch of mortar at a time – it dries quickly!


Step 5: How to Cut Stone Veneer for a DIY Fireplace
The stones I used for building a fireplace came in a variety of shapes and sizes, but there were a few spots where trimming was necessary. I’d start by selecting a piece that fit height-wise, then marked where to cut off the excess.

For cutting, you’ll want to use a tile saw. I was aiming for a natural look, not the I perfectly clean cut look, so I adjusted the blade to cut only partway through the stone, making a partial cut from the backside. Then, I gave it a good whack with a hammer, breaking the stone along the line I had scored. To finish, I used the claw end of the hammer to rough up the edge, giving it an organic, natural look.


Now I have a piece that will fit perfectly in the gap I need to fill and the edge looks very natural and organic.

Step 6: Filling Gaps Between Stones When Building a Fireplace
Once the last stone was in place and the mortar had dried, it was time to fill the gaps. Although the stone looked great on its own, filling the spaces would make it look even better. I used a light-colored mortar for this part, rather than the standard gray used to attach the stones. A drill with a mixing paddle attachment is essential here – it saves a ton of time and effort when building a fireplace.


After mixing the mortar, I filled a mortar bag, which works like a giant icing bag. I squeezed mortar into the gaps between the stones, adjusting the amount so the grout was nearly level with the stones. Though the mortar may look messy at first, trust the process!

After the mortar had set for about 20 minutes, I went back with a gloved hand to smooth out the bumps and feather the edges. Be sure to work quickly before it hardens too much! I tackled the fireplace in small sections – filling, smoothing, and repeating until the entire fireplace was done.

Next, I worked my way up the fireplace, tackling it in small sections. I filled the gaps with mortar, smoothed it with a gloved hand, and then moved on to the next section. Filling then smoothing, filling then smoothing… just kept repeating that until I was done building a fireplace!

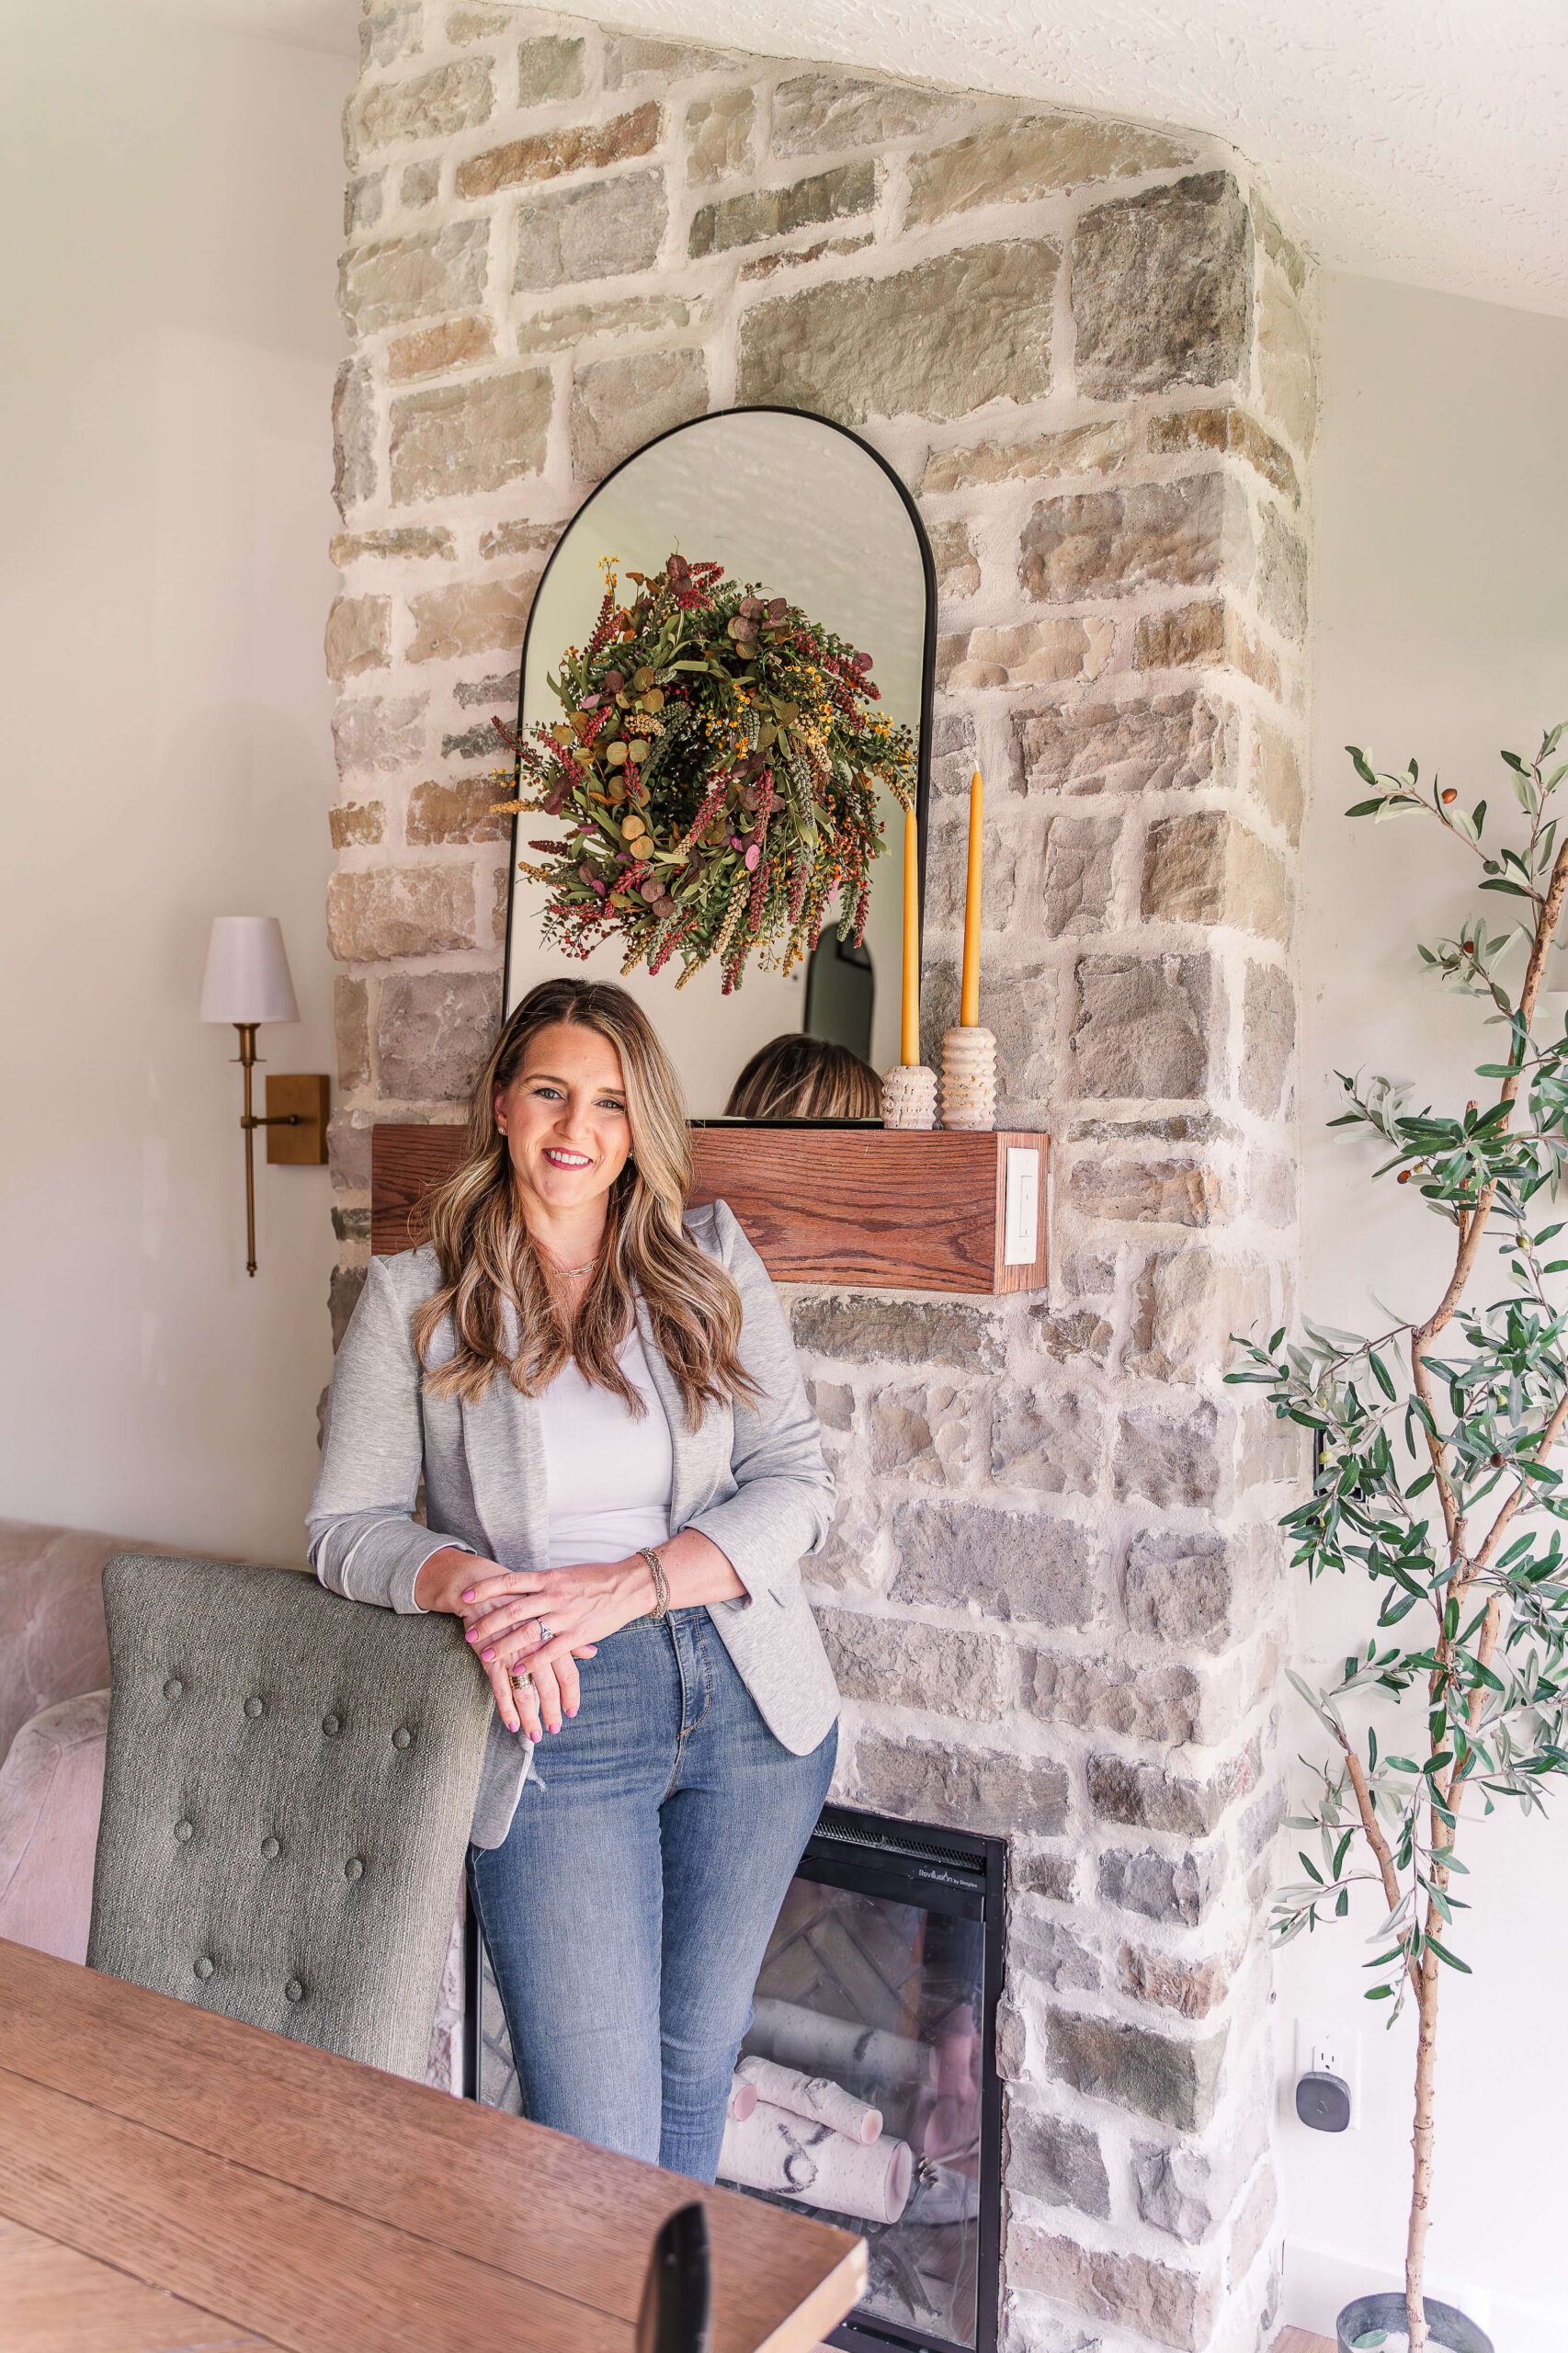
I did this! I was so proud and so happy to finish building a fireplace in my dining room. It turned out beautifully.
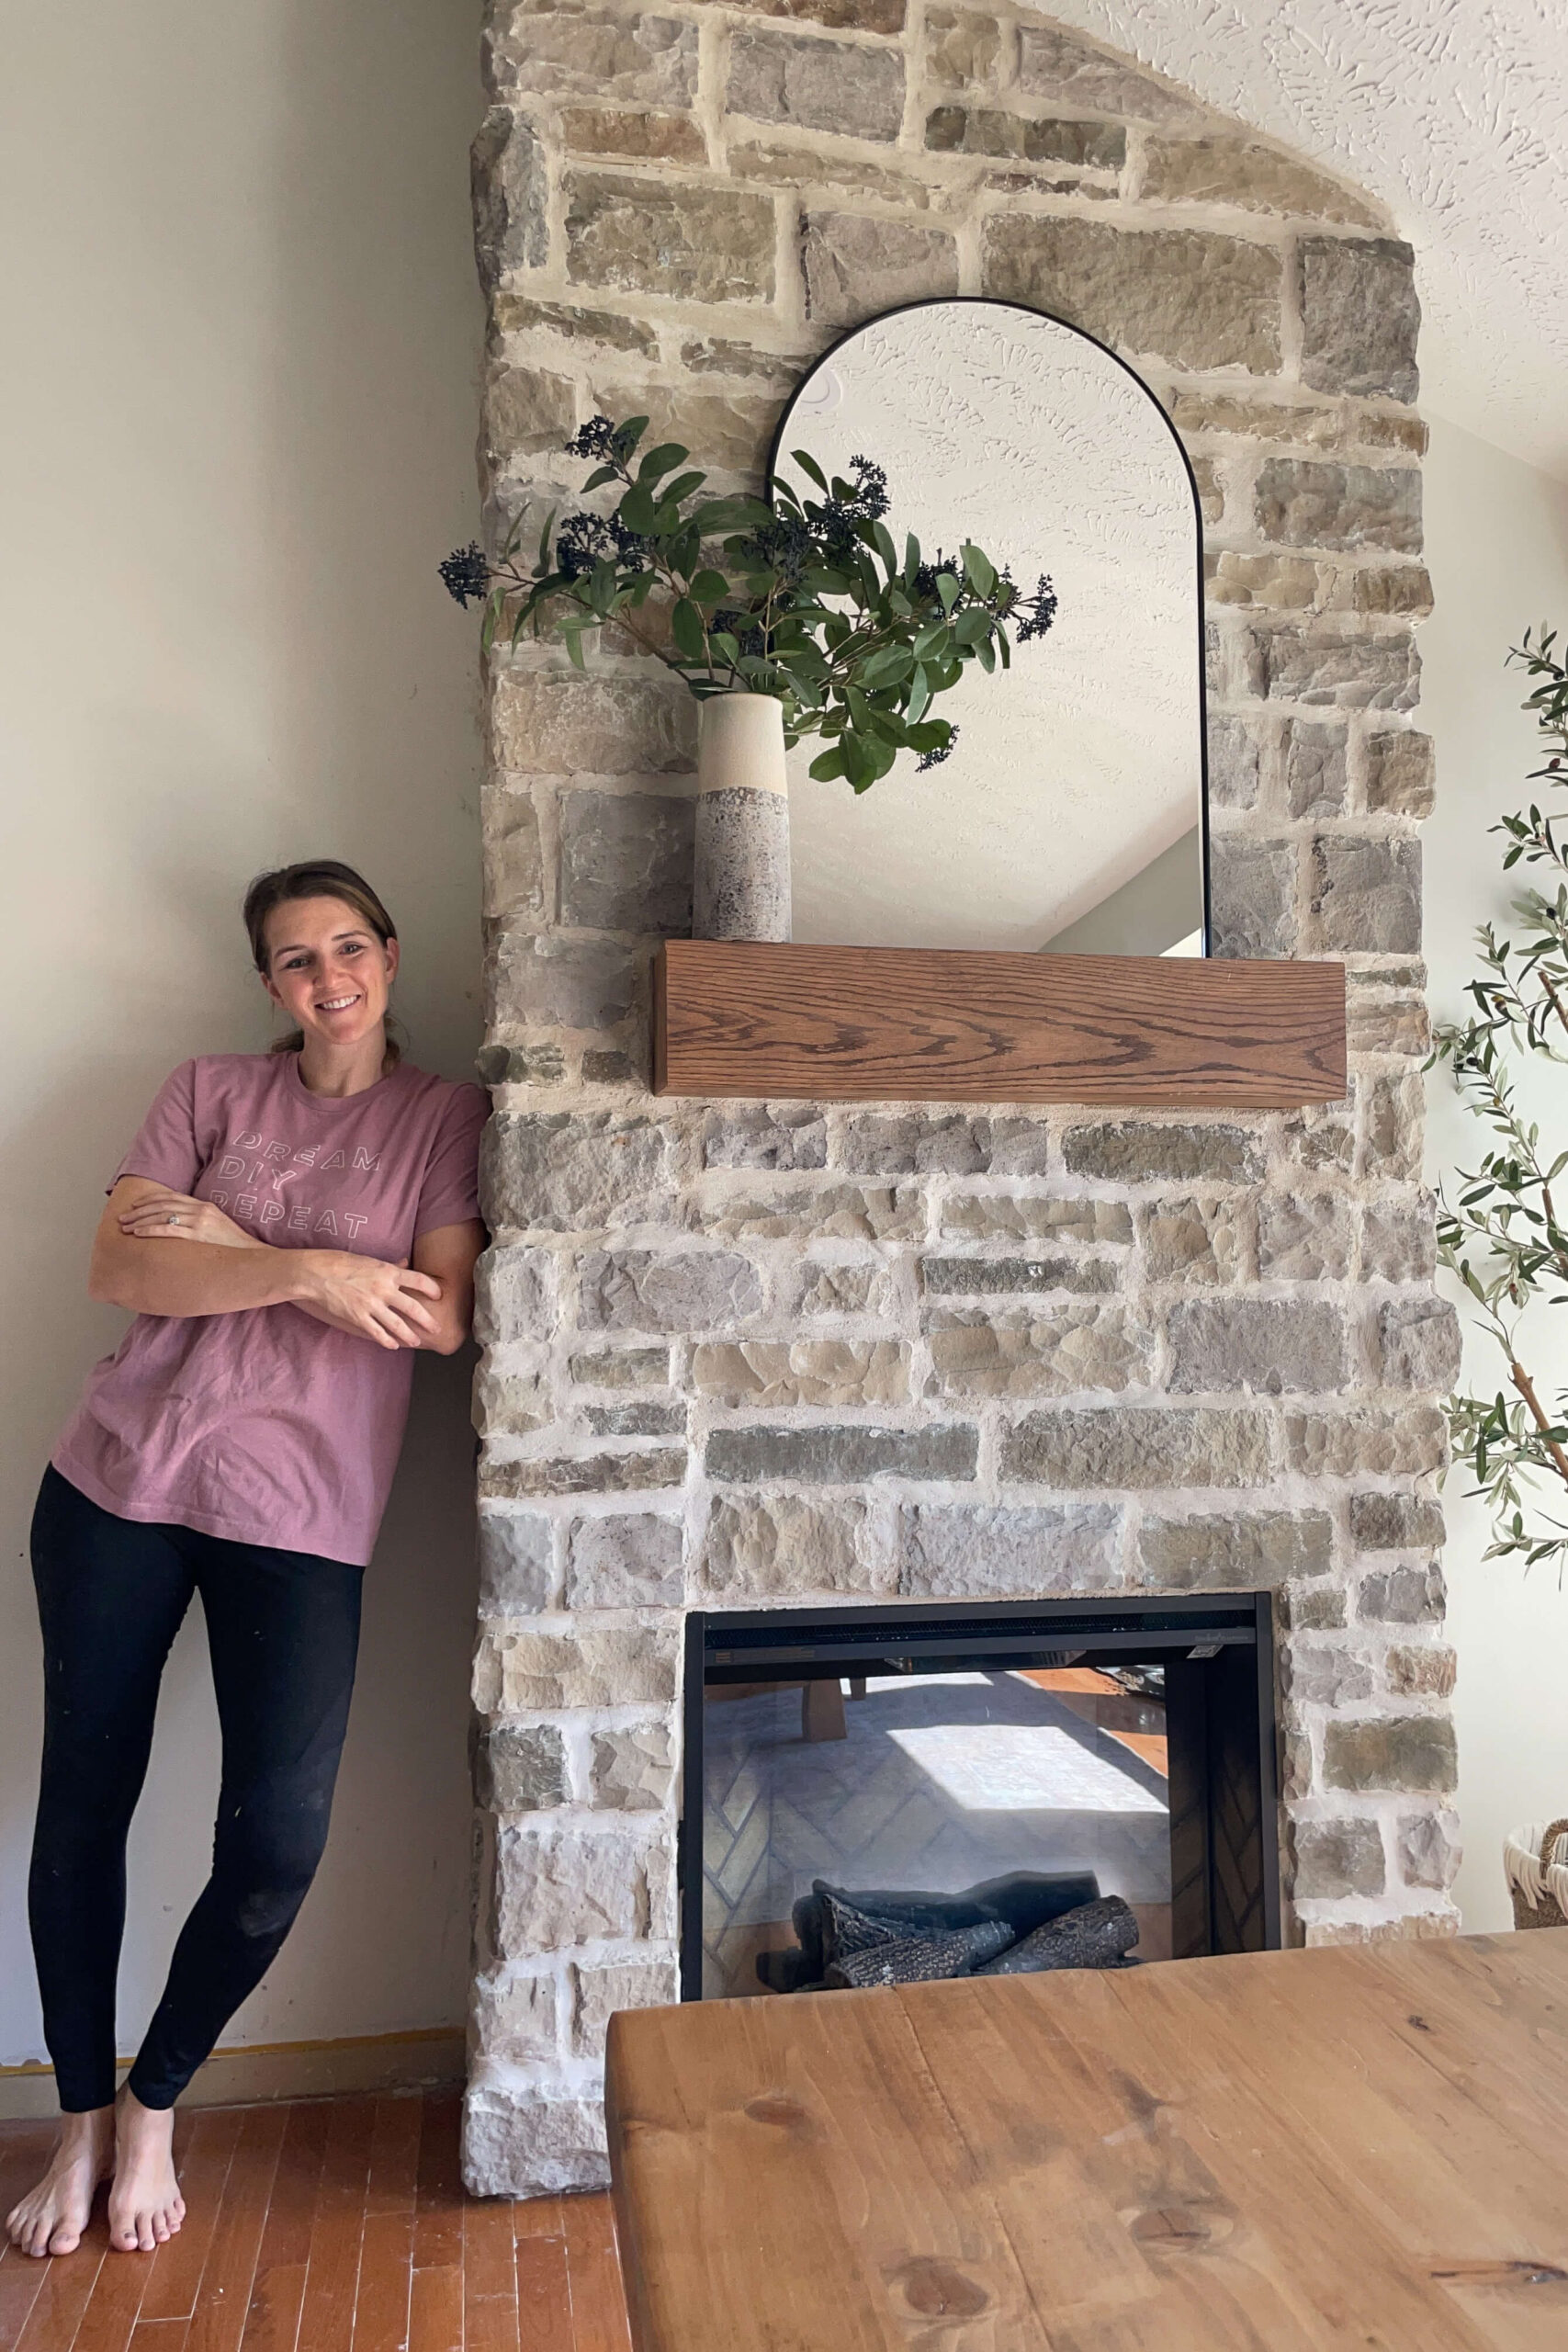
Here is an even better picture after I added a couple of sconces for lighting and updated the flooring too.

Before and After: DIY Fireplace Transformation
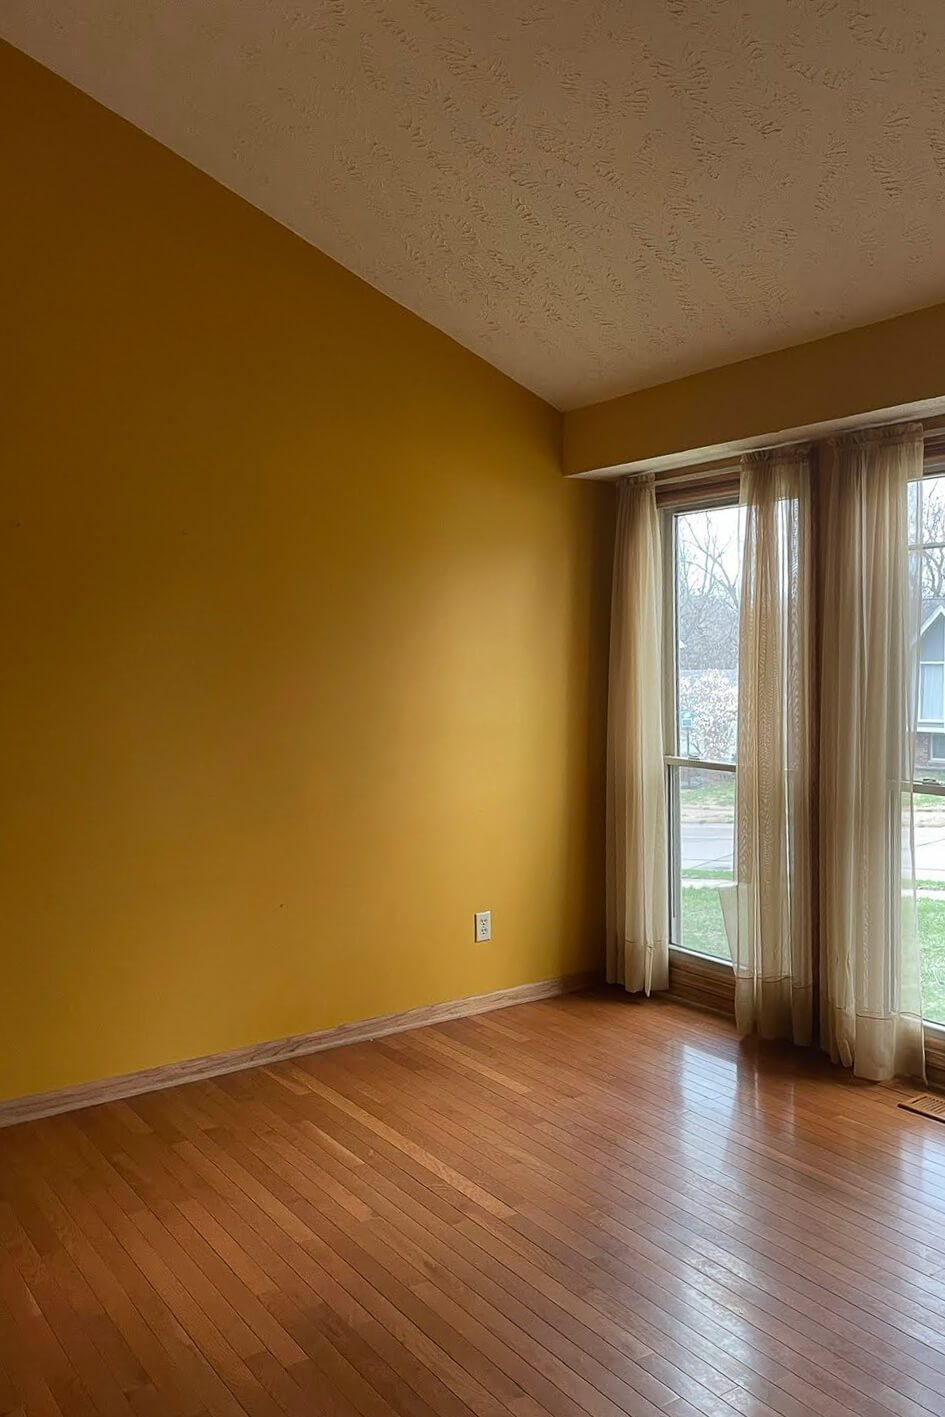
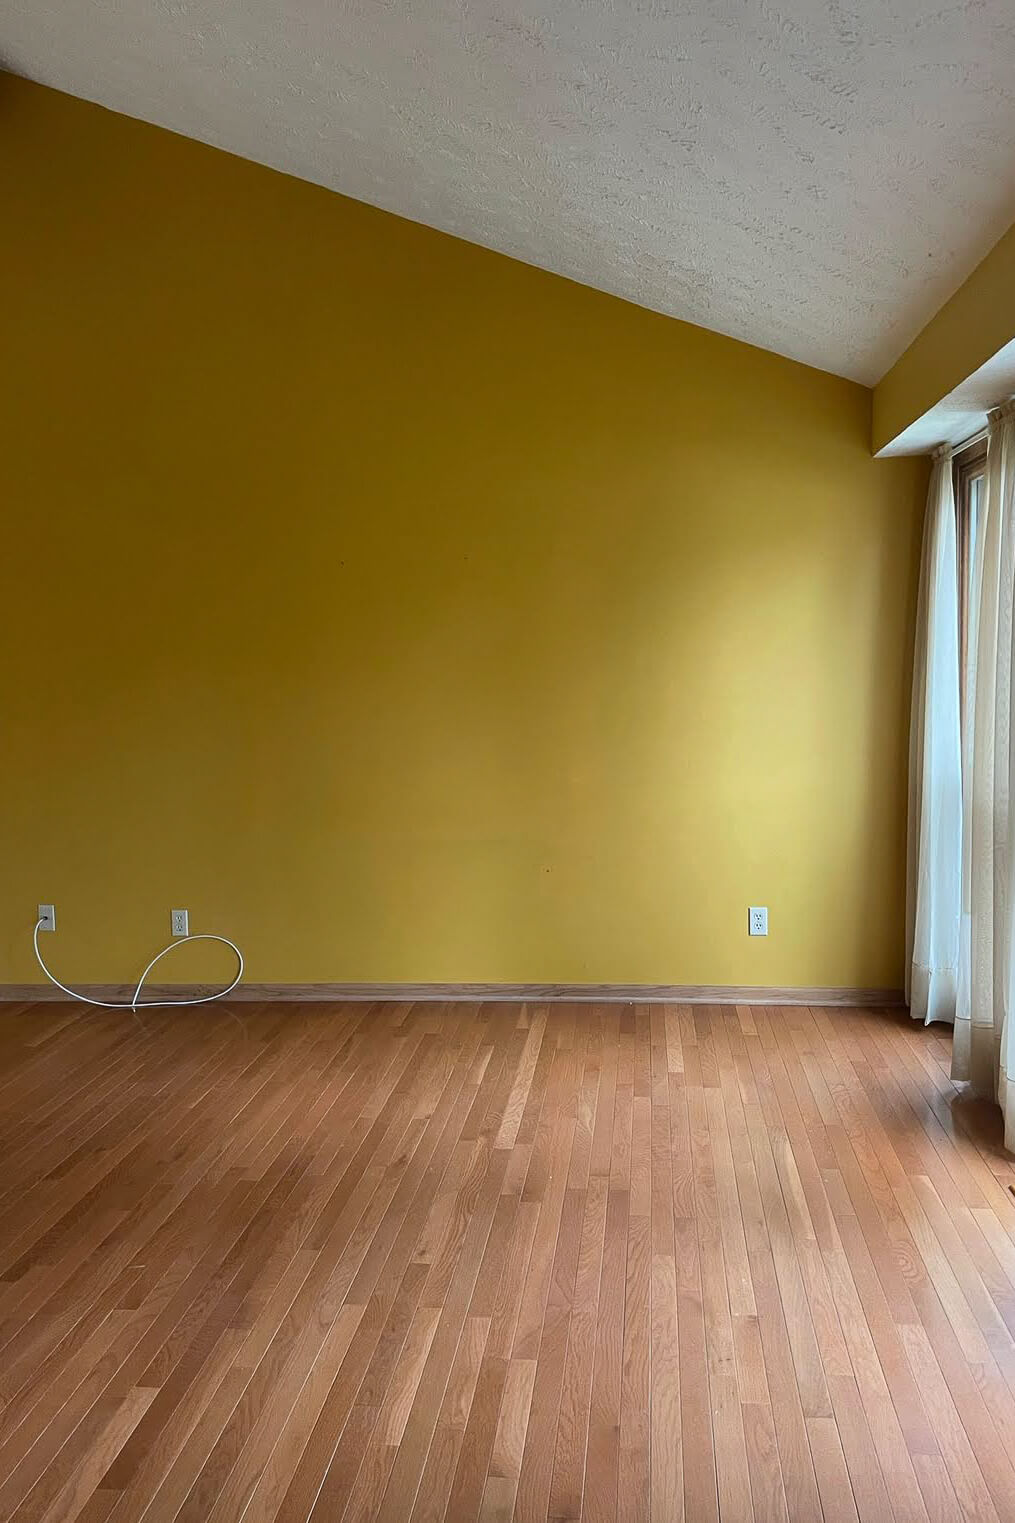
Check out these before and after pics – from when we first moved in to how it looks now! Yes, the house was VERY yellow when we bought it.
I can hardly believe this is the same room. Building a fireplace made such a big difference in this space! We love our dining room and spend so much time hanging out here. Whether it’s eating, doing craft projects, or reading… we love this cozy space.

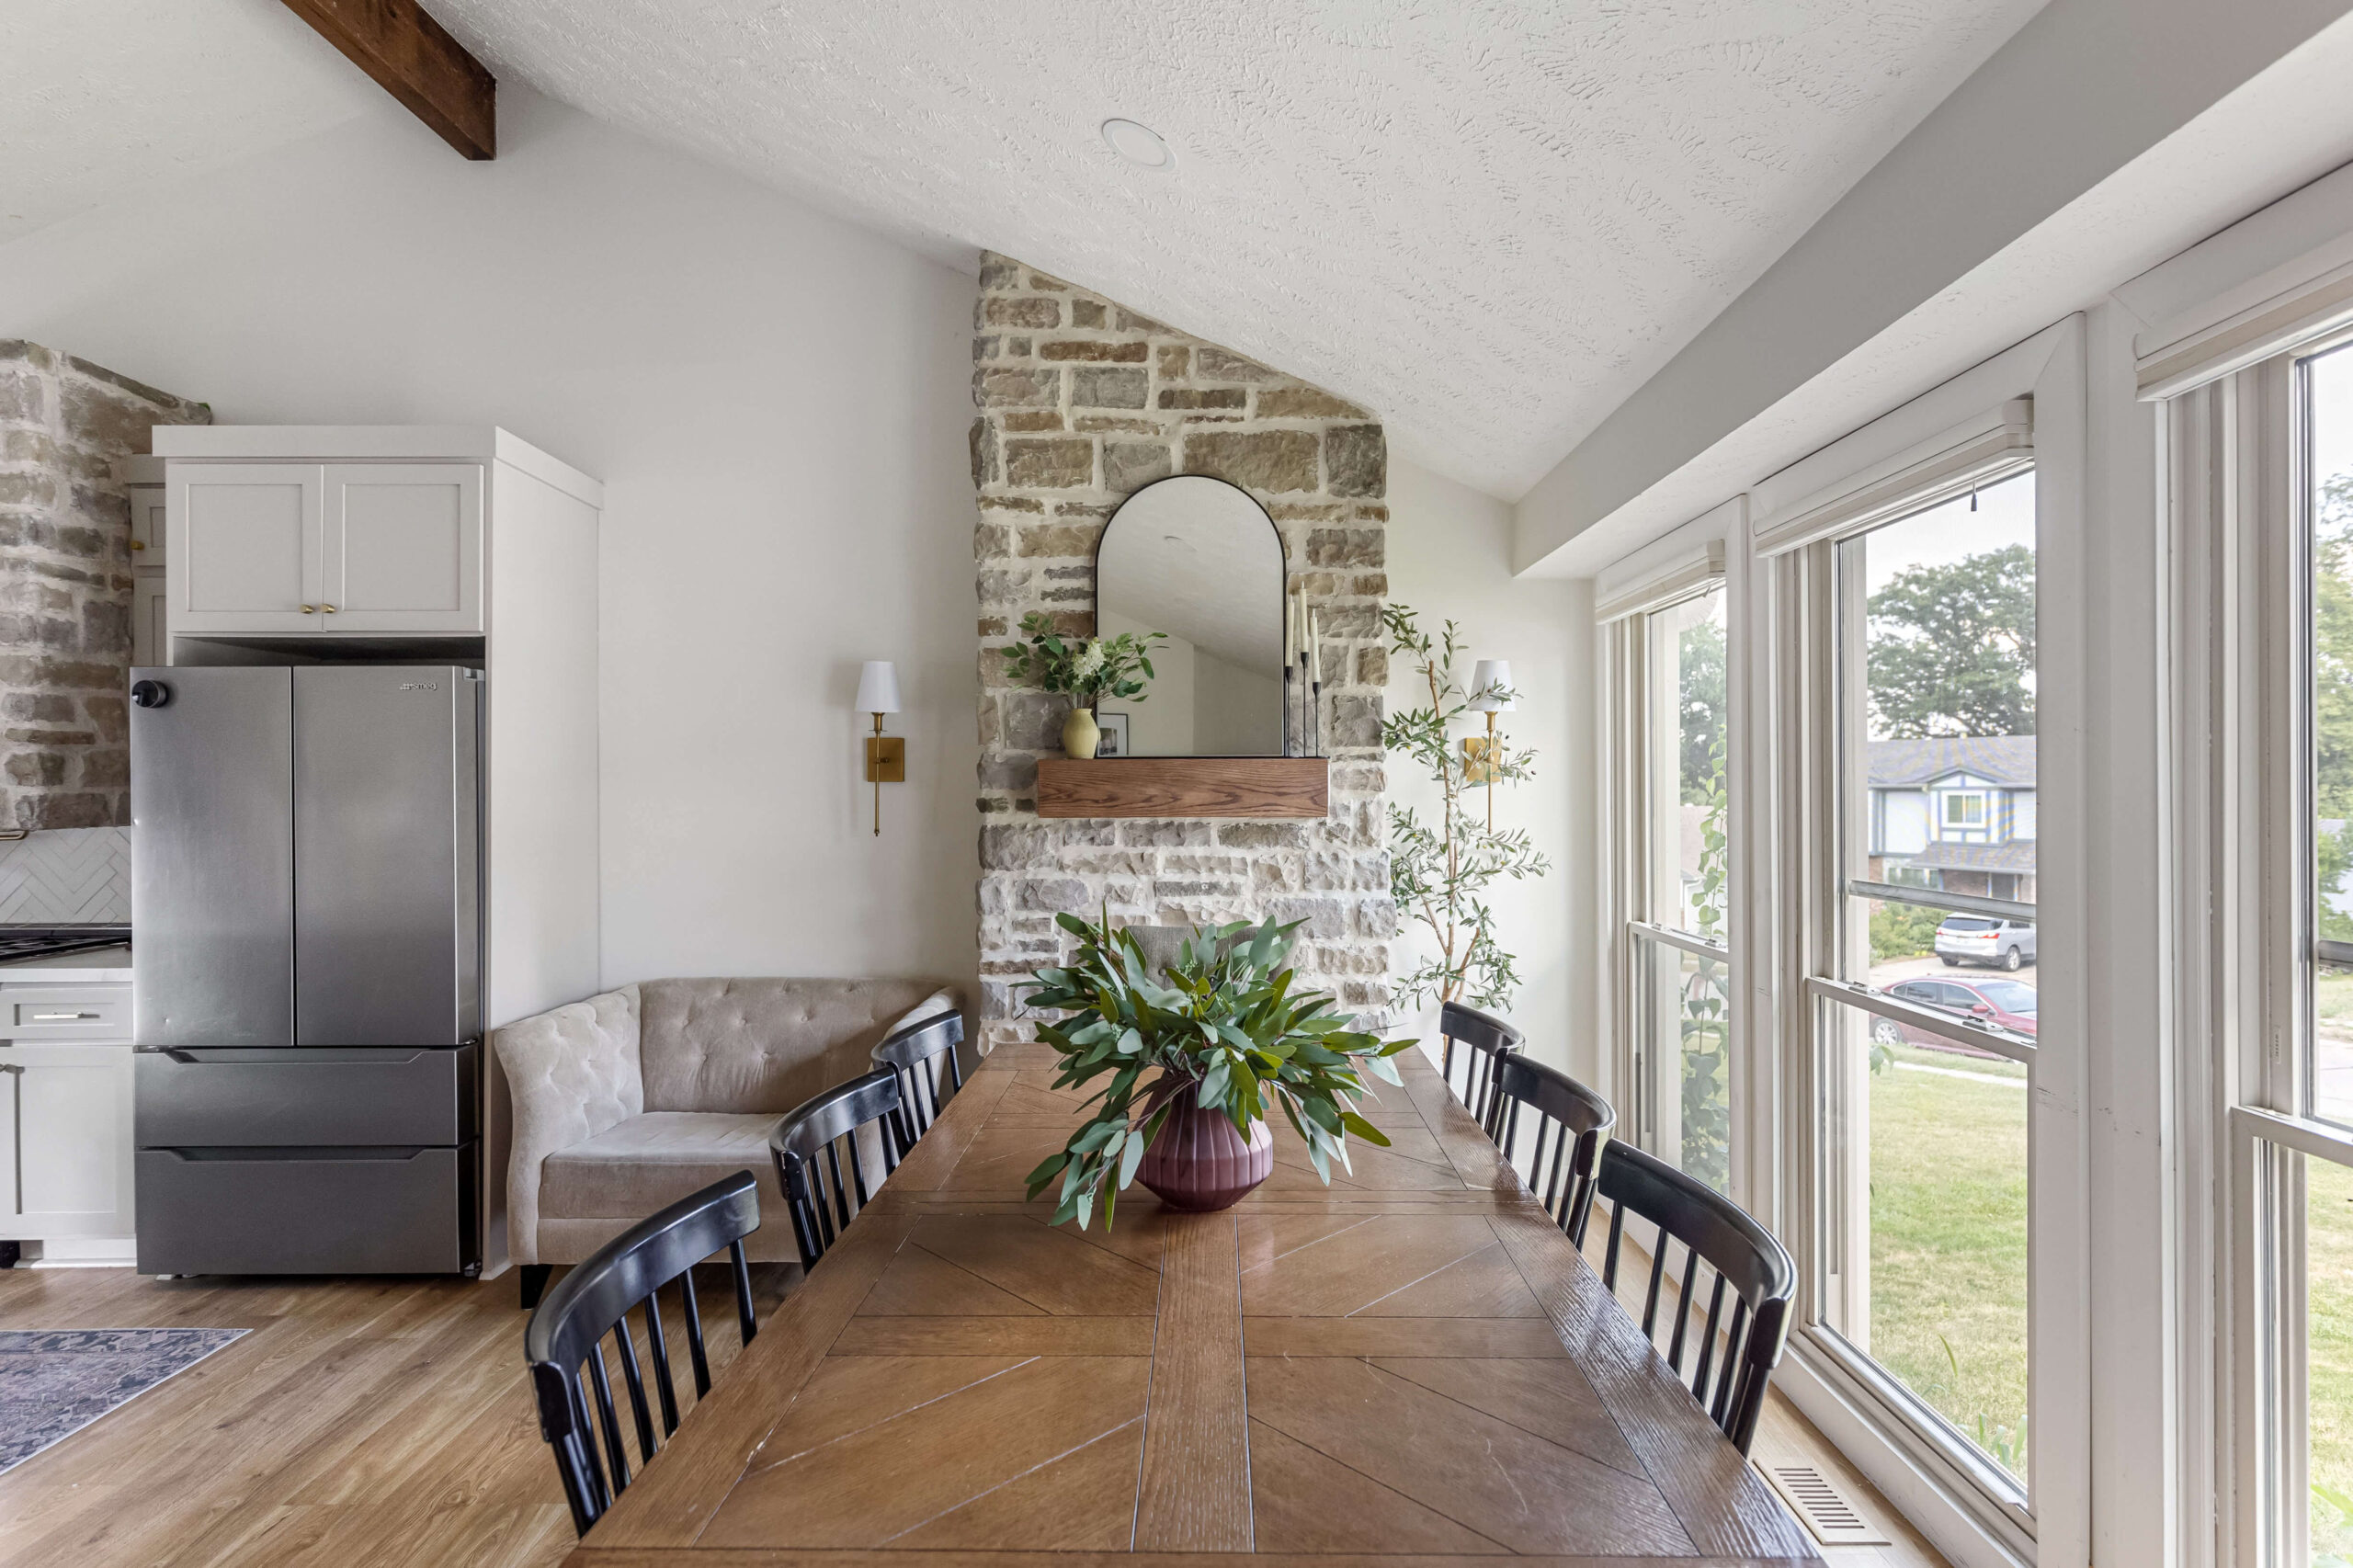
When we remodeled the downstairs, we created an open-concept kitchen, and I absolutely love how bright and airy it feels. The stone on the fireplace matches the stone I used for the range hood, so the whole space flows together perfectly.
I love updating my house and making it something special with DIY projects. Being a military family, we only have a short amount of time left in this house, so I’m trying to knock all my projects off my list as quickly as I can. Be sure to follow along on Instagram as I work my way around this house completely transforming it one DIY project (like building a fireplace) at a time.
📌 Save this Project for Later
Pin now and come back when you’re ready to build your dream DIY stone fireplace!
DIY Stone Fireplace FAQs: What You Need to Know Before Building
It’s totally doable with the right tools, materials, and patience. If you’ve tackled framing, basic wiring, and finish work before, building a fireplace surround is a great intermediate-level DIY.
Yes! Electric fireplace inserts make it possible to add a fireplace just about anywhere—no chimney required. Just make sure you have access to power and consider heat safety.
used a stone veneer from Centurion Stone (Oak Park Summit Blend), but any quality stone veneer or stacked stone will work depending on the look you want.
For electric fireplace inserts, you usually don’t need a permit, but always check your local building codes—especially if you’re doing any electrical work.

What type of insert did you use for your fireplace?
It’s linked in the blog post 🙂
It’s beautiful! What stones (brand / website) did you use?
I purchased my stone from Centurion Stone of Iowa. You can also use a stone dealer local to you. I chose their Oak Park Summit Blend.