


DIY Backyard Hammock Stand


Updated July 13, 2026
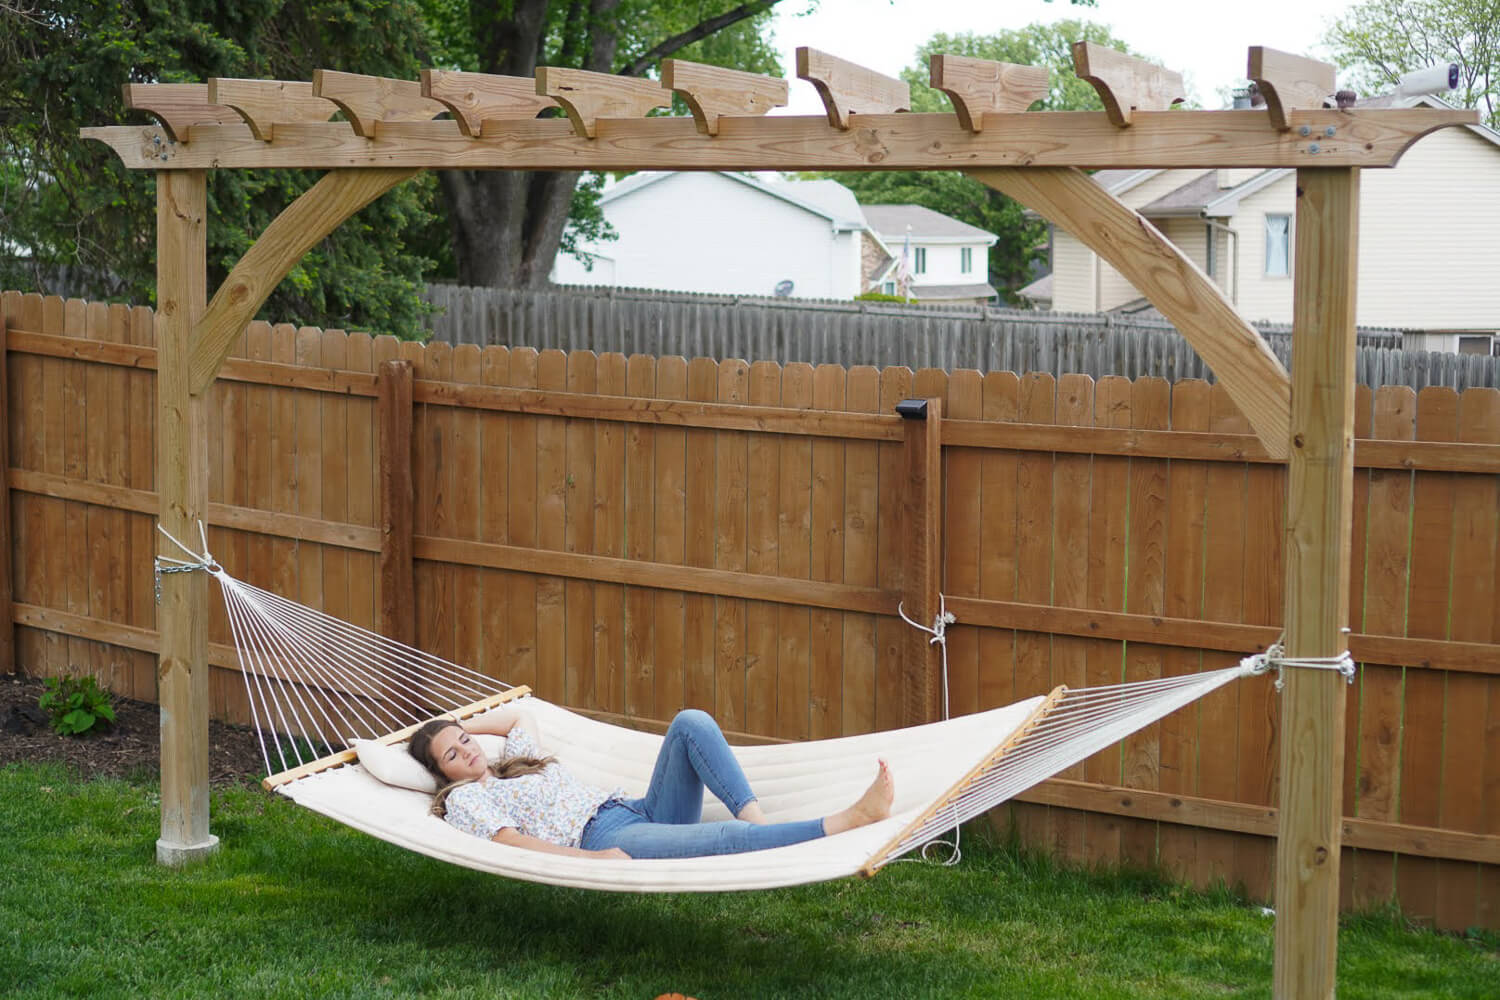
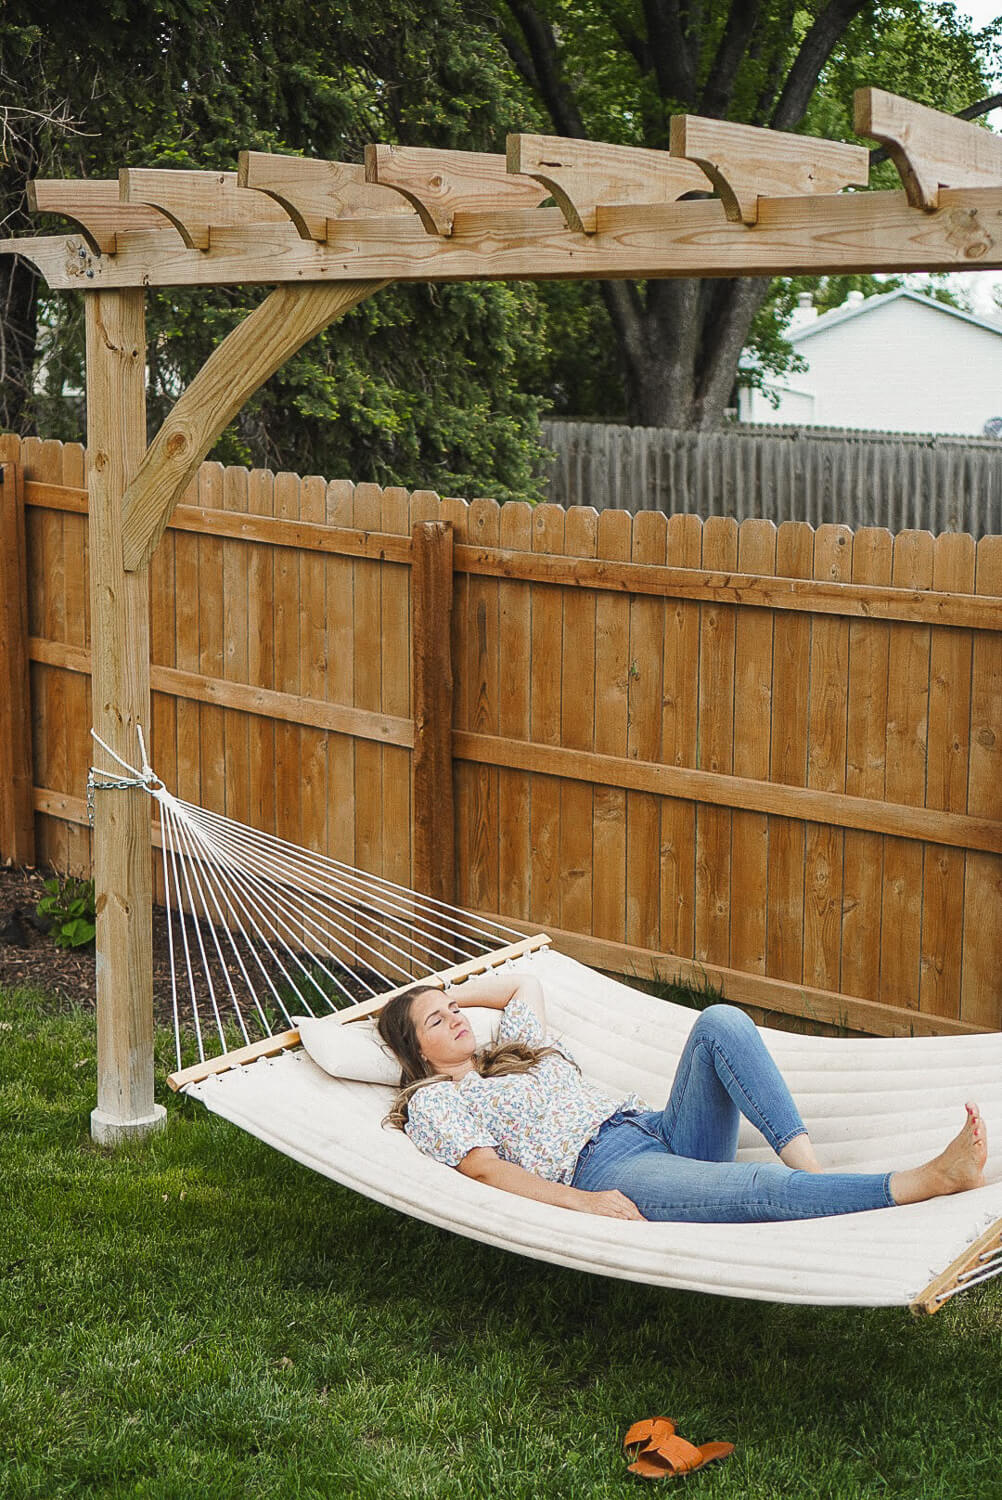
Looking to build your own backyard hammock stand? You’ve come to the right place! Last summer I jumped into all kinds of projects in our backyard to make it into a peaceful oasis that would be an extension of our indoor living space. We added a patio, built garden boxes, installed flower beds, and a lawn watering system, but nothing is as dreamy and relaxing as this hammock.
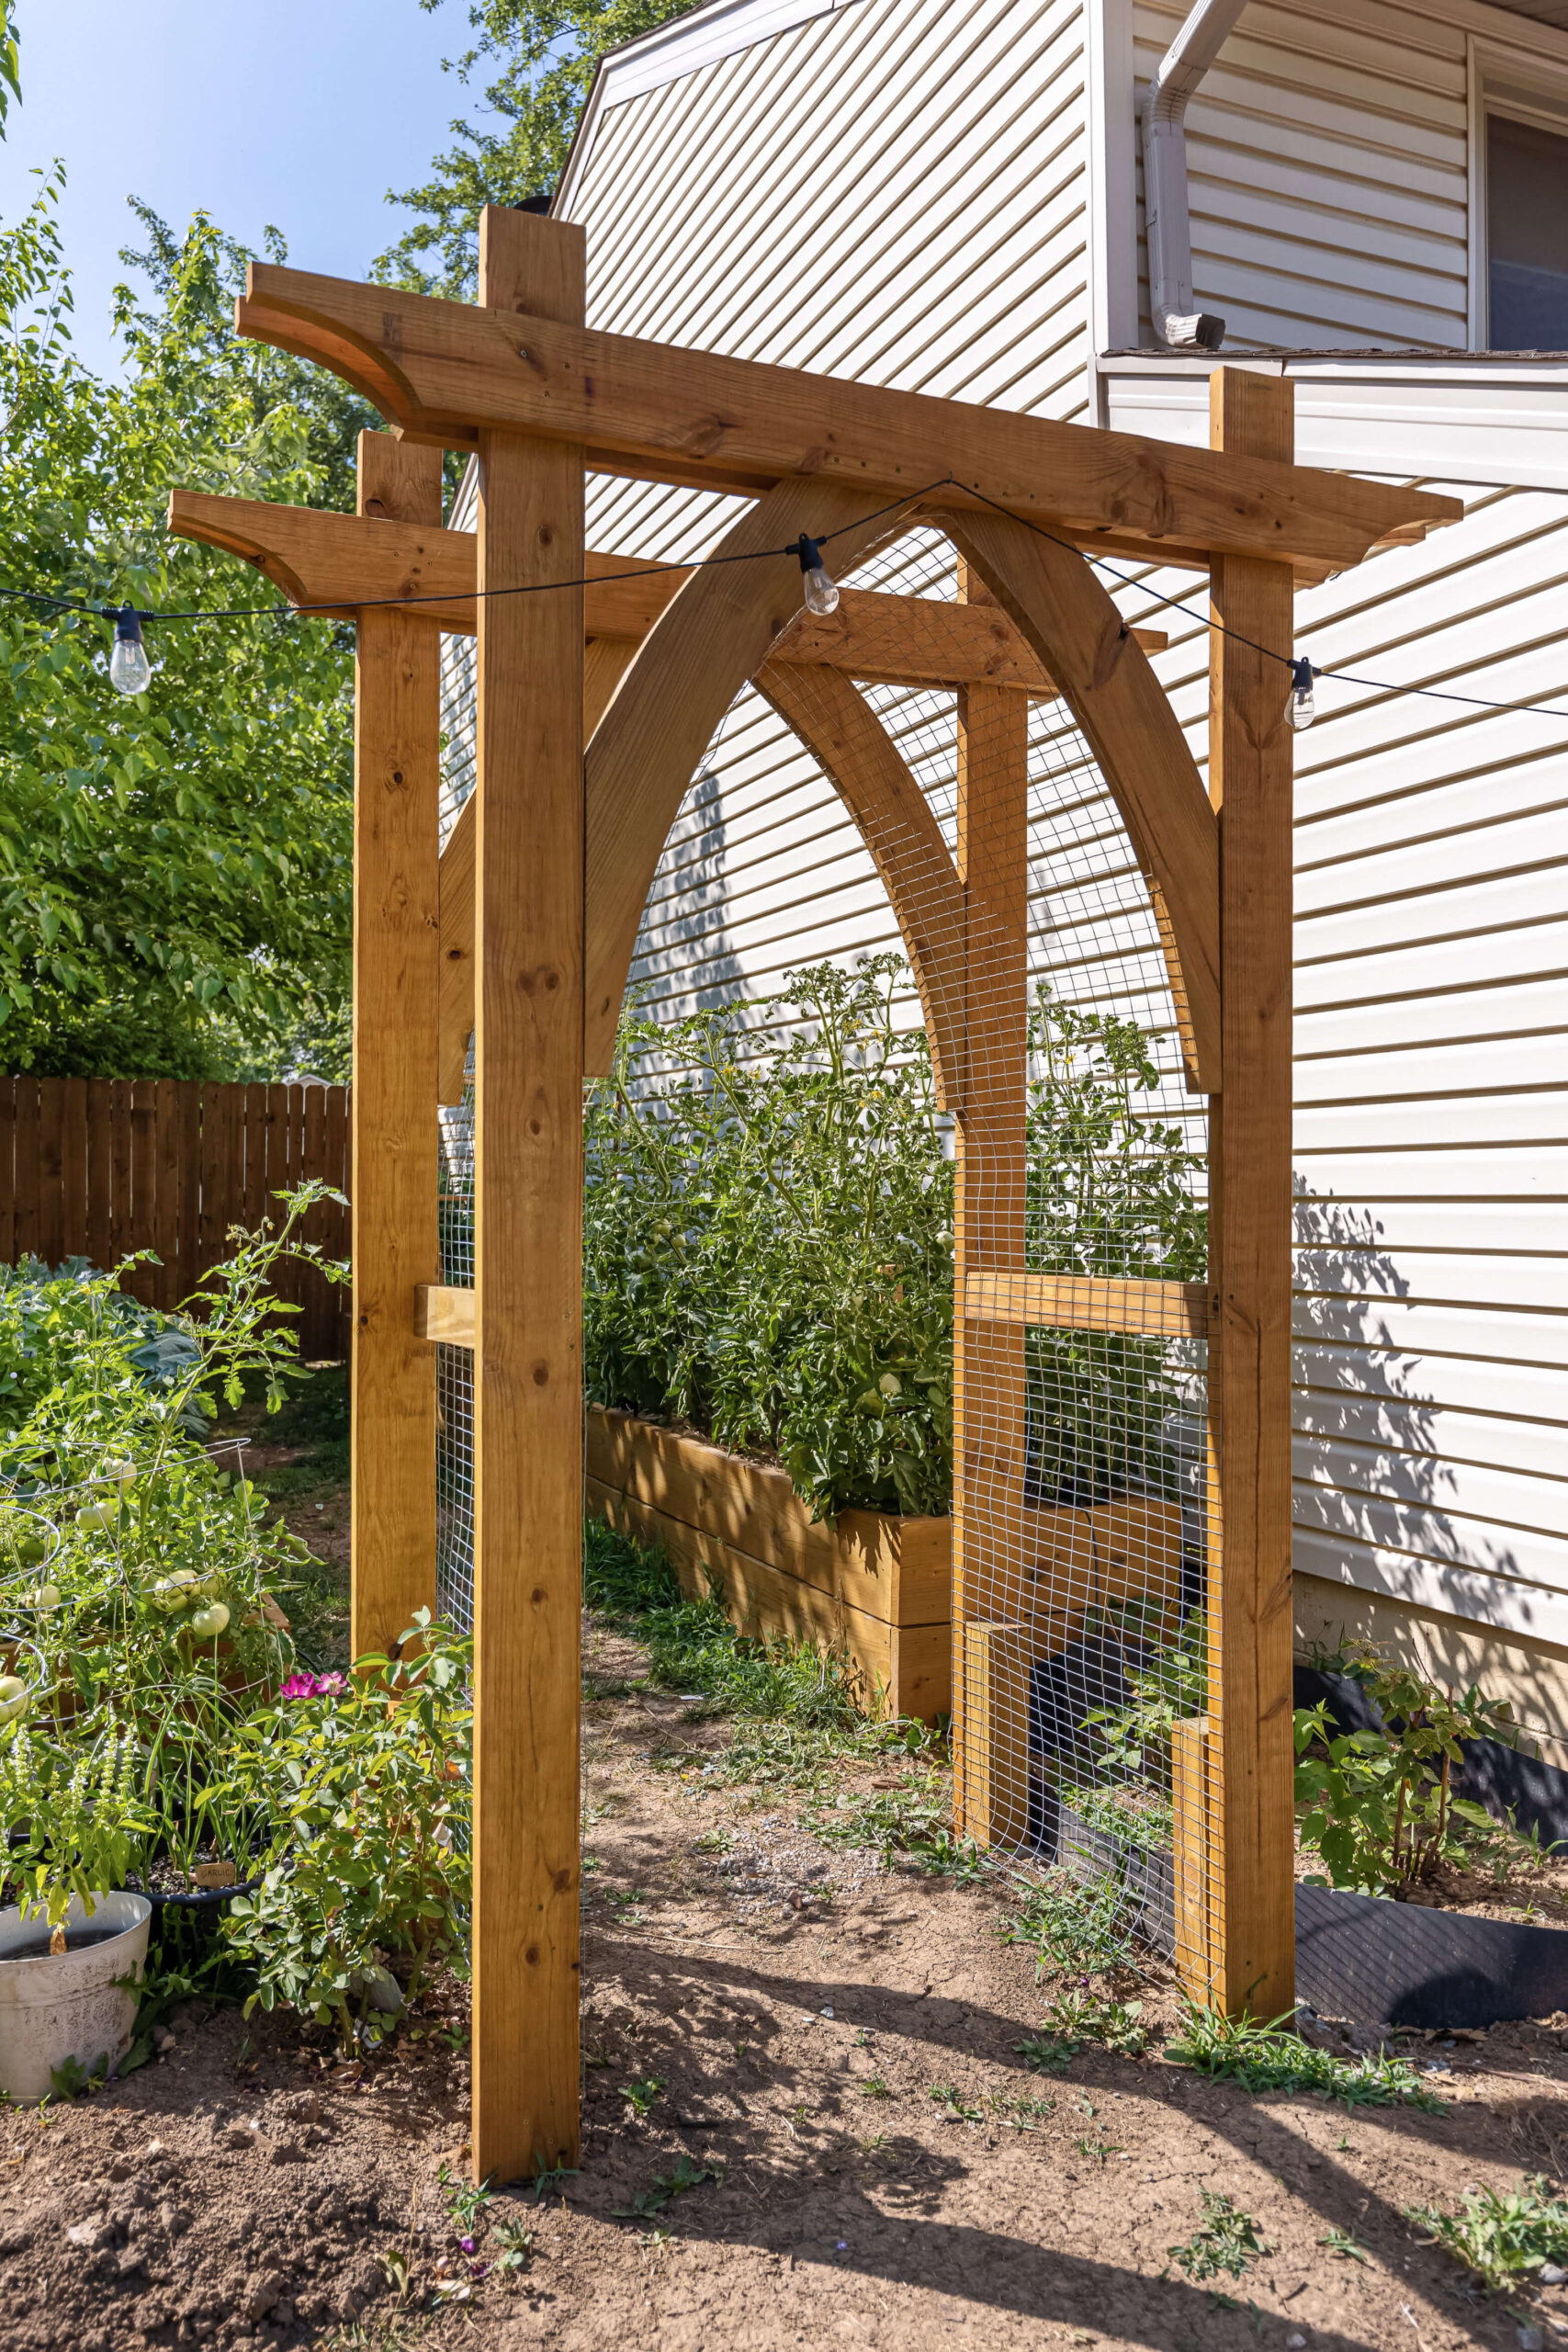
When designing my backyard hammock stand, I took inspiration from this garden arbor that I also built. I wanted to use the same arch details in the center and the same rounded, cut-out design on the edges of the cross beams.
What You Need to Build a Backyard Hammock Stand
This project requires very basic tools and only a few supplies. It’s a great beginner level DIY project that will really upgrade your backyard space.
Tools
- Tape measure
- Circular saw
- Miter saw
- Jig saw
- Hammer
- Square
- Drill or impact driver
- Level
- Post hole digger
- Shovel
- Large drill bit
- Small drill bit
- Locking pliers
Materials
- 2 – 6×6 at 12ft pressure treated lumber ( I used 4×6’s, but would recommend using 6×6’s)
- 2 – 2×6 at 16ft pressure treated lumber
- 3 – 2×8 at 8ft pressure treated lumber
- 1 – 2×12 at 8ft pressure treated lumber
- Carriage bolts
- Marking paint
- Concrete
- Cardboard concrete tube form
- Brackets
- Screws
- String
- Hooks
- Hammock
- Scotchguard
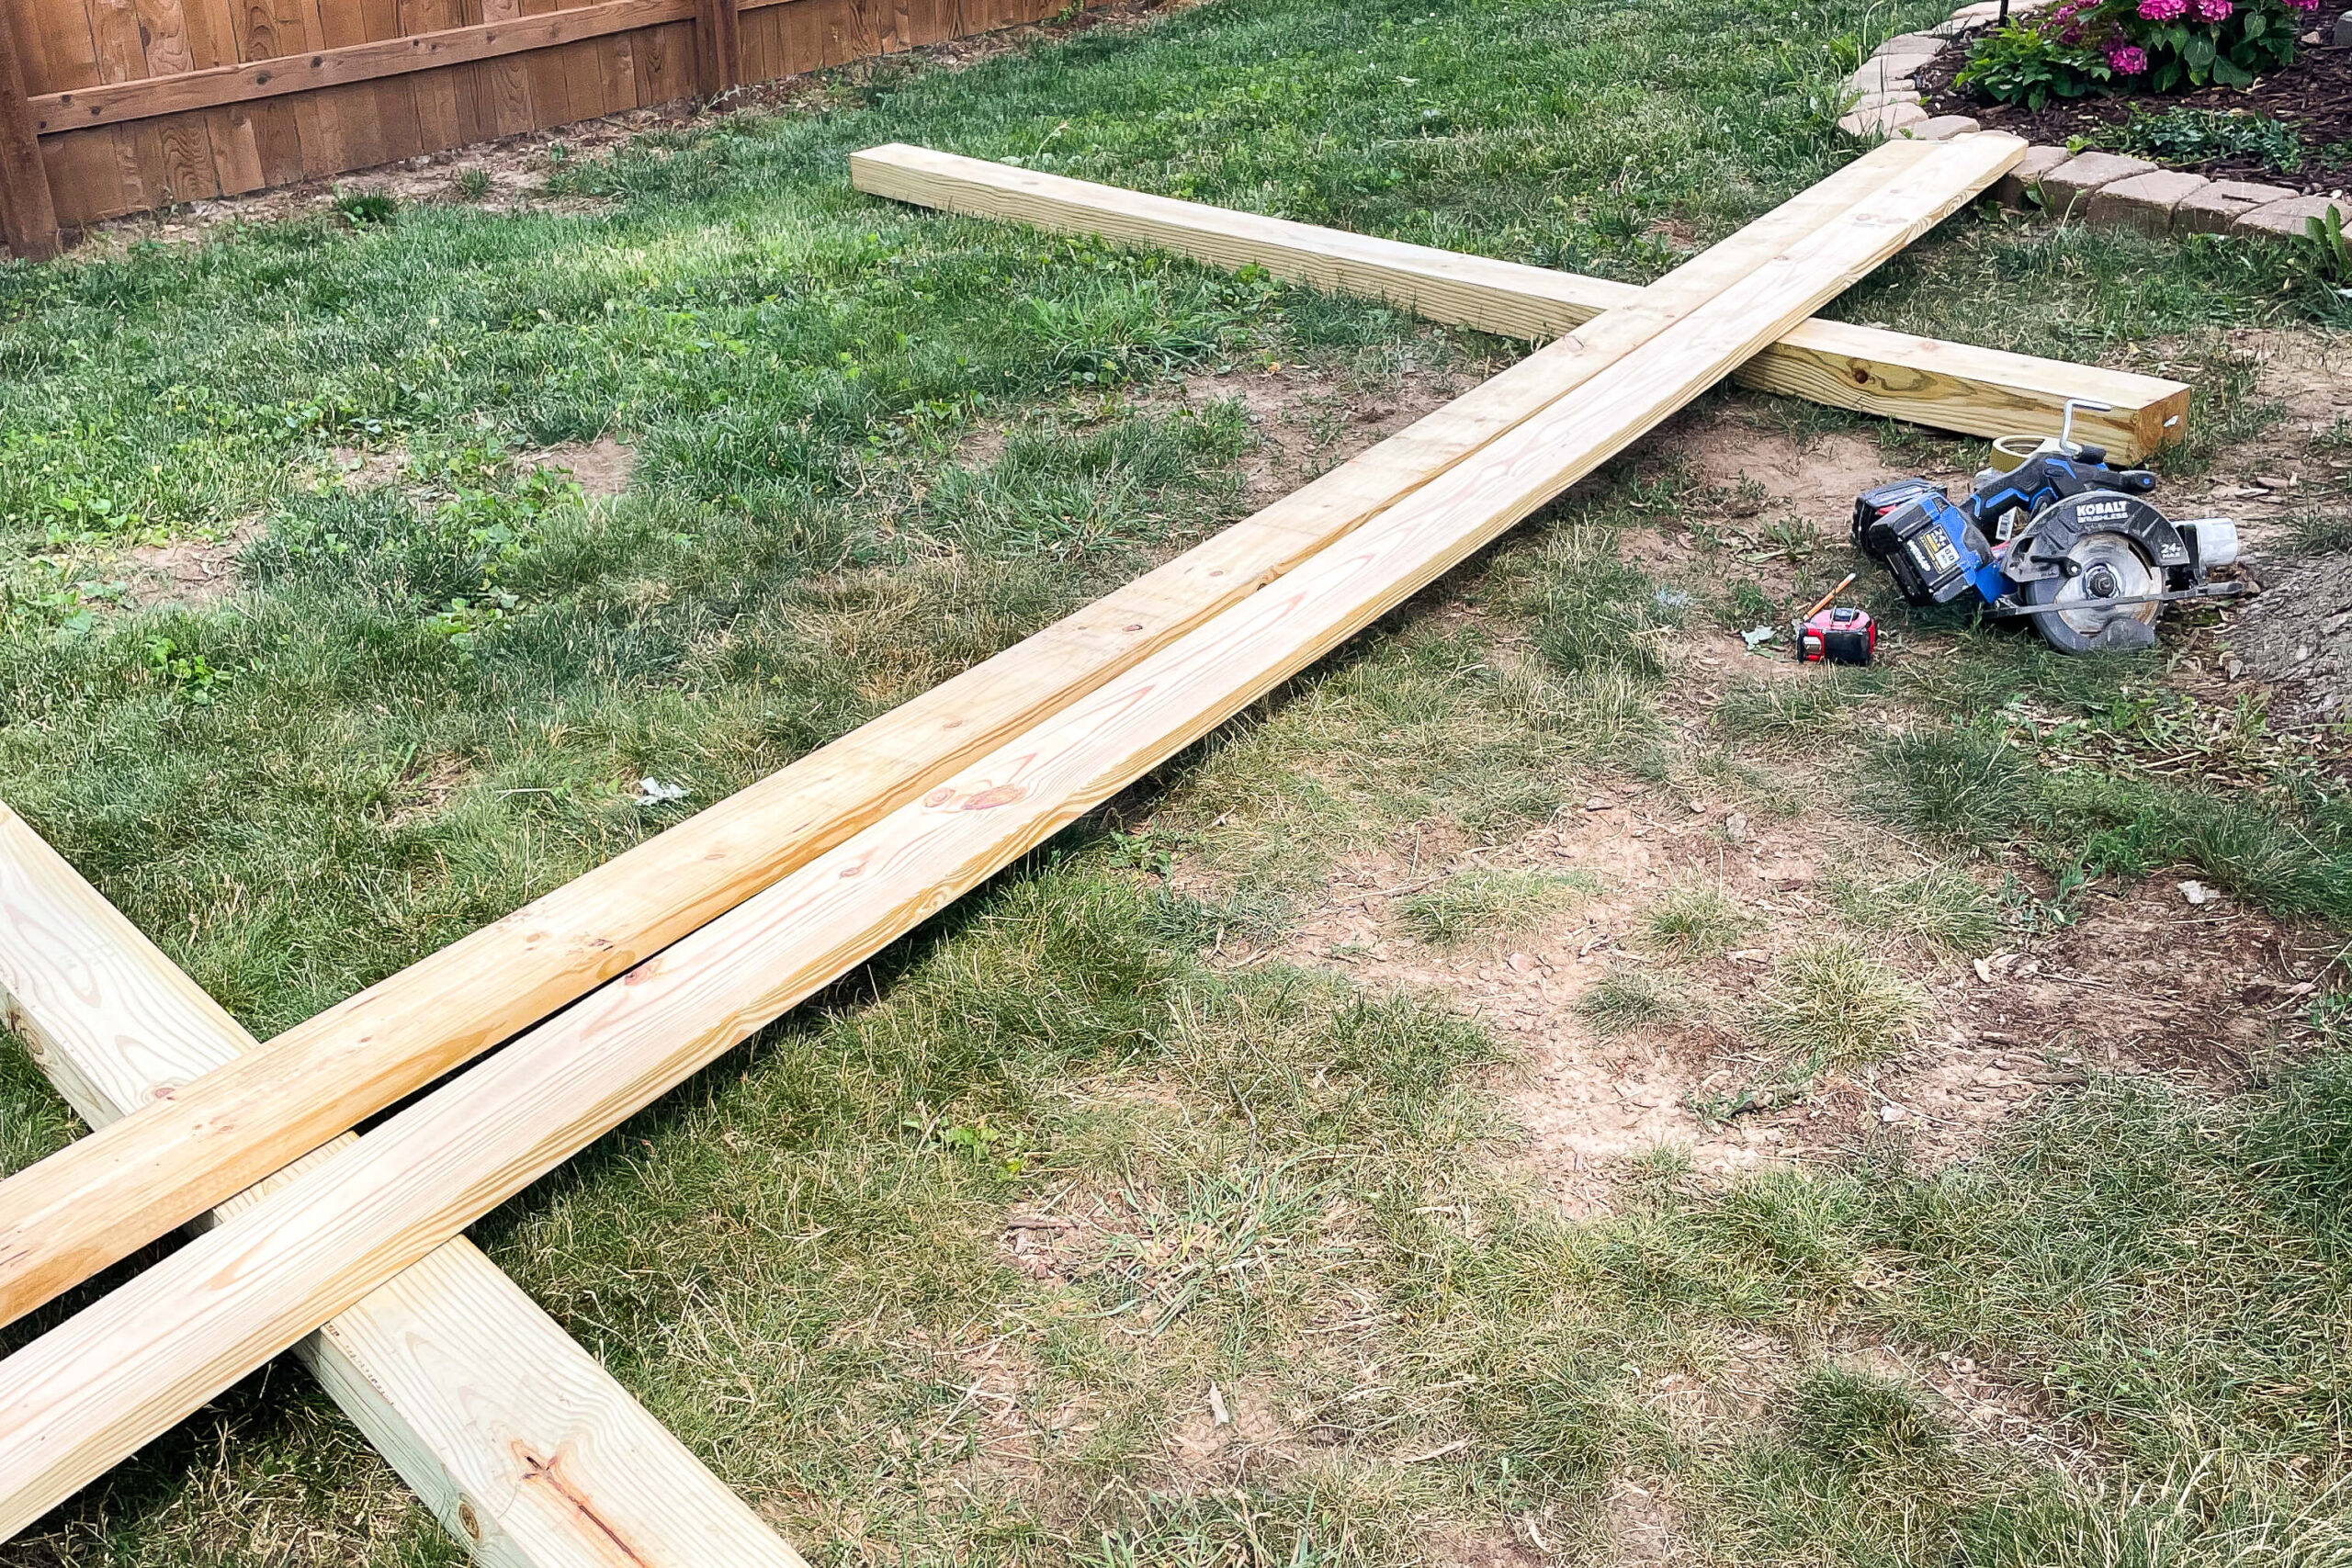
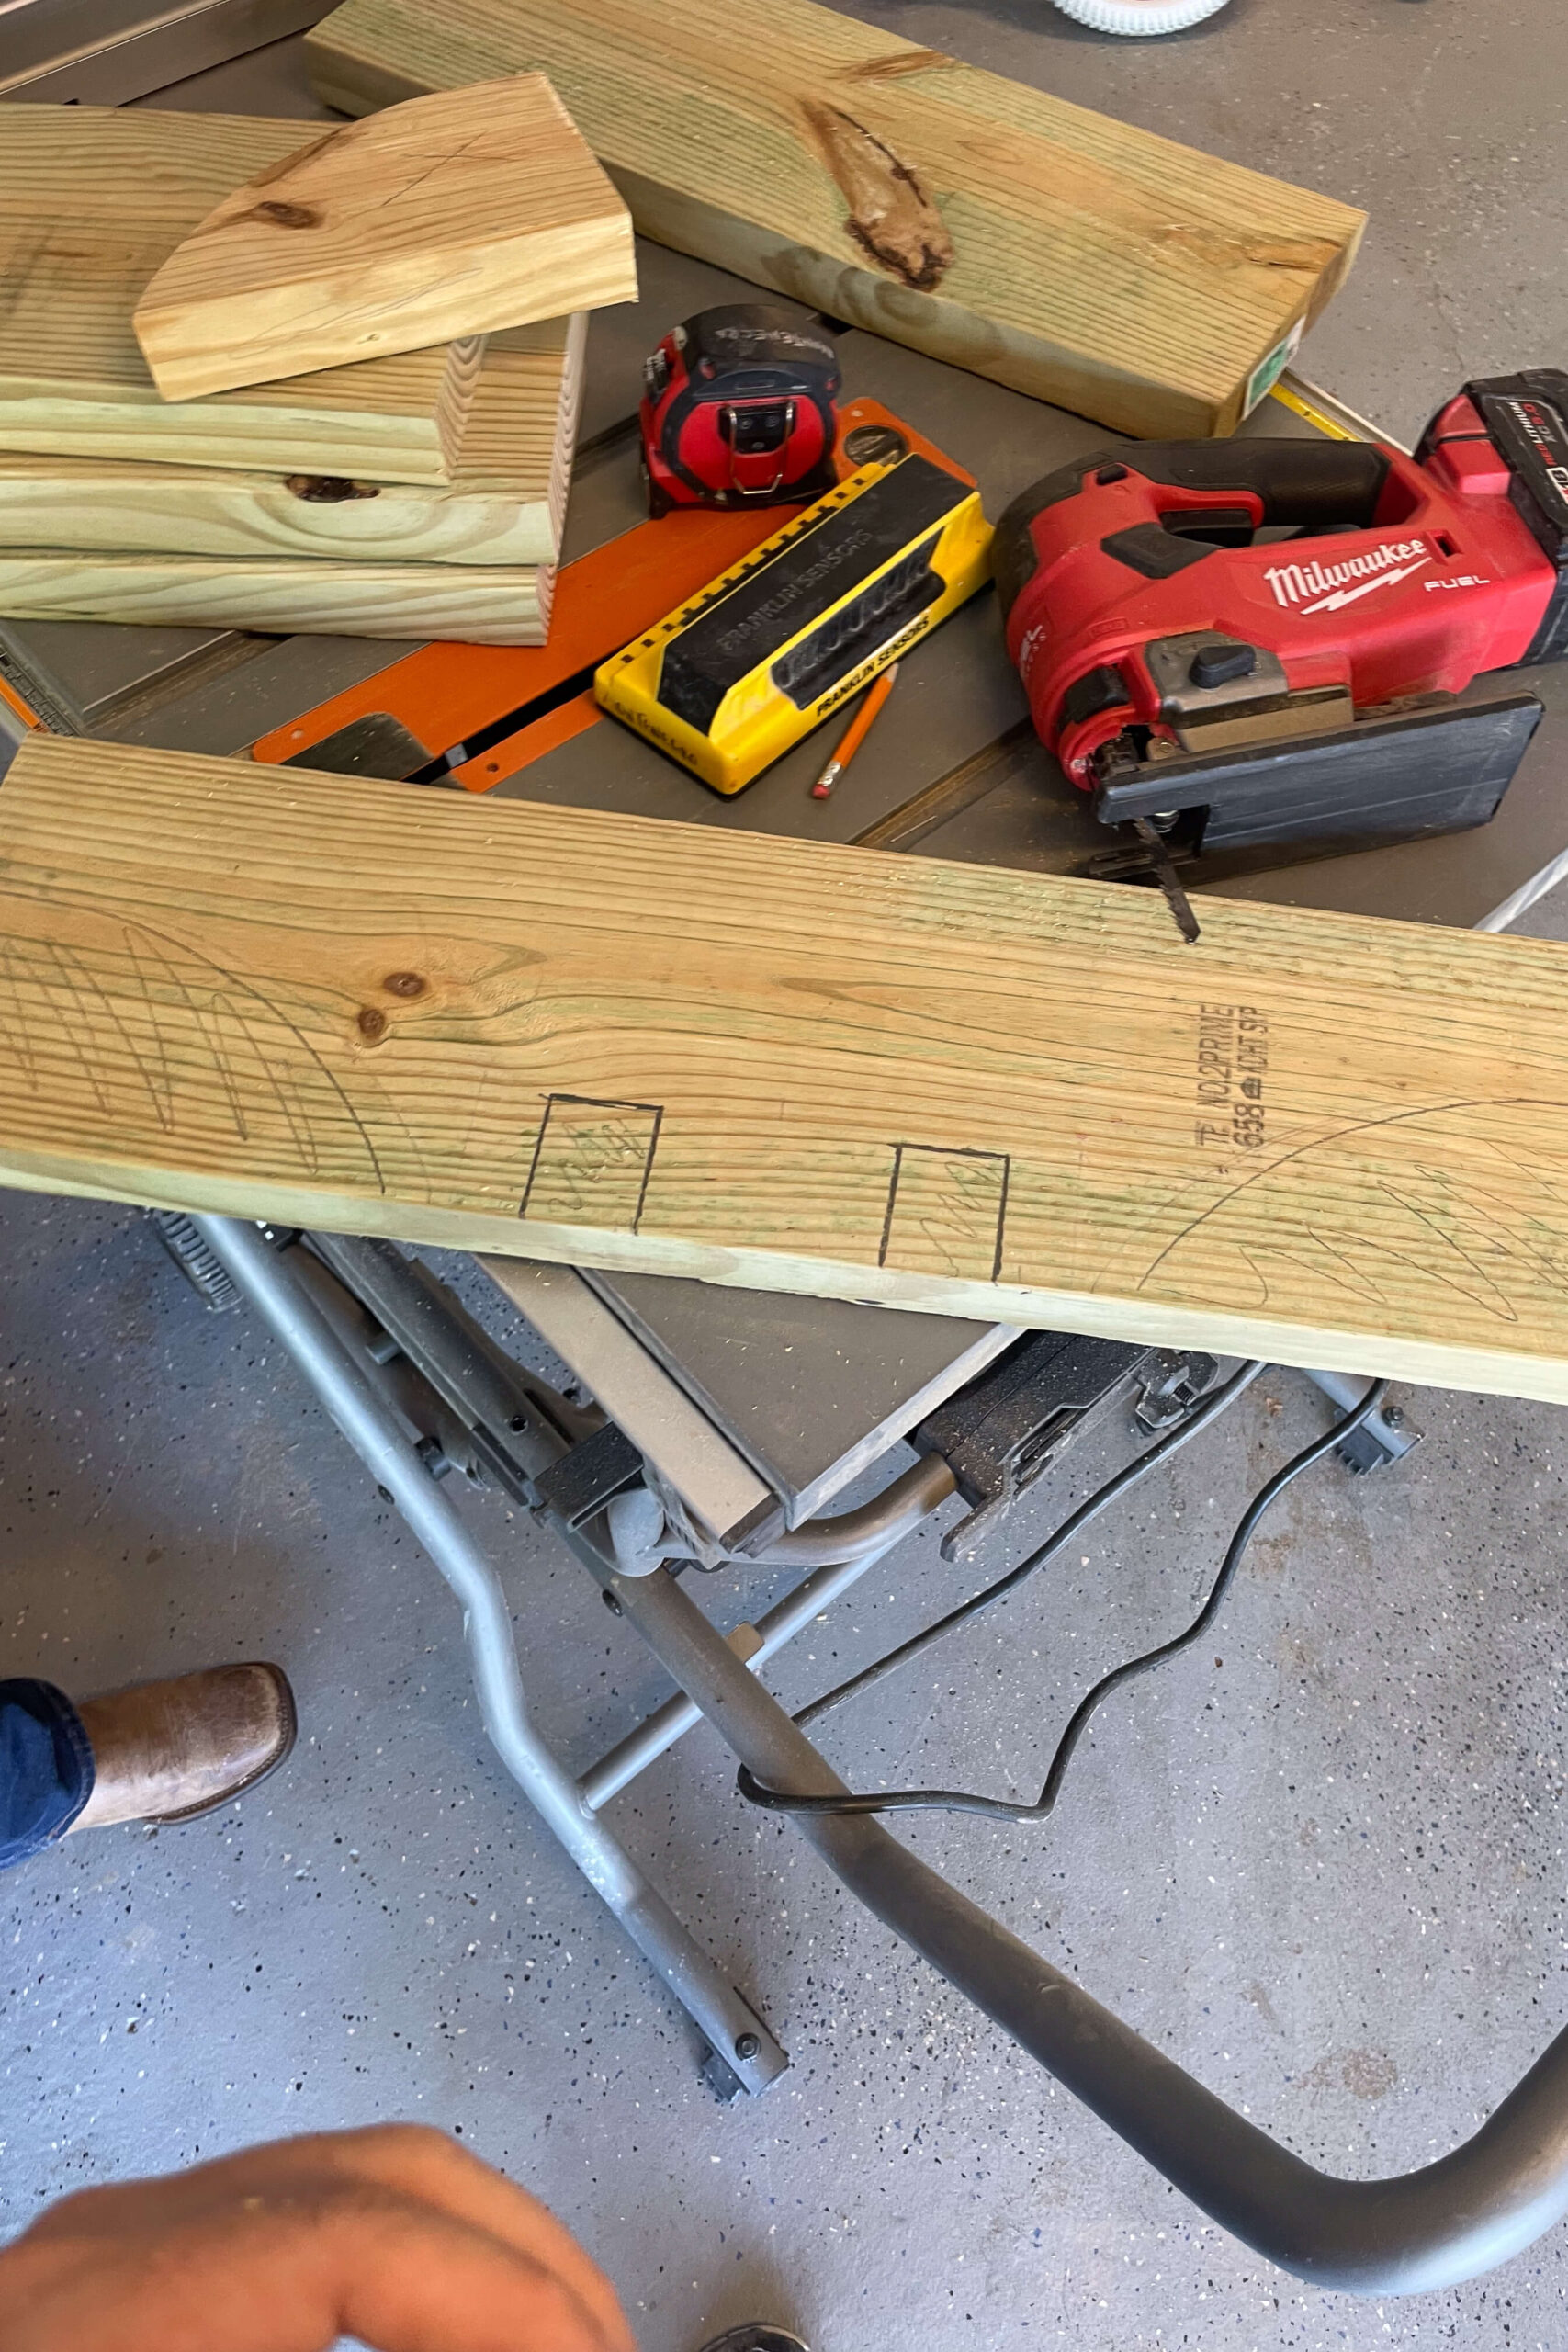
Cutting Wood for the Backyard Hammock Stand
I built this backyard hammock stand down on the ground, then lifted it into place after it was just about done.
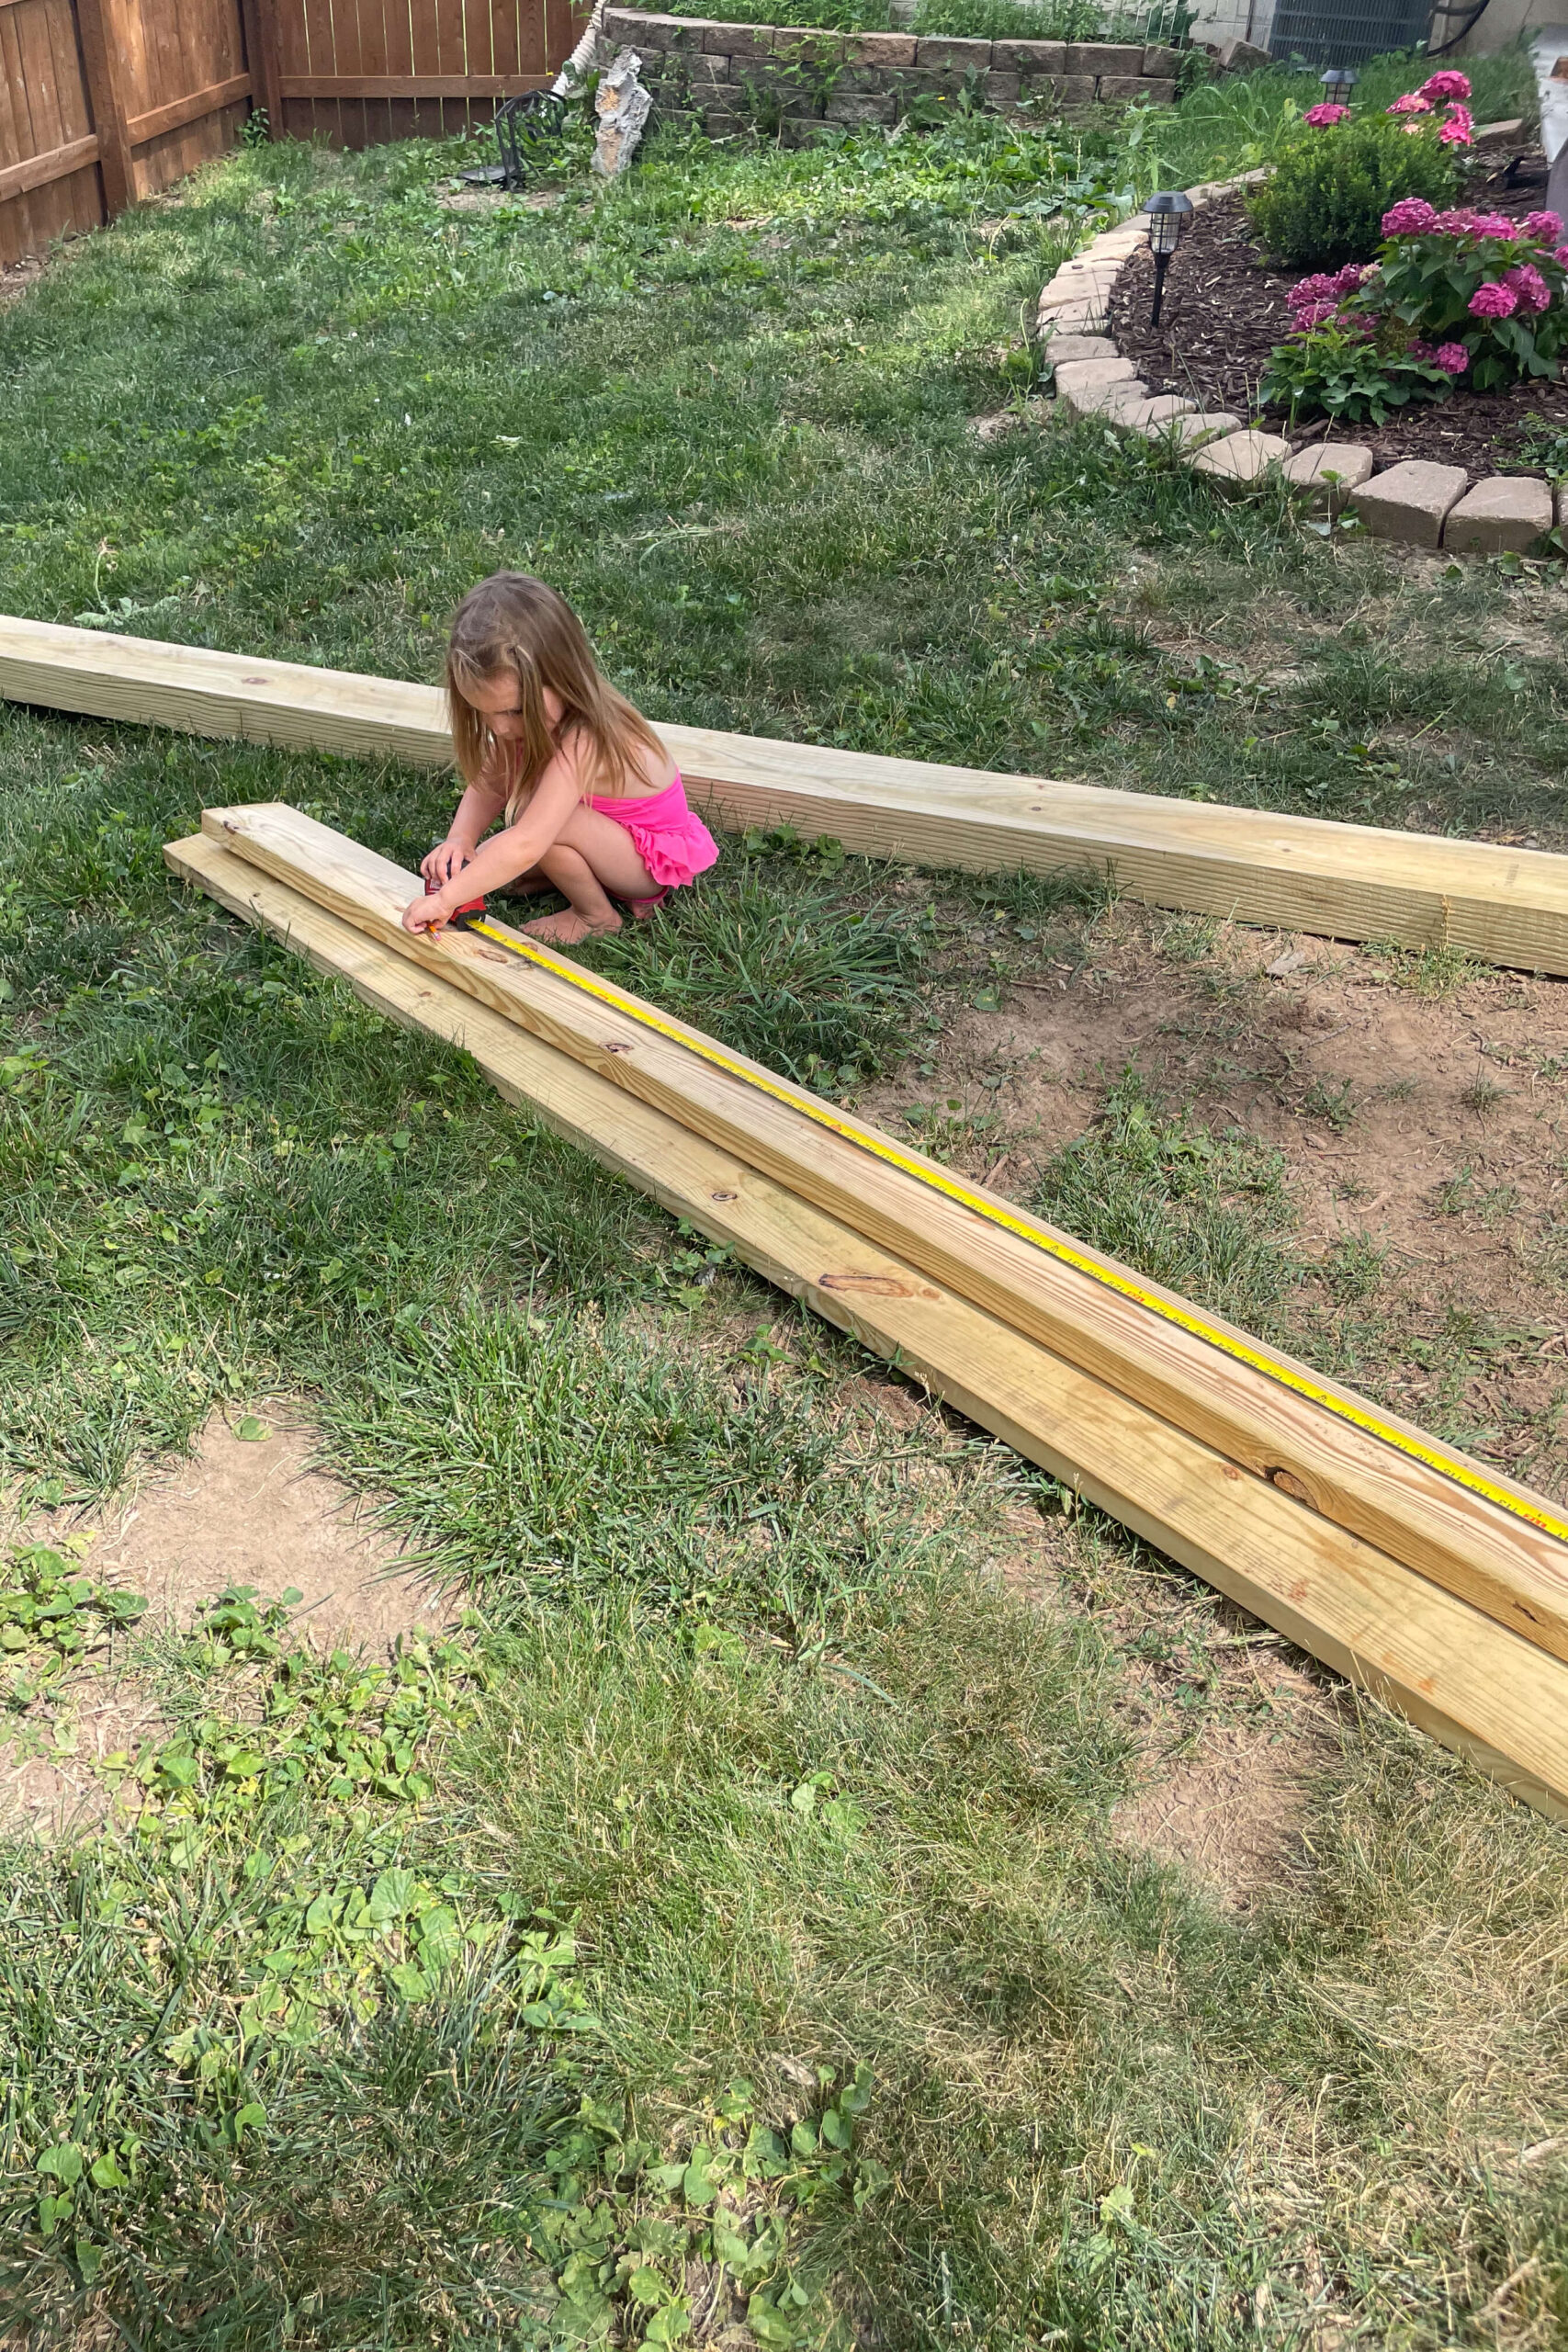
First, I laid out all of my wood for the basic frame of the hammock stand. The 6×6 posts are already the perfect length at 12 feet and didn’t need any cutting. The 2x6s that I used for the cross beams needed to be cut to length.
The hammock that I ordered is 13 feet long, so I needed a 12 ft span on the inside of the posts. I also wanted 1 ft extra at the ends for the overhang, and the 6×6 posts are 5.5 inches thick. So, for all you mathies out there, 12 ft + 1 ft + 1 ft + 5.5 in + 5.5 in = 14 ft and 11 in, so for my backyard hammock stand, I cut the 2×6 cross beams at 14 ft and 11 in.
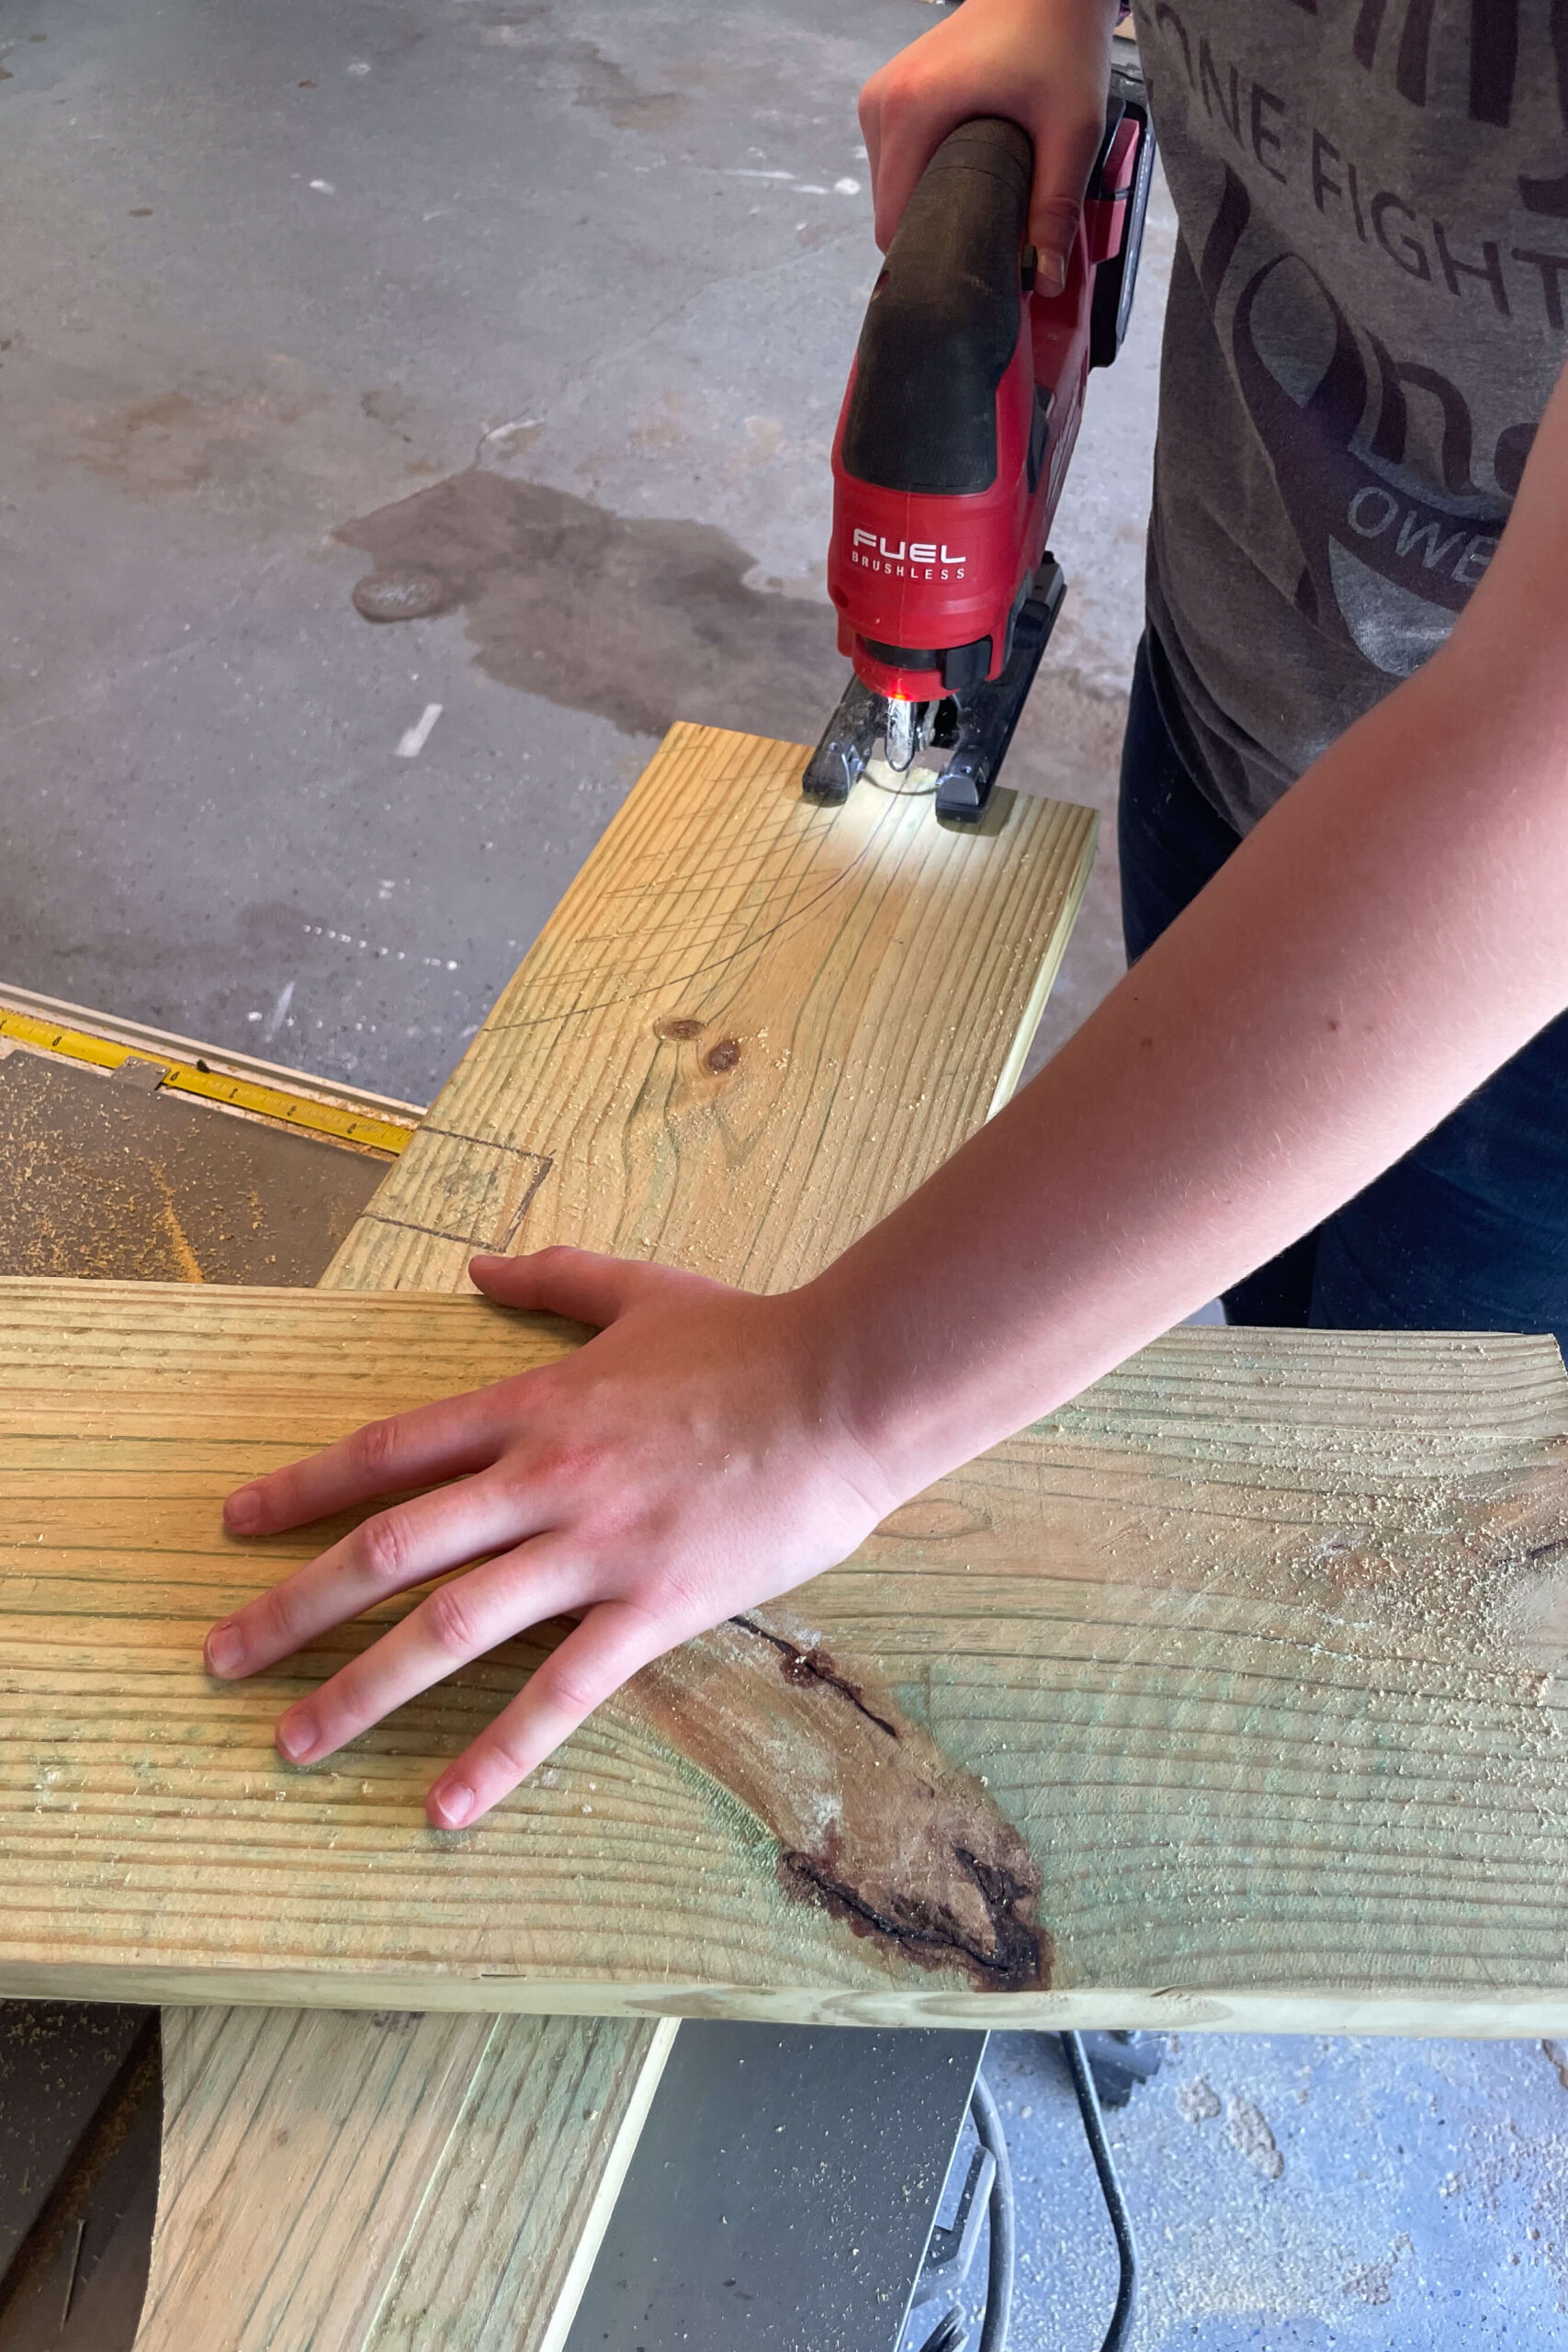
Once we had our cut lines marked, my battery operated circular saw was the perfect tool for cutting the wood right in the backyard. Just lay the 2×6 across another piece of wood to elevate it off the ground for cutting.
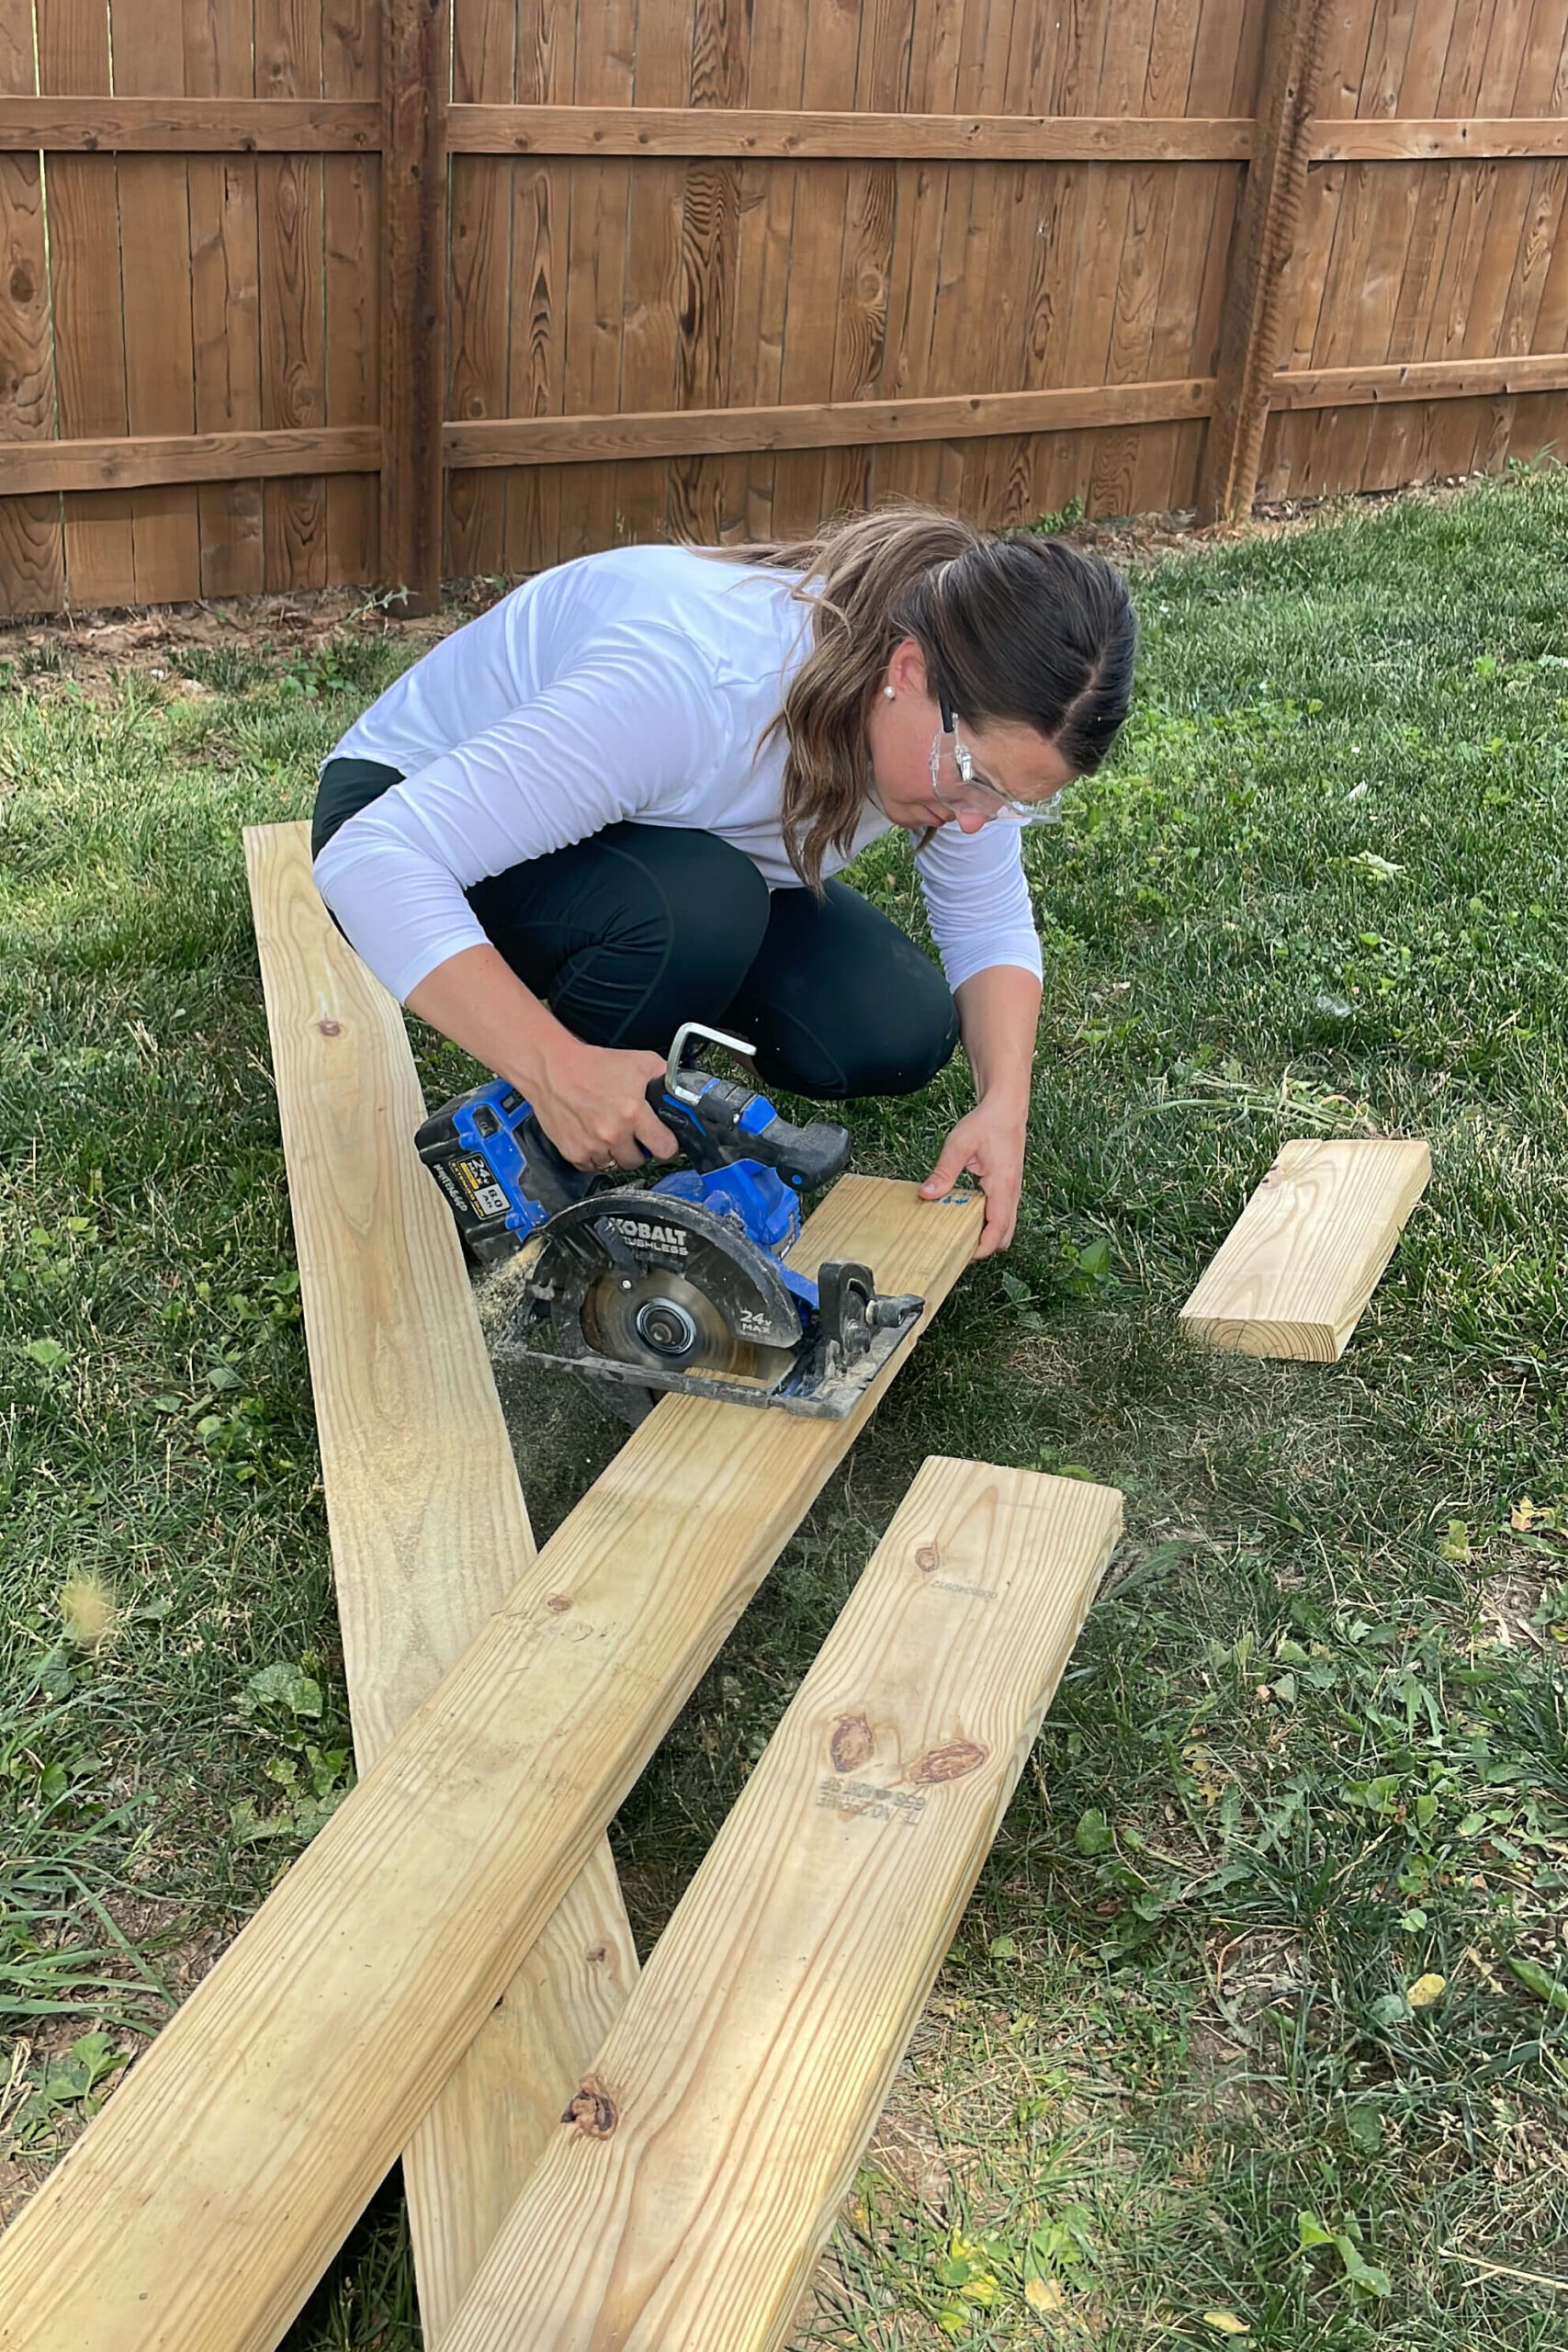
To cut the rounded design out of the end of the overhang I measured down from the top of my piece 1.5 inches, then in 8 inches from the edge at the bottom. After that I just used a pencil to freehand draw a rounded shape, then used my jigsaw to cut it out.

After you have cut out the first side, you can use the piece you cut off as the template for the rest of the ends. Simply trace, then use your jigsaw to cut it out. Don’t throw away that cut-out piece when you are done. We’re going to use it for another template to trace a little later on in this project.


Assembling the Backyard Hammock Stand
Now that our overhang detail is cut, it is time to lay everything out.
I measured in 12 inches from the end of my cross beam and marked a 5.5 inch rectangle for where my post would go. Use a square to make sure that you are not placing your beams at an angle.
Then I drilled holes for the carriage bolts that will hold it all together. Whatever size carriage bolt you use will determine the size of your drill bit. If you use 3/8 inch bolts, then use a 1/2 inch drill bit.
Be careful that nothing is underneath your wood as you drill. I accidentally put a hole in a brand new garden hose. Oops!
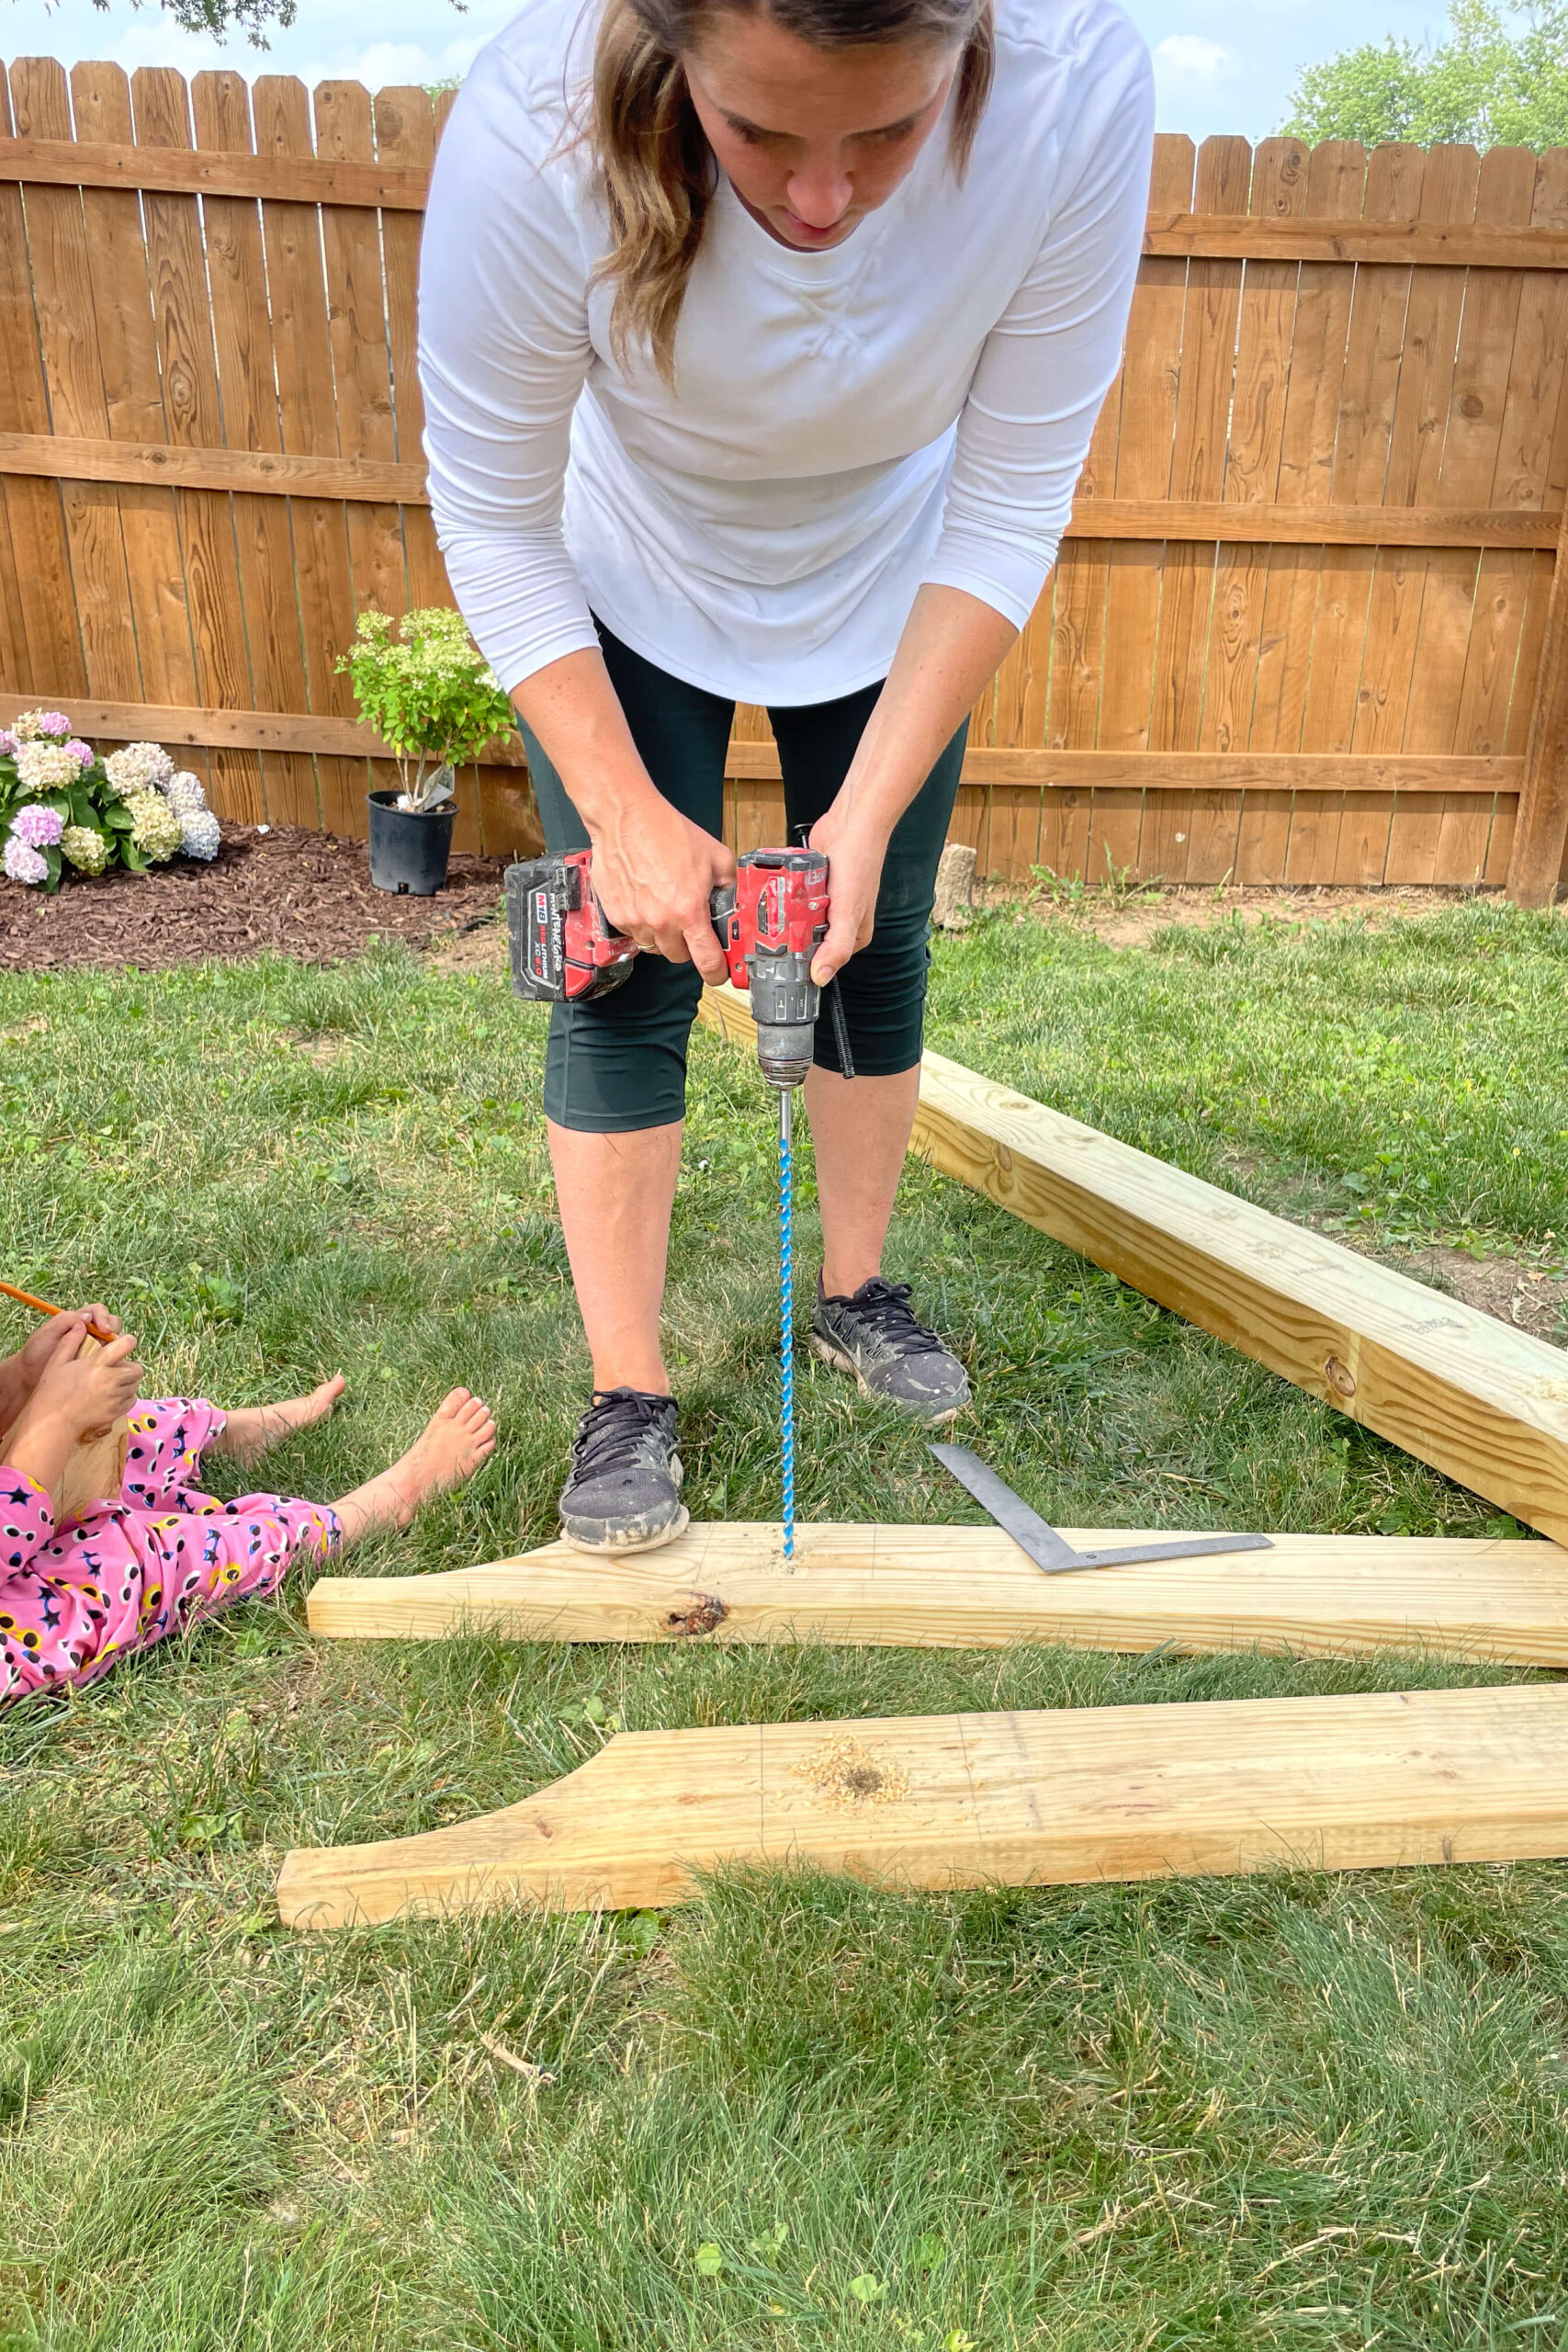
Place a washer over the hole you drilled, then add the carriage bolt. You want a nice, tight fit so the carriage bolts might require a little hammering to get them all the way through.
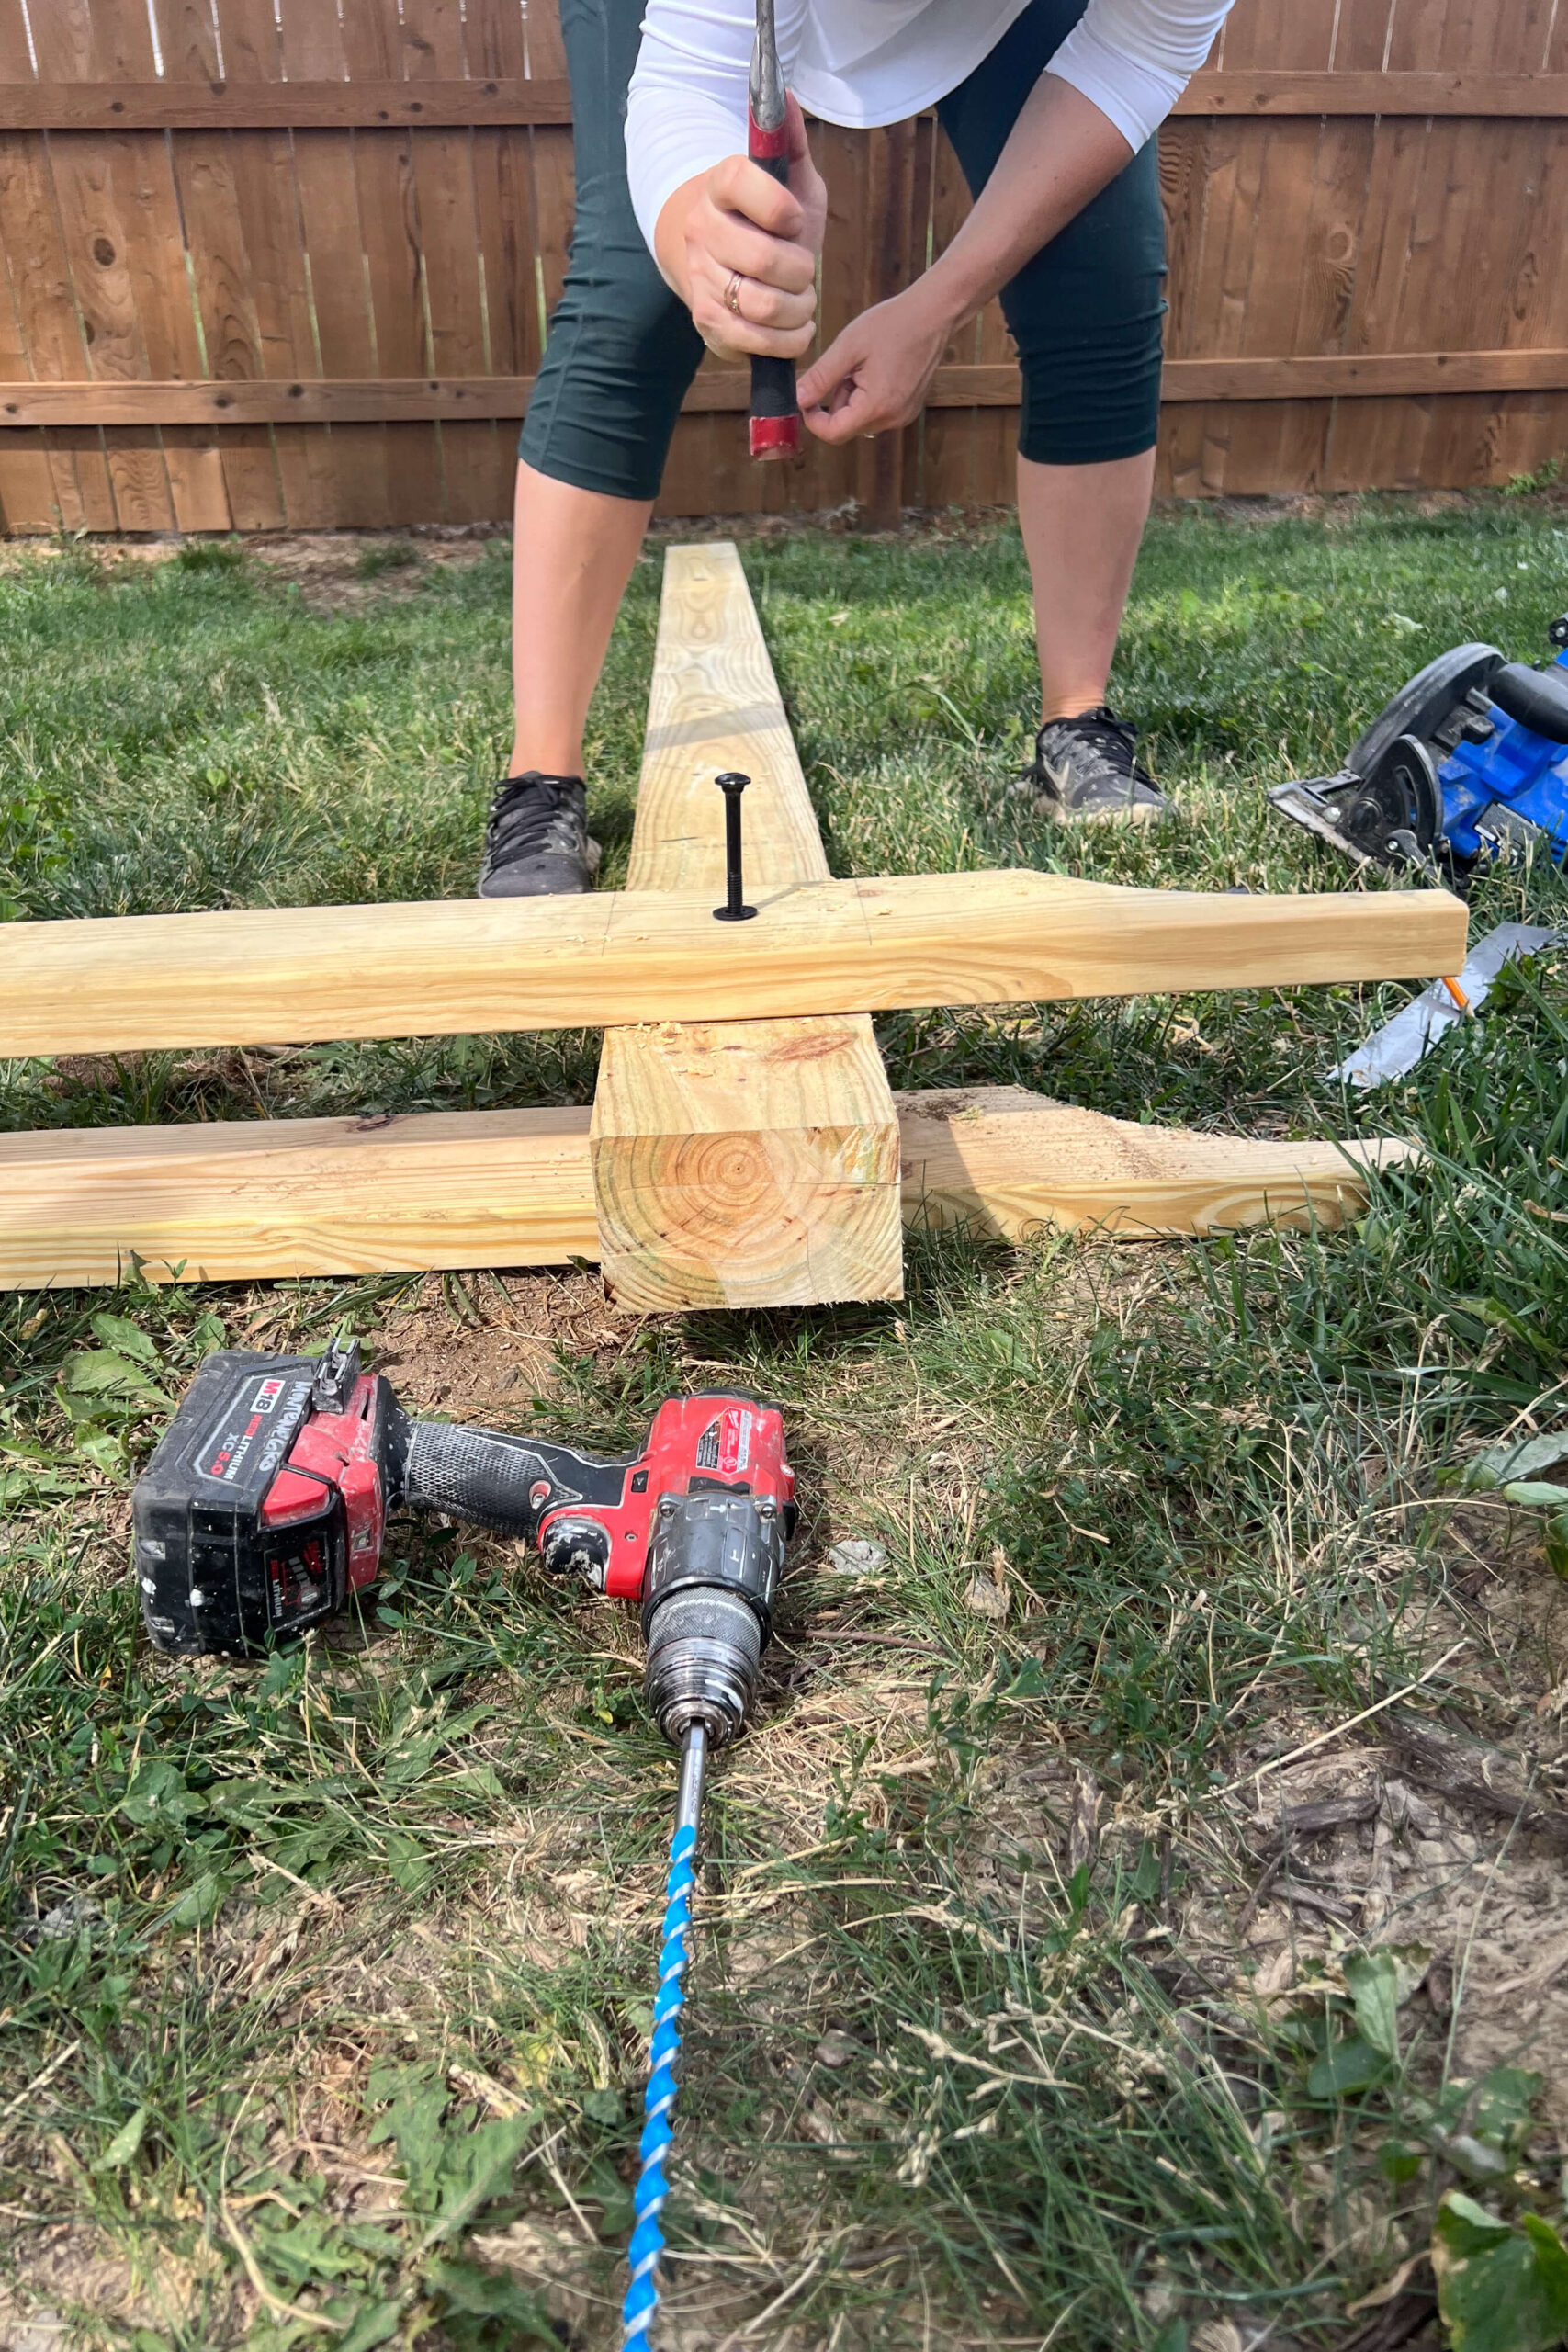
I initially planned on doing just one carriage bolt right in the center, where my posts and cross beams overlapped, but that was not good enough. You will want to do three carriage bolts in a triangle shape around the center. When you have all of the carriage bolts in place, it will look like the picture below. Make sure that you place your bolts from the front towards the back. That way, the nut that twists ends up on the backside of your backyard hammock stand.

Cutting and Attaching the Cross Braces
The cross braces that I designed will sit on top of my backyard hammock stand and serve two purposes. First, they add interest and detail, making the presentation look prettier. Two, they also help brace the cross beams, giving me a sturdier hammock stand.
I decided to use 10 cross braces made out of 2×8’s. You can use more or less based on what you think looks good. A miter saw makes quick work of cutting these 2×8’s down to length. Each of my cross braces was cut to 27.5 inches long.
Now that they were cut to length, I needed to cut out the design. I took the rounded cutout piece leftover from what I had already cut out of the ends of the cross beams and cut 1/2 inch off of the end to make it just a little bit shorter. I traced the rounded detail onto each end of my cross brace, then marked and drew the notches that needed to be cut out for each of the cross beams.

Once you have all of your cut lines marked, you can cut it all out using a jig saw.

After all of the cross braces are cut out, it’s time to put them in place. You want them to fit tightly onto the cross beams, so they might need a little bit of tapping with the hammer to get them on. If it is too tight of a fit, go back with the jig saw and cut a little more out.
We evenly spaced out the 10 cross braces, then screwed on these small brackets to hold them in place. I put one bracket on each side of the cross brace.
If you put the brackets against the backside of the cross beam that will be in the front of your backyard hammock stand, then they will not be nearly as visible.


Digging Holes for Your Backyard Hammock Stand
Now it’s time to get this frame up in the air!
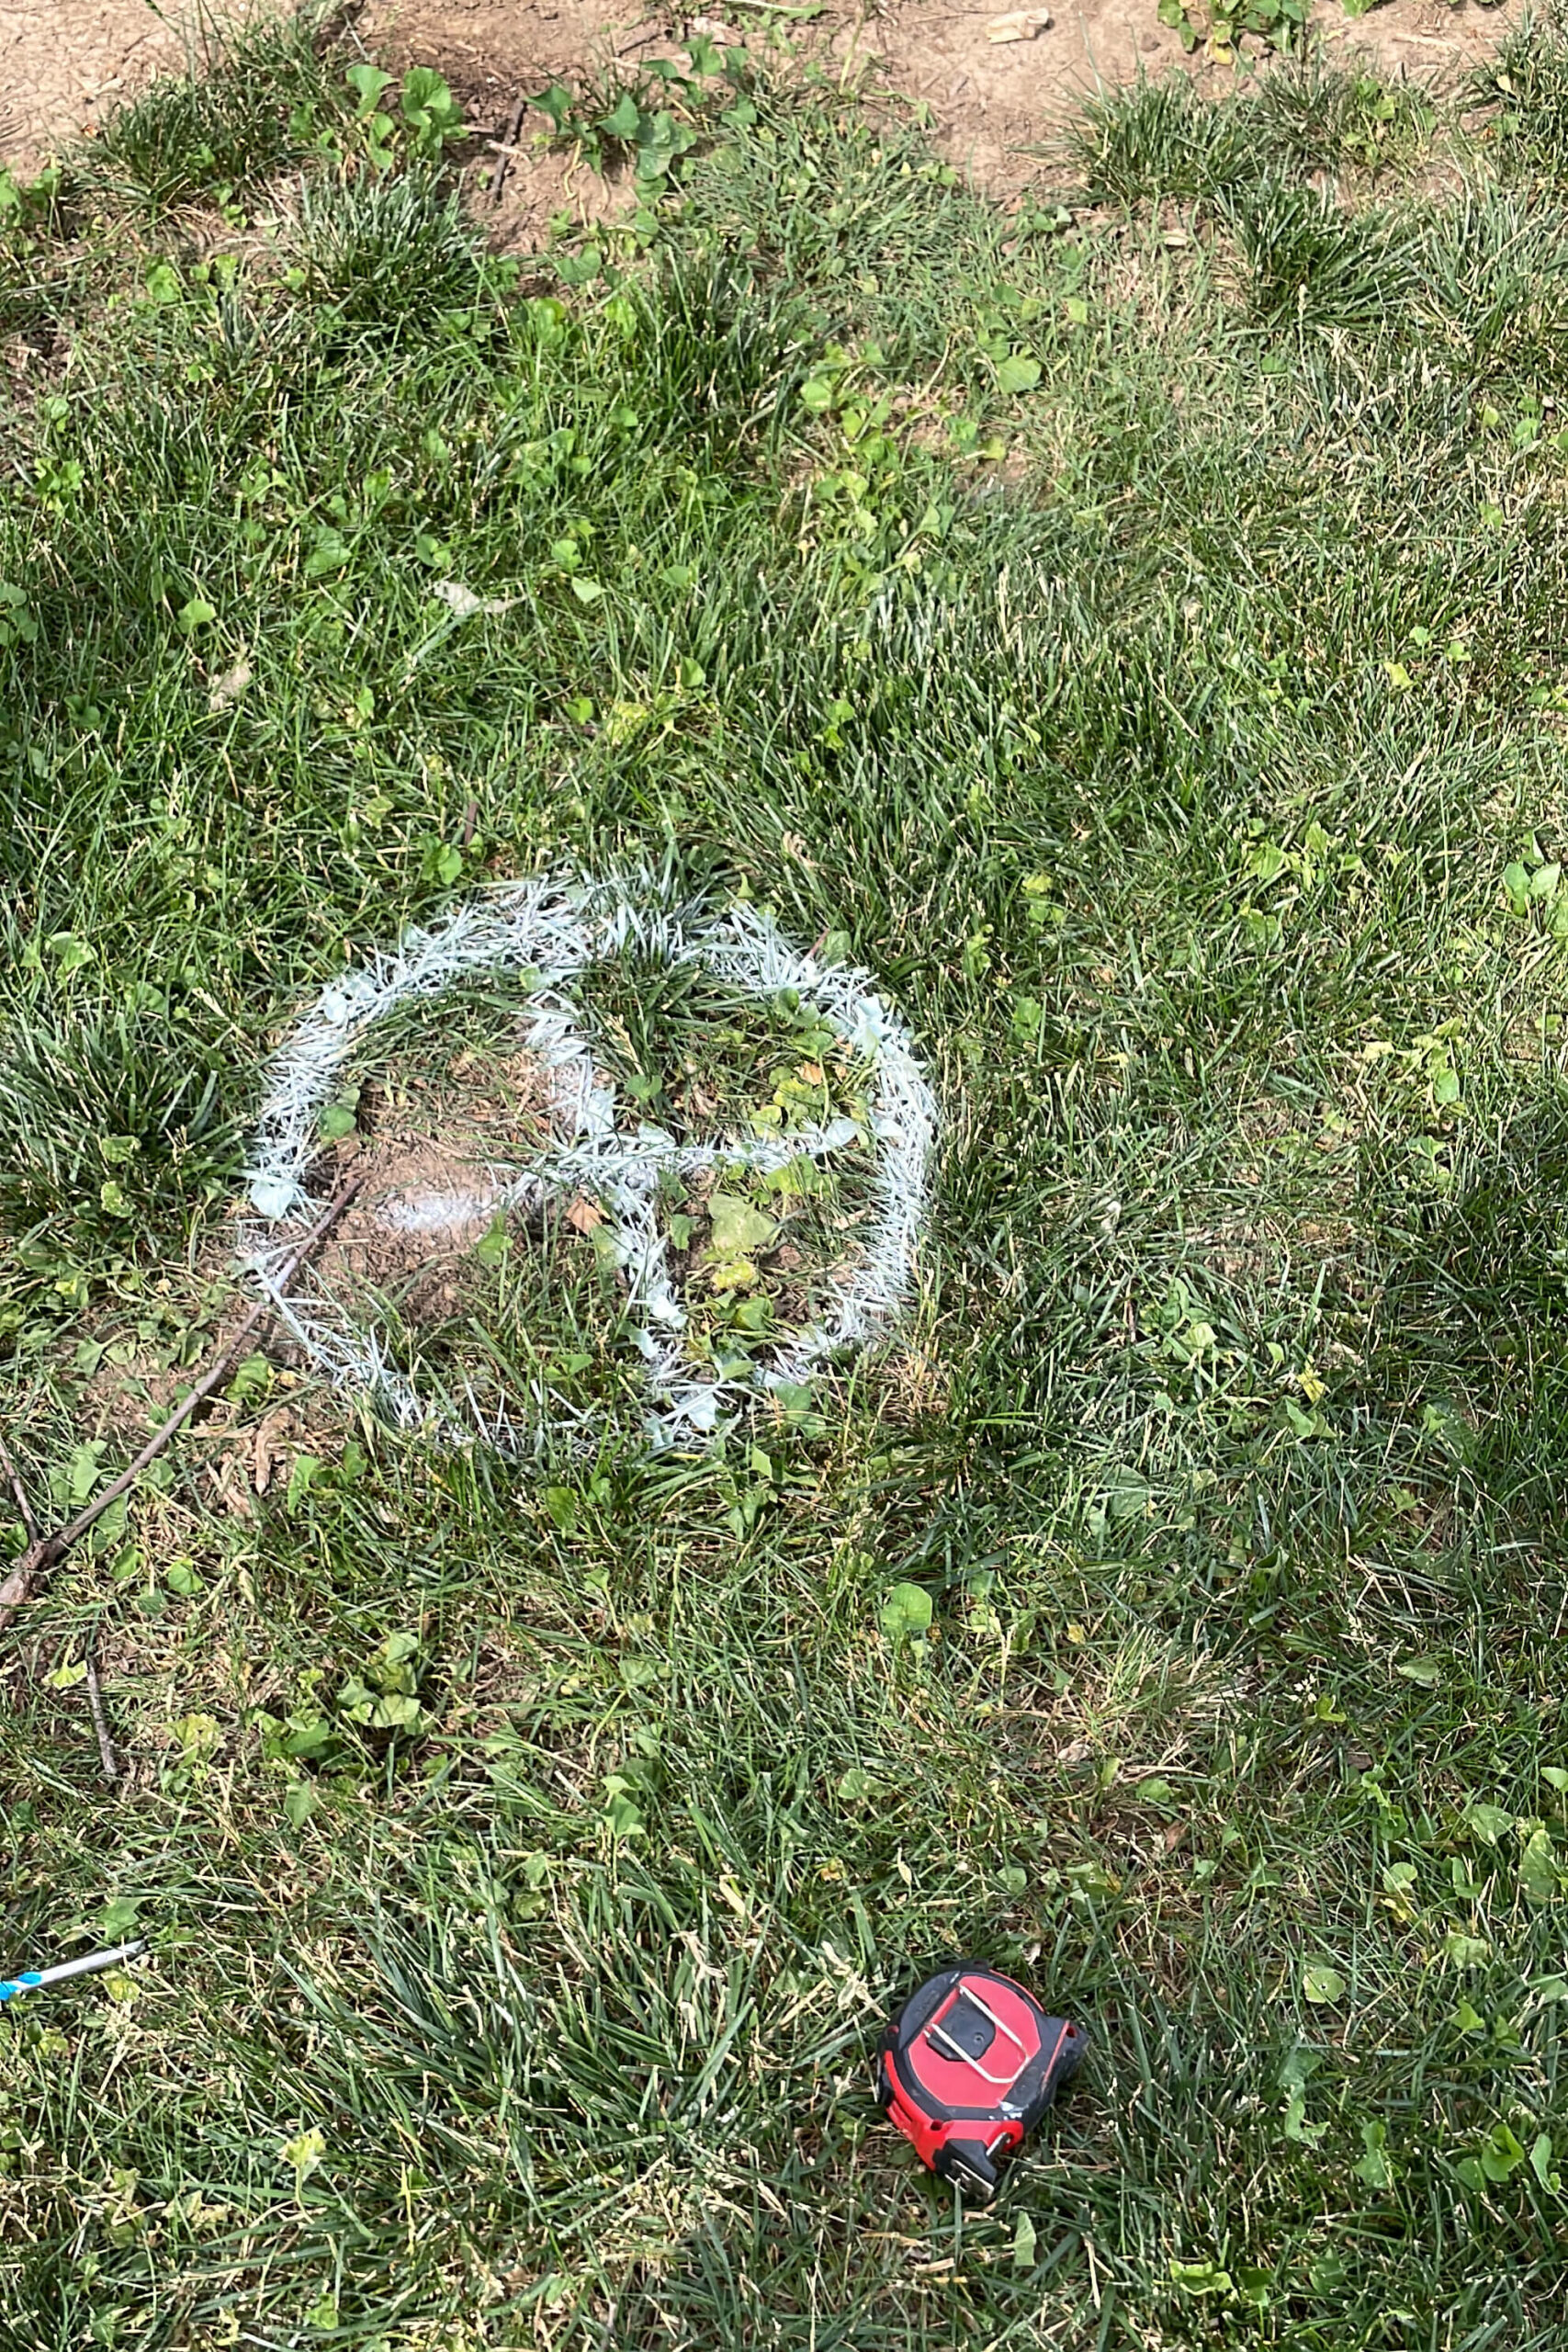
Before digging any holes in your backyard, you always want to be sure that where you are digging, there are no pipes for your sprinklers, electrical or sewage lines, or anything that you do not want to accidentally run into. I had the city come out prior to this to mark where all the electrical, water and gas lines were so that I could be sure to steer clear of them.
I needed two holes, one for each end post of my backyard hammock stand. Since my posts are 12 feet apart, the holes need to be 12 feet apart as well. I measured out 65 inches off my fence to give us plenty of room for swinging, and then, using spray paint, I marked my two holes where I needed to dig.
A pointed digging shovel is the perfect tool to get you started, but you will need a post hole digger. As the hole gets further and further down, a post hole digger can actually fit into the narrow hole and lift out the dirt. Save your dirt as you remove it, because some of it will need to be backfilled in.

In full transparency, I dug holes and built this backyard hammock stand twice. On my first attempt I only went down 18 inches thinking that would be enough. That was not enough. The result was a wobbly, unsafe hammock stand. Don’t be like Crystel. Dig deeper holes.
Since that first mistake, I have learned that as a basic rule of thumb, you want about 30% of your post to be in the ground. So for 12 foot long posts I will have 4 feet in the ground and 8 feet above the ground. That’s a lot of digging, but it can be done. My daughter was just about 4 feet tall at the time, and worked out as the perfect measuring stick for our 4 feet deep hole.
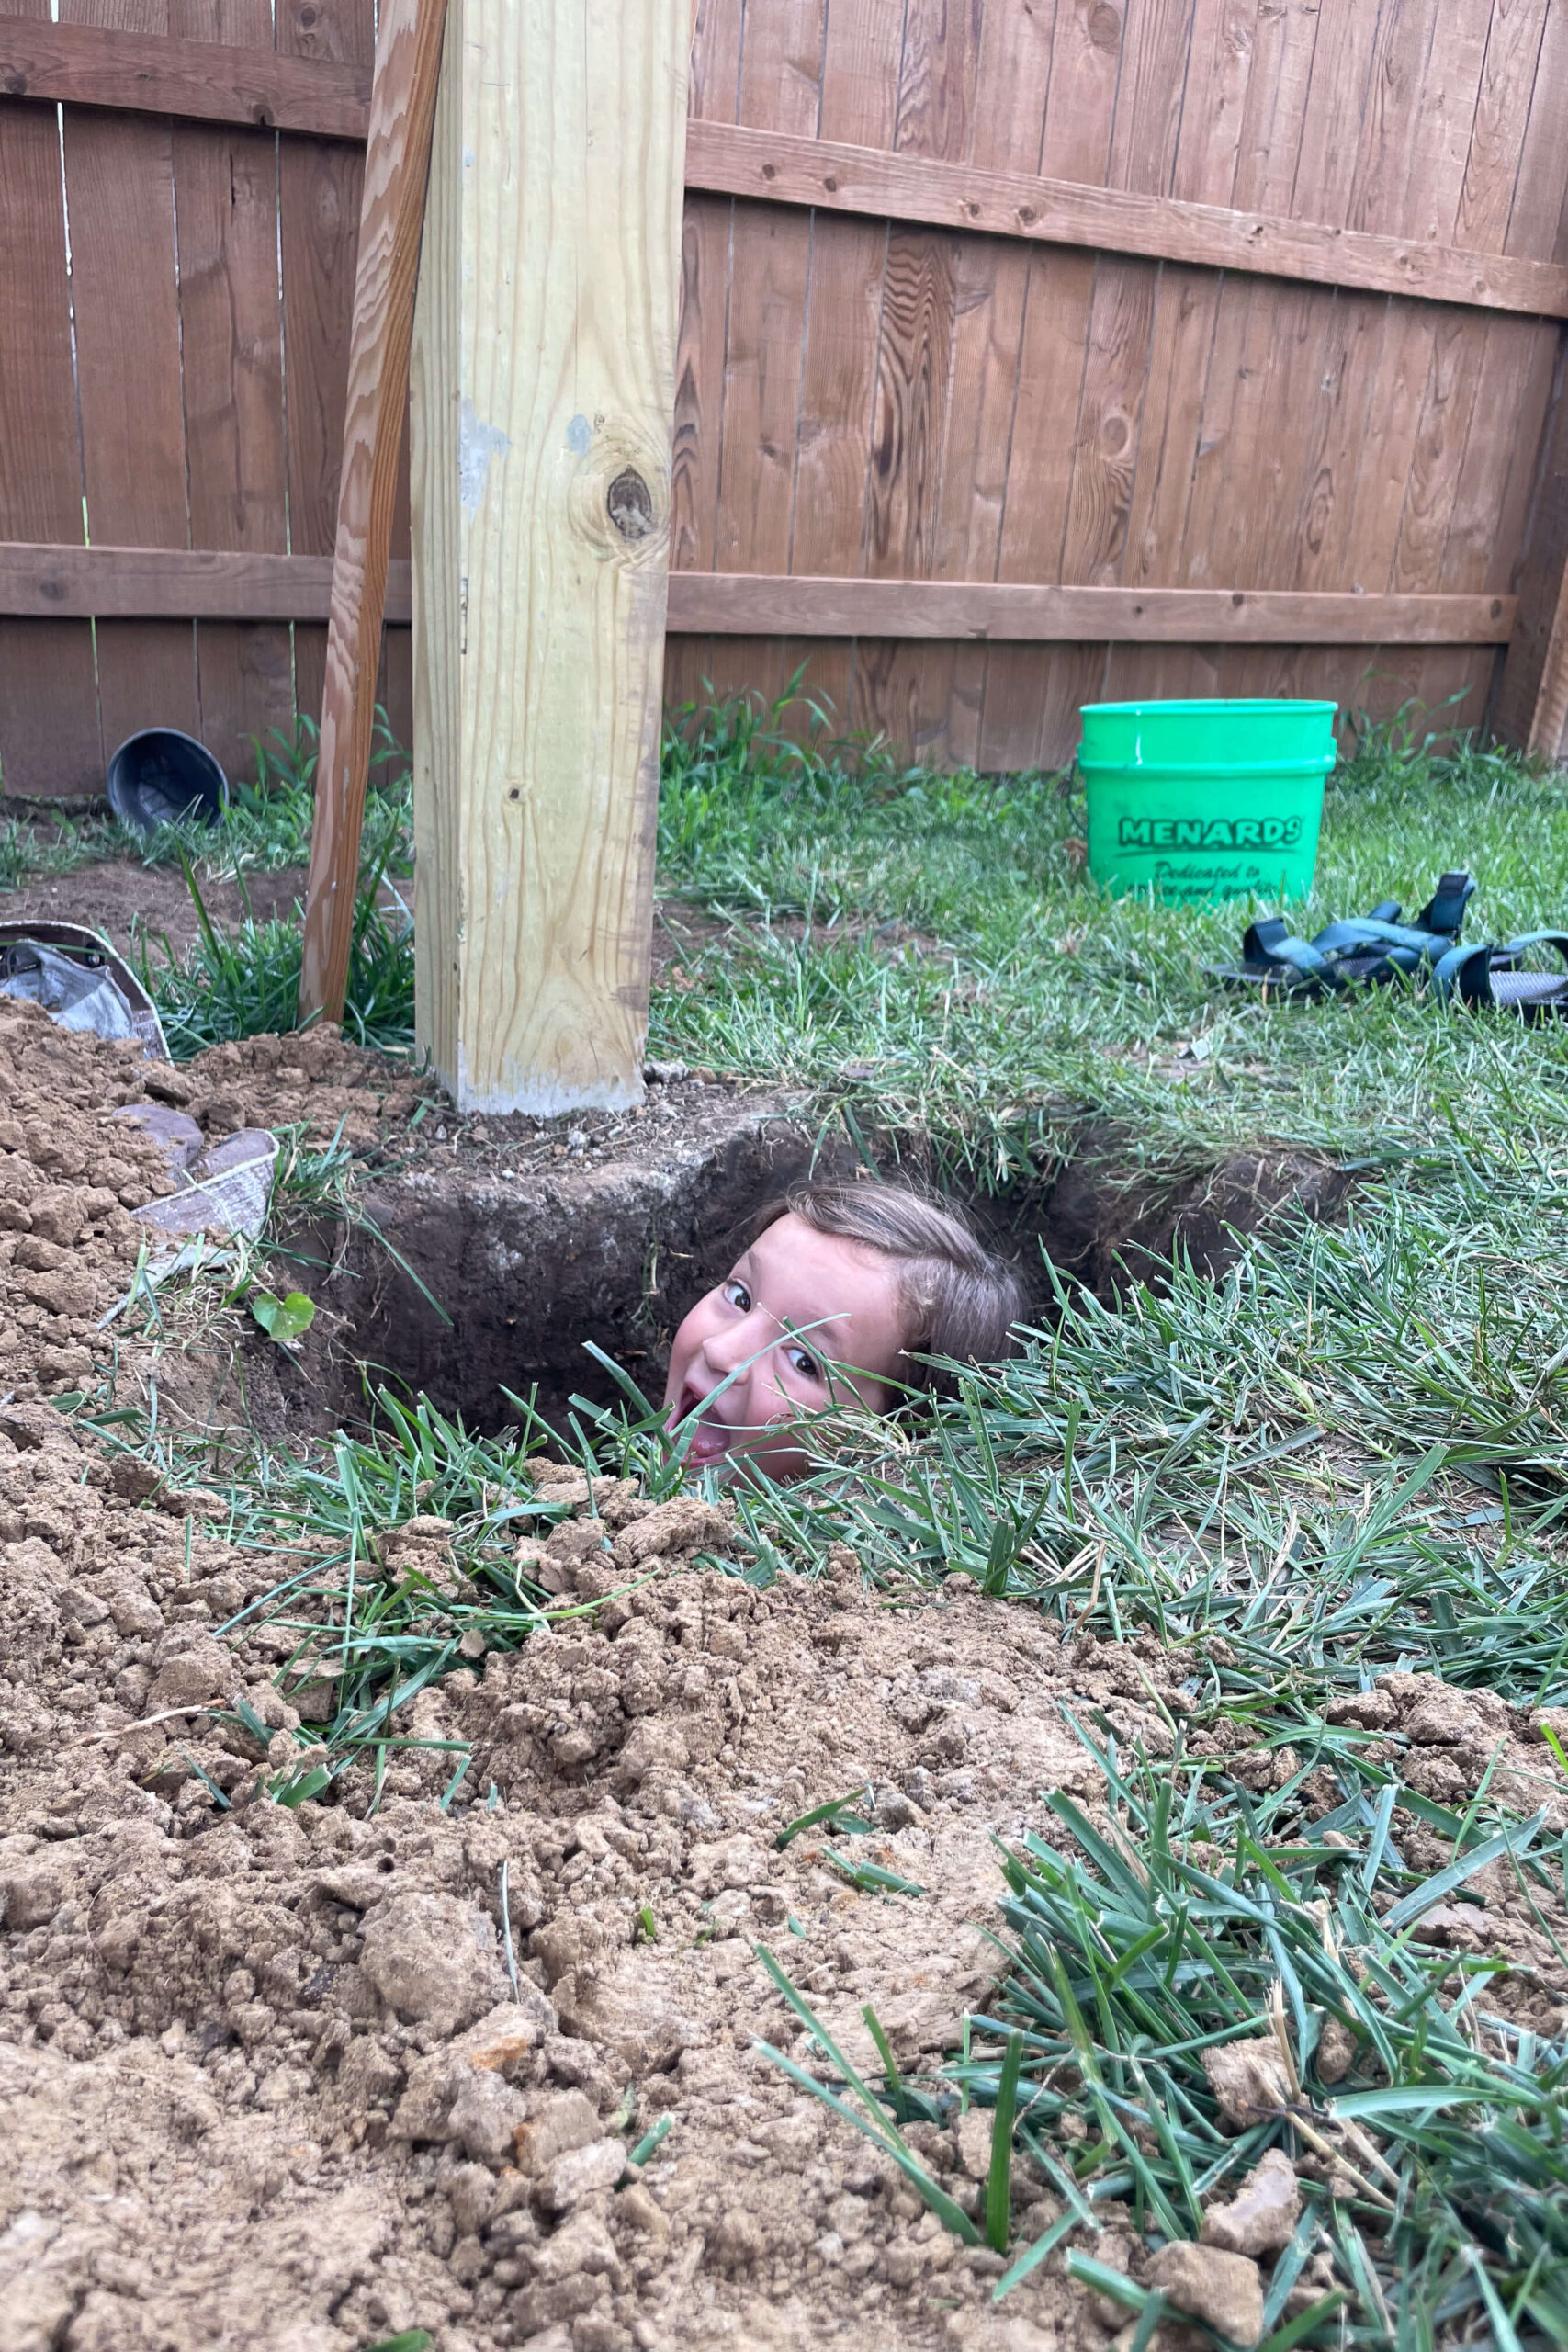
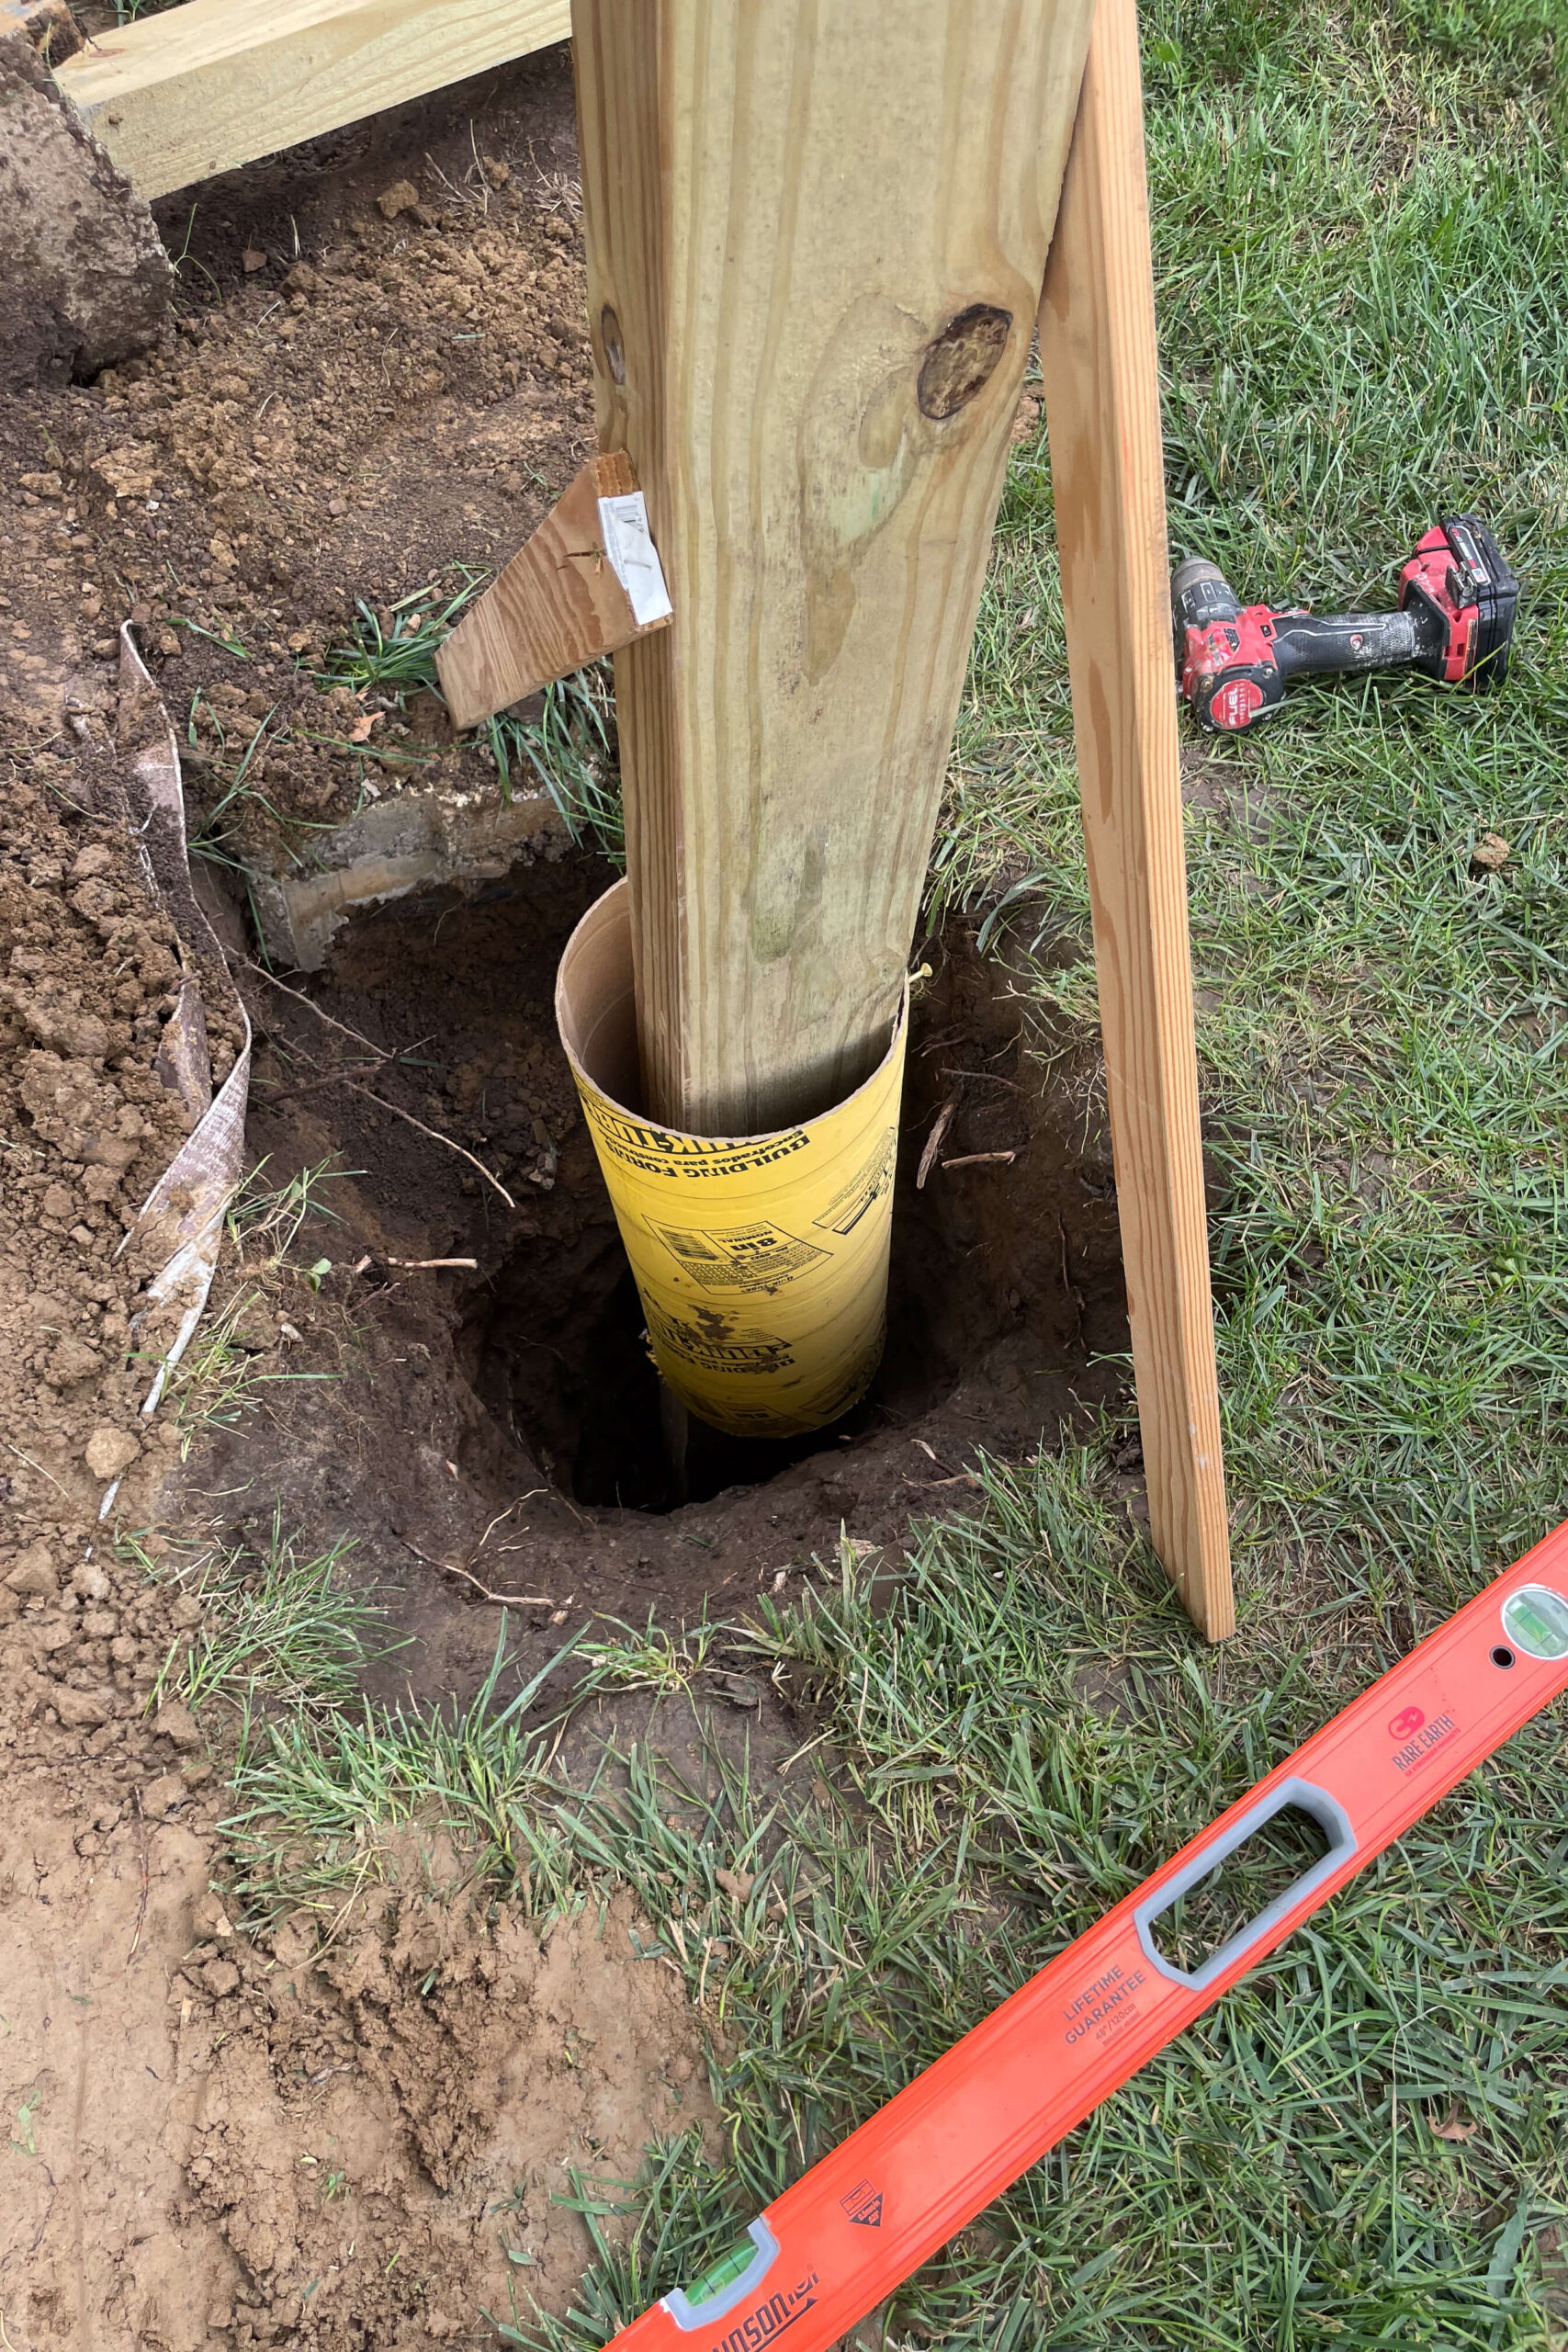
Before slipping it into the holes, we put these concrete form tubes around each post, then lifted the backyard hammock stand into place. These tubes will help make sure that the wood post is entirely encased in concrete and does not touch dirt. This will really help lengthen the life of my backyard hammock stand.
The last thing you have to do before pouring concrete is add braces to keep your posts straight. The braces are made of scrap wood and are temporarily screwed into the post. Use a level to make sure that your posts are plumb (perfectly straight up and down), then attach your wood braces to hold the post in place. We will remove these braces later after the concrete is set.

A wheelbarrow, shovel, and a little water are all you need for mixing and pouring your concrete.


We used a garden trowel to make sure that the inside of the cardboard tube was also getting nice and full of concrete around the post. The hole doesn’t need to be full to the top of the concrete. The remainder of the hole we will backfill with dirt after the concrete is dry.
I used 4 – 60 lb bags and 6 – 80 lb bags of concrete. You may or may not need that much depending on the size of your hole.


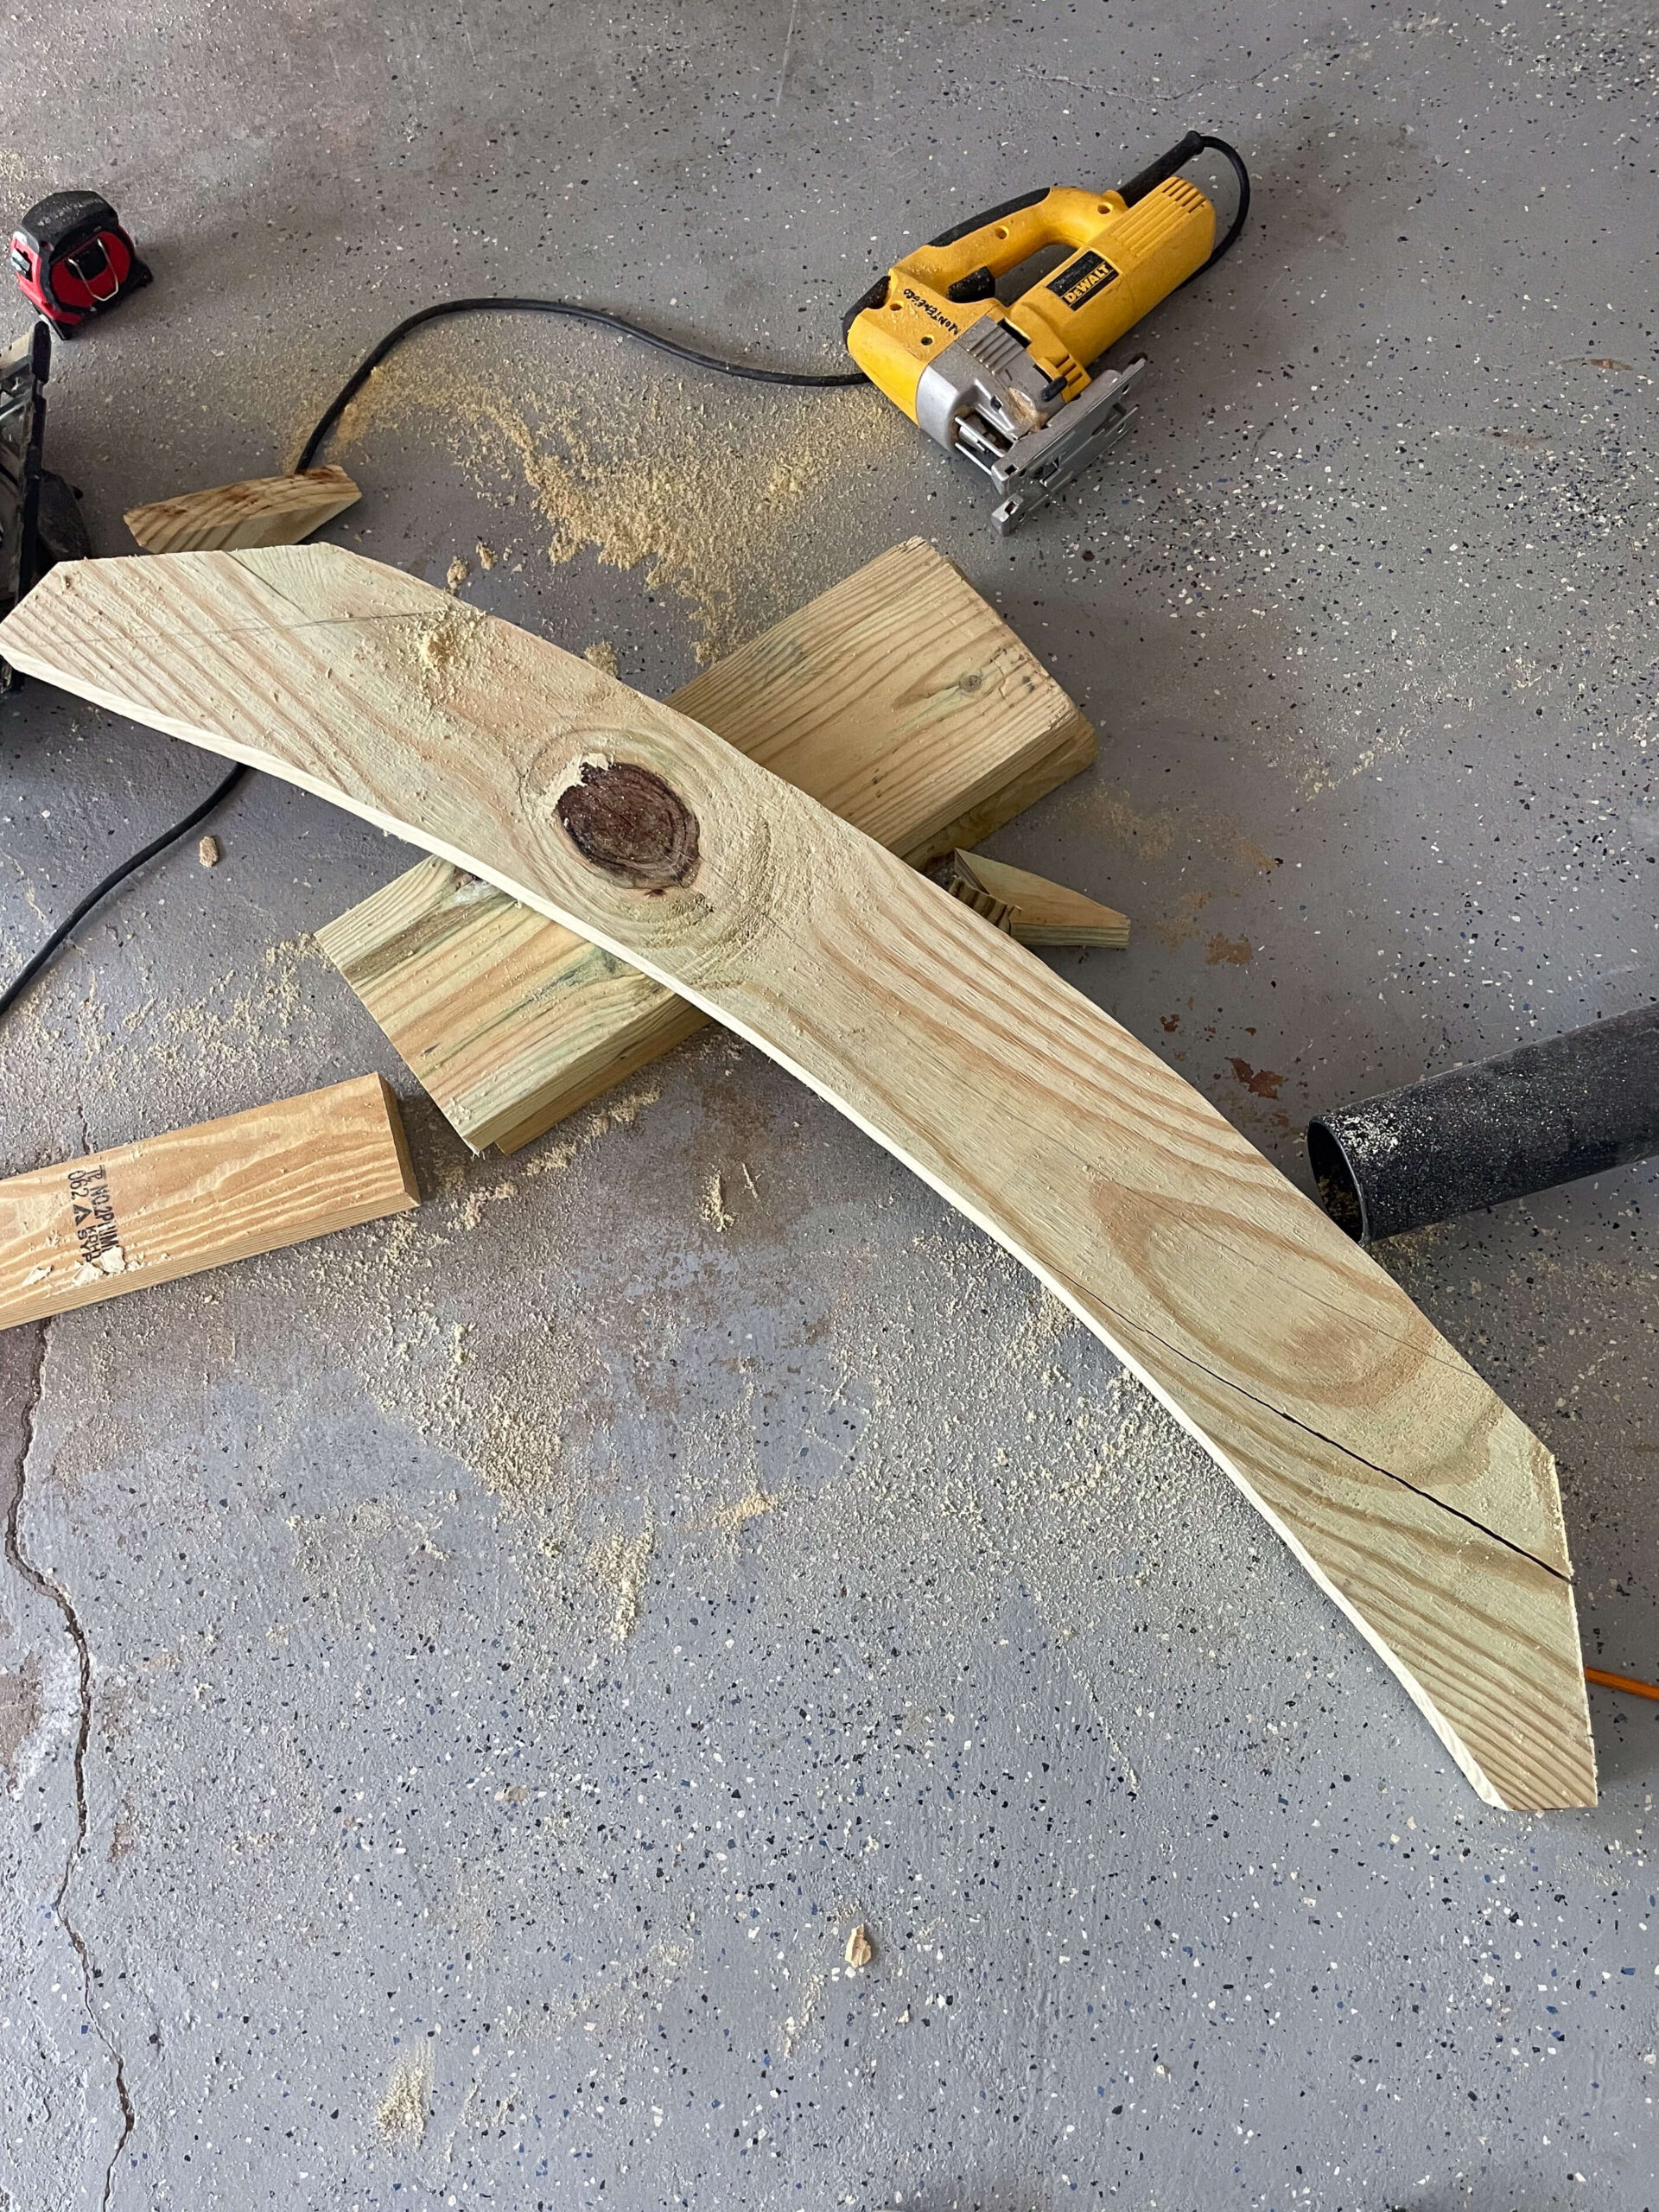
Making the Arch Details
To create the arch details for my backyard hammock stand, I am starting with a 2×12.
First step is two cut a piece of the 2×12 at a length of 4 feet, then mark the center. Place a 2×4 in the center of the 2×12 making it look like a giant letter “T”.

Next, I added a screw at the bottom end of the 2×4, leaving it poking up enough out of the wood that I could tie a piece of string to it.


Unroll the string just enough that it is the perfect length for a pencil to meet the lower corner of your piece of wood. Hold the string at that length, and draw an arch over towards the lower corner on the other side.


Now that I had the lower edge of my arch drawn, I need the upper edge.
I measured up 7 inches from the lower corner on both edges of my piece, then unrolled my string a little more so that my pencil could meet that mark I had just made. Keeping my string held tight at that length, I used the pencil and the string to mark the top edge of my arch.


Once again I am using the jig saw. It’s the perfect tool for cutting out small details, or rounded edges like on these arches.
Pro Tip: The saw dust being made as you cut gets in the way. I set up my leaf blower so that it blew away as the jig saw cut. A helper with a shop vacuum would also work great. Otherwise you will have to keep stopping and blowing in order to see your cut line.


Now that my arches were cut out, I had to dry fit them on my backyard hammock stand frame to see how many edges I would need to cut off and at what angle. This part is more easily done with two people. Place your arch against your frame, and then use a pencil to mark where the arch piece overlaps with the frame.

For the lower side of my arch (pictured below on the left) I am just cutting right along that pencil line so it sits flush against the vertical posts. I am also going to square off the bottom so it doesn’t have that point left over.
For the upper end of my arch (pictured below on the right) I am going to attach it with screws to the back of one of the cross beams so I am going to cut it off a couple of inches above the line that I marked that way when I line it up with the cross beam, I still have some overlap to attach it.


And here is what it looks like when it’s all cut out. Again, my jig saw was the perfect tool for making these cuts.
For the top side of my arch, I’m attaching it straight to the backside of the cross beam with screws. For the lower edge of the arch, I’m lining it up flush with the front of the side post, then using a few pocket holes, I screwed it right to the post.
If you do not have a pocket hole jig for making pocket holes, you could also use a couple of the same small brackets that we used for attaching the cross braces. Just use the brackets on the backside where they won’t be as visible.


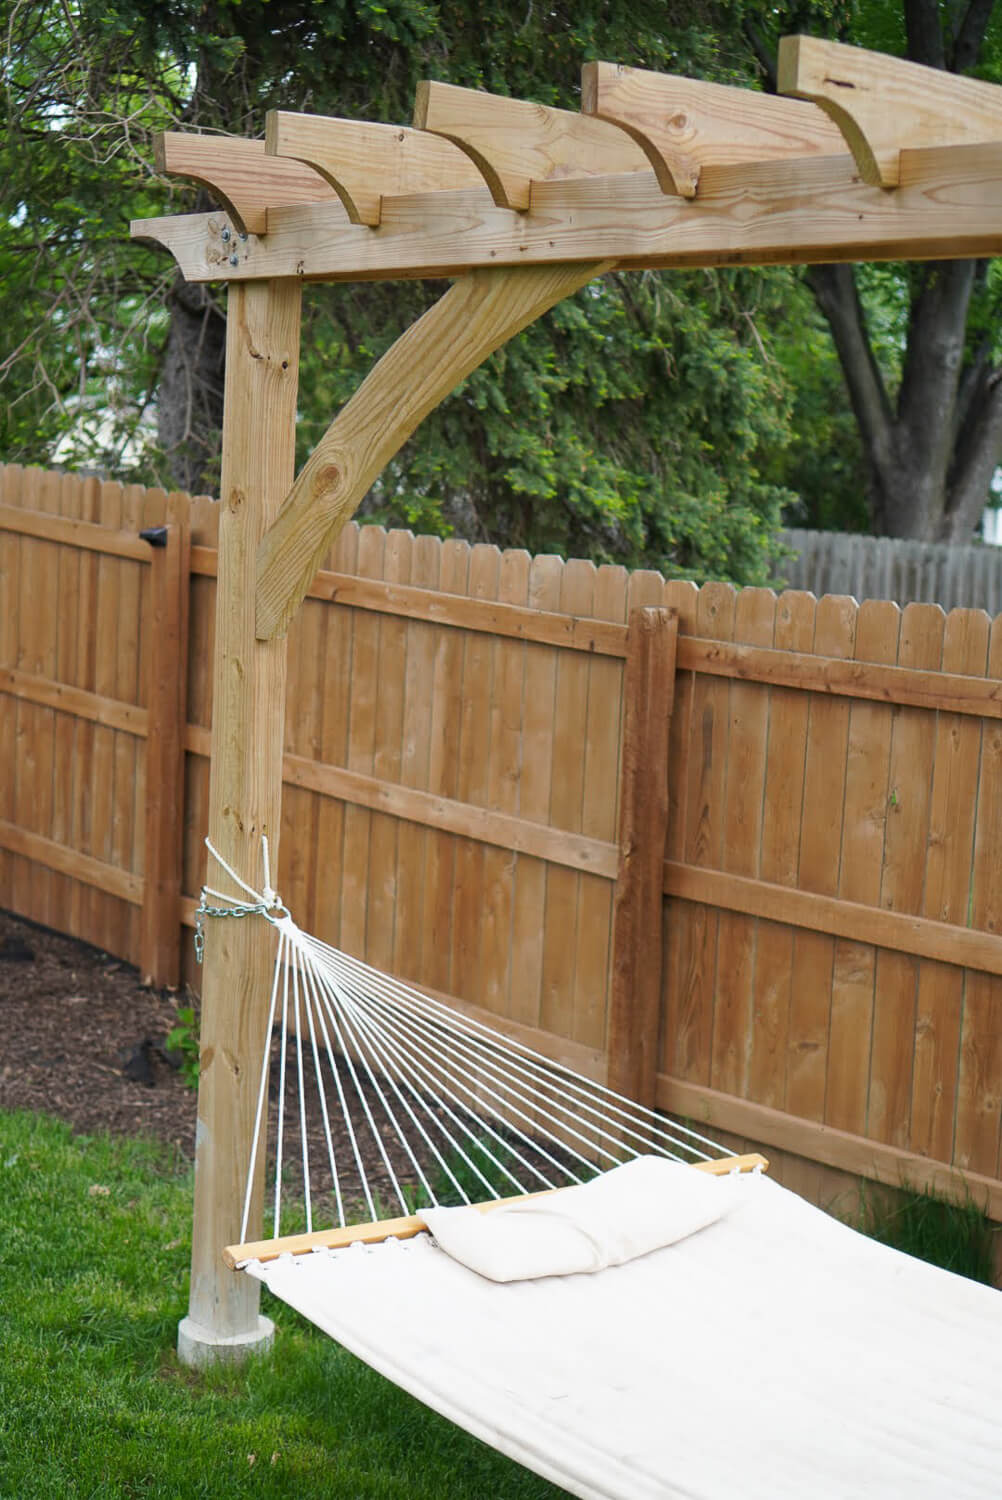
Adding the Finishing Touches
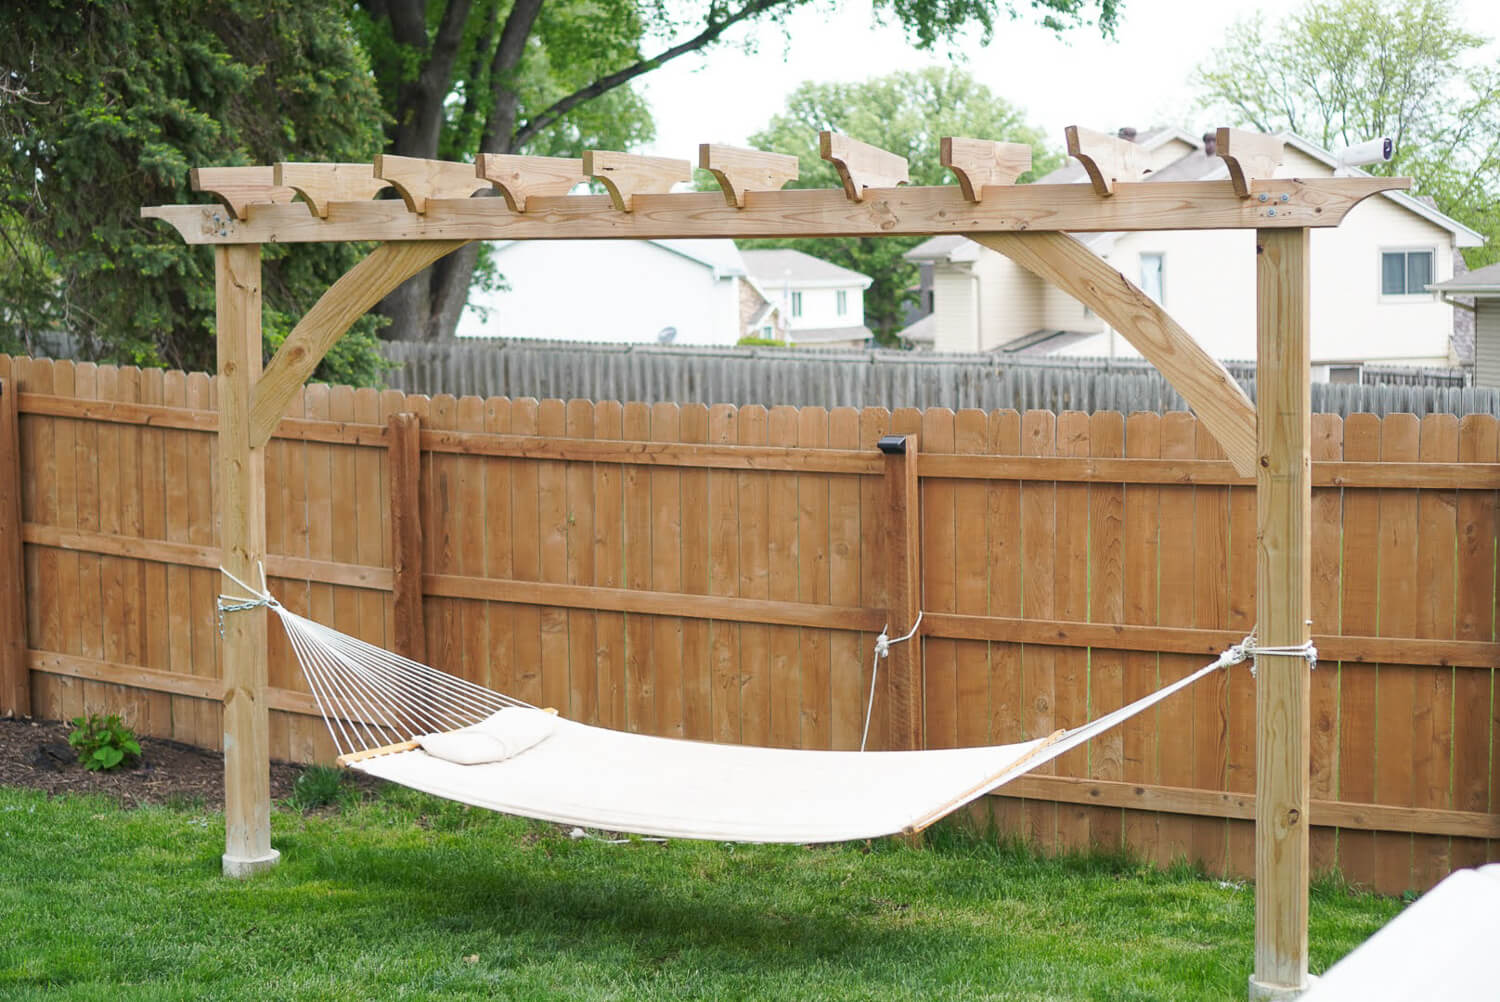
Look how beautiful it is. The arch details do help hold the frame and give it some structural support, but they also are just pretty.
Now that the building of my backyard hammock stand is done, it is time for all the finishing details. The cardboard tubing surrounding the post can be torn off, and the holes backfilled with dirt. Eventually I would love to plant something pretty to climb the edge of my backyard hammock stand. If you have ideas of what I should plant, be sure to let me know in the comments.


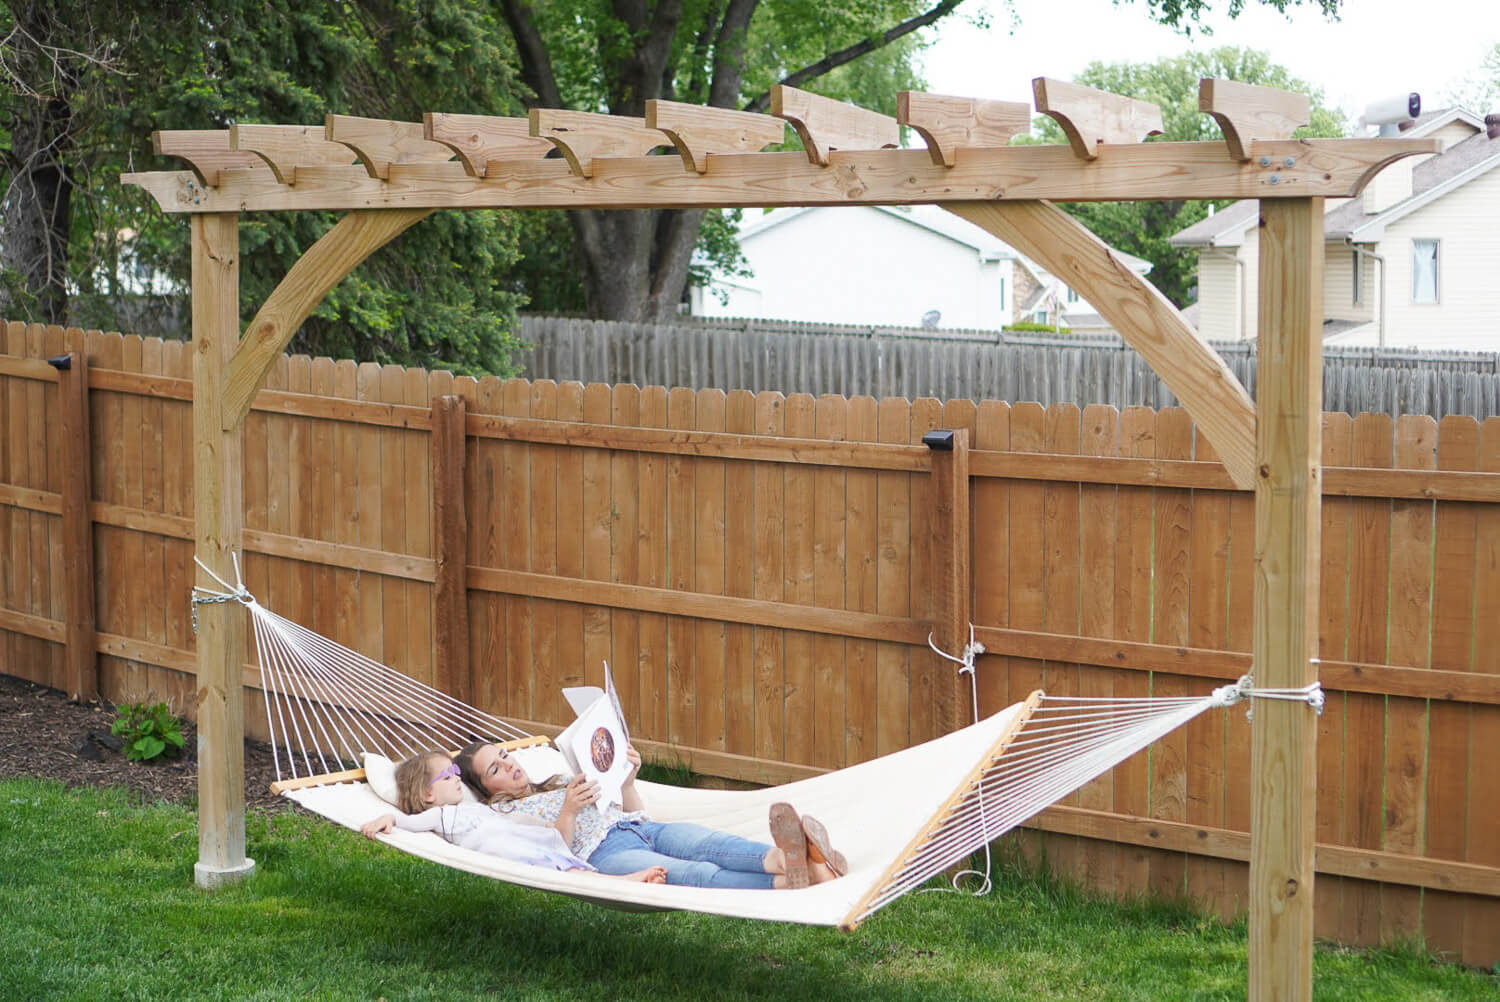
To add the hooks for your hammock, just drill a small pilot hole that is smaller than the threaded part of the hook that you are going to use. Then twist the hook into the hole. A regular pair of pliers can be used for holding the hook while you twist, but a pair of locking pliers will make it a breeze.

Once your hook is on, it’s time to hang the hammock. I chose this gorgeous one, and I am so happy with how beautiful and comfortable it is.

Last step before relaxing in this beauty is treating it with Scotchguard. Follow the instructions on the can, but it’s very easy to spray on to help keep your hammock looking beautiful.


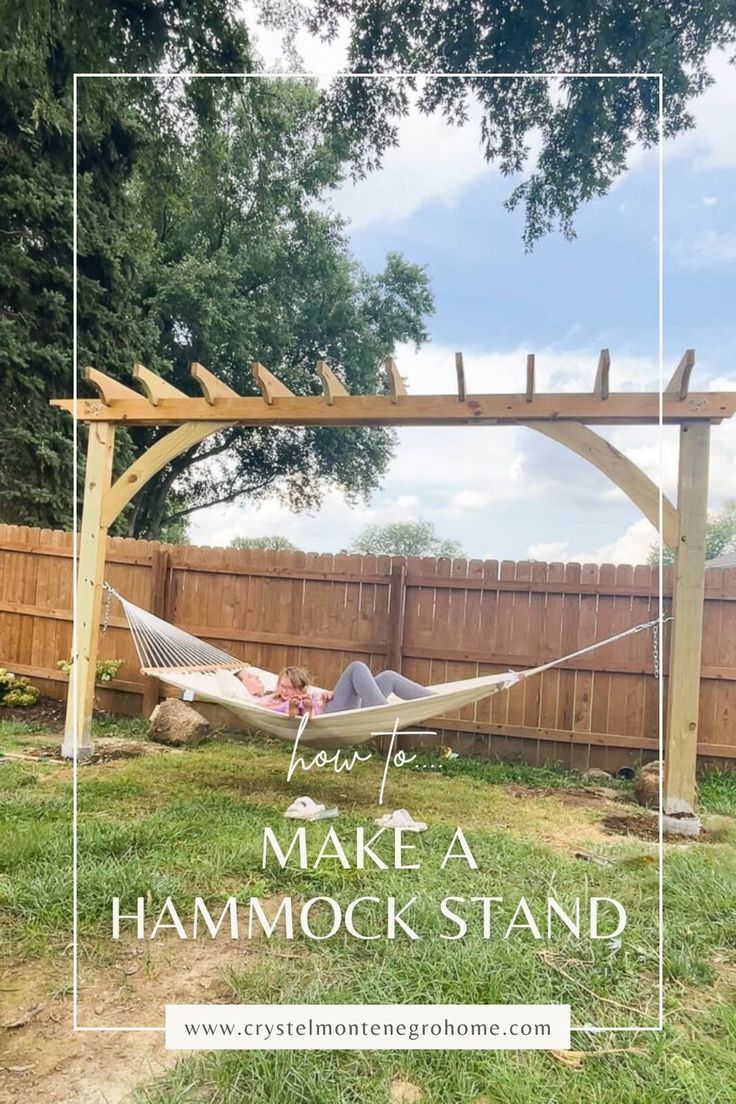
And that’s it. The backyard hammock stand is ready for all kinds of swinging. My girls love playing on it, and I love how beautiful it looks in our yard.
I will go back and add the same Behr Waterproofing Stain and Sealer that I did on the garden arbor that I built, but I have to wait about 30 days for the pressure treated lumber on this backyard hammock stand to dry out before applying any sealer to it. For now, we will just swing and enjoy!
How much did this project cost?
It cost about $150
The lumber you used in this project looks like
Doug Fir not Pressure Treated? Can you tell me specifically what kind of lumber you used?
Thank you!
I for sure used pressure treated 🙂