

Updated August 7, 2025
When I decided to update my bedroom, I had my eye on a gorgeous cane bed frame – but the price tag was way too high. Like any good DIYer, I looked at my phone screen and thought, “I can make that!” And that’s exactly what I did.
If you’ve been dreaming of a cane bed frame but don’t want to spend a fortune, follow along as I break down how I built my own for a fraction of the cost. From making my own 2x2s to assembling the final bed frame, I’m covering every step so you can build one too!
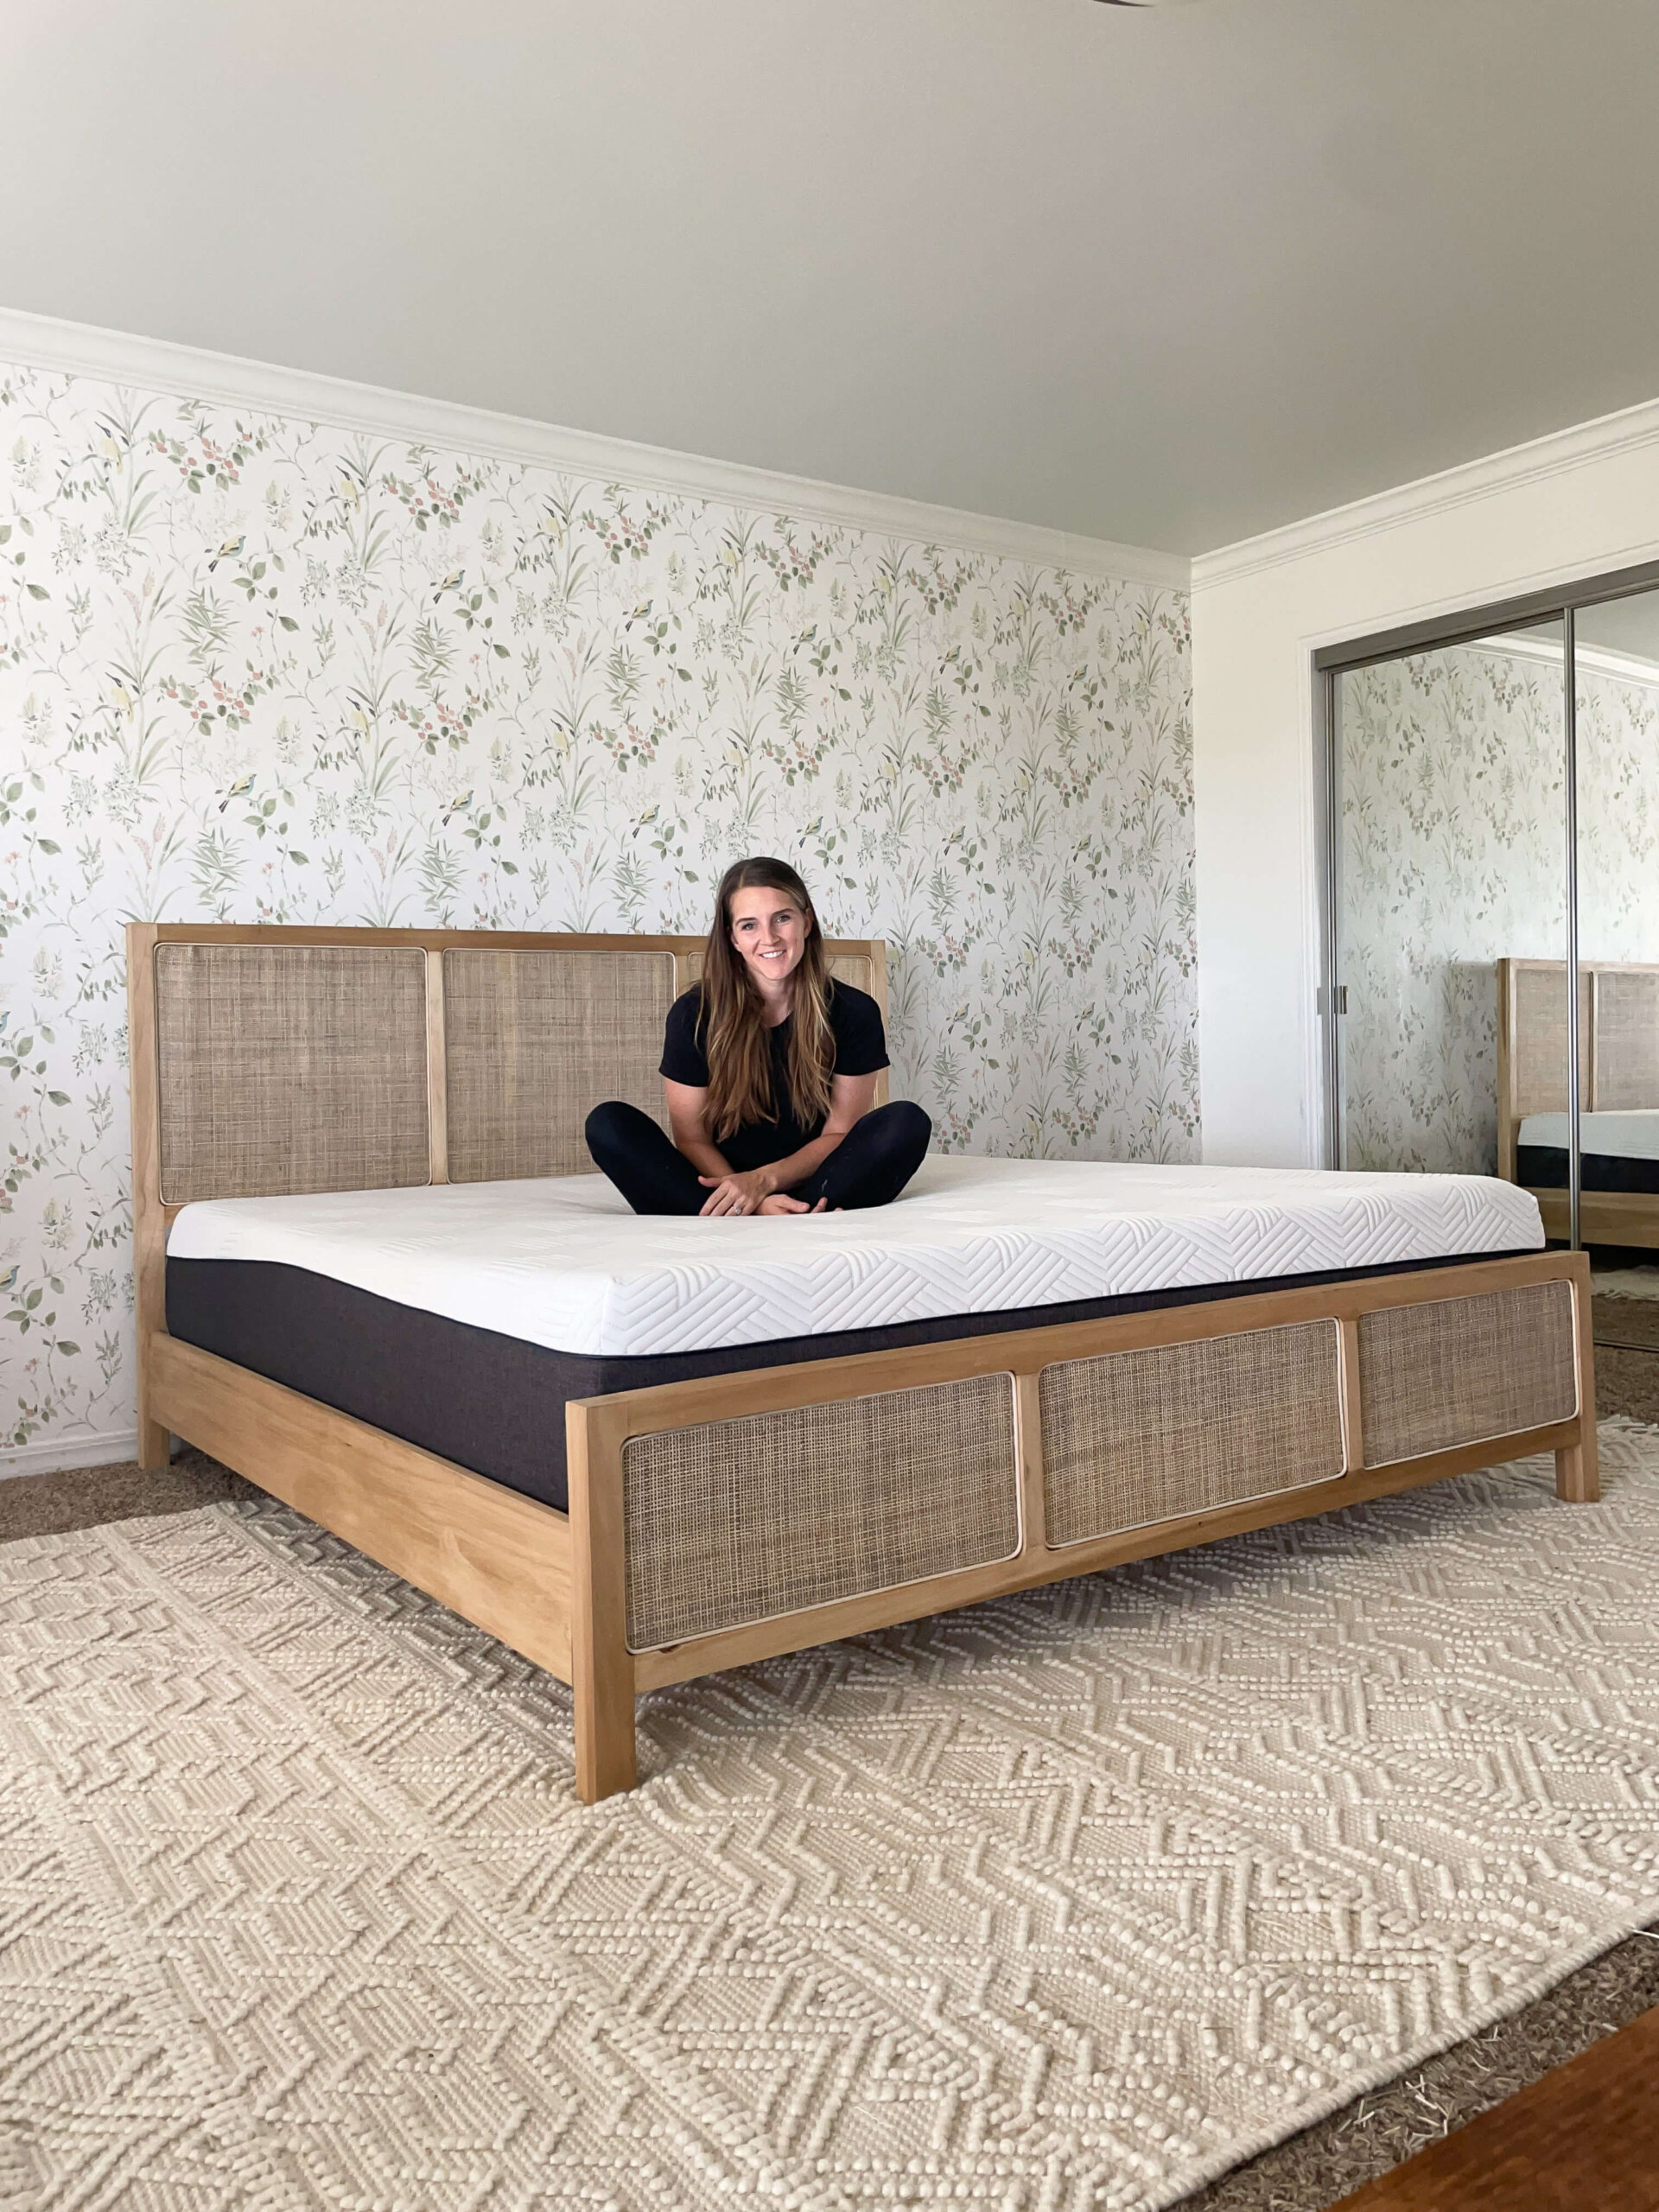
Table of Contents
- Tools I Used to Build a Cane Bed
- Materials for Building a DIY Cane Bed Frame
- Watch the DIY Cane Bed Frame Build in Action!
- How I Made True 2×2 Boards for My DIY Cane Bed Frame
- Step-by-Step: Building the Cane Bed Footboard
- How to Build the Headboard for a Cane Bed Frame
- Routing a Groove to Inset Cane Webbing
- How I Stained and Sealed the Bed Frame
- Soaking and Installing Cane Webbing on a DIY Bed Frame
- Tips to Prevent Cane Webbing from Coming Loose
- How to Build a Strong Mattress Support System
- Assembling the Mattress Support to the Bed Frame
- Final Assembly: Bringing the Cane Bed Frame Together
- My Finished Cane Bed Frame: Modern and Budget-Friendly
- 📌 Save This Project for Later
- Frequently Asked Questions About Building a Cane Bed Frame
Tools I Used to Build a Cane Bed
- Clamps
- Table saw
- Planer
- Handheld sander
- Miter saw
- Drill
- Pocket hole jig
- Router
- Stapler
- Utility knife
Materials for Building a DIY Cane Bed Frame
- 1x3x8 poplar boards
- Wood glue
- 1/4 inch dowel or dowel pins
- Wood screws
- 1x10x8 poplar boards
- Wood stain
- Polycrylic
- Cane webbing
- 2×3’s
Watch the DIY Cane Bed Frame Build in Action!
Want to see this DIY bed frame with cane webbing come together step by step? Watch this quick YouTube Short for a behind-the-scenes look at the entire build. Hit play below!
How I Made True 2×2 Boards for My DIY Cane Bed Frame
Did you know 2×2 boards aren’t actually 2 inches by 2 inches? They’re 1 1/2 inches by 1 1/2 inches! Since I wanted my cane bed frame to have a true 2×2 frame, I made my own boards by gluing three 1×3 poplar boards together and clamping them tightly.


After 24 hours, I ran the boards through the table saw to get close to the right size, then used a planer and handheld sander to smooth everything out. This gave me the custom, solid wood look I wanted for my DIY cane bed frame.


Step-by-Step: Building the Cane Bed Footboard
I started my cane bed frame build with the footboard. Using a miter saw, I cut the boards into the lengths I needed:
- 2 horizontal pieces
- 2 vertical pieces
- 2 edge pieces
For a seamless look, I used invisible dowel joints to assemble the footboard. Here’s how:
- Drill matching holes in both the vertical and horizontal pieces.
- Add wood glue to the holes.
- Insert dowel pins (or trim a dowel to size if making your own).


For the footboard edges, I used pocket holes to attach them securely. Since the pocket holes are hidden on the underside, I didn’t mind them being slightly visible. (You can always fill and sand them if you prefer a completely smooth finish!)


DIY Confession: After finishing the footboard, I realized the backside would be hidden by the mattress – oops! If I built this cane bed frame again, I’d probably just use pocket holes for everything instead of dowel joints. But hey, lesson learned, and it still looks great!
How to Build the Headboard for a Cane Bed Frame
Next up: the headboard. Since this part of the cane bed frame would be against the wall, I opted for pocket hole joinery instead of dowels. This made assembly faster and easier, plus the joints are super strong when combined with wood glue.


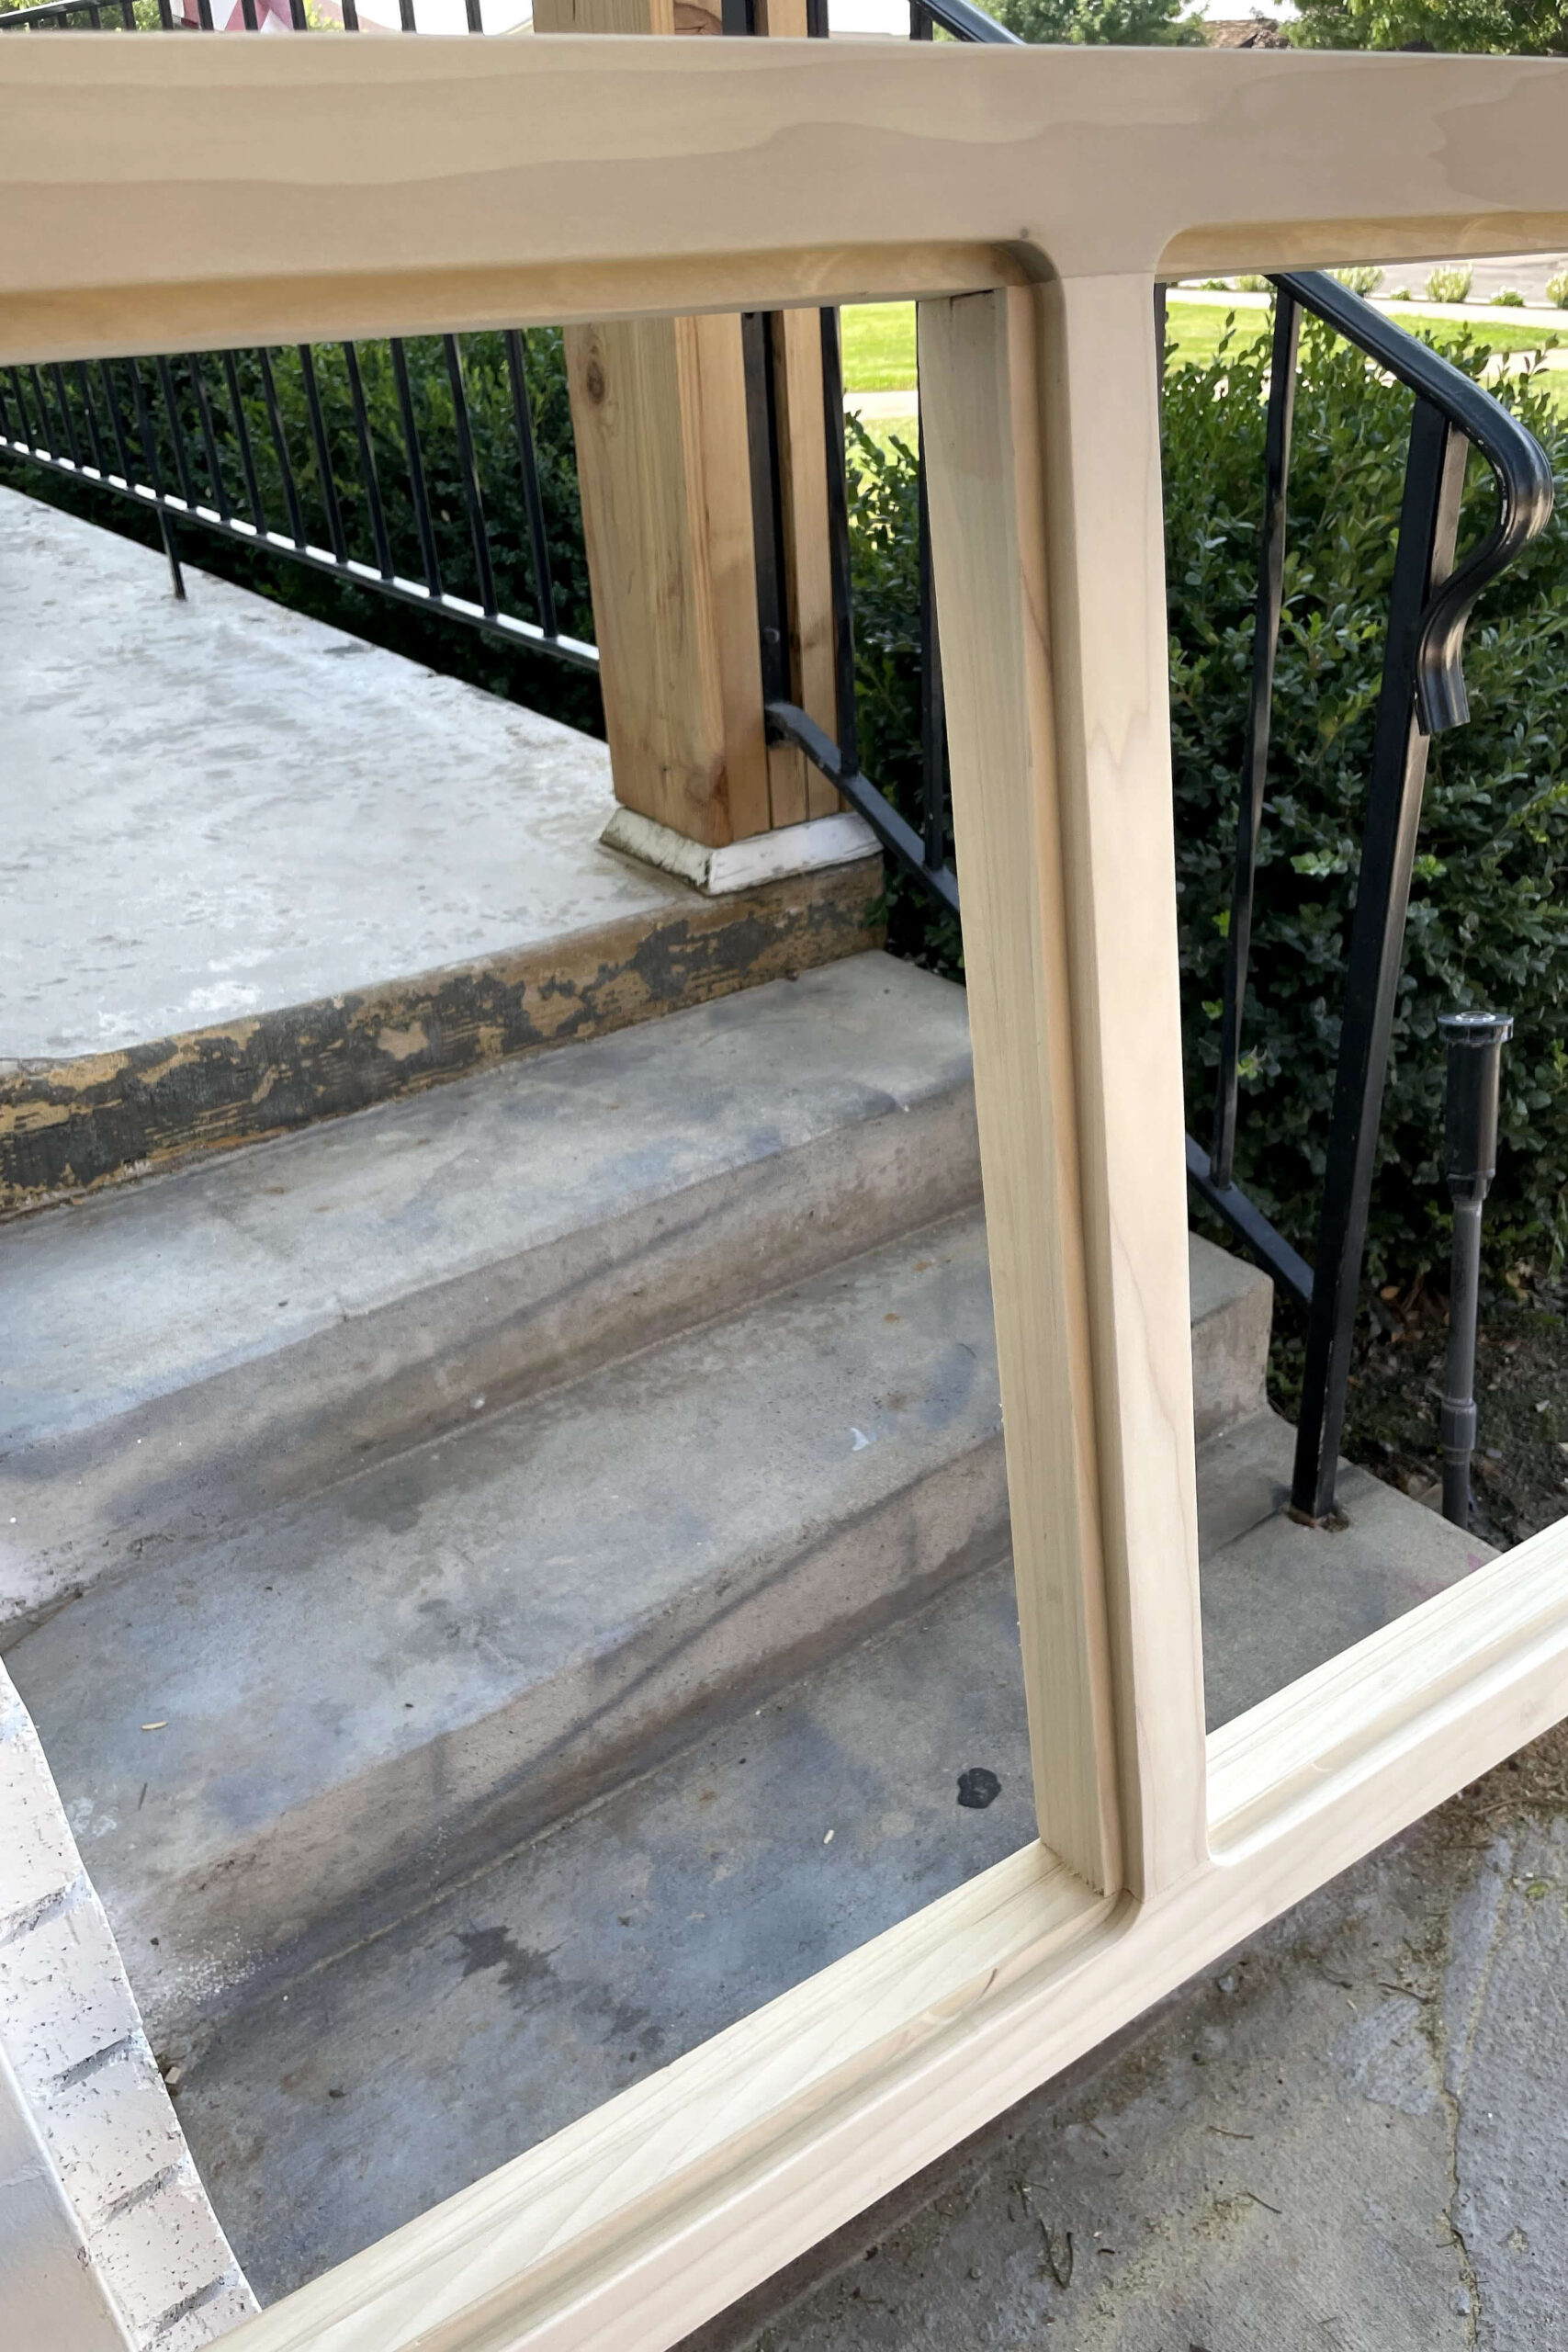
Routing a Groove to Inset Cane Webbing
Once the footboard and headboard were built, it was time to prep for the cane webbing. You can decide whether you want the cane paneling on the front or back, but I chose the front-facing side for a clean and modern look.
To inset the cane webbing, I used a router to create a shallow groove along the edges of both the headboard and footboard. This groove holds the cane securely and gives the bed frame a high-end, custom look.

How I Stained and Sealed the Bed Frame
Next, I sanded and stained all the pieces, including the side rails, which I made from poplar 1x10s.
For the stain color, I mixed:
- ½ tablespoon of Minwax Early American stain
- ¼ cup of Polycrylic
This lightens the color while sealing the wood at the same time – a technique I’ve used on other DIY projects, like my staircase makeover.
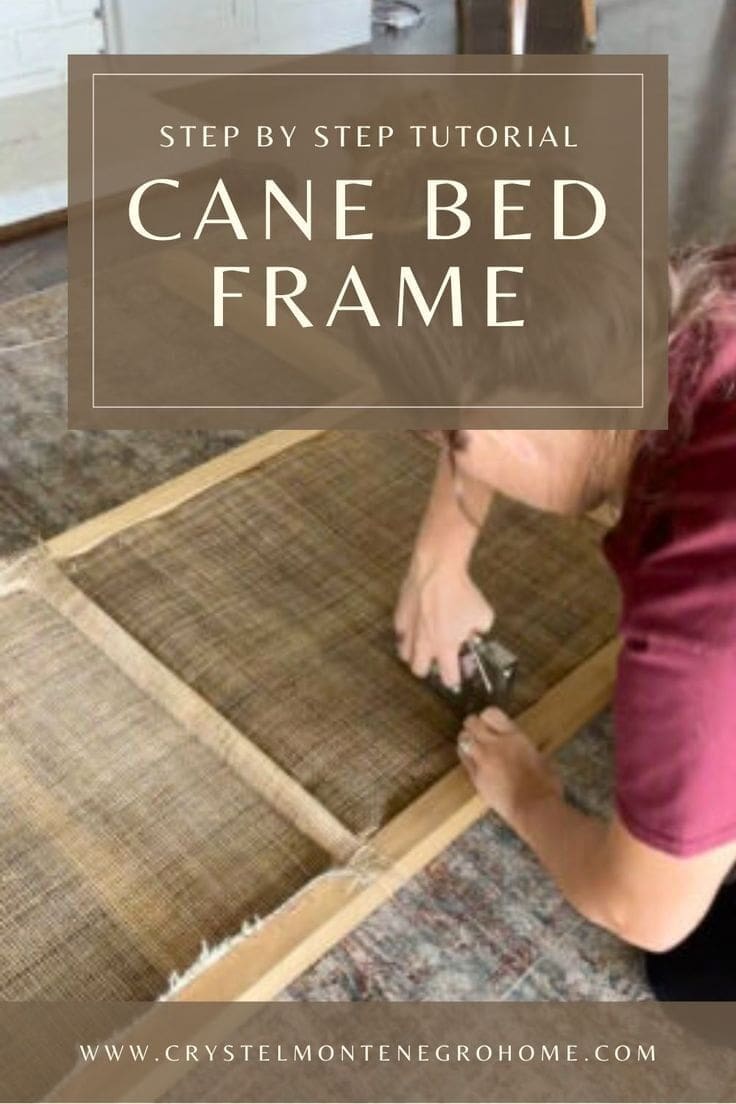
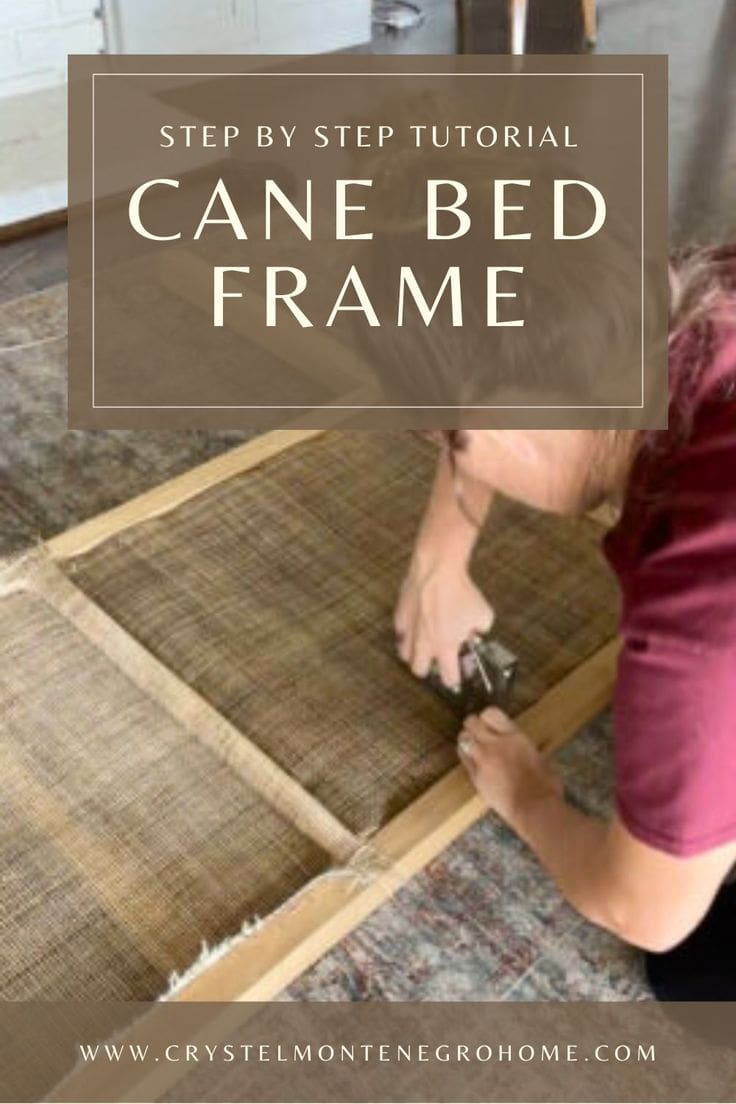
Soaking and Installing Cane Webbing on a DIY Bed Frame
Before installing the cane webbing, I soaked it in water for 30 minutes to make it more flexible. The easiest way? Drop the whole roll into the bathtub and let it sit!
Once soaked, I stretched the cane tightly across the grooves and secured it using staples. As the cane webbing dries, it naturally shrinks and tightens up, making it extra secure. Any excess can be cut off with a utility knife.


Tips to Prevent Cane Webbing from Coming Loose
I was worried the cane webbing might loosen over time, so I tried folding the edges under before stapling. This was tricky, but for the headboard, it was worth the extra effort (since I’ll be leaning against it). For the footboard, I skipped this step since it wasn’t necessary.


To finish the cane panels, I added trim to cover the staples and give it a polished look. Soaking the trim in warm water made it more pliable before gluing and stapling it into place.


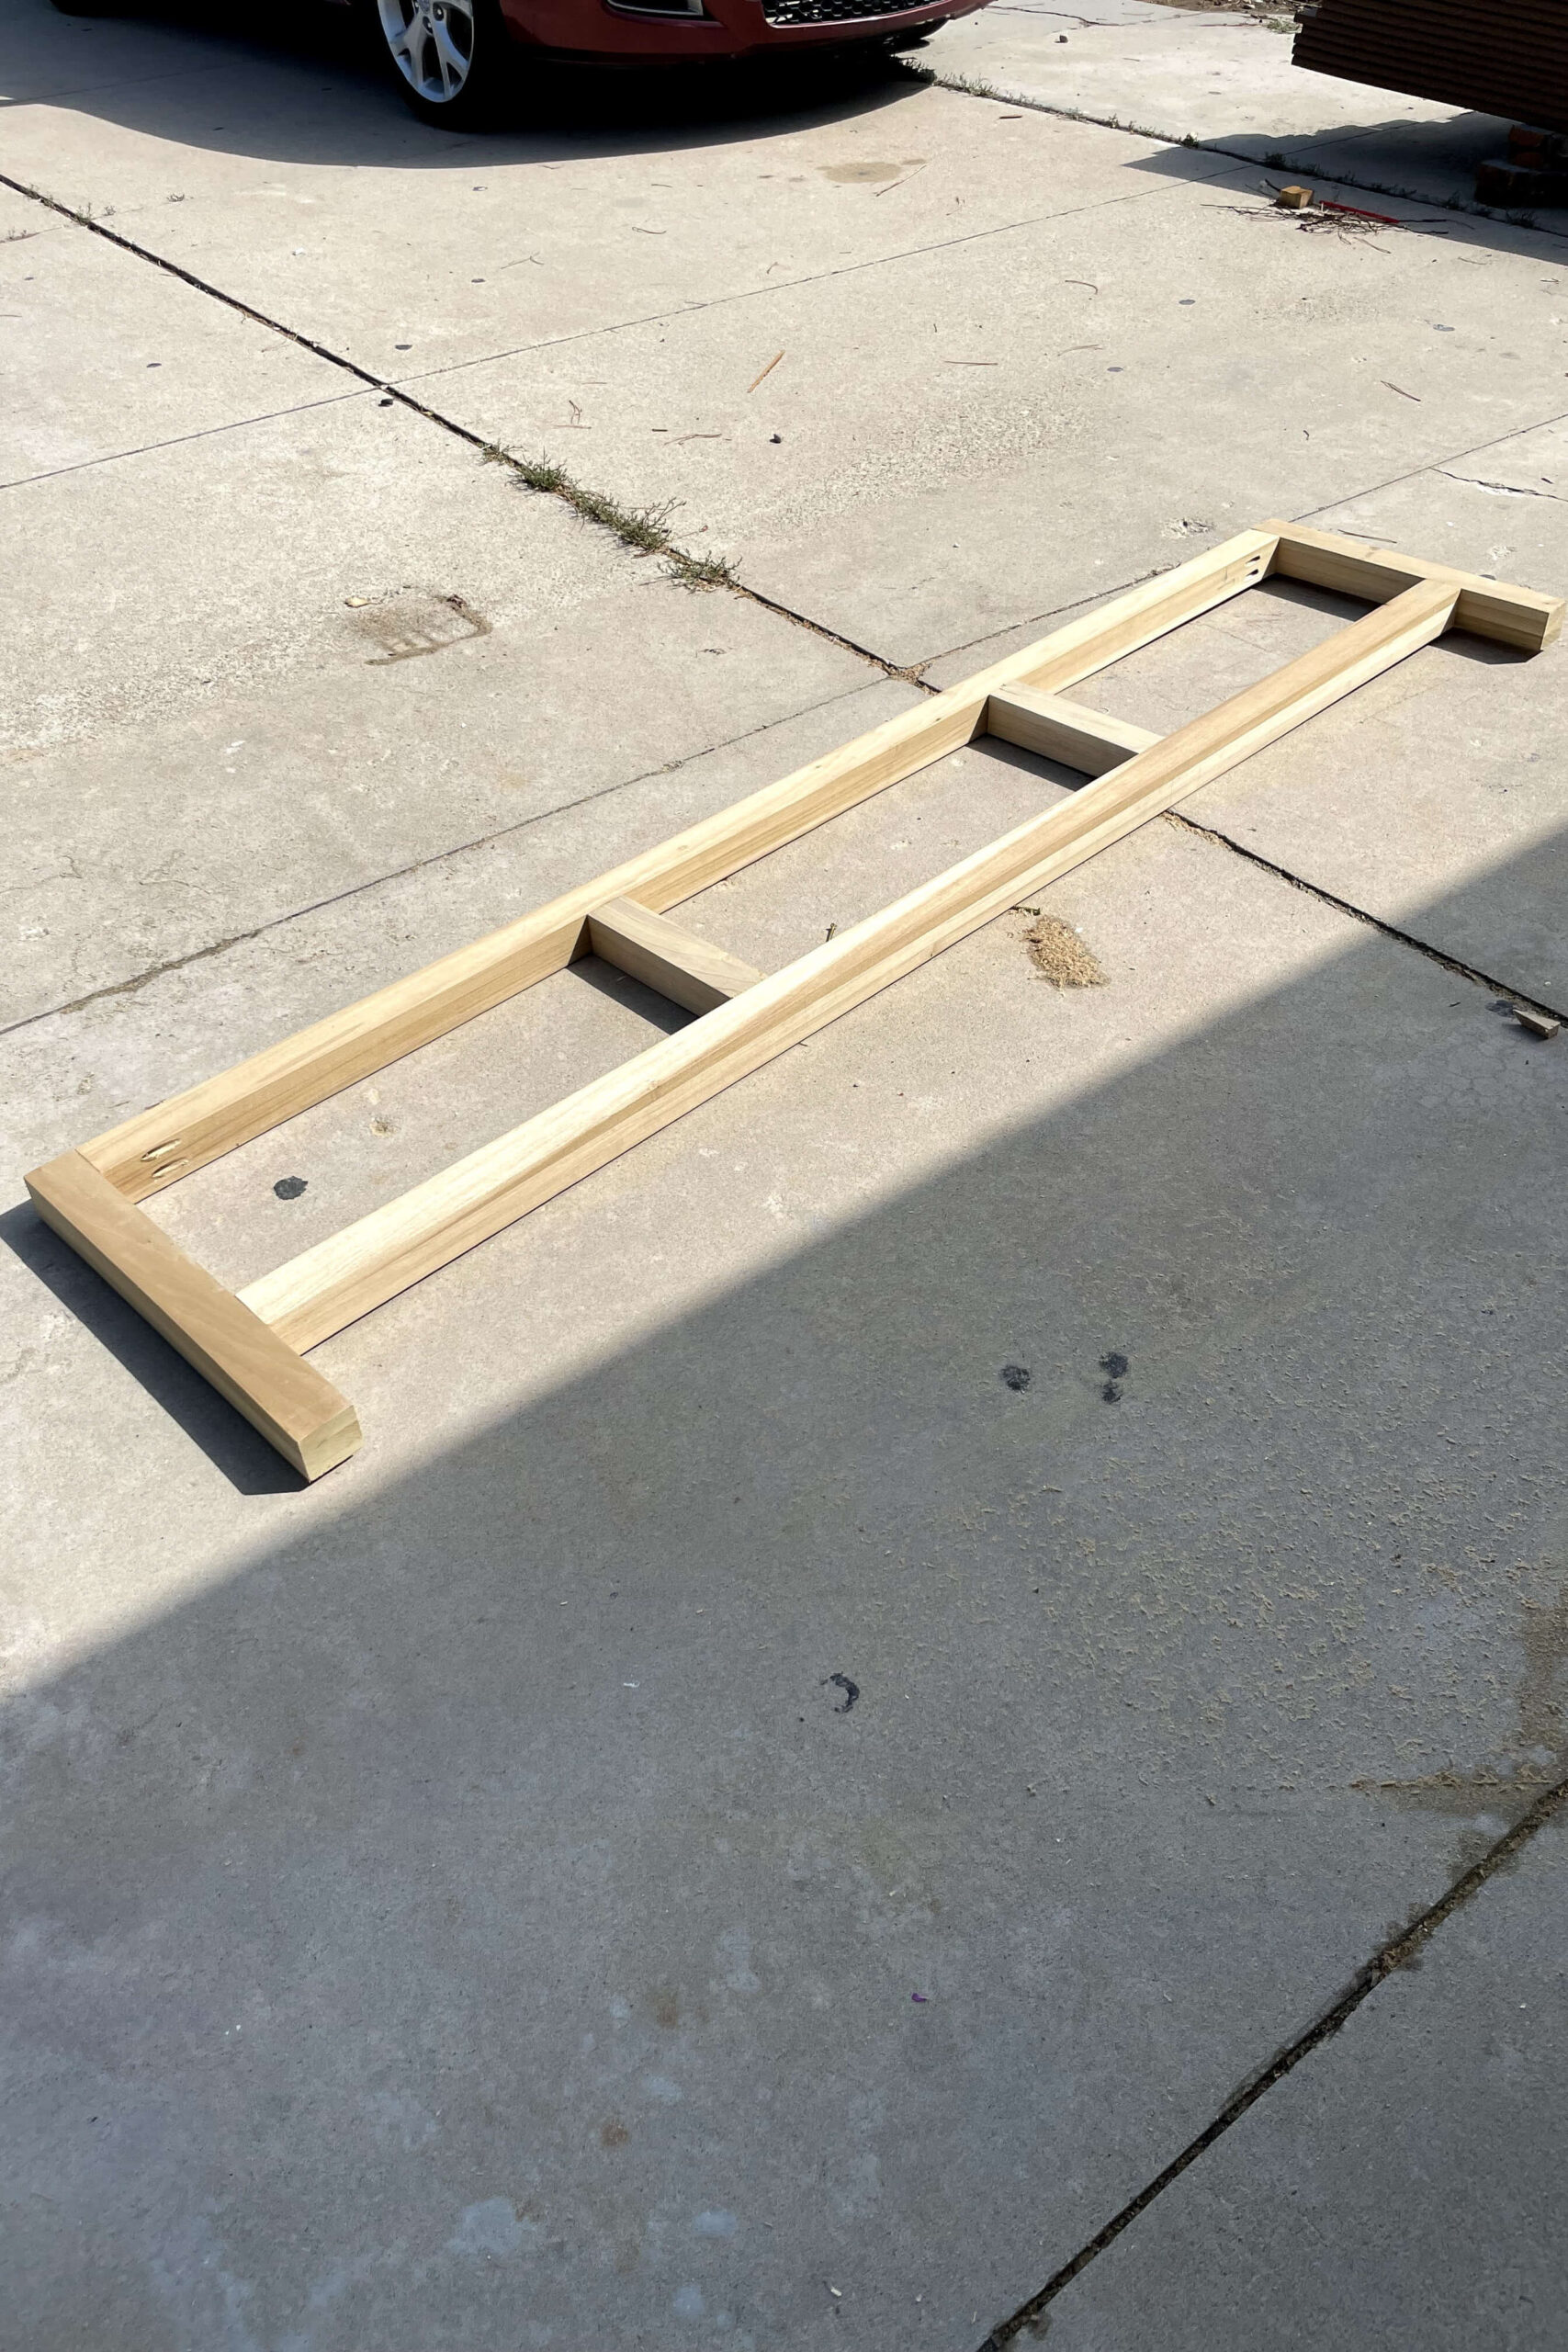
How to Build a Strong Mattress Support System
For the mattress support, I built a simple frame from 2x3s, adding cross beams for stability. This step is totally customizable depending on the size of your mattress.
Since I wanted my cane bed frame to be sturdy and long-lasting, I made sure to use plenty of wood glue along with screws for extra durability.


Assembling the Mattress Support to the Bed Frame
Once that was done, it was finally time to assemble this cane bed frame. I attached my mattress support piece to the back of the footboard and the legs of the headboard using screws and wood glue.
Finally, I attached the side rails slightly higher than the bottom mattress support piece, to create a lip that would keep the mattress in place.


Final Assembly: Bringing the Cane Bed Frame Together
Now for the exciting part – putting it all together!
- I attached the mattress support
- I secured the mattress support frame to the back of the footboard and the legs of the headboard using screws and wood glue.
- I installed the side rails
- The side rails were attached slightly higher than the mattress support, creating a small lip to keep the mattress from sliding around.
My Finished Cane Bed Frame: Modern and Budget-Friendly
And that’s it! My cane bed frame was finally assembled. It looks amazing and really gives my bedroom the perfect modern, yet timeless, vibe. I’m so proud of how it turned out!
It gives my bedroom a modern, yet timeless vibe, and I couldn’t be happier with how it turned out. The best part? I built this entire cane bed frame for a fraction of the cost of store-bought versions.
If you’ve been thinking about building your own bed, I highly recommend giving this a try. Drop any questions in the comments – I’d love to hear your thoughts!
If you’re interested in building more furniture, check out my post on how I made this modern farmhouse-style dining table!
📌 Save This Project for Later
Frequently Asked Questions About Building a Cane Bed Frame
Not at all! With basic woodworking skills, a miter saw, pocket hole jig, and router, you can build a beautiful cane bed frame in a weekend.
You can buy cane webbing online at retailers like Amazon, Etsy, and specialty woodworking stores. Make sure to measure your panels before ordering!
Poplar is a great choice for a lightweight yet durable bed frame. If you want a more rustic look, try oak or maple.
Yes, but staining cane can be tricky. It absorbs stain differently than wood, so a light wash with diluted stain works best.

Love this!! Where do you get your poplar from?
Home Depot or Lowes. The only 2 stores I shop at 🙂