How To Build Office Cabinets Part 1


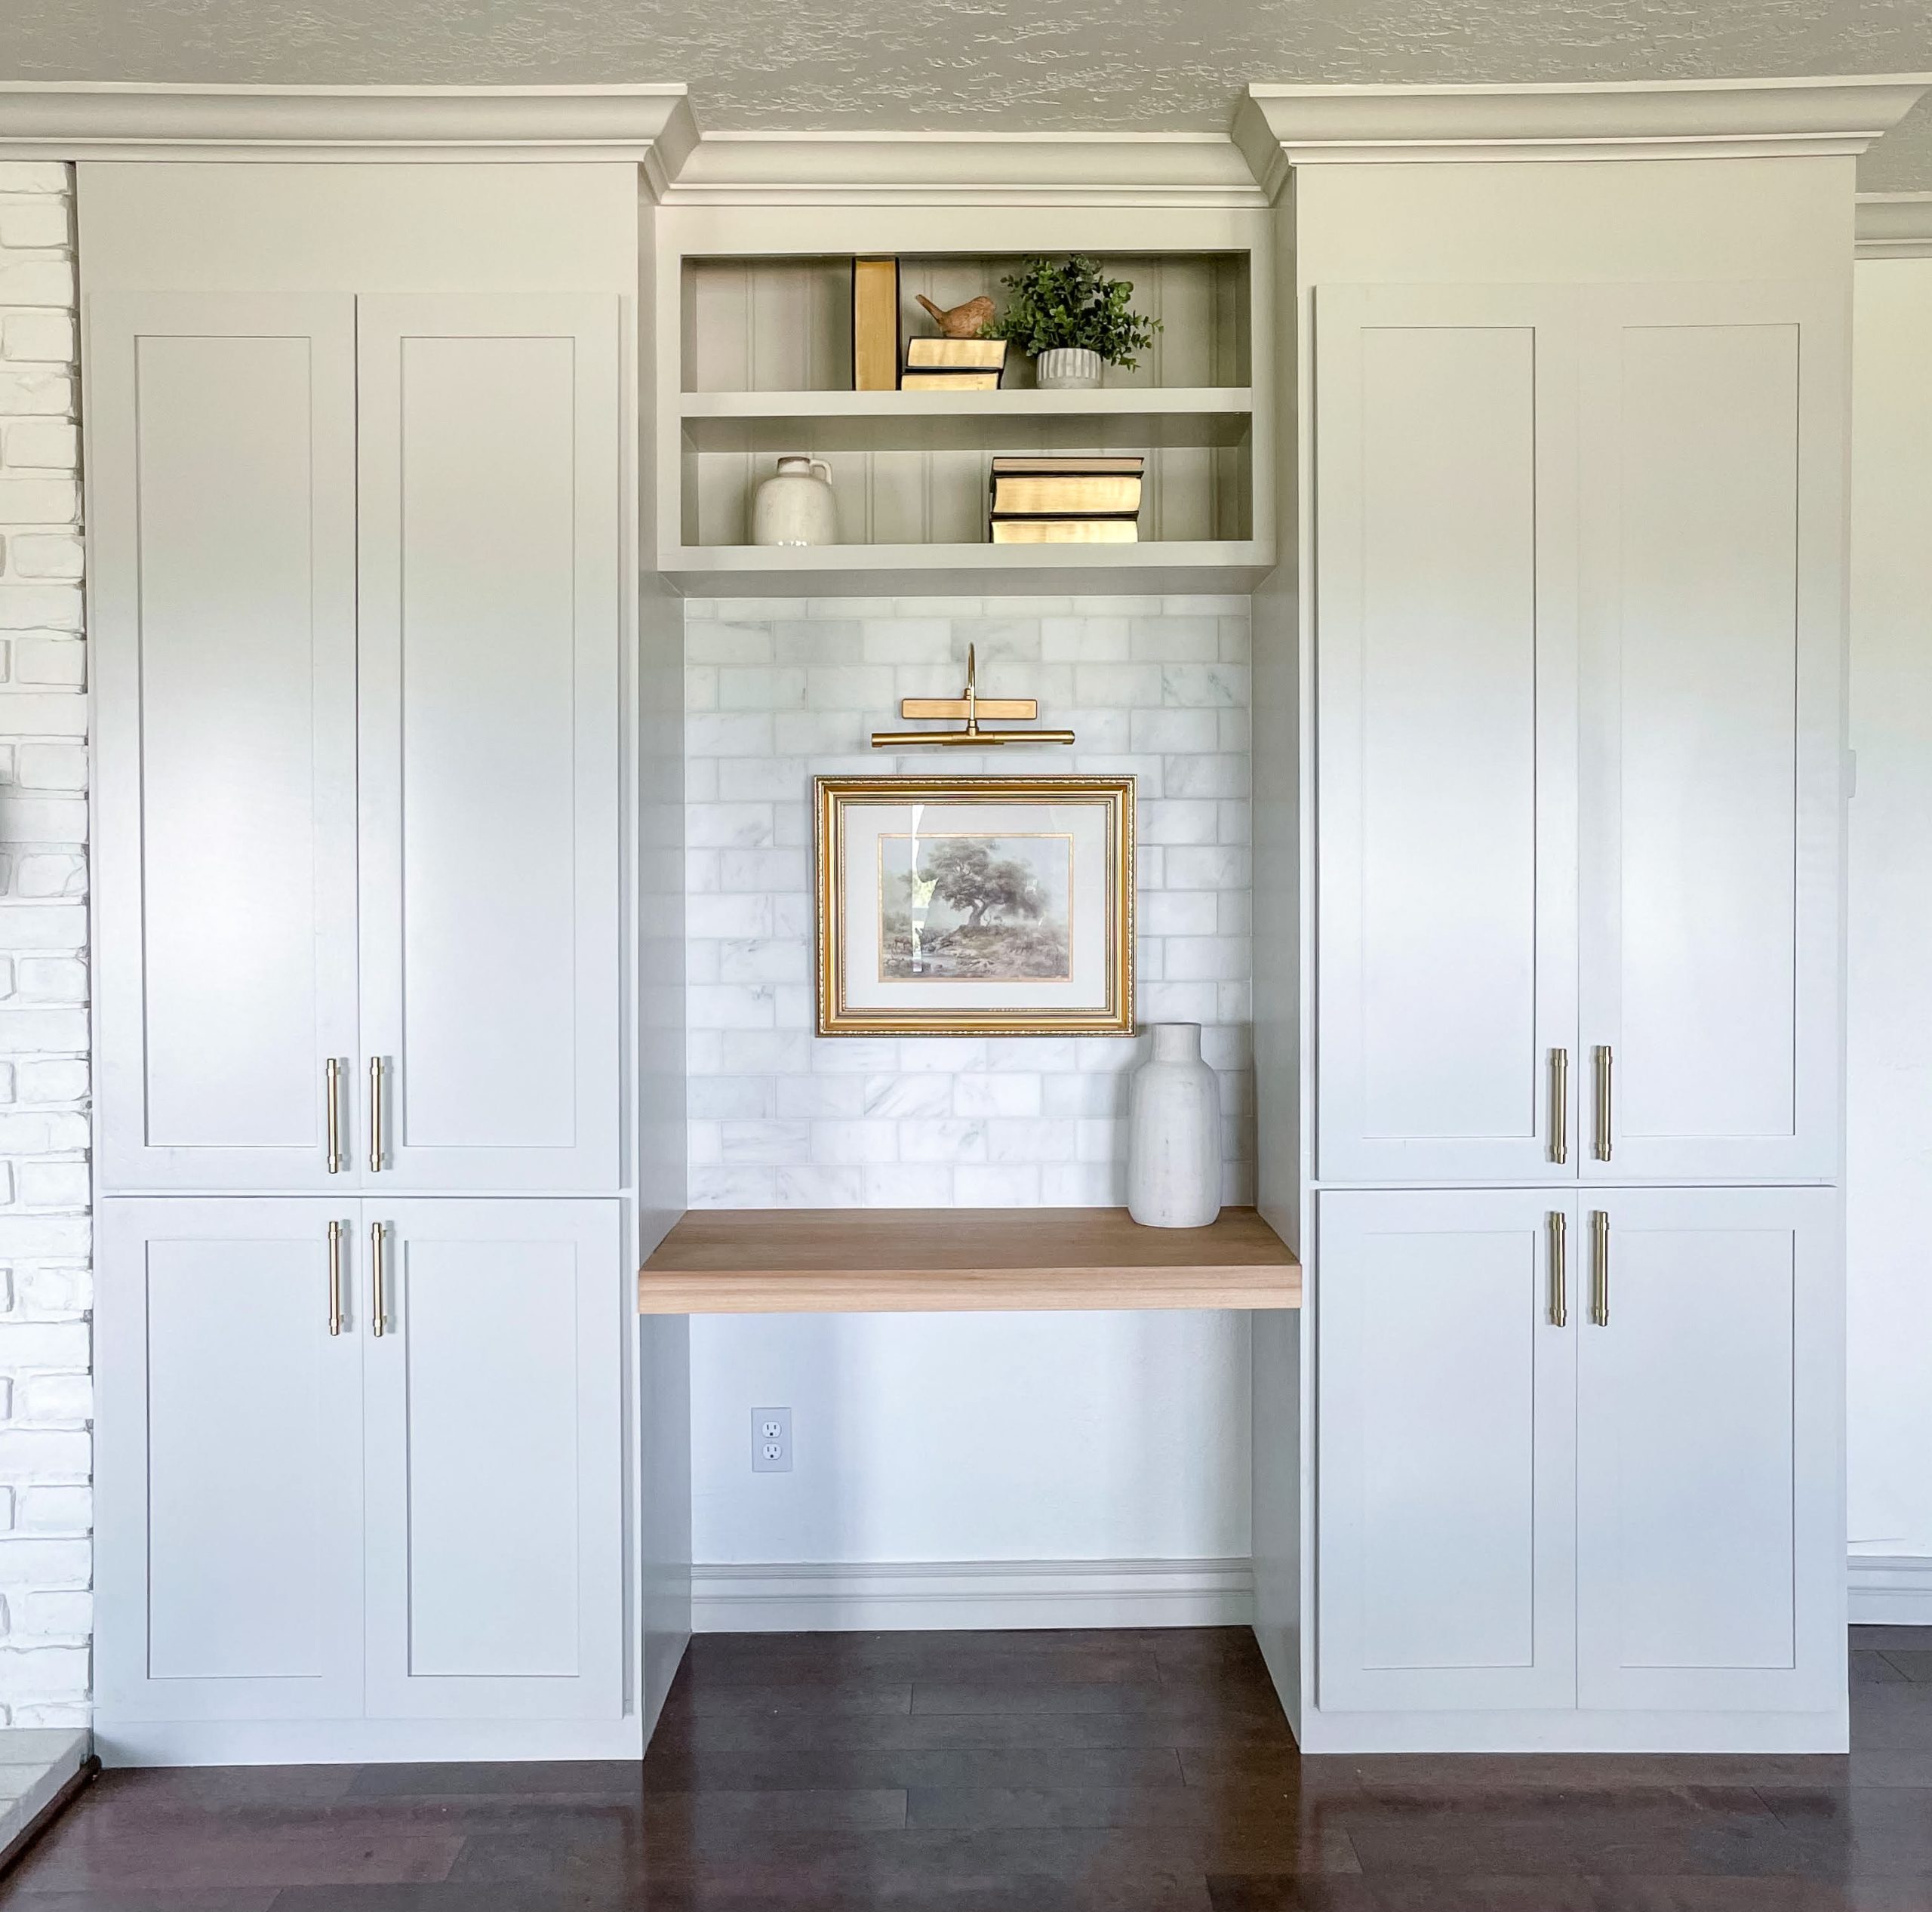
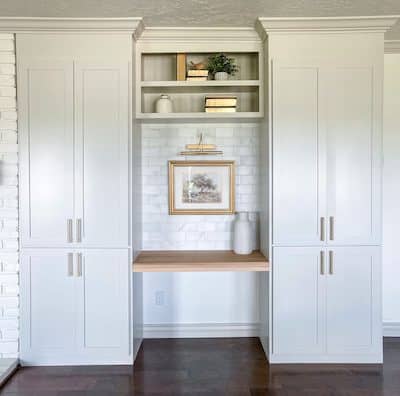
Life as a stay-at-home-working Mom to 3 young littles means that having an entire room dedicated to a home office just isn’t practical. Why devote an entire room to paper products and 11 half used Scotch Tape dispensers? With my kids, when I need to work, holing up in another room isn’t an option. However, those paper products need somewhere to go, right? My solution was to design my own office. Specifically, a built-in cabinet with doors to hide all those tape dispensers, including a desk for my girls to sit at while they tape all the things… and for me to get a little work done too I guess. The design needed to check-off some important boxes: be functional AND beautiful. Done and Done. Keep reading to see how to build office cabinets.
**This post includes affiliate links. If you purchase from these links, I may get a small commission from the seller. But the great thing is, this doesn’t cost you any extra money! **
Supplies
- (4) 3/4-in x 4-ft x 8-ft Sheets of Plywood (# of boards to purchase is dependent on # of shelves you ultimately want)
- (3) 4-ft x 8-ft Sheets of Bead Board
- (5) 1-in x 2-in x 8-ft Boards of Select Pine
- (2) 1-in x 8-in x 8-ft Boards of Poplar Wood
- (1) 1-in x 3-in x 8-ft Board of Poplar Wood
- (1) 1-in x 2-in x 8-ft Ledger Board
- 1 1/4 inch – Kreg Pocket Hole Screws
- 2 1/2 inch – Wood Screws
- 1 1/4 inch – Brad Nails
- (6) 1 1/2 inch – Corner Brace L Brackets
- Wood Glue
- Birch Edge Banding
- 100 – 150 Grit Orbital Sandpaper
- Latex Caulk
- Primer
- Paint color of your choice
- Minwax Oil Based Early American Stain
- Minwax Water Based Polycrylic in Clear Gloss
- Cabinet Hardware
- Pegs
TOOLS
- Circular Saw
- Table Saw
- Miter Saw
- Drill
- Nail Gun
- Kreg Pocket Hole Jig
- Kreg Adjustable Shelf Pin Jig
- Laser Level
- Clamps
- Stud Finder
- Orbital Sander
- Caulk Gun
- Straight Edge
- Prybar
- Graco Paint Sprayer
- Zip Wall
- Painters Tape
- Plastic Drop Cloths
How To Get Started
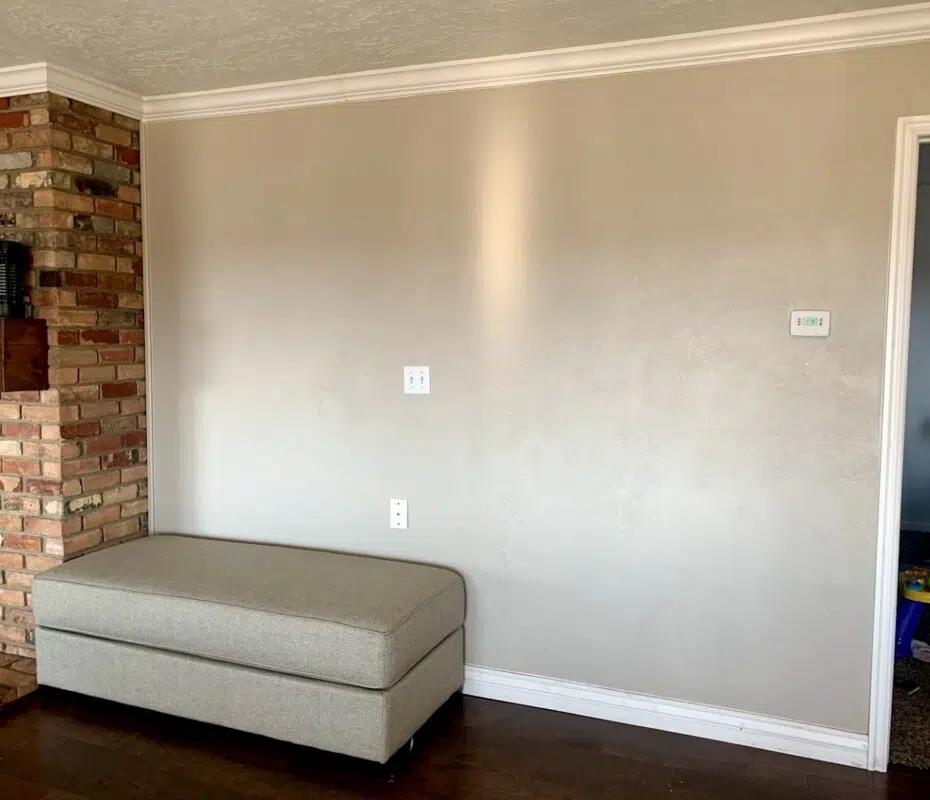
It’s best to choose a wall that requires minimal moving of outlets, light switches, vent grates, etc. Sadly, I had no such a wall. I needed to relocate a vent grate, and if I planned to plug things in under my future desk, I needed to move an outlet. Moving the vent grate was pretty straightforward, and with some guidance from a contractor (and YouTube), I was able to move the electric box on my own. I would recommend hiring an electrician if you’re not experienced. After I finished the first phase of prep work, I started the second by removing all the plate covers, baseboards, and crown molding (carefully). Everything needed to be saved for the finish work.
How to Cut Out the Home Office Cabinets
My office humbly started as two rectangular boxes made from plywood.
I used a circular saw and a straight edge to cut 3 sheets of plywood down the length. Did you know that foam insulation is helpful when you’re cutting large sheets of wood? The insulation lifts the wood off the the ground, as well as protects the saw blade from grinding into the pavement. That’s a DIY hack to put in your pocket.
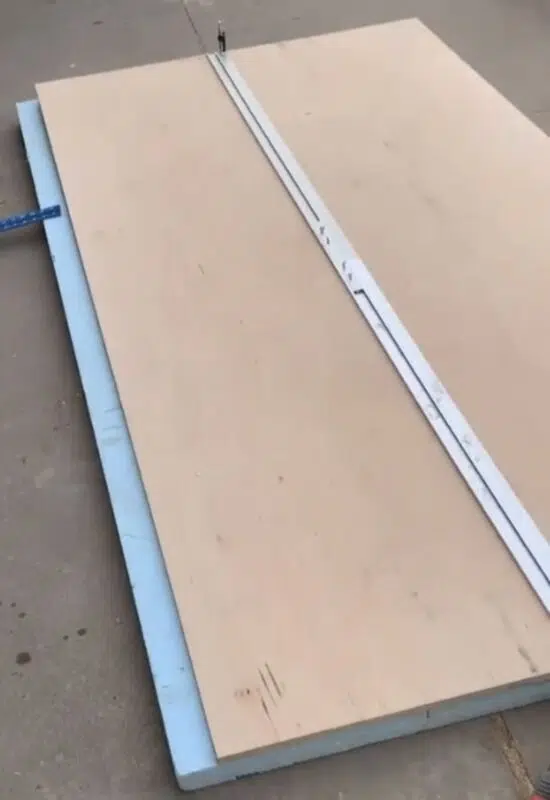
My cuts yielded me 6 boards.
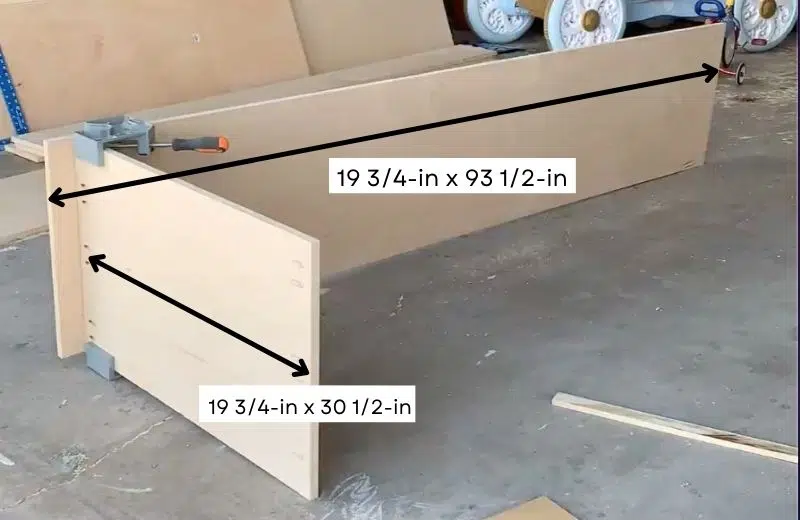
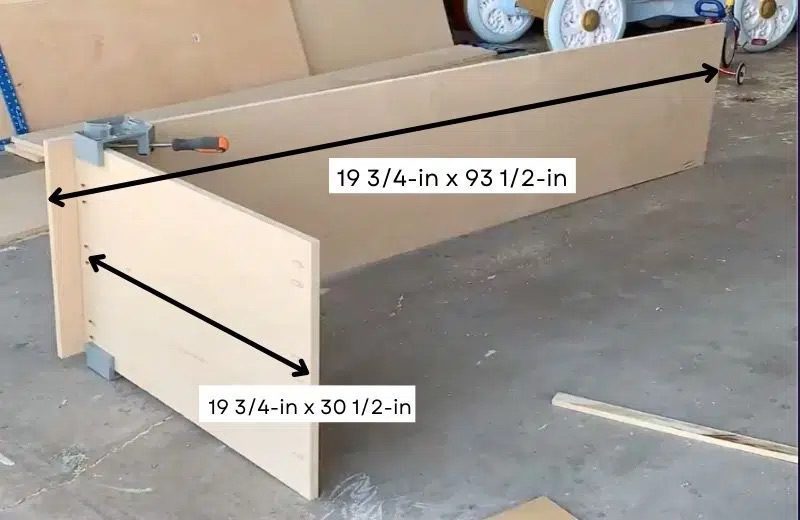
Of those boards, 4 became cabinet walls and were cut to 19 3/4 inch x 93 1/2 inch. Much of my construction was done while the cabinet was laying on its back. Because my walls are 8 feet tall, I determined that 93 1/2 inches gave me enough clearance to set my cabinets upright without gouging my ceiling on the way.
For the ceiling and floor of my cabinets, I cut 4 pieces of plywood measuring 19 3/4 inch x 30 1/2 inch.
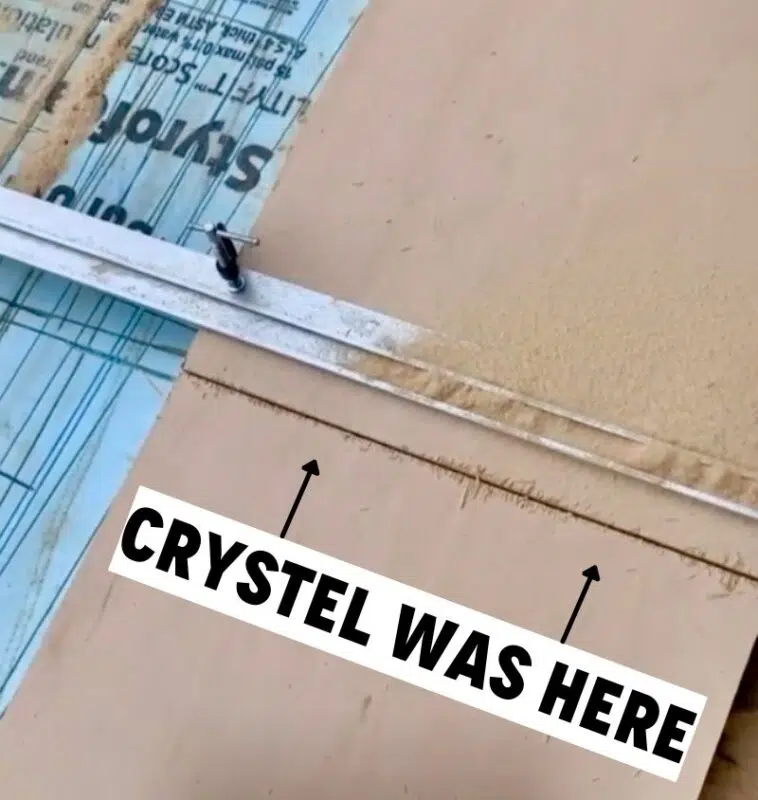
The cuts for my horizontal boards were made across the grain of the plywood, which can cause the wood to splinter and otherwise look a mess. To avoid splintering, place a piece of painters tape where the cut will be made, mark a line on the tape, and make your cut. The tape will prevent what you see in the picture below (I forgot this hack). Also — making sure that you blade on your saw is nice and sharp will give you a much cleaner cut. Again, I used a straight edge to ensure an even cut.
How to Assemble the Home Office Boxes
A Kreg Pocket Hole Jig is a must for this project. It makes it easy to screw everything together, without actually seeing that you.screwed.everything.together.
I should note that throughout this project, I used wood glue on every joint.
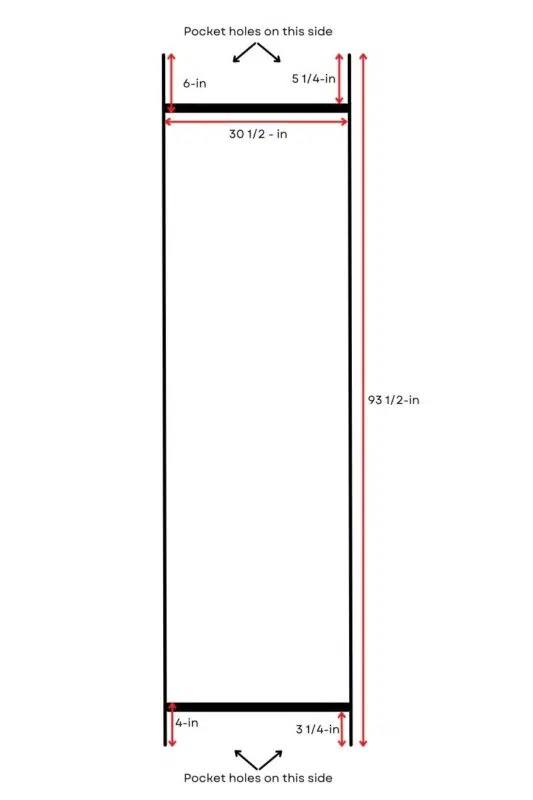
I drilled 6 sets of pocket holes (3 sets on each side) into the cabinet floor. You’ll notice in the pictures below I didn’t screw my pieces together end to end. I had a plan to frame the cabinets, which I’ll explain more on later. I measured 3 1/4 inches up from the bottom of my wall, applied my wood glue, and clamped my floor on top of that line. The clamp made it easy to keep my boards square and stable. Through the pocket holes, using 1 1/4 inch pocket screws, I screwed my floor into both walls.
I made sure the side with the pocket holes was facing down since the other side is a visible bottom shelf.
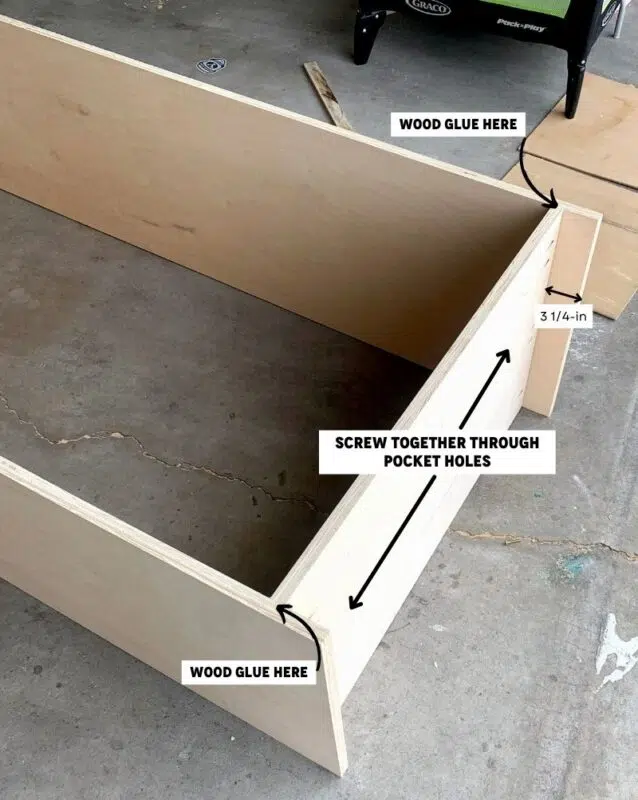
For the top of the frame, it’s the same plot with a small twist: I measured, drew a line, wood glued, clamped it, and screwed through pocket holes. The twist is I measured 5 1/4 inches down from the top of the wall.
Here’s a picture for reference that is absolutely not to scale.
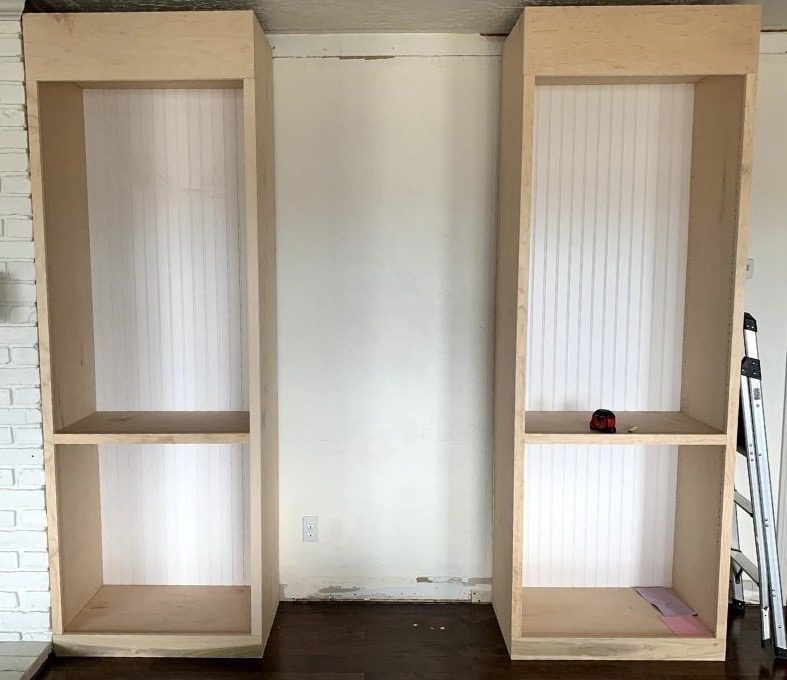
How to Attach Backing
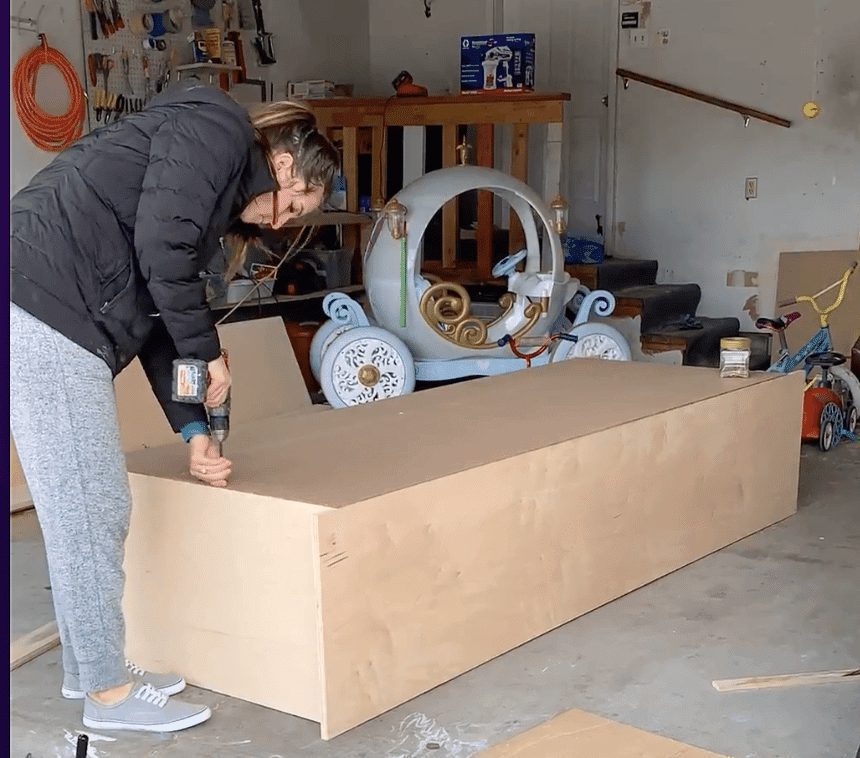
It’s coming along, right? Next up is to take care of the back. I could have totally skipped this part, but using bead board made the cabinets look more finished, rather than opening the doors and seeing a blank wall.
I measured and cut 2 sheets of bead board, each measuring 32 inches x 93 1/2 inches, and secured it to the back of each cabinet using 2 1/2 inch wood screws.
If you’ve been building along with me, take some time to admire your work. Pat yourself on the back. Grab a soda. I took a ride in Cinderella’s carriage.
How to Add Adjustable Shelving
You know what’s underrated? Adjustable shelving. Raise your hand if you’ve ever wished you could move a kitchen shelf to fit those awkwardly tall water bottles that no one ever uses. Adjustable shelving, my friends.
I currently don’t own any awkwardly tall office supplies, but now I won’t have restrictions. #winning
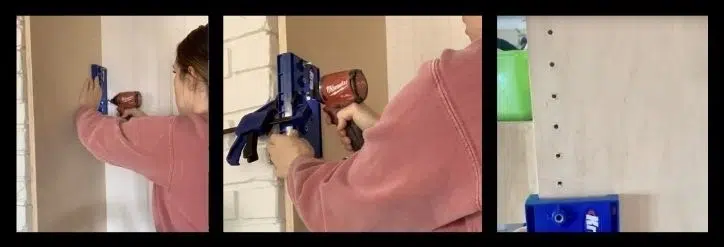
Kreg has all kinds of fun tools to make our lives easier and prettier (pocket holes!). I used an Adjustable Shelf Pin Drilling Jig by Kreg to drill a set of holes down the inside of each wall.
Next, I moved my cabinets upright and got to drilling. I used my laser level to make a horizontal beam across my cabinet, lined up my Kreg, and drilled away.
How to Build the Frames for the Office Cabinets
I laid my cabinet onto it’s back for this next part.
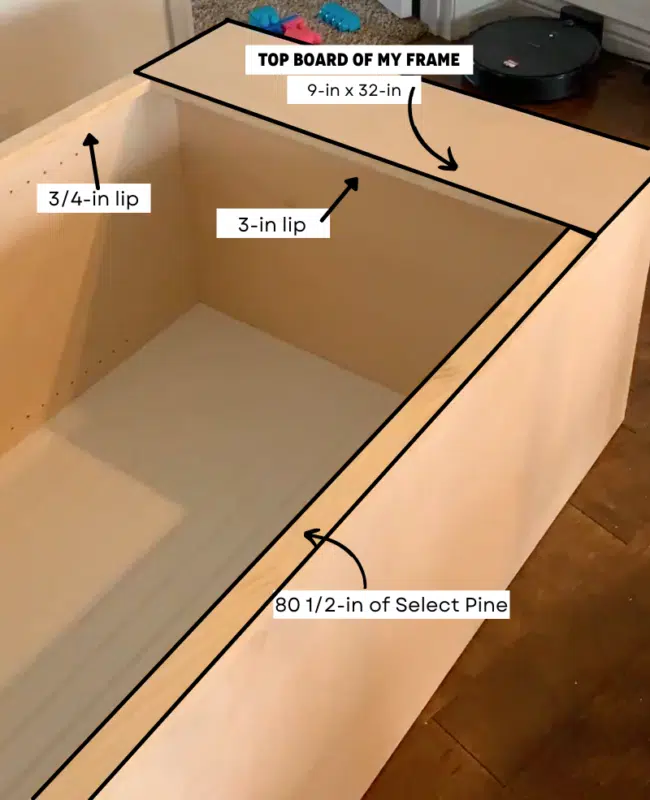
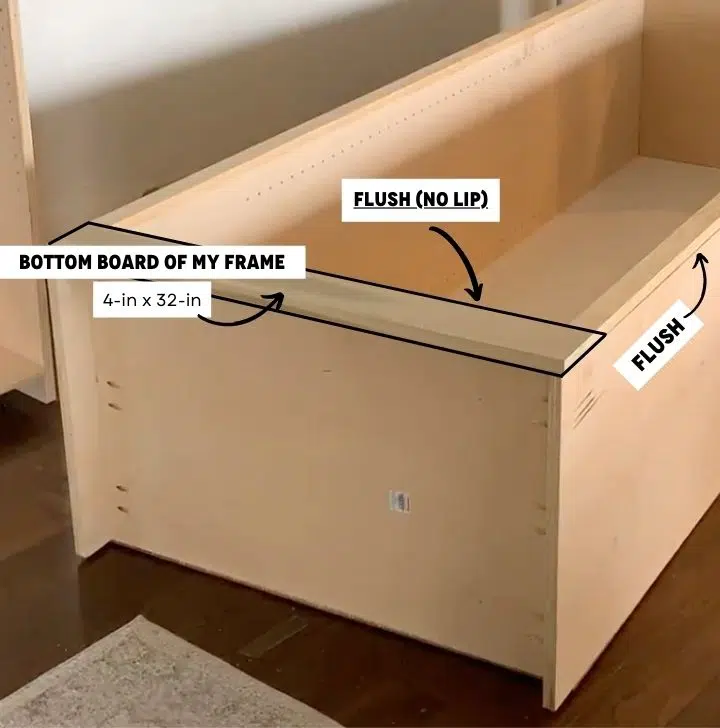
To start my frame, I cut 2 pieces of plywood. One measured 4 inches x 32 inches and the other 9 inches x 32 inches. The smaller board will be attached at the floor of the cabinet and the larger will be attached at the ceiling.
I didn’t want a lip at the floor of my cabinet, so I positioned the smaller board until it was flush side to side and top to bottom, which closed up the open space.
However, at the ceiling of my cabinet, I wanted a lip, and decided to position the larger board so it closed up the open space, was flush side to side, and created a 3 inch lip.
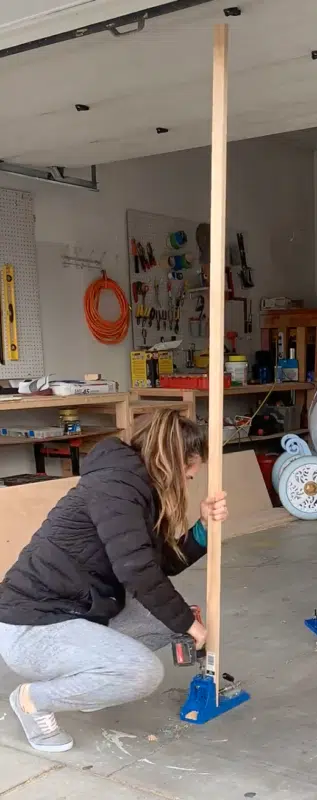
I used the select pine to make the sides of my frame. To figure out the length to cut, I measured along the exposed wall of my cabinet, which was 80 1/2 inches. The select pine created an intentional 3/4 inch lip along the walls.
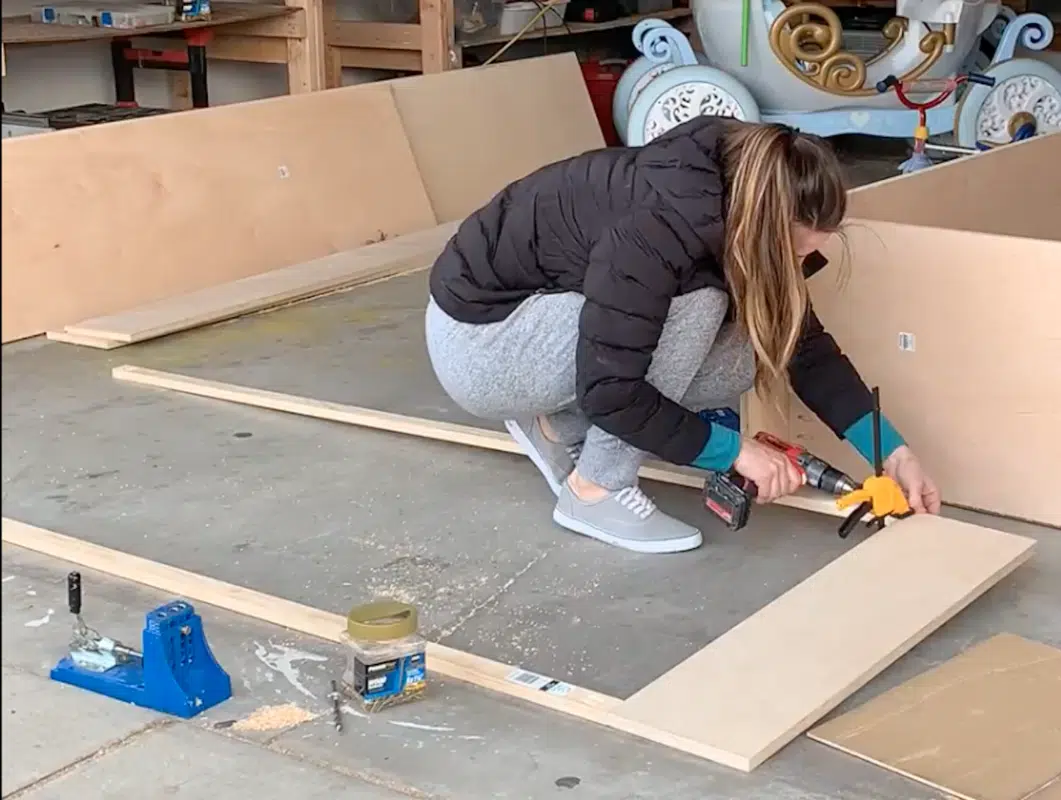
I drilled a set of pocket holes on the backside of the select pine, and screwed each end to the top and bottom boards of my frame.
How to Attach the Frame to the Home Office Cabinets
I knew each cabinet would have a larger upper door and a lower smaller door, and because I wanted a distinct looking separation, I installed a shelf 1/3 of the way up the cabinet (or 2/3 of the way down from the top if you’re an optimist). After measuring a piece of plywood 30 1/2 inches x 19 inches to fit inside the cabinet, and on the underside of the shelf, I drilled 3 sets of pocket holes on each side and screwed it into the walls of my cabinet.
I laid my frame on the cabinet so the pocket holes were facing up. From there, I added another board of select pine to my frame to cover the exposed front of my new shelf. Lastly, I measured it so it would be flush with the rest of the frame, which was 29 inches. Again, I used pocket holes (are you sensing a theme?) on each end of the new piece, clamped it secure, and screwed it to the frame. I made sure the new piece was flush with the top of the new shelf, and would create a 3/4 inch lip on the underside.

The raw edge of plywood is unattractive. I cut and trimmed a strip of iron on edge banding to fit exactly over the raw edge on the top of my frame. I just followed the directions on the package and used a razor blade to trim off the excess. Easy peasy.
I used my orbital sander with 150 grit sandpaper and sanded my frames until they were nice and smooth and ready for paint.
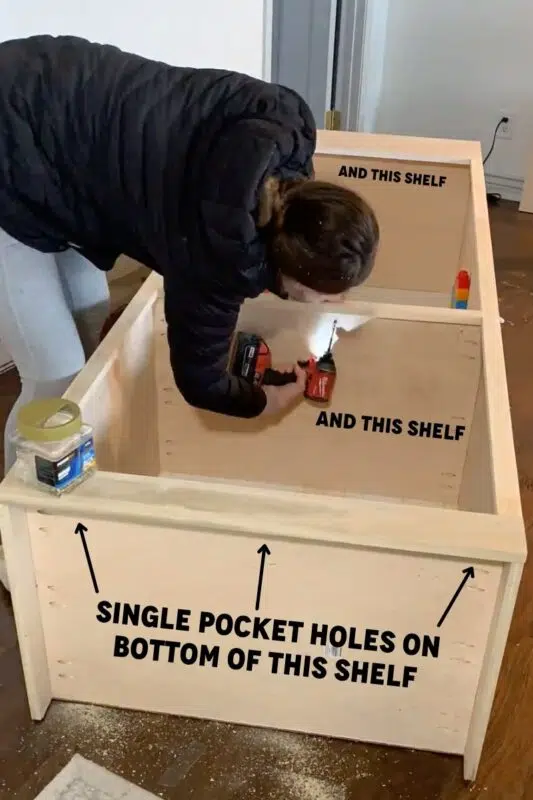
AT LAST! It’s was time to attach my frames to the cabinets. To make sure it was super secure, I drilled 3 single pocket holes on the underside of each of the 3 shelves so I could screw directly into my frame. I used my nail gun and brad nails to secure the sides of the frame.
Look how Pretty-Ish!
Take a break. You deserve it. Go play with some tape.
Check out Part 2 of HOW TO Build Office Cabinets to see how to build the connecting shelf, add additional shelving, and paint the cabinetry.
Check out Part 3 of HOW TO Build Office Cabinets to see how to build the desk, tile the backsplash, and add the cabinet doors.
Feel free to leave a comment if you liked this post or have any questions.
All of my stories for this project can be found in my Office Part 1 and Office Part 2 highlights on my instagram account @crystelmontenegrohome.
Leave a Reply
